Crawfish Trap Design and Construction - SRAC Fact Sheets
Crawfish Trap Design and Construction - SRAC Fact Sheets
Crawfish Trap Design and Construction - SRAC Fact Sheets

Create successful ePaper yourself
Turn your PDF publications into a flip-book with our unique Google optimized e-Paper software.
July 2009<br />
PR<br />
<strong>SRAC</strong> Publication No. 2404<br />
<strong>Crawfish</strong> <strong>Trap</strong> <strong>Design</strong> <strong>and</strong> <strong>Construction</strong><br />
In recent years, annual harvests of 20<br />
to 40 million pounds (9,000 to 18,000<br />
MT) of wild crawfish <strong>and</strong> 60 to 70<br />
million pounds (27,000 to 32,000 MT)<br />
of farmed crawfish have been typical<br />
in Louisiana. Virtually all this production<br />
is accomplished with baited<br />
wire-mesh traps. Baited traps are also<br />
the most common method of harvesting<br />
crawfish in most other parts of<br />
the world. Two basic wire-mesh trap<br />
designs have become st<strong>and</strong>ards in<br />
Louisiana’s wild <strong>and</strong> farmed crawfish<br />
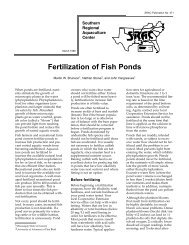
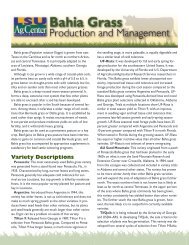
industries. Pillow traps (Fig. 1)<br />
Figure 1. Typical pillow trap design made<br />
from vinyl-coated, ¾-inch (1.9-cm) hexagonal-mesh<br />
cut 48 inches (122 cm) wide.<br />
1 Louisiana State University Agricultural Center<br />
Mark Shirley <strong>and</strong> C. Greg Lutz 1<br />
have been used for decades in natural<br />
swamp habitats such as the Atchafalaya<br />
River Basin, where water<br />
levels may fluctuate several feet in<br />
just a few days. In managed production<br />
ponds, where shallow water is<br />
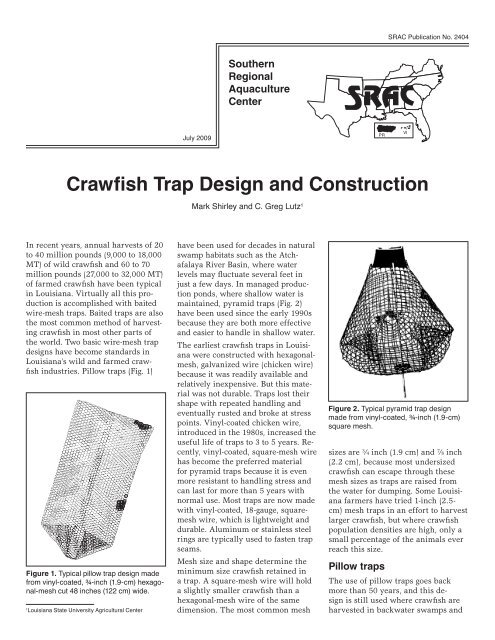
maintained, pyramid traps (Fig. 2)<br />
have been used since the early 1990s<br />
because they are both more effective<br />
<strong>and</strong> easier to h<strong>and</strong>le in shallow water.<br />
The earliest crawfish traps in Louisiana<br />
were constructed with hexagonalmesh,<br />
galvanized wire (chicken wire)<br />
because it was readily available <strong>and</strong><br />
relatively inexpensive. But this material<br />
was not durable. <strong>Trap</strong>s lost their<br />
shape with repeated h<strong>and</strong>ling <strong>and</strong><br />
eventually rusted <strong>and</strong> broke at stress<br />
points. Vinyl-coated chicken wire,<br />
introduced in the 1980s, increased the<br />
useful life of traps to 3 to 5 years. Recently,<br />
vinyl-coated, square-mesh wire<br />
has become the preferred material<br />
for pyramid traps because it is even<br />
more resistant to h<strong>and</strong>ling stress <strong>and</strong><br />
can last for more than 5 years with<br />
normal use. Most traps are now made<br />
with vinyl-coated, 18-gauge, squaremesh<br />
wire, which is lightweight <strong>and</strong><br />
durable. Aluminum or stainless steel<br />
rings are typically used to fasten trap<br />
seams.<br />
Mesh size <strong>and</strong> shape determine the<br />
minimum size crawfish retained in<br />
a trap. A square-mesh wire will hold<br />
a slightly smaller crawfish than a<br />
hexagonal-mesh wire of the same<br />
dimension. The most common mesh<br />
VI<br />
Figure 2. Typical pyramid trap design<br />
made from vinyl-coated, ¾-inch (1.9-cm)<br />
square mesh.<br />
sizes are 3 ⁄4 inch (1.9 cm) <strong>and</strong> 7 ⁄8 inch<br />
(2.2 cm), because most undersized<br />
crawfish can escape through these<br />
mesh sizes as traps are raised from<br />
the water for dumping. Some Louisiana<br />
farmers have tried 1-inch (2.5cm)<br />
mesh traps in an effort to harvest<br />
larger crawfish, but where crawfish<br />
population densities are high, only a<br />
small percentage of the animals ever<br />
reach this size.<br />
Pillow traps<br />
The use of pillow traps goes back<br />
more than 50 years, <strong>and</strong> this design<br />
is still used where crawfish are<br />
harvested in backwater swamps <strong>and</strong>
other natural areas. Pillow traps<br />
are easily made from vinyl-coated,<br />
hexagonal-mesh wire of any width.<br />
These traps are shaped like a pillow<br />
<strong>and</strong> have two inverted funnels at the<br />
bottom that allow crawfish to enter<br />
the trap. The other end is closed<br />
off with metal rings, except for one<br />
corner that can be opened to extract<br />
the crawfish. A clothespin or other<br />
simple clamp is typically used to<br />
keep the trap closed until the harvester<br />
is ready to empty it.<br />
Wire 48 inches wide (122 cm) is a<br />
convenient size for pillow trap construction,<br />
although some harvesters<br />
will make an extended trap so that<br />
the top of the trap can reach above<br />
the water surface even at depths of<br />
more than 1 meter. If water quality<br />
is poor, crawfish can suffocate if<br />
they are unable to reach the surface<br />
once inside the trap. However, if<br />
there is even a slight current, traps<br />
can normally be deployed completely<br />
under water without undue stress on<br />
the confined crawfish.<br />
Once baited, pillow traps are usually<br />
set in the water by leaning them<br />
against a tree stump, stake or other<br />
object at about a 45- to 60-degree<br />
angle. A cord tying the trap to a<br />
branch makes it easy to locate.<br />
<strong>Crawfish</strong> are attracted to the scent<br />
of the bait <strong>and</strong> will crawl around the<br />
trap, entering through the funnel in<br />
an attempt to reach the bait. If funnels<br />
are deep enough <strong>and</strong> set at the<br />
correct angle (avoiding contact with<br />
the walls or bottom of the trap), few<br />
crawfish will find their way back out<br />
of the trap. If funnels are too short<br />
or angled downward, many crawfish<br />
will easily find their way out of the<br />
trap.<br />
Pillow traps are easily stored <strong>and</strong><br />
transported. The “pillows” can be<br />
slightly flattened <strong>and</strong> stacked one on<br />
top of the other. This is especially<br />
convenient when large numbers of<br />
traps are periodically moved as water<br />
levels change in natural environments.<br />
Pyramid traps<br />
Pyramid traps are the best trap<br />
design for use in ponds where water<br />
levels are kept between 14 <strong>and</strong> 24<br />
inches (36 <strong>and</strong> 46 cm) deep. Craw-<br />
fish farmers no longer use pillow<br />
traps in ponds because a stake must<br />
be placed at every trap location to<br />
lean the pillow against or hang it<br />
from. Removing the clothes pin <strong>and</strong><br />
opening the wire also slows the<br />
process of running a line of traps in<br />
a pond.<br />
Before pyramid traps, many pond<br />
producers had modified the traditional<br />
pillow trap design to incorporate<br />
a built-in metal rod so traps could<br />
be deployed vertically, with a metal<br />
flashing-lined opening on one side of<br />
the top of the trap. These innovations<br />
were incorporated into the pyramid<br />
traps used today. The three funnel<br />
entrances at the base of a pyramid<br />
trap have been shown to catch more<br />
crawfish with the same amount of<br />
bait than a two-funnel trap, while<br />
the flat bottom allows several pounds<br />
of crawfish to accumulate in the trap<br />
before harvesting.<br />
A key feature of the pyramid trap is<br />
the combination collar <strong>and</strong> h<strong>and</strong>le on<br />
the top of the trap, which prevents<br />
crawfish from climbing out while<br />
making the trap easier to grasp, lift<br />
<strong>and</strong> empty quickly (Fig. 2). This<br />
allows pond harvesting to proceed<br />
non-stop, with a trap being lifted,<br />
dumped <strong>and</strong> re-baited while the<br />
harvest boat is in motion. The newly<br />
baited trap is set in place immediately<br />
in front of the next trap to be lifted<br />
(Fig. 3). The only disadvantage of<br />
pyramid traps is that they are more<br />
rigid <strong>and</strong> bulkier than pillow traps,<br />
which makes them harder to transport<br />
<strong>and</strong> store.<br />
Most farmers prefer to have vertical<br />
metal rods attached through<br />
their pyramid traps to make them<br />
more stable so that wind, waves <strong>and</strong><br />
wildlife cannot overturn them. A 5 ⁄8inch<br />
(1.6-cm) rod is usually secured<br />
to the plastic collar; it extends down<br />
through the center of the trap <strong>and</strong><br />
protrudes about 6 inches (15 cm) to<br />
anchor the trap in the pond bottom<br />
(Fig. 2). A cross-bar or disc is typically<br />
used to secure the rod to the<br />
bottom of the trap as well.<br />
Ideally, the plastic top of the trap<br />
should be just above the surface<br />
of the water. This allows crawfish<br />
to climb to the surface to breathe<br />
should dissolved oxygen become a<br />
problem. The height of a pyramid<br />
trap can be varied by using different<br />
widths of wire or cutting the wire to<br />
different lengths, but the st<strong>and</strong>ard<br />
pyramid trap dimensions call for a<br />
piece of wire 24 inches (61 cm) wide<br />
cut to a length of 52 inches (132 cm).<br />
Height can be added by fixing a wiremesh<br />
throat to the top of the pyramid<br />
<strong>and</strong> then attaching the collar at the<br />
top of the throat (Fig. 4). Although it<br />
adds to the cost of the trap, this modification<br />
is commonly used because<br />
it makes the trap useable at varying<br />
water depths.<br />
Figure 3. The h<strong>and</strong>le incorporated into the collar allows a pyramid trap to be lifted,<br />
dumped, re-baited <strong>and</strong> set back in the pond without stopping.
Figure 4. Pyramid traps are often made<br />
with extensions so they can be used in<br />
deeper water. <strong>Crawfish</strong> should be able<br />
to reach the surface to avoid low-oxygen<br />
conditions in traps.<br />
<strong>Trap</strong> construction<br />
<strong>Crawfish</strong> traps are fairly easy to<br />
make, but constructing a large number<br />
of them can take a great deal<br />
of time. The tools needed include<br />
wire cutters, ring fastener pliers <strong>and</strong><br />
a wooden spindle or tapered-neck<br />
bottle for forming funnels. With<br />
h<strong>and</strong> tools, pillow traps take about 10<br />
minutes to construct, while pyramid<br />
traps may take about 20 minutes.<br />
Commercial trap makers reduce the<br />
time to about 5 minutes by using special<br />
devices to pre-cut lengths of wire<br />
<strong>and</strong> automated ring guns to rapidly<br />
connect wire seams (Fig. 5).<br />
Figure 5. Pneumatic ring guns to speed<br />
the trap construction process are available<br />
from specialty suppliers.<br />
Pillow trap construction<br />
Step 1<br />
Cut a piece of vinyl-coated, hexagonal-mesh<br />
wire 48 inches (122 cm)<br />
wide <strong>and</strong> 52 inches (132 cm) long.<br />
Step 2<br />
Connect the cut sides to make an<br />
open cylinder by twisting the stubs<br />
of the wire together. A modified<br />
ice pick (bent at a 90-degree angle)<br />
works well for this purpose. Weaving<br />
the ends together in this way makes<br />
a stiffer seam than simply crimping<br />
with rings, <strong>and</strong> makes the trap<br />
stronger <strong>and</strong> longer lasting. Once the<br />
seam is secure, however, it should<br />
still be crimped with metal rings to<br />
prevent it from eventually opening<br />
over time.<br />
Step 3<br />
Close one end of the trap by fastening<br />
the facing edges with metal rings,<br />
leaving the last 3 inches (7.6 cm)<br />
open at the two corners (Fig. 6). This<br />
will be the bottom of the trap.<br />
Figure 6. The corner of the trap seam is<br />
left open, <strong>and</strong> occasionally bent in slightly,<br />
so funnels can be formed.<br />
Step 4<br />
Close one-half to two-thirds of the<br />
top of the trap with metal rings. Use<br />
a clothes pin to close the remaining<br />
opening.<br />
Step 5<br />
Invert the two bottom corners over a<br />
long-necked bottle or wooden spindle<br />
to form funnel entrances. Angle the<br />
funnels upward at about a 75- to<br />
80-degree angle (Fig. 7). Trim each<br />
entrance hole to be sure it is wide<br />
enough for a large crawfish to enter<br />
(roughly 2 inches, or 5 cm).<br />
Figure 7. A wooden spindle or a longnecked<br />
bottle can be used to form funnels.<br />
Several modifications can be made<br />
to pillow traps depending on the<br />
fishing habitat <strong>and</strong> the preferences<br />
of the harvester. Extended traps can<br />
be made by splicing a 24-inch-wide<br />
(61-cm) piece of wire to the top of<br />
a 48-inch (122-cm) trap. The resulting<br />
60-inch-tall (152-cm) trap can be<br />
used in water more than 4 feet deep<br />
<strong>and</strong> still allow crawfish to reach the<br />
surface to breath. This is necessary<br />
where floating vegetation is so thick<br />
that it covers the entire water surface.<br />
Another variation of the pillow trap<br />
is one that sits flat on the bottom <strong>and</strong><br />
has three funnel entrances. The top<br />
corner of the trap that would otherwise<br />
be sealed is formed into a third<br />
funnel, with the remaining corner<br />
clamped closed with a clothes pin<br />
as in a typical st<strong>and</strong>ing pillow trap.<br />
If there is enough current to keep<br />
oxygenated water flowing through<br />
the trap, this bottom-sitting pillow<br />
trap is very effective. A string <strong>and</strong>/or<br />
float can be used to retrieve the trap<br />
if needed.
Pyramid trap construction<br />
As noted above, a pyramid trap usually<br />
has a collar at the top to prevent<br />
escape <strong>and</strong> allow it to be lifted more<br />
easily. Molded trap collars can be<br />
purchased from trap manufacturers.<br />
These pieces have a flared bottom<br />
edge <strong>and</strong> a lip in one side of the top<br />
edge to make the trap easy to grab.<br />
<strong>Trap</strong> collars also can be made with<br />
thin-wall plastic PVC pipe that is 6<br />
inches (15 cm) in diameter <strong>and</strong> cut<br />
into 5-inch (13-cm) pieces. Heat the<br />
top edge of the pipe until the plastic<br />
is softened, then bend one side over<br />
to form a h<strong>and</strong>le. The bottom edge<br />
should be heated <strong>and</strong> then flared outward<br />
somewhat to match the angle of<br />
the top of the trap.<br />
Step 1<br />
Cut a piece of vinyl-coated, squaremesh<br />
wire that is 52 inches (132 cm)<br />
long <strong>and</strong> 24 inches (61 cm) wide (Fig.<br />
8a).<br />
Step 2<br />
Fold the wire in half <strong>and</strong> connect the<br />
sides with rings every 1.5 inches (4<br />
cm). Stop 5 inches (13 cm) from one<br />
end <strong>and</strong> fold in the corner to start<br />
what will eventually become the<br />
third funnel entrance (see below).<br />
Add a few more rings, leaving the last<br />
2 inches (5 cm) of the corner open.<br />
Step 3<br />
Lay the cylinder on its side with the<br />
initial seam facing upward. Close one<br />
of the open ends with a vertical seam,<br />
leaving the corners open to form funnels<br />
(Fig. 8b). At this point, the usual<br />
practice is to place the collar/h<strong>and</strong>le<br />
loosely within the trap before closing<br />
it completely (not pictured in photos).<br />
Close the open end of the trap with a<br />
perpendicular seam. Note: This seam<br />
should be horizontal, while the seam<br />
on the opposite side remains vertical<br />
(Fig. 8c). Leave one corner open for a<br />
third funnel. The other corner will be<br />
trimmed to serve as the throat of the<br />
trap.<br />
Step 4<br />
Use a long-necked bottle or wooden<br />
spindle to form the three funnel entrances<br />
of the trap. In one continuous<br />
motion, push the bottle into an open<br />
Figures 8a-d. The typical process of forming a pyramid trap from a length of squarewire<br />
mesh. For illustrative purposes, the wire has been pre-bent to show where funnels<br />
will be formed <strong>and</strong> pre-cut where the collar will be attached to the throat.<br />
corner <strong>and</strong> extend the funnel about 6<br />
inches (15 cm) into the trap. Funnels<br />
should be angled upward at approximately<br />
45 to 50 degrees. The holes<br />
should be large enough for a large<br />
crawfish to enter. Trim if needed.<br />
(a)<br />
(c)<br />
Step 5<br />
Gently flex <strong>and</strong> bend the wire so that<br />
the three corners with funnels lie<br />
flat on the bottom (Fig. 8d). A slight<br />
crease can be bent into the wire along<br />
the bottom edge of the pyramid. If<br />
left with a rounded bottom, the trap<br />
will easily tip over. The top of the<br />
pyramid can now be cut to fit the<br />
plastic collar. The hole should be cut<br />
slightly smaller than the diameter<br />
of the collar. Cut several squares of<br />
mesh to allow the collar to squeeze<br />
up into the hole (Fig. 9). Use rings to<br />
attach the wire to the outside of the<br />
h<strong>and</strong>le every 1 to 2 inches (2.5 to 5<br />
cm) around the trap.<br />
(b)<br />
(d)<br />
Figure 9. The collar should be placed<br />
within the trap before the third seam is<br />
closed, then pulled into position in the<br />
throat <strong>and</strong> secured with metal rings. Note<br />
the lip at the top of the collar to facilitate<br />
h<strong>and</strong>ling <strong>and</strong> dumping.<br />
Step 6 (Optional)<br />
For stability, attach a rod that is 25<br />
inches (64 cm) long <strong>and</strong> 5 ⁄8 inch (1.6<br />
cm) in diameter to the plastic h<strong>and</strong>le<br />
using several rings through the wire<br />
<strong>and</strong> the plastic top. A 3 ⁄4-inch (1.9-
cm), 90-degree bend on the top end<br />
of the rod should be positioned into<br />
a hole drilled into the plastic h<strong>and</strong>le<br />
(Fig. 10). Use a plastic washer to hold<br />
the rod in position where it protrudes<br />
through the bottom of the trap. Discs<br />
made especially for this purpose<br />
are available from commercial<br />
Figure 10. If a vertical rod is desired, it<br />
can be bent <strong>and</strong> secured through a hole in<br />
the trap collar.<br />
trap producers. Use rings to fasten<br />
the washer to the bottom. The rod<br />
should protrude about 6 inches (15<br />
cm) below the trap (Fig. 11).<br />
Figure 11. Vertical rods should be secured<br />
to the trap bottom with plastic discs, which<br />
can be fabricated on site or purchased<br />
from commercial trap manufacturers.<br />
A slightly smaller pyramid trap can<br />
be made by cutting the wire only<br />
48 inches (122 cm) long <strong>and</strong> following<br />
the same steps described above.<br />
However, cutting the wire more than<br />
52 inches (132 cm) long will make a<br />
trap more cumbersome to h<strong>and</strong>le.<br />
Specialty traps<br />
Small-mesh traps can be used to<br />
catch smaller crawfish for fish bait<br />
or as a means of monitoring crawfish<br />
populations. Follow the steps<br />
described above. Another option is to<br />
use purchased minnow traps made<br />
with small mesh.
<strong>SRAC</strong> fact sheets are reviewed annually by the Publications, Videos <strong>and</strong> Computer Software Steering Committee. <strong>Fact</strong> sheets are revised<br />
as new knowledge becomes available. <strong>Fact</strong> sheets that have not been revised are considered to reflect the current state of knowledge.<br />
The work reported in this publication was supported in part by the Southern Regional Aquaculture Center through Grant No. 2007-<br />
38500-18470 from the United States Department of Agriculture, Cooperative State Research, Education, <strong>and</strong> Extension Service.