Integra Financial System General Ledger Journal Entry Manual
Integra Financial System General Ledger Journal Entry Manual
Integra Financial System General Ledger Journal Entry Manual

Create successful ePaper yourself
Turn your PDF publications into a flip-book with our unique Google optimized e-Paper software.
<strong>Integra</strong> <strong>Financial</strong> <strong>System</strong><br />
<strong>General</strong> <strong>Ledger</strong><br />
<strong>Journal</strong> <strong>Entry</strong> <strong>Manual</strong>
1 INTRODUCTION<br />
The aim of this document is to outline the procedures involved in the operation of the<br />
McKeown <strong>Integra</strong> financial software package. The university has been using a McKeown<br />
financial package for some time now. This package has now been superseded by an upgraded<br />
version that may contain changes affecting some faculties or departments. It is hoped that<br />
this manual will help identify these changes and assist department in the adaptation of them.<br />
2 ACCESS<br />
Due the nature of the information stored in the McKeown <strong>System</strong> access will be limited to<br />
members of staff depending on their department/ faculty and their position therein.<br />
3 GENERAL LEDGER JOURNAL ENTRY<br />
Although the McKeown <strong>Integra</strong> <strong>System</strong> is a module-based system and as such the <strong>General</strong><br />
<strong>Ledger</strong> receives the majority of its information from the other modules directly i.e. the Sales<br />
<strong>Ledger</strong>, Purchase Ordering <strong>System</strong>, Purchase <strong>Ledger</strong> etc. there will still be a requirement for<br />
some journal entries to be created in the <strong>General</strong> <strong>Ledger</strong>.<br />
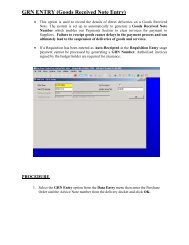
To enter a <strong>Journal</strong> <strong>Entry</strong> select option ‘<strong>Journal</strong>s’ from the Main Menu illustrated below.<br />
This screen may vary from user to user.
Having selected the journal option from the main menu you will now be presented with the<br />
above screen. The menu offers ‘8’ journal entry options. <strong>Journal</strong>s are input using the<br />
[Current Period <strong>Journal</strong>s].
The user can now commence to enter the <strong>Journal</strong>. Illustrated below is the initial screen of the<br />
<strong>Journal</strong> <strong>Entry</strong> procedure.<br />
The first field to be completed is the <strong>Journal</strong> Type. The journal type determines:<br />
• what information you will be requested for<br />
• the decimal precision of the data<br />
• the control mechanisms to be applied<br />
• the prompts/descriptors to appear for certain data fields<br />
The main <strong>Journal</strong> Type established for direct entry to the <strong>General</strong> <strong>Ledger</strong> by devolved users is<br />
JV01. As a rule correcting journals should be processed through the subsidiary systems in<br />
which the original entry was made.<br />
Input the ‘<strong>Journal</strong> Type’ in the appropriate field. The <strong>Journal</strong> Type can either be keyed<br />
in directly (if known) or selected from a lookup table menu that can be obtained by<br />
clicking the ‘magnifying glass symbol’ icon on the tool bar.<br />
The next item requested is the ‘Source Code’. This source code is defaulted from the <strong>Journal</strong><br />
Type press the [TAB] key to accept. The default source is ‘00’ which indicates a direct entry<br />
journal.<br />
The Posting Period field will default to the current period and the <strong>Journal</strong> number will be<br />
determined by the system when the journal is created.<br />
The <strong>Journal</strong> Date should be the current system date. The [TAB] key will default the current<br />
date in.<br />
Having selected the journal type additional information will default in. In the case of the<br />
JV01 the following additional information is required to be input;
• Prepared by<br />
• Authorised by<br />
• Narrative<br />
The <strong>Journal</strong> has a narrative section that can hold up to 4 lines of 40 characters. All users<br />
should enter a narrative here to help describe the <strong>Journal</strong> and the reason for its entry.<br />
The Currency Code field defaults to Pounds Sterling and the in the Foreign Currency field<br />
the conversion rate appears for the ECU. However you can input a different rate.<br />
Once the appropriate fields have been entered the screen should look like the one shown<br />
below.<br />
Click on [Proceed] for the Control tab card to be viewed.<br />
The screen will now change to that displayed on the next page.
The total value of debits for the journal being posted must be entered in the field marked<br />
Control Totals (Debits) opposite gbp.<br />
The last requirement on this screen is to enter the number of lines that will be entered on the<br />
journal. Once this is done hit the [TAB] key to continue.
The Screen will again change. It is in this screen that the actual detail of the <strong>Journal</strong> will be<br />
entered.<br />
The Line No. field will default to the first line number 001.<br />
The Narrative field will default to that which was entered on the <strong>Journal</strong> Voucher Header<br />
screen.<br />
Firstly enter the account code against which a posting is to be made. This account code (cost<br />
centre and analysis code) can either be keyed in directly (if known) or selected from a lookup<br />
table menu that can be obtained by pressing the ‘magnifying glass symbol’ button on the tool<br />
bar.<br />
Having selected the account code [TAB] to the debit/credit selection. This will default to<br />
Debit. To change this to Credit ‘click’ on the Debit button with the right mouse button. Now<br />
[TAB] across to the next field. This will allow you to enter the amount to be debited or<br />
credited to the account.
The screen will now look like the one shown above.<br />
Having done this ‘click’ on the [ADD] button.
The screen will change and now allow you to enter the details for line 2.<br />
Details of what was entered on line 1 now appears at the bottom of the screen.<br />
This screen is shown below.<br />
Repeat the steps for the next line on the journal.<br />
After having input details of the last line in the journal the screen will now appear as shown<br />
below.
Having done this click on the [ADD] button.<br />
The box shown above will appear. Click on [OK] and the <strong>Journal</strong> Number which is<br />
generated by the system will appear.<br />
Record this number on the journal input form.<br />
Details of all postings for the journal will now be shown at the bottom of the screen.
Another box will now appear as shown on the next page called Update Complete.<br />
This box shows the <strong>Journal</strong> Voucher number. Click on [OK].<br />
By clicking on the [Control] tab card you should see the following screen.
Remember: Debit total must equal the Credit total and that the total number of lines must<br />
not exceed the number of lines previously entered on the Control tab card.