

Vertical Blinds Installation Instructions - Blinds By Vertican
Vertical Blinds Installation Instructions - Blinds By Vertican
Vertical Blinds Installation Instructions - Blinds By Vertican

You also want an ePaper? Increase the reach of your titles
YUMPU automatically turns print PDFs into web optimized ePapers that Google loves.
linds<br />
y<br />
ertican Inc.<br />
<strong>Vertical</strong> <strong>Blinds</strong><br />
<strong>Installation</strong> <strong>Instructions</strong><br />
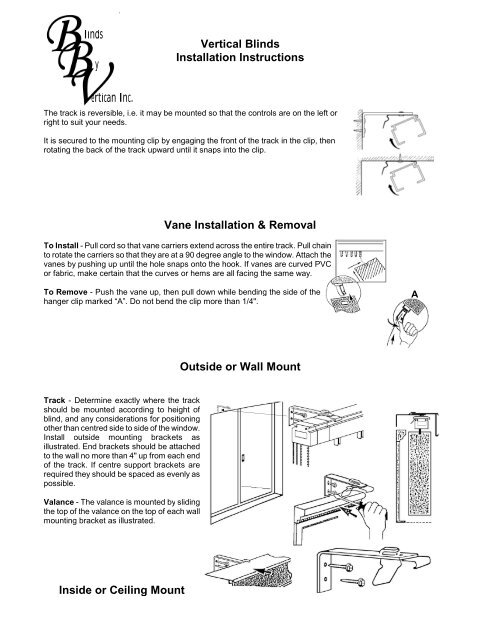
The track is reversible, i.e. it may be mounted so that the controls are on the left or<br />
right to suit your needs.<br />
It is secured to the mounting clip by engaging the front of the track in the clip, then<br />
rotating the back of the track upward until it snaps into the clip.<br />
Vane <strong>Installation</strong> & Removal<br />
To Install - Pull cord so that vane carriers extend across the entire track. Pull chain<br />
to rotate the carriers so that they are at a 90 degree angle to the window. Attach the<br />
vanes by pushing up until the hole snaps onto the hook. If vanes are curved PVC<br />
or fabric, make certain that the curves or hems are all facing the same way.<br />
To Remove - Push the vane up, then pull down while bending the side of the<br />
hanger clip marked “A”. Do not bend the clip more than 1/4".<br />
Track - Determine exactly where the track<br />
should be mounted according to height of<br />
blind, and any considerations for positioning<br />
other than centred side to side of the window.<br />
Install outside mounting brackets as<br />
illustrated. End brackets should be attached<br />
to the wall no more than 4" up from each end<br />
of the track. If centre support brackets are<br />
required they should be spaced as evenly as<br />
possible.<br />
Valance - The valance is mounted by sliding<br />
the top of the valance on the top of each wall<br />
mounting bracket as illustrated.<br />
Inside or Ceiling Mount<br />
Outside or Wall Mount<br />
A
Track - Mount the installation clips (tab to rear) to the<br />
inside of the casing, or ceiling, a minimum of 1 1/4"<br />
from the window or wall to allow the vanes to tilt open<br />
properly. The end clips should be attached no more<br />
than 4" in from each end of the track. Any centre<br />
supports required should be spaced evenly between<br />
the ends.<br />
Valance - The valance is attached directly to the<br />
mounting surface (casing or ceiling), “sandwiched”<br />
between the surface and the mounting clips as<br />
illustrated. If the front surface of the valance is to be<br />
flush with side casings or wall, you will need a<br />
minimum of 4 ½" window recess.<br />
Valance Detail<br />
Fabric Weights or Bottom Chain<br />
<strong>Installation</strong> of Fabric Weights with Clip and Chain - Insert a weight into the hem of<br />
each vane. Start at front or back at one of the end vanes, and snap a clip into the hole<br />
on the edge of the weight. Snap the next clip to the same edge of the bottom<br />
weight in the next vane, and carry on to the other end of the track. Do the same<br />
thing with the other side of the vanes. If track is a centre split, cut front and back<br />
chains between centre vanes to allow split.<br />
PVC Chain - Thread supplies chain through keyhole at bottom of each vane leaving<br />
enough chain between to allow vanes to hang straight.<br />
Self-Aligning Vane Hangers<br />
Your track is equipped with a self-aligning mechanism. In the event that a vane becomes misaligned, use<br />
the following procedure to realign all vanes.<br />
1. Rotate the vanes and apply slight pressure at the closed position (you should hear a ratchet sound).<br />
2. Rotate the vanes in the opposite direction, also applying slight pressure at the closed position.