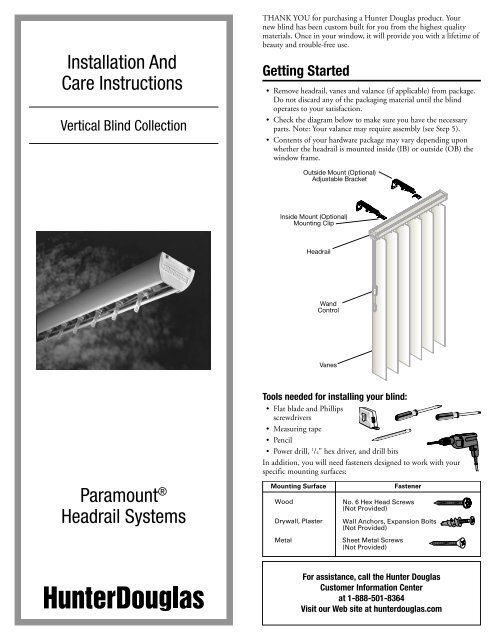
Installation And Care Instructions Paramount ... - Hunter Douglas
Installation And Care Instructions Paramount ... - Hunter Douglas
Installation And Care Instructions Paramount ... - Hunter Douglas

You also want an ePaper? Increase the reach of your titles
YUMPU automatically turns print PDFs into web optimized ePapers that Google loves.
<strong>Installation</strong> <strong>And</strong><br />
<strong>Care</strong> <strong>Instructions</strong><br />
Vertical Blind Collection<br />
<strong>Paramount</strong> ®<br />
Headrail Systems<br />
THANK YOU for purchasing a <strong>Hunter</strong> <strong>Douglas</strong> product. Your<br />
new blind has been custom built for you from the highest quality<br />
materials. Once in your window, it will provide you with a lifetime of<br />
beauty and trouble-free use.<br />
Getting Started<br />
•<br />
•<br />
•<br />
Remove headrail, vanes and valance (if applicable) from package.<br />
Do not discard any of the packaging material until the blind<br />
operates to your satisfaction.<br />
Check the diagram below to make sure you have the necessary<br />
parts. Note: Your valance may require assembly (see Step 5).<br />
Contents of your hardware package may vary depending upon<br />
whether the headrail is mounted inside (IB) or outside (OB) the<br />
window frame.<br />
Outside Mount (Optional)<br />
Adjustable Bracket<br />
Inside Mount (Optional)<br />
Mounting Clip<br />
Headrail<br />
Wand<br />
Control<br />
Vanes<br />
Tools needed for installing your blind:<br />
Flat blade and Phillips<br />
screwdrivers<br />
Measuring tape<br />
Pencil<br />
Power drill, 1 •<br />
•<br />
•<br />
•<br />
/4" hex driver, and drill bits<br />
In addition, you will need fasteners designed to work with your<br />
specific mounting surfaces:<br />
Mounting Surface Fastener<br />
Wood<br />
Drywall, Plaster<br />
Metal<br />
No. 6 Hex Head Screws<br />
(Not Provided)<br />
Wall Anchors, Expansion Bolts<br />
(Not Provided)<br />
Sheet Metal Screws<br />
(Not Provided)<br />
For assistance, call the <strong>Hunter</strong> <strong>Douglas</strong><br />
Customer Information Center<br />
at 1-888-501-8364<br />
Visit our Web site at hunterdouglas.com
1 Inside Mount <strong>Installation</strong><br />
Outside Mount <strong>Installation</strong><br />
Measure <strong>And</strong> Mark Mounting Clip Location<br />
• Mark mounting clip locations between 2" and 4" from each<br />
end of the headrail. Evenly space intermediate clips between<br />
end clips at 24" to 30" intervals. If available,<br />
2-4"<br />
use a mounting template to determine<br />
consistent mounting depth.<br />
2-4"<br />
30" Maximum 30" Maximum<br />
NOTE: If you do not have a mounting template, measure depth<br />
to allow 1 ⁄2" clearance between vane and window (i.e. 2 1 ⁄4" for 3 1 ⁄2"<br />
vanes). Blinds having widths and lengths greater than 120" will<br />
require additional brackets to support the stacked vanes.<br />
NOTE: If a valance is included, refer to Step 5 for valance assembly<br />
prior to installing the mounting clips.<br />
NOTE: The inside surface of the valance dust cover has three parallel<br />
lines; use the center line to position drill holes.<br />
Ceiling/Head<br />
Mounting Clip<br />
Wall<br />
Vane<br />
3<br />
Side<br />
View<br />
1 /2"<br />
21 4<br />
/4"<br />
1 Install Mounting Clips (<strong>And</strong> Assembled Valance)<br />
• Drill pilot holes through<br />
dust cover valance at<br />
mounting clip locations<br />
as marked.<br />
• Insert a screw through<br />
the mounting clip.<br />
Center Groove<br />
Mounting Clip<br />
• Hold the valance in<br />
Mounting Screw<br />
position and drill<br />
through the valance<br />
and into ceiling.<br />
Valance<br />
• Position a<br />
mounting clip<br />
at each hole and<br />
screw into place.<br />
Valance<br />
(Optional)<br />
• Align and tighten<br />
the valance<br />
against the ceiling<br />
into its finished<br />
mounting position.<br />
/4"<br />
1 /2"<br />
• Center the headrail<br />
underneath the<br />
mounting clips.<br />
• Tilt the headrail and insert it into the front edge of the mounting<br />
clips. Pull forward, then roll the headrail back toward the rear of<br />
the blind. Push up and snap into place.<br />
• To remove the headrail, locate the rear tab on the mounting clip.<br />
• Push up on the rear tab to release the track.<br />
Tilt <strong>And</strong><br />
Pull Forward<br />
Rear Tab<br />
Roll Back<br />
INSTALL REMOVE<br />
Push Up<br />
2<br />
•<br />
•<br />
•<br />
•<br />
•<br />
•<br />
3<br />
•<br />
•<br />
•<br />
Attach “L” mount<br />
brackets 2" to 4"<br />
from each end<br />
of the headrail.<br />
Evenly space<br />
intermediate brackets<br />
between end brackets at<br />
24" to 30" intervals.<br />
Adjust mounting clips to allow 1 /2"<br />
clearance between the vane and the wall<br />
(i.e. 2 1 /4" for 3 1 /2" vane).<br />
Valance<br />
(Optional)<br />
Finished Side<br />
Light Diffusion<br />
Into Room<br />
2-4" 2-4"<br />
30" Maximum<br />
Center headrail underneath mounting brackets.<br />
Tilt the headrail and insert it into the front edge of the mounting<br />
brackets. Pull and roll the headrail up toward the rear of the blind<br />
and snap into place.<br />
If a valance is included, install a valance hanger next to each<br />
“L” bracket.<br />
Center the valance in relationship to the headrail and slide it into<br />
the valance hanger.<br />
Attach Vanes<br />
Valance Hanger<br />
Vane<br />
3 1 /2"<br />
4 1 /4"<br />
Determine the desired light/view direction.<br />
(Top-Down View)<br />
Light Source (Sun)<br />
Light Source (Sun)<br />
“L” Bracket<br />
2 1 /4"<br />
Wall<br />
Light Diffusion<br />
Into Room<br />
Mounting<br />
Clip<br />
Side<br />
View<br />
Finished Side<br />
Rotate the vane hooks so the slot between the long and the short<br />
prong is facing you.<br />
Push the vane into the hook until<br />
it “snaps” into place.<br />
Carrier<br />
Long<br />
Prong<br />
1 /2"<br />
Short<br />
Prong
4 Remove Vanes<br />
•<br />
•<br />
•<br />
5<br />
Push up on the vane.<br />
Gently open the vane hook by inserting a credit card-sized piece of<br />
rigid plastic between the vane and the long prong of the vane hook.<br />
<strong>Care</strong>fully remove the vane.<br />
Valance Assembly<br />
Single-Tiered Closed Square Corner<br />
Insert Attachment:<br />
1. Cut a fabric insert for the valance<br />
and each valance return 1" longer<br />
at each end than the valance and<br />
Valance<br />
valance return width.<br />
1"<br />
2. Center the fabric insert in the<br />
valance and wrap the excess from one Valance<br />
Insert<br />
side around to the back of the valance (for<br />
vinyl - cut flush with the ends of the valance).<br />
1"<br />
3.<br />
4.<br />
Insert a corner clip to hold the fabric in place.<br />
At the opposite end, pull the<br />
fabric insert tight, wrap it around<br />
to the back, and secure it in place<br />
with another corner clip.<br />
Valance Return<br />
Clip<br />
Valance Return<br />
Clip<br />
5. Center each valance return fabric<br />
insert and wrap the excess from one<br />
side around to the back of the valance return.<br />
Corner Clip<br />
6. Attach the valance return to the valance using<br />
the already attached corner clip.<br />
Corner Clip<br />
7. At the opposite end of the valance return,<br />
pull the fabric insert tight and secure it in<br />
place with a valance return clip.<br />
8. Repeat steps 5-7 for the other valance return.<br />
NOTE: Vinyl inserts should be cut flush with the ends of the valance<br />
and valance returns. Secure vinyl in place with the corner clip and<br />
valance return clips.<br />
Single-Tiered Open Square Corner (Fabric Only)<br />
1. Cut fabric long<br />
enough to wrap<br />
around the corners<br />
and over both<br />
returns plus at least<br />
Valance<br />
Return<br />
2.<br />
1" excess at each end.<br />
Attach the corner clip and<br />
valance returns.<br />
Valance Return<br />
Clip<br />
Corner Clip<br />
3. Insert the fabric into the valance, wrap it<br />
through the corner clip and into the<br />
valance return.<br />
Valance Return<br />
Clip<br />
NOTE: Leave enough extra fabric at the<br />
other end of the fabric insert to be able<br />
to wrap around the other valance return.<br />
4. Wrap excess fabric around the end<br />
of the valance return and secure<br />
it with a valance return clip (for vinyl<br />
- cut the insert flush with the ends of the<br />
valance return).<br />
5. Repeat steps 3-4 for the other valance return.<br />
Single-Tiered Universal Round Corner<br />
1.<br />
2.<br />
3.<br />
4.<br />
5.<br />
6.<br />
7.<br />
8.<br />
6<br />
Install the round valance corners onto each end of the valance.<br />
Install the valance returns onto each end of the round<br />
valance corners.<br />
Cut the fabric insert 4" longer than<br />
the total length of the valance plus<br />
both returns.<br />
Place the fabric insert into the<br />
valance, continuing around the<br />
round valance corner and through<br />
the valance return.<br />
Wrap excess fabric around the end<br />
of the valance return and secure it with<br />
a valance return clip.<br />
From the other end of the fabric<br />
insert, pull the fabric tight, then repeat<br />
steps 4-5.<br />
Attach the clear valance corner<br />
caps onto the valance corners, top<br />
and bottom.<br />
Use a (#4) 1 /2" screw to secure each valance return<br />
onto the valance dust cover surface.<br />
NOTE: Vinyl inserts should be cut flush with the ends of the<br />
valance returns. Secure vinyl in place with the valance return clips.<br />
Double-Tiered Universal Round Corner<br />
1. To install the double-tiered universal round<br />
corner valance, follow the instructions for<br />
the single-tiered universal round corner<br />
valance. The corner caps are installed on<br />
the top and bottom of the upper valance<br />
and only on the bottom of the lower valance.<br />
2. Install the valance stacking clips into the back<br />
lips of the (upper) dust cover<br />
valance, and space 24"<br />
apart. For an outside<br />
mount (OB) only, add an<br />
additional stacking clip to<br />
each return.<br />
3. For an inside mount (IB), use<br />
the rear groove of the valance<br />
dust cover to position drill holes.<br />
Cord Tensioner and<br />
Cord Length<br />
!<br />
WARNING<br />
Fabric<br />
Insert<br />
Valance<br />
Screw<br />
Rear Groove<br />
Mounting Screw<br />
Valance<br />
Return<br />
Round Valance<br />
Corner<br />
Valance<br />
Return Clip<br />
Clear Corner<br />
Clip Caps<br />
The cord tensioner must be properly installed for the pulley to rotate<br />
and for the cords to be kept taut. Proper installation will help reduce<br />
the chance of accidental strangulation by making the cords less<br />
accessible to young children.<br />
Sill Mounted Jamb Mounted<br />
Wall Mounted<br />
Use A Wall<br />
Anchor To Hold<br />
Mounting Screw<br />
In Place.
7<br />
•<br />
•<br />
•<br />
•<br />
•<br />
Cord Tensioning<br />
Determine mounting location. If cord adjustment is required,<br />
refer to step 9.<br />
Fully extend the cord tensioning device, rotate the body<br />
45 degrees and lock it into this extended position.<br />
Position the cord tensioning device at the mounting location.<br />
Hold the cord taut with the cord tensioning device in the<br />
extended position and mount the base using the supplied screws.<br />
Release the tension by rotating the base 45 degrees.<br />
NOTE: Cord tensioning applies only if the blind is ordered with a chain<br />
and cord control system. The PermaTilt ® Wand Control System comes<br />
standard on all <strong>Paramount</strong> ® Headrail Systems.<br />
8<br />
Wand Adjustment<br />
Cord Adjustment<br />
To reduce cord length on a Side Draw Blind:<br />
•<br />
•<br />
•<br />
•<br />
•<br />
•<br />
•<br />
•<br />
•<br />
•<br />
Extend Rotate 45˚ Release<br />
If the wand does not hang straight or the cord is too tight, raise the<br />
cord tether to put slack on the cord:<br />
• Using a .050 hex key, loosen the set<br />
screw in the wand lock through the<br />
access hole. Raise the tether to decrease<br />
tension; lower the tether to increase<br />
tension. Tighten the set screw and<br />
•<br />
check the adjustment.<br />
If the cord is too loose, see section 9. Access<br />
Hole<br />
.050<br />
Hex Key<br />
9<br />
Release the tension on the cord with the cord tensioner.<br />
Place the blind in the open position.<br />
Locate the cord knot in the front<br />
of the lead carrier.<br />
Loosen the adjusting screw until<br />
the cord moves.<br />
Pull the cord to the<br />
desired length.<br />
Tie a knot.<br />
Tighten the adjusting screw.<br />
Reset the cord tension with the<br />
cord tensioner.<br />
Test for proper cord tension.<br />
Cut the excess cord.<br />
Screw and<br />
Cord Knot<br />
Side Draw<br />
Carriers in<br />
Open Position<br />
To reduce cord length on Center Draw Blinds:<br />
• Release the tension on the cord with the cord tensioner.<br />
•<br />
•<br />
Place the blind in the closed position.<br />
Locate the cord ends in the front of the<br />
Center Draw<br />
Carriers Closed<br />
lead carrier.<br />
Position<br />
• Loosen the adjusting screw.<br />
Screw<br />
• Select the cord knot that adjusts<br />
the cord length only; if any carrier<br />
movement is observed, select the<br />
other cord.<br />
CAUTION: Cutting the wrong cord will<br />
cause irreparable damage.<br />
• Pull the cord to the desired length.<br />
• Tie a double knot, tighten screw.<br />
• Reset the tension with the cord tensioner.<br />
• Test for proper cord tension.<br />
• Cut the excess cord.<br />
10<br />
<strong>Care</strong> <strong>And</strong> Cleaning<br />
Dusting<br />
Regular light dusting with a feather duster is all the cleaning that is<br />
needed in most circumstances.<br />
Vacuuming<br />
Use a hand-held vacuum with low suction for more thorough<br />
dust removal.<br />
Spot-Cleaning<br />
•<br />
•<br />
•<br />
Prepare a solution of warm water and a mild detergent.<br />
Dampen a clean cloth in the solution and wring it out.<br />
Dab the spot with the dampened cloth until it is gone.<br />
CAUTION: Vertical fabrics should not be spot-cleaned or immersed<br />
in water.<br />
Compressed Air<br />
You can use compressed air or a hair dryer (cool setting) to blow the<br />
dust off your valance.<br />
For more comprehensive cleaning instructions, call the<br />
<strong>Hunter</strong> <strong>Douglas</strong> Customer Information Center toll free at:<br />
1-888-501-8364<br />
© 2005 <strong>Hunter</strong> <strong>Douglas</strong> Inc. ® Registered trademark of <strong>Hunter</strong> <strong>Douglas</strong> Inc.<br />
Trademark of <strong>Hunter</strong> <strong>Douglas</strong> Inc.<br />
Patented in the U.S. and foreign countries. Other U.S. and foreign patents pending.<br />
PCN 77PMI0105 rev. 11/05