Installation And Care Instructions Paramount ... - Hunter Douglas
Installation And Care Instructions Paramount ... - Hunter Douglas
Installation And Care Instructions Paramount ... - Hunter Douglas

You also want an ePaper? Increase the reach of your titles
YUMPU automatically turns print PDFs into web optimized ePapers that Google loves.
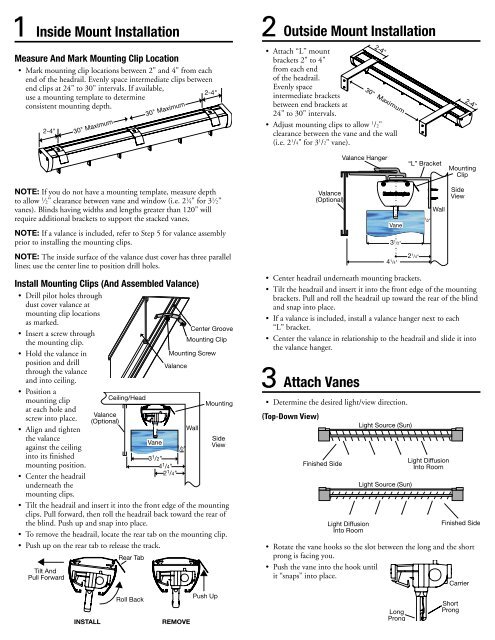
1 Inside Mount <strong>Installation</strong><br />
Outside Mount <strong>Installation</strong><br />
Measure <strong>And</strong> Mark Mounting Clip Location<br />
• Mark mounting clip locations between 2" and 4" from each<br />
end of the headrail. Evenly space intermediate clips between<br />
end clips at 24" to 30" intervals. If available,<br />
2-4"<br />
use a mounting template to determine<br />
consistent mounting depth.<br />
2-4"<br />
30" Maximum 30" Maximum<br />
NOTE: If you do not have a mounting template, measure depth<br />
to allow 1 ⁄2" clearance between vane and window (i.e. 2 1 ⁄4" for 3 1 ⁄2"<br />
vanes). Blinds having widths and lengths greater than 120" will<br />
require additional brackets to support the stacked vanes.<br />
NOTE: If a valance is included, refer to Step 5 for valance assembly<br />
prior to installing the mounting clips.<br />
NOTE: The inside surface of the valance dust cover has three parallel<br />
lines; use the center line to position drill holes.<br />
Ceiling/Head<br />
Mounting Clip<br />
Wall<br />
Vane<br />
3<br />
Side<br />
View<br />
1 /2"<br />
21 4<br />
/4"<br />
1 Install Mounting Clips (<strong>And</strong> Assembled Valance)<br />
• Drill pilot holes through<br />
dust cover valance at<br />
mounting clip locations<br />
as marked.<br />
• Insert a screw through<br />
the mounting clip.<br />
Center Groove<br />
Mounting Clip<br />
• Hold the valance in<br />
Mounting Screw<br />
position and drill<br />
through the valance<br />
and into ceiling.<br />
Valance<br />
• Position a<br />
mounting clip<br />
at each hole and<br />
screw into place.<br />
Valance<br />
(Optional)<br />
• Align and tighten<br />
the valance<br />
against the ceiling<br />
into its finished<br />
mounting position.<br />
/4"<br />
1 /2"<br />
• Center the headrail<br />
underneath the<br />
mounting clips.<br />
• Tilt the headrail and insert it into the front edge of the mounting<br />
clips. Pull forward, then roll the headrail back toward the rear of<br />
the blind. Push up and snap into place.<br />
• To remove the headrail, locate the rear tab on the mounting clip.<br />
• Push up on the rear tab to release the track.<br />
Tilt <strong>And</strong><br />
Pull Forward<br />
Rear Tab<br />
Roll Back<br />
INSTALL REMOVE<br />
Push Up<br />
2<br />
•<br />
•<br />
•<br />
•<br />
•<br />
•<br />
3<br />
•<br />
•<br />
•<br />
Attach “L” mount<br />
brackets 2" to 4"<br />
from each end<br />
of the headrail.<br />
Evenly space<br />
intermediate brackets<br />
between end brackets at<br />
24" to 30" intervals.<br />
Adjust mounting clips to allow 1 /2"<br />
clearance between the vane and the wall<br />
(i.e. 2 1 /4" for 3 1 /2" vane).<br />
Valance<br />
(Optional)<br />
Finished Side<br />
Light Diffusion<br />
Into Room<br />
2-4" 2-4"<br />
30" Maximum<br />
Center headrail underneath mounting brackets.<br />
Tilt the headrail and insert it into the front edge of the mounting<br />
brackets. Pull and roll the headrail up toward the rear of the blind<br />
and snap into place.<br />
If a valance is included, install a valance hanger next to each<br />
“L” bracket.<br />
Center the valance in relationship to the headrail and slide it into<br />
the valance hanger.<br />
Attach Vanes<br />
Valance Hanger<br />
Vane<br />
3 1 /2"<br />
4 1 /4"<br />
Determine the desired light/view direction.<br />
(Top-Down View)<br />
Light Source (Sun)<br />
Light Source (Sun)<br />
“L” Bracket<br />
2 1 /4"<br />
Wall<br />
Light Diffusion<br />
Into Room<br />
Mounting<br />
Clip<br />
Side<br />
View<br />
Finished Side<br />
Rotate the vane hooks so the slot between the long and the short<br />
prong is facing you.<br />
Push the vane into the hook until<br />
it “snaps” into place.<br />
Carrier<br />
Long<br />
Prong<br />
1 /2"<br />
Short<br />
Prong