Installation And Care Instructions Paramount ... - Hunter Douglas
Installation And Care Instructions Paramount ... - Hunter Douglas
Installation And Care Instructions Paramount ... - Hunter Douglas

Create successful ePaper yourself
Turn your PDF publications into a flip-book with our unique Google optimized e-Paper software.
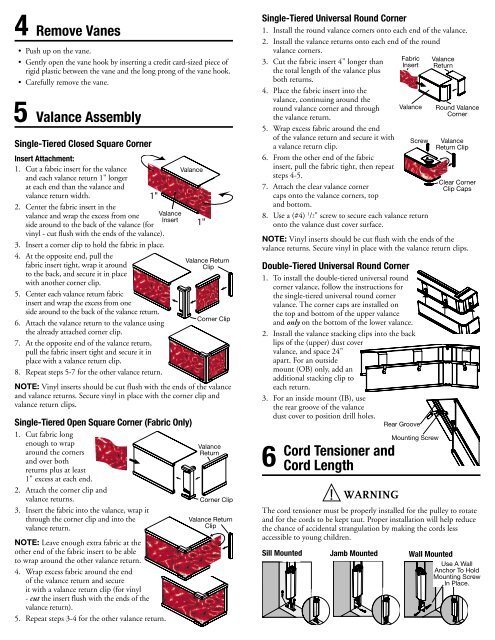
4 Remove Vanes<br />
•<br />
•<br />
•<br />
5<br />
Push up on the vane.<br />
Gently open the vane hook by inserting a credit card-sized piece of<br />
rigid plastic between the vane and the long prong of the vane hook.<br />
<strong>Care</strong>fully remove the vane.<br />
Valance Assembly<br />
Single-Tiered Closed Square Corner<br />
Insert Attachment:<br />
1. Cut a fabric insert for the valance<br />
and each valance return 1" longer<br />
at each end than the valance and<br />
Valance<br />
valance return width.<br />
1"<br />
2. Center the fabric insert in the<br />
valance and wrap the excess from one Valance<br />
Insert<br />
side around to the back of the valance (for<br />
vinyl - cut flush with the ends of the valance).<br />
1"<br />
3.<br />
4.<br />
Insert a corner clip to hold the fabric in place.<br />
At the opposite end, pull the<br />
fabric insert tight, wrap it around<br />
to the back, and secure it in place<br />
with another corner clip.<br />
Valance Return<br />
Clip<br />
Valance Return<br />
Clip<br />
5. Center each valance return fabric<br />
insert and wrap the excess from one<br />
side around to the back of the valance return.<br />
Corner Clip<br />
6. Attach the valance return to the valance using<br />
the already attached corner clip.<br />
Corner Clip<br />
7. At the opposite end of the valance return,<br />
pull the fabric insert tight and secure it in<br />
place with a valance return clip.<br />
8. Repeat steps 5-7 for the other valance return.<br />
NOTE: Vinyl inserts should be cut flush with the ends of the valance<br />
and valance returns. Secure vinyl in place with the corner clip and<br />
valance return clips.<br />
Single-Tiered Open Square Corner (Fabric Only)<br />
1. Cut fabric long<br />
enough to wrap<br />
around the corners<br />
and over both<br />
returns plus at least<br />
Valance<br />
Return<br />
2.<br />
1" excess at each end.<br />
Attach the corner clip and<br />
valance returns.<br />
Valance Return<br />
Clip<br />
Corner Clip<br />
3. Insert the fabric into the valance, wrap it<br />
through the corner clip and into the<br />
valance return.<br />
Valance Return<br />
Clip<br />
NOTE: Leave enough extra fabric at the<br />
other end of the fabric insert to be able<br />
to wrap around the other valance return.<br />
4. Wrap excess fabric around the end<br />
of the valance return and secure<br />
it with a valance return clip (for vinyl<br />
- cut the insert flush with the ends of the<br />
valance return).<br />
5. Repeat steps 3-4 for the other valance return.<br />
Single-Tiered Universal Round Corner<br />
1.<br />
2.<br />
3.<br />
4.<br />
5.<br />
6.<br />
7.<br />
8.<br />
6<br />
Install the round valance corners onto each end of the valance.<br />
Install the valance returns onto each end of the round<br />
valance corners.<br />
Cut the fabric insert 4" longer than<br />
the total length of the valance plus<br />
both returns.<br />
Place the fabric insert into the<br />
valance, continuing around the<br />
round valance corner and through<br />
the valance return.<br />
Wrap excess fabric around the end<br />
of the valance return and secure it with<br />
a valance return clip.<br />
From the other end of the fabric<br />
insert, pull the fabric tight, then repeat<br />
steps 4-5.<br />
Attach the clear valance corner<br />
caps onto the valance corners, top<br />
and bottom.<br />
Use a (#4) 1 /2" screw to secure each valance return<br />
onto the valance dust cover surface.<br />
NOTE: Vinyl inserts should be cut flush with the ends of the<br />
valance returns. Secure vinyl in place with the valance return clips.<br />
Double-Tiered Universal Round Corner<br />
1. To install the double-tiered universal round<br />
corner valance, follow the instructions for<br />
the single-tiered universal round corner<br />
valance. The corner caps are installed on<br />
the top and bottom of the upper valance<br />
and only on the bottom of the lower valance.<br />
2. Install the valance stacking clips into the back<br />
lips of the (upper) dust cover<br />
valance, and space 24"<br />
apart. For an outside<br />
mount (OB) only, add an<br />
additional stacking clip to<br />
each return.<br />
3. For an inside mount (IB), use<br />
the rear groove of the valance<br />
dust cover to position drill holes.<br />
Cord Tensioner and<br />
Cord Length<br />
!<br />
WARNING<br />
Fabric<br />
Insert<br />
Valance<br />
Screw<br />
Rear Groove<br />
Mounting Screw<br />
Valance<br />
Return<br />
Round Valance<br />
Corner<br />
Valance<br />
Return Clip<br />
Clear Corner<br />
Clip Caps<br />
The cord tensioner must be properly installed for the pulley to rotate<br />
and for the cords to be kept taut. Proper installation will help reduce<br />
the chance of accidental strangulation by making the cords less<br />
accessible to young children.<br />
Sill Mounted Jamb Mounted<br />
Wall Mounted<br />
Use A Wall<br />
Anchor To Hold<br />
Mounting Screw<br />
In Place.