Get It Right 8 paver laying - Ibstock
Get It Right 8 paver laying - Ibstock
Get It Right 8 paver laying - Ibstock

Create successful ePaper yourself
Turn your PDF publications into a flip-book with our unique Google optimized e-Paper software.
GET IT RIGHT<br />
8. Laying <strong>Ibstock</strong> Clay Pavers for rigid<br />
and flexible applications<br />
<strong>Ibstock</strong> Clay Paver Installation Guidelines (not SUDS)<br />
Pavers in the <strong>Ibstock</strong> range are intended for domestic use and are generally to be laid by one of two<br />
distinct methods. 65mm thick <strong>paver</strong>s should be dry bedded on sand (flexible) and 50mm <strong>paver</strong>s are<br />
intended for mortar bedding (rigid) with 10mm mortar joints. The latter version ideal for covering<br />
existing concrete pathways as they act as a veneer rather than a load bearing unit.<br />
Pavers suitable for sustainable urban drainage systems should be laid to a different method not covered in this<br />
sheet.<br />
The design of the pavement structure and its installation is covered by a series of Guides and Codes<br />
of Practice which form the constituent parts of BS 7533. Parts 1 & 2 cover the design of ‘Heavy Duty’<br />
and Lightly Trafficked’ pavements respectively. Installation is covered in Part 3 for flexible paving<br />
and the soon to be published Part 9 for Rigid Paving.<br />
<strong>It</strong>s not possible to summarise the content of the relevant Parts of BS7533 and Professional<br />
Specifiers are advised to consult the Codes and select products accordingly.<br />
However, for domestic applications the following notes will assist in achieving satisfactory results.<br />
Sand Bedded Pavers (flexible system)<br />
1. Ensure rigid edge restraints are effective for the whole of the paved area and are adequately<br />
secure. The pavement will try to spread in-use and the joints will open up unless restrained by<br />
walling or kerbs. Newly laid proprietary kerbs together with any concrete haunching, must be allowed<br />
to gain sufficient strength before compaction of sub-base and <strong>laying</strong> course takes place.<br />
2. Prepare the sub-base which may consist of either an existing sound pavement or crushed<br />
aggregate if paving on virgin ground. The depth of sub-base needs to be between 150-200mm if on<br />
virgin ground dependant on soil conditions and planned usage. Drain falls must be formed in the<br />
sub-base (not the <strong>laying</strong> course) and it should be well compacted with a plate vibrator.<br />
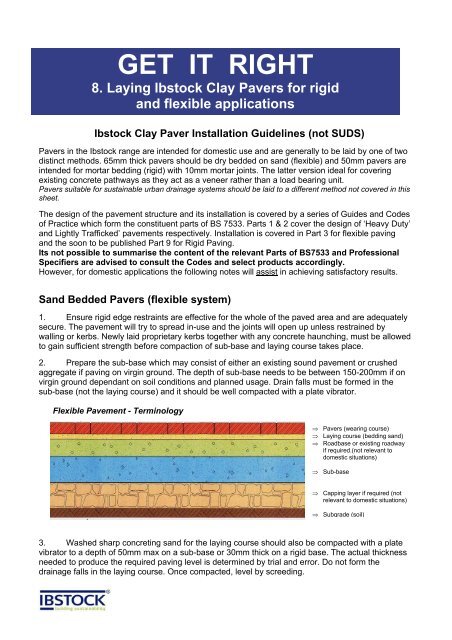
Flexible Pavement - Terminology<br />
⇒ Pavers (wearing course)<br />
⇒ Laying course (bedding sand)<br />
⇒ Roadbase or existing roadway<br />
if required.(not relevant to<br />
domestic situations)<br />
⇒ Sub-base<br />
⇒ Capping layer if required (not<br />
relevant to domestic situations)<br />
⇒ Subgrade (soil)<br />
3. Washed sharp concreting sand for the <strong>laying</strong> course should also be compacted with a plate<br />
vibrator to a depth of 50mm max on a sub-base or 30mm thick on a rigid base. The actual thickness<br />
needed to produce the required paving level is determined by trial and error. Do not form the<br />
drainage falls in the <strong>laying</strong> course. Once compacted, level by screeding.
4. The <strong>Ibstock</strong> clay <strong>paver</strong>s can now be laid to the chosen <strong>laying</strong> pattern which should<br />
commence form a straight section of the edge restraint. Do not stand on the sand when <strong>laying</strong><br />
<strong>paver</strong>s. Pavers should be laid with joint width typically within the range of 2-5mm.<br />
Edge restraints Sloping sites<br />
5. Alignment of the pattern should be checked periodically using string lines at right angles and<br />
minor adjustments made to maintain it within reason. The achievement of perfectly straight joint lines<br />
may not be possible due to permitted manufacturing tolerances and variations in the surface profile<br />
of the pavement.<br />
6. Avoid infill pieces less than ¼ of the original <strong>paver</strong> size. To achieve this use half to three<br />
quarter <strong>paver</strong>s near an edge to slightly adjust the bond pattern. Pavers should be cut with a power<br />
saw or multi bladed <strong>paver</strong> splitter.<br />
7. After placing all the <strong>paver</strong>s, fine, dry jointing sand must be brushed into the joints until they are<br />
full. Surplus sand lying on the surface should then be brushed away.<br />
8. The Plate vibrator fitted with a neoprene sole plate is then used to compact the <strong>paver</strong>s. Two or<br />
three passes need to be made with additional sand being brushed in each time.<br />
9. After final compaction has taken place a thin layer of jointing sand should be left on the surface<br />
to help fill any voids which may develop.
Mortar Bedded Pavers (Rigid veneer)<br />
These are laid in a 15-20mm thick mortar bed on a concrete base with each <strong>paver</strong> buttered on 2<br />
edges before being set into the mortar. Final jointing should be carried out when the mortar has<br />
stiffened.<br />
Designation (i) mortar (1: ¼ : 3 cement: lime: sand) should be used and vertical joints must be well<br />
filled and compacted. Plasticised mixes should be avoided in this situation.<br />
Movement joints must be incorporated at 6m spacings and at the perimeter when paving is<br />
constrained by walls.<br />
The concrete sub-base must be strong enough to withstand envisaged loading (note; BDA guidelines<br />
indicate minimum 300mm concrete base for foot traffic alone), and <strong>paver</strong>s must be fully bedded with no<br />
voids, the whole assembly being regarded as a rigid system.<br />
Mortar bedded <strong>paver</strong>s are manufactured to a brick bed size and should be laid with a nominal 10mm<br />
joint width.<br />
Rigid Paver -Terminology<br />
⇒ Pavers and mortar joints<br />
⇒ Mortar bed<br />
⇒ Concrete base (to<br />
structural requirements)<br />
⇒ Capping layer<br />
⇒ Sub-grade (soil)<br />
Paver <strong>laying</strong> patterns –<br />
Rigid lay are sized to incorporate a nominal 10mm mortar joint (215x102mm bed dimensions),<br />
Flexible lay are sized to be laid with a joint width typically 2-5mm ( 200x100mm bed dimensions).<br />
Basket weave Herringbone at 45º Herringbone at 90º Running bond<br />
Maintenance<br />
Little or no maintenance is required with clay paving. Any discolouration due to organic growths can<br />
be treated with fungicides available from all garden centres and DIY stores. The use of a High<br />
Pressure Washer is NOT recommended on either method of installation, it will compromise joint<br />
strength and may reduce durability.