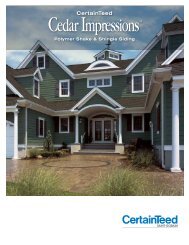
Technical Data Sheet - CertainTeed
Technical Data Sheet - CertainTeed
Technical Data Sheet - CertainTeed

You also want an ePaper? Increase the reach of your titles
YUMPU automatically turns print PDFs into web optimized ePapers that Google loves.
<strong>Technical</strong> <strong>Data</strong> <strong>Sheet</strong> (Continued)<br />
WinterGuard Series Page 2 of 3<br />
Applicable Standards:<br />
ASTM D 1970<br />
ICC ESR-1492<br />
UL 790: Classified for use as underlayment beneath Class A, B, or C fire rated shingle systems<br />
Florida Product Approval # FL3455<br />
Miami-Dade Product Control Approved<br />
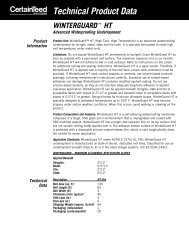
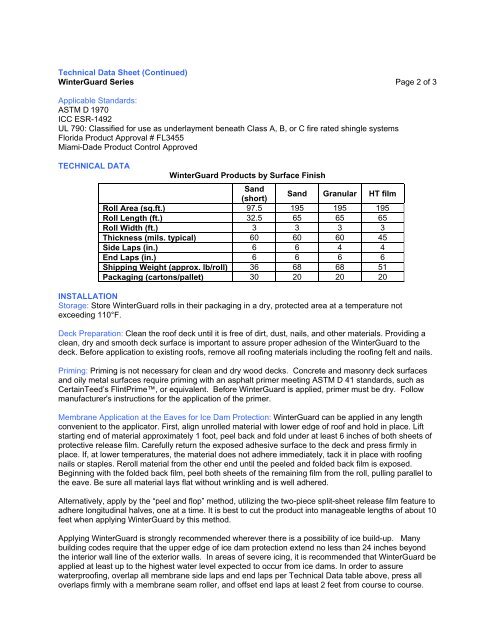
TECHNICAL DATA<br />
WinterGuard Products by Surface Finish<br />
Sand<br />
(short)<br />
Sand Granular HT film<br />
Roll Area (sq.ft.) 97.5 195 195 195<br />
Roll Length (ft.) 32.5 65 65 65<br />
Roll Width (ft.) 3 3 3 3<br />
Thickness (mils. typical) 60 60 60 45<br />
Side Laps (in.) 6 6 4 4<br />
End Laps (in.) 6 6 6 6<br />
Shipping Weight (approx. lb/roll) 36 68 68 51<br />
Packaging (cartons/pallet) 30 20 20 20<br />
INSTALLATION<br />
Storage: Store WinterGuard rolls in their packaging in a dry, protected area at a temperature not<br />
exceeding 110°F.<br />
Deck Preparation: Clean the roof deck until it is free of dirt, dust, nails, and other materials. Providing a<br />
clean, dry and smooth deck surface is important to assure proper adhesion of the WinterGuard to the<br />
deck. Before application to existing roofs, remove all roofing materials including the roofing felt and nails.<br />
Priming: Priming is not necessary for clean and dry wood decks. Concrete and masonry deck surfaces<br />
and oily metal surfaces require priming with an asphalt primer meeting ASTM D 41 standards, such as<br />
<strong>CertainTeed</strong>’s FlintPrime, or equivalent. Before WinterGuard is applied, primer must be dry. Follow<br />
manufacturer's instructions for the application of the primer.<br />
Membrane Application at the Eaves for Ice Dam Protection: WinterGuard can be applied in any length<br />
convenient to the applicator. First, align unrolled material with lower edge of roof and hold in place. Lift<br />
starting end of material approximately 1 foot, peel back and fold under at least 6 inches of both sheets of<br />
protective release film. Carefully return the exposed adhesive surface to the deck and press firmly in<br />
place. If, at lower temperatures, the material does not adhere immediately, tack it in place with roofing<br />
nails or staples. Reroll material from the other end until the peeled and folded back film is exposed.<br />
Beginning with the folded back film, peel both sheets of the remaining film from the roll, pulling parallel to<br />
the eave. Be sure all material lays flat without wrinkling and is well adhered.<br />
Alternatively, apply by the “peel and flop” method, utilizing the two-piece split-sheet release film feature to<br />
adhere longitudinal halves, one at a time. It is best to cut the product into manageable lengths of about 10<br />
feet when applying WinterGuard by this method.<br />
Applying WinterGuard is strongly recommended wherever there is a possibility of ice build-up. Many<br />
building codes require that the upper edge of ice dam protection extend no less than 24 inches beyond<br />
the interior wall line of the exterior walls. In areas of severe icing, it is recommended that WinterGuard be<br />
applied at least up to the highest water level expected to occur from ice dams. In order to assure<br />
waterproofing, overlap all membrane side laps and end laps per <strong>Technical</strong> <strong>Data</strong> table above, press all<br />
overlaps firmly with a membrane seam roller, and offset end laps at least 2 feet from course to course.