Landmark Snap In Installation Guide - CertainTeed
Landmark Snap In Installation Guide - CertainTeed
Landmark Snap In Installation Guide - CertainTeed

Create successful ePaper yourself
Turn your PDF publications into a flip-book with our unique Google optimized e-Paper software.
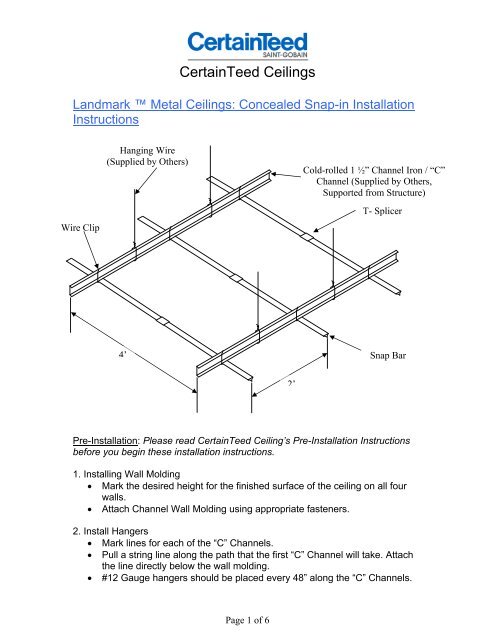
<strong>CertainTeed</strong> Ceilings<br />
<strong>Landmark</strong> Metal Ceilings: Concealed <strong>Snap</strong>-in <strong>In</strong>stallation<br />
<strong>In</strong>structions<br />
Wire Clip<br />
Hanging Wire<br />
(Supplied by Others)<br />
Cold-rolled 1 ½” Channel Iron / “C”<br />
Channel (Supplied by Others,<br />
Supported from Structure)<br />
T- Splicer<br />
4’ <strong>Snap</strong> Bar<br />
2’<br />
Pre-<strong>In</strong>stallation: Please read <strong>CertainTeed</strong> Ceiling’s Pre-<strong>In</strong>stallation <strong>In</strong>structions<br />
before you begin these installation instructions.<br />
1. <strong>In</strong>stalling Wall Molding<br />
• Mark the desired height for the finished surface of the ceiling on all four<br />
walls.<br />
• Attach Channel Wall Molding using appropriate fasteners.<br />
2. <strong>In</strong>stall Hangers<br />
• Mark lines for each of the “C” Channels.<br />
• Pull a string line along the path that the first “C” Channel will take. Attach<br />
the line directly below the wall molding.<br />
• #12 Gauge hangers should be placed every 48” along the “C” Channels.<br />
Page 1 of 6
3. <strong>In</strong>stall the “C” Channels<br />
• <strong>In</strong>stall the first section of “C” Channel by looping the hanging wire around<br />
the channel and twisting.<br />
4. <strong>In</strong>stall <strong>Snap</strong> Bars<br />
• Establish the location of the first <strong>Snap</strong> Bar. (See the Pre-<strong>In</strong>stallation<br />
<strong>In</strong>structions for Room Layout <strong>In</strong>structions).<br />
• <strong>In</strong>stall the first <strong>Snap</strong> Bar perpendicular to the “C” Channels using Wire<br />
Clips as illustrated below.<br />
• Use additional Wire Clips along the length of the <strong>Snap</strong> Bars.<br />
• If required, use T-bar Splicer to splice the ends of Tee Bars together as<br />
illustrated below.<br />
• <strong>In</strong>stall the remaining <strong>Snap</strong> Bars 2 feet on center.<br />
Page 2 of 6
5. Square the Grid System<br />
• Check to see if the system is square by measuring diagonally across the<br />
opening between the <strong>Snap</strong> Bar and the “C” Channel. The measurements<br />
should be the equal if the system is square.<br />
6. <strong>In</strong>stall Border Panels<br />
• Put on white gloves.<br />
• Border panels must be installed first because they fit into the channel wall<br />
molding and are clipped (illustrated below).<br />
“C” Channel<br />
(Supplied by Others)<br />
Hanging Wire<br />
(Supplied by Others)<br />
Wire Clip<br />
Hold Down Clip<br />
<strong>Snap</strong> Bar<br />
Wall<br />
<strong>Snap</strong>-in Panel<br />
Channel Wall Molding<br />
• To cut border panels, measure the desired distance, then, using a band<br />
saw, cut the panel 1/8” shy of your desired length.<br />
• <strong>In</strong>stall the panel cut end first, and then install the factory edges.<br />
• <strong>In</strong>stall a hold down clip to prevent buckling.<br />
• Corner panels should be installed in the sequence illustrated on the next<br />
page.<br />
Page 3 of 6
Wall<br />
1<br />
3<br />
Wall 2 4<br />
7. <strong>In</strong>stall Field Panels<br />
• Put on white gloves and hold the panel by its edges.<br />
• Force the panel’s crimped edges into the Tee Bar.<br />
• Slide the panels into position and level.<br />
8. Cornice <strong>In</strong>stallation (3 Options)<br />
• Option 1: Glue top of cornice to ceiling panels and nail (every 6”) it to a<br />
furring strip.<br />
• Corners should be mitered.<br />
<strong>Snap</strong> Bar<br />
Wall<br />
Glue<br />
<strong>Snap</strong>-in Panel<br />
Cornice<br />
Nail<br />
Page 4 of 6
• Option 2: Screw cornice to ceiling panels and nail to a furring strip every 6<br />
inches. Corners should be mitered.<br />
<strong>Snap</strong> Bar<br />
Wall<br />
<strong>Snap</strong>-in Panel<br />
Page 5 of 6
• Option 3: Rip a piece of lumber to match the contour of the cornice. Nail<br />
the cut lumber to the wall to act as a furring strip. Nail the cornice to the<br />
furring strip. Corners should be mitered.<br />
<strong>Snap</strong> Bar<br />
Wall<br />
<strong>Snap</strong>-in Panel<br />
Page 6 of 6