TREX® FENCING
TREX® FENCING
TREX® FENCING

You also want an ePaper? Increase the reach of your titles
YUMPU automatically turns print PDFs into web optimized ePapers that Google loves.
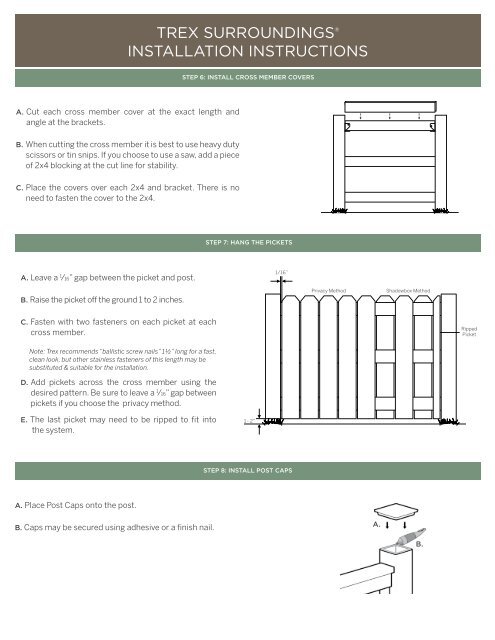
a. Leave a 1 /16” gap between the picket and post.<br />
b. Raise the picket off the ground 1 to 2 inches.<br />
c. Fasten with two fasteners on each picket at each<br />
cross member.<br />
Note: Trex recommends “ballistic screw nails” 1½” long for a fast,<br />
clean look, but other stainless fasteners of this length may be<br />
substituted & suitable for the installation.<br />
D. Add pickets across the cross member using the<br />
desired pattern. Be sure to leave a 1 /16” gap between<br />
pickets if you choose the privacy method.<br />
e. The last picket may need to be ripped to fit into<br />
the system.<br />
Trex sUrroUnDings ®<br />
insTAllATion insTrUcTions<br />
a. Cut each cross member cover at the exact length and<br />
angle at the brackets.<br />
b. When cutting the cross member it is best to use heavy duty<br />
scissors or tin snips. If you choose to use a saw, add a piece<br />
of 2x4 blocking at the cut line for stability.<br />
c. Place the covers over each 2x4 and bracket. There is no<br />
need to fasten the cover to the 2x4.<br />
a. Place Post Caps onto the post.<br />
b. Caps may be secured using adhesive or a finish nail.<br />
steP 6: install cross member coVers<br />
steP 7: Hang tHe PicKets<br />
1 - 2”<br />
1/16”<br />
steP 8: install Post caPs<br />
Privacy method shadowbox method<br />
a.<br />
b.<br />
Ripped<br />
Picket<br />
5x5 Trex fence post (2)<br />
Surroundings gate frame kit<br />
Surroundings pickets (to cover frame)<br />
Pressure-treated 2x4s cut to length (3)<br />
Cross member covers cut to length (3)<br />
Gate post insert<br />
Post caps (2)<br />
Trex sUrroUnDings ®<br />
gATe insTAllATion gUiDe<br />
tools neeDeD surrounDings gate comPonents<br />
before You begin<br />
» Read all instructions before<br />
installation.<br />
38½”<br />
» Follow steps 1 and 2 of Trex<br />
44½”<br />
surroundings Installation<br />
Instructions to 50½ lay out fence<br />
and dig holes.<br />
56½<br />
size oPening<br />
38½”<br />
44½”<br />
50½”<br />
56½”<br />
size opening<br />
oPening WiDtHs WitH corresPonDing 2x4 lengtHs<br />
steP 1: set tHe gate Posts<br />
Note: Due to concrete cure times, set the gate posts 2-3 days before gate is installed.<br />
a. Install gate post insert in hole designated for the hinge post.<br />
The insert does not need to extend beyond the height of the top<br />
gate hinge. The open side of the insert should face away from gate<br />
opening.<br />
b. Fill hole with concrete to 6” below ground level. ensure insert<br />
is plumb and that the center line is aligned with the fence. Allow<br />
concrete to set.<br />
Note: If there is not a fence section on the opposite side of the latch, install latch post<br />
with an insert as well.<br />
PicKets neeDeD<br />
6<br />
7<br />
8<br />
9<br />
b.<br />
a.<br />
cut lengtH for 2x4<br />
6”<br />
33”<br />
39”<br />
45”<br />
51”<br />
19