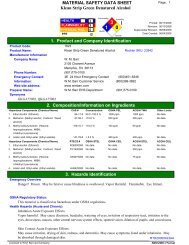
Router Fluting Jig Instructions - Rockler.com
Router Fluting Jig Instructions - Rockler.com
Router Fluting Jig Instructions - Rockler.com

Create successful ePaper yourself
Turn your PDF publications into a flip-book with our unique Google optimized e-Paper software.
Fig. 1 Fig. 2<br />
Rev 5/09<br />
3<br />
Set Up <strong>Instructions</strong>:<br />
Distributed by <strong>Rockler</strong> Companies, Inc.<br />
©2009 <strong>Rockler</strong> Woodworking and Hardware<br />
1 1 ⁄2"<br />
1. Identify the distance from the center of the first flute to the<br />
edge of the work piece. Then adjust the acrylic router<br />
plate (Part 2) so this measurement lines up with the end of<br />
the yellow write/erase marking surface (Part 3). Fig. 1.<br />
2. Then using a pencil, mark the yellow write/erase (Part 3)<br />
marking surface at the ‘0’ mark for the first flute.<br />
3. To mark the second flute, measure to the left of ‘0’ on the<br />
scale the distance equal to the spacing between flutes and<br />
make a mark. Fig. 1.<br />
4. Move the acrylic router plate (Part 2) so the ‘0’ mark lines<br />
up with the second tic mark, and measure to the left of ‘0’<br />
on the scale the distance equal to the spacing between<br />
flutes and make a mark. Fig. 2.<br />
5. Repeat step 4 until all flutes are marked on the yellow<br />
write/erase surface (Part 3).<br />
6. Attach your router to the acrylic router plate (Part 2). You<br />
may have to drill new mounting holes depending on your<br />
router base configuration.<br />
7. Place the jig over your workpiece and adjust it to the width<br />
of your stock by moving the adjustable fence (Part 4).<br />
Tighten the fence knobs (Part 7), making sure the jig slides<br />
easily but is not loose or sloppy. The jig is adjustable for<br />
stock up to 9 1 ⁄2" wide. Fig. 3.<br />
8. Before routing the flutes, set the router bit to the desired<br />
depth of cut. Move the acrylic router plate so the ‘0’ on the<br />
scales lines up with the first tick mark on the writable<br />
marking surface, lock it in place and make the cut. Fig. 4.<br />
9. To rout the remaining flutes, once again move the acrylic<br />
router plate so ‘0’ on the scale lines up with the tick marks<br />
as shown in Fig. 5.<br />
Note: When making any kind of flute, remember to move the<br />
router in and out of the cuts quickly to prevent burning.<br />
2<br />
7<br />
Fig. 3<br />
Fig. 4<br />
Fig. 5<br />
4<br />
1st flute<br />
2nd flute<br />
28636<br />
2