On target with more brightness - International Dentistry SA - Modern ...
On target with more brightness - International Dentistry SA - Modern ...
On target with more brightness - International Dentistry SA - Modern ...

Create successful ePaper yourself
Turn your PDF publications into a flip-book with our unique Google optimized e-Paper software.
Clinical<br />
<strong>On</strong> <strong>target</strong> <strong>with</strong> <strong>more</strong> <strong>brightness</strong><br />
Benjamin Votteler 1<br />
The loss of tooth structure may have many causes, such as caries, abrasion or even dental trauma. Restoring the resulting<br />
dental defect by means of an adhesively luted ceramic restoration normally offers the best possible solution. Various<br />
methods are used to achieve this goal, such as layering over refractory dies and CAD/CAM applications. The press technique<br />
(hot pressing) presents an additional option and this method is discussed in detail in this report.<br />
Introduction<br />
The press technique provides an ideal solution for creating<br />
veneers: high quality (shade, accuracy) can be achieved<br />
using an efficient working method. Whether or not a<br />
restoration seamlessly blends into the natural oral<br />
environment depends not only on the layering scheme<br />
applied by the dental technician. The press ceramic used<br />
to create the restoration also has an essential effect on the<br />
final outcome. The new IPS e.max ® Press Impulse kit<br />
features new press ingots, which enable dental technicians<br />
to attain impressive results.<br />
Case Report<br />
A 19-year-old female patient presented <strong>with</strong> a horizontal<br />
fracture in the incisal region <strong>with</strong> enamel splitting, which<br />
extended far into the palatal zone. This injury happened<br />
when the patient was 14 years old and fell onto the edge<br />
of a chair whilst playing.<br />
However, there was good fortune in bad fortune: the<br />
two damaged anterior teeth remained vital. The teeth had<br />
been restored <strong>with</strong> temporary composite restorations to<br />
bridge the time until the patient reached the end of her<br />
1 MDT, Pfullingen/Germany<br />
Correspondence:<br />
Benjamin Votteler, MDT, Dentaltechnik Votteler GmbH & Co. KG,<br />
Arbach ob der Straße 10, 72793 Pfullingen,Germany<br />
benni@votteler.eu<br />
www.votteler.eu<br />
50 INTERNATIONAL DENTISTRY – AFRICAN EDITION VOL. 1, NO. 2<br />
growth phase. Now, it was time to provide her <strong>with</strong> a<br />
permanent restoration (Fig 1). As the shade of the anterior<br />
teeth was slightly brighter than the A1 shade in the dentin,<br />
or the dentin body, selecting appropriate press ingots was<br />
no easy task.<br />
In search of the correct material<br />
Normally, I select an ingot that is one colour tone lighter<br />
than the actual tooth shade. This was not possible here.<br />
The Bleach BL ingots of the IPS e.max ® Press LT (Low<br />
Translucency) range did not match the requirements of this<br />
case. In addition, the saturation of the Bleach ingot is too<br />
high to be suitable for veneers on non-discoloured tooth<br />
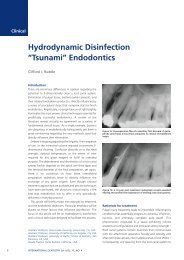
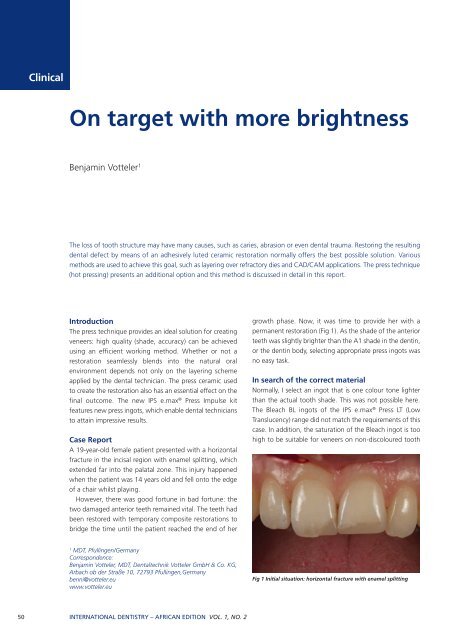
Fig 1 Initial situation: horizontal fracture <strong>with</strong> enamel splitting
Fig 2 Conservative preparation design for 360° veneers Fig 3 The IPS e.max Press Impulse copings modelled in wax<br />
preparations and prevents the natural colour of the<br />
remaining tooth structure to shine through the restoration.<br />
Even the excellent light optical properties of the IPS e.max<br />
Press ® HT (High Translucency) press ingots were not<br />
suitable for this patient case.<br />
As luck would have it, however, I attended an in-house<br />
continuing education course on all-ceramics held for<br />
opinion leaders at Ivoclar Vivadent just a few days before<br />
and there I received the first press ingots from the IPS e.max<br />
Press Impulse kit and was also able to see these materials<br />
in situ in the oral cavity of a patient. The Impulse ingots are<br />
available in three Value shades <strong>with</strong> different degrees of<br />
<strong>brightness</strong> and in two Opal shades <strong>with</strong> different levels of<br />
opacity.<br />
I decided to use an individual layering technique for this<br />
patient case. The new Value ingots appeared to be the<br />
perfect material for this purpose. The translucency of these<br />
ingots is between that of the IPS e.max Press HT and the IPS<br />
e.max Press LT ingots.<br />
Clinical<br />
In addition, they offer a natural fluorescence. The<br />
chroma gradation is divided into three degrees (V1, V2,<br />
V3).<br />
The following information was essential to produce the<br />
restoration: the shade of Value 1 is between HT BL1 and HT<br />
BL2 and the shades of Value 2 and Value 3 are between LT<br />
A1 and HT BL1. From my viewpoint, these ingots perfectly<br />
fill the gap in the range of ingots, providing the levels of<br />
<strong>brightness</strong> that hitherto have been missing. The opalescent<br />
characteristics of the ingots are comparable to those of the<br />
IPS e.max Press HT materials.<br />
Conservative tooth preparation was carried out on both<br />
the labial and palatal side to place 360° veneers (Fig 2).<br />
After an impression had been taken and a model created,<br />
the frameworks were designed in wax featuring a thickness<br />
of 0.4 to 0.5 mm (Fig 3) and pressed <strong>with</strong> the IPS e.max<br />
Press Impulse ingots in Value 1 (Fig 4 and 5). The press<br />
temperature of the ingots corresponds to that of the HT<br />
ingots. The reaction layer is almost entirely removed when<br />
Fig 4 Copings after pressing of the ingots Fig 5 The pressed veneers are approx. 0.6 mm thick.<br />
INTERNATIONAL DENTISTRY – AFRICAN EDITION VOL. 1, NO. 2 51
Votteler<br />
Fig 7 First, IPS e.max Ceram Dentin and Transpa Neutral were<br />
applied.<br />
Fig 9 Reconstruction of the mamelons<br />
Fig 6. The frameworks show a lifelike opalescence.<br />
the restoration is divested using glass beads (50 μm) at 2<br />
bar pressure. In my opinion, using an appropriate furnace<br />
has a major effect on the outcome – for instance, the<br />
Programat ® EP 5000 ensures gentle treatment of the<br />
material during the press cycle (Fig 6).<br />
Structured layering<br />
After foundation firing, the cervical and proximal areas<br />
were characterized <strong>with</strong> IPS e.max ® Ceram stains (Shades<br />
52 INTERNATIONAL DENTISTRY – AFRICAN EDITION VOL. 1, NO. 2<br />
Fig 8 The youthful opalescent properties of the natural teeth can be<br />
mimicked in the proximal and incisal areas <strong>with</strong> Effect materials.<br />
Fig 10 The mamelons were built up using a mixture of Effect<br />
materials which were defined beforehand.<br />
and Essences). The dentin body was built up. Transpa<br />
Neutral (TN) was applied in the incisal area to reduce the<br />
degree of Saturation (Fig 7 and 8). Opal Effect 1 (OE 1) was<br />
applied to the proximal and incisal areas to mimic the<br />
youthful opalescent effects (Fig 9 and 10).<br />
The structure of the mamelons caught my eye already<br />
during the shade selection process. A mixture of IPS e.max<br />
Ceram Mamelon materials enabled a lifelike reproduction<br />
of the mamelon. A soft transition between the internal
Votteler<br />
Fig 11 Layered veneers on the model Fig 12 Try-in in the patient’s mouth<br />
Fig 13 Gold powder facilitates the final contouring and shaping of<br />
the restorations.<br />
structures and the body was achieved <strong>with</strong> Dentin/OE3 and<br />
the <strong>brightness</strong> value was adjusted. Various Enamel and<br />
Opal materials were used to complete the tooth shape on<br />
the labial side.<br />
To finish off the layering procedure for the main firing<br />
cycle, the restoration was framed <strong>with</strong> a layer of dentin to<br />
create a halo. The veneer was slightly over-contoured to<br />
compensate for material shrinkage. As a result, correction<br />
firing was obsolete (Fig 11).<br />
As this was the first time I used the new Value ingots for<br />
a patient case, I was keen to check the esthetic effect in<br />
the patient’s mouth. The image of the try-in clearly shows<br />
that a balanced translucent effect has been achieved in the<br />
restoration: no greying and no inappropriately intense<br />
masking of the substrate can be seen (Fig 12).<br />
High precision finishing<br />
Finishing the form and functional aspects of the restoration<br />
is an essential part of my work. The surface was given its<br />
final structure <strong>with</strong> rotary instruments before glaze firing<br />
54 INTERNATIONAL DENTISTRY – AFRICAN EDITION VOL. 1, NO. 2<br />
Fig 14 Completed veneers on the model<br />
was conducted – gold powder is of particular use in this<br />
respect (Fig 13). After glaze firing, the proximal contacts<br />
and the occlusion were checked on the uncut model. To<br />
complete the procedure in the dental laboratory, the<br />
restoration was manually polished on a polishing unit<br />
using a fine pumice/Sidol mixture and a water soaked felt<br />
wheel (Fig 14).<br />
Incorporating the restoration – a moment of<br />
suspense<br />
The enamel surface of the prepared teeth were etched <strong>with</strong><br />
37% orthophosphoric acid for thirty seconds and then<br />
rinsed <strong>with</strong> a water/air spray for sixty seconds. The threecomponent<br />
bonding agent (Syntac ® Classic) was applied<br />
according to the manufacturer’s directions for use. At the<br />
same time, the all-ceramic restorations were etched <strong>with</strong><br />
9% hydrofluoric acid and after twenty seconds carefully<br />
rinsed <strong>with</strong> water.<br />
Next, the restorations were cleaned <strong>with</strong> alcohol and<br />
subsequently silanated <strong>with</strong> Monobond Plus. Note: the
Votteler<br />
Fig 15 and 16 The restorations in situ optimally blend into the natural dentition<br />
Fig 17 The result: harmonious contours of the lips ... Fig 18 … veneers <strong>with</strong> lifelike opalescent and ideal <strong>brightness</strong><br />
effects and ...<br />
restorations should be protected from light after<br />
application of the bonding agent (Heliobond ® in this case).<br />
To prevent the conditioned surfaces from becoming<br />
contaminated, they should be etched and silanated not in<br />
the dental laboratory but immediately before they are<br />
placed in the oral cavity in the dental practice.<br />
A purely light-curing luting composite (Variolink ®<br />
Veneer), which is available in various degrees of bright ness,<br />
is well suited for the cementation of these veneers.<br />
As an advantage, light-curing composites give users<br />
ample time to remove excess material.<br />
After the 360° veneers were conditioned and filled <strong>with</strong><br />
luting material, they were accurately placed on the tooth<br />
preparations and excess material was re - moved.<br />
Dental floss was used to remove surplus material from<br />
the interdental spaces, a brush for the margins and a small<br />
foam sponge for the palatal areas. Next, the veneers were<br />
polymerized to the tooth structure from the palatal and<br />
vestibular side for five seconds each side.<br />
56 INTERNATIONAL DENTISTRY – AFRICAN EDITION VOL. 1, NO. 2<br />
Fig 19 … ultimately a happy patient.
The operator applied Liquid Strip to the cement joints to<br />
prevent contact <strong>with</strong> oxygen (oxygen inhibition layer). If<br />
this precaution is not taken, there is a risk that the cement<br />
joints may discolour after a fairly short time.<br />
Finally, the restorations were polymerized for sixty<br />
seconds from each side and the retraction cords were<br />
removed. Checking the sulci for remaining composite<br />
luting material is essential at this point. After the static and<br />
dynamic occlusion had been inspected, the treatment was<br />
completed (Figs 15 to 19).<br />
Votteler<br />
Conclusion<br />
The new IPS e. max Press Impulse Value ingots feature a<br />
translucency that lies between that of the IPS e.max Press<br />
HT and IPS e.max Press LT ingots. The fluorescent and<br />
opalescent properties of the press material optimally<br />
enhance the esthetics of the restoration. Like all the other<br />
materials from the IPS e.max Press range, these ingots offer<br />
a typical flexural strength of 400 MPa and therefore give<br />
the required peace of mind to the treatment team.<br />
Reprinted <strong>with</strong> permission from Reflect 01/11