Print this Article - Mel Bay's Harmonica Sessions
Print this Article - Mel Bay's Harmonica Sessions
Print this Article - Mel Bay's Harmonica Sessions

You also want an ePaper? Increase the reach of your titles
YUMPU automatically turns print PDFs into web optimized ePapers that Google loves.
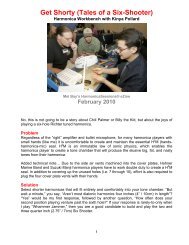
Improving on a Good Thing<br />
“Monster <strong>Harmonica</strong> Workbench” with Kinya Pollard<br />
<strong>Mel</strong> Bay’s <strong>Harmonica</strong><strong>Sessions</strong>® eZine<br />
April 2007<br />
Last issue I reviewed the Seydel Blues Soloist Pro <strong>Harmonica</strong><br />
(#11301A @ $35.95). Readers will remember that I was not satisfied<br />
that <strong>this</strong> instrument was living up to its potential.<br />
This month I’ll begin work on “customizing” the Blues Soloist Pro. Numerous proven<br />
strategies will be applied in an attempt to create my next favorite harp.<br />
For new readers, please refer to past issues of <strong>Harmonica</strong> <strong>Sessions</strong>, Monster <strong>Harmonica</strong><br />
Workshop for a listing of required tools and recommended set up techniques.<br />
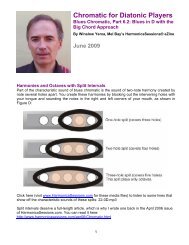
Sizing (a.k.a. Embossing)<br />
A term, I believe originally coined by Master <strong>Harmonica</strong> Craftsman Pat Missin, is a<br />
technique of “shrinking” the size of the reed plate slots. Reducing the tolerance surrounding<br />
the reed will minimize air leakage, increase compression, and enable the player to achieve<br />
extraordinary volume with less effort.<br />
tuning fork, a socket, etc.)<br />
Notice the amount of light that is shining through the<br />
gaps surrounding the reed before the sizing technique<br />
is applied.<br />
Utilizing the handle end of a pair of tweezers, apply<br />
slight pressure and gently stroke the entire length of<br />
the reed slot in a back and forth motion. Due to the<br />
radius of the tweezers handle, the reed will be pushed<br />
into the slot as you make your way toward the rivet<br />
end of the reed. This will limit sizing to approximately<br />
90% of the reed slot. Not sizing the last 10% will be<br />
negligible.<br />
(Tip: almost any small radius implement will work well<br />
as a sizing tool, for example, the ball end handle of a<br />
1
Divot<br />
My modification of the tip scooping<br />
technique is to machine crescentshaped<br />
divots into the tip of the reed<br />
slot. This technique turbo charges the<br />
air directly underneath the free end of<br />
the reed where there is the most<br />
leverage. Another strategy that will<br />
lead us towards harmonica bliss!<br />
The reduction of light surrounding the reed after the<br />
sizing process is significantly less.<br />
Profiling<br />
This technique incorporates both setting the reed curvature and calibrating the gap (offset).<br />
Mastering these techniques will perfectly match your playing style to your harmonica;<br />
thereby, giving you the sensation of playing an instrument that was built personally for you.<br />
Sectioning the reed into thirds is an excellent<br />
strategy for ensuring a methodical approach to<br />
reed curling. The reed plinking tool (modified<br />
feeler gauge) on the left raises the free end of the<br />
reed and applies pressure to the apex of the<br />
curve (try visualizing a saber striking an opponent<br />
during a fencing match–see the curvature?) The<br />
brass stock shown on the right, gently massages<br />
(locks in) the curvature into the reed.<br />
2
Refer to the “The Tao of <strong>Harmonica</strong> Customizing” April 2004 issue for detailed instruction on<br />
Reed Curling and Gapping.<br />
I hate to do <strong>this</strong> to you, but <strong>this</strong> issue is going to end as a cliffhanger. Stay tuned ‘til our next<br />
issue of Monster <strong>Harmonica</strong> Workbench when I will publish the results of <strong>this</strong> harmonicacustomizing<br />
jamboree...<br />
Stay tuned!<br />
Kinya<br />
The Harpsmith<br />
3