
You also want an ePaper? Increase the reach of your titles
YUMPU automatically turns print PDFs into web optimized ePapers that Google loves.
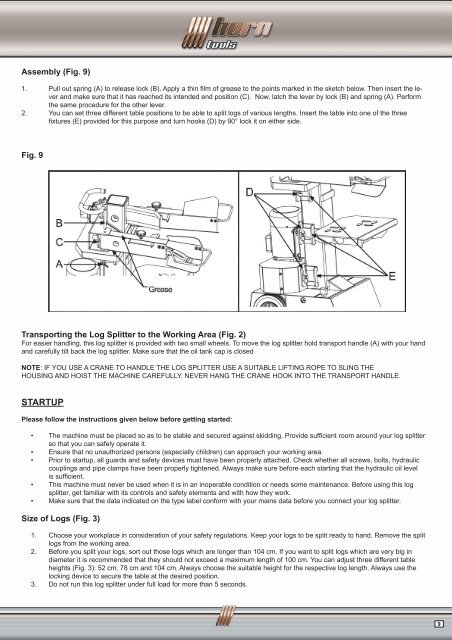
Assembly (Fig. 9)<br />
1. Pull out spring (A) to release lock (B). Apply a thin film of grease to the points marked in the sketch below. Then insert the le-<br />
ver and make sure that it has reached its intended end position (C). Now, latch the lever by lock (B) and spring (A). Perform<br />
the same procedure for the other lever.<br />
2. You can set three different table positions to be able to split logs of various lengths. Insert the table into one of the three<br />
fixtures (E) provided for this purpose and turn hooks (D) by 90° lock it on either side.<br />
Fig. 9<br />
Transporting the Log Splitter to the Working Area (Fig. 2)<br />
For easier handling, this log splitter is provided with two small wheels. To move the log splitter hold transport handle (A) with your hand<br />
and carefully tilt back the log splitter. Make sure that the oil tank cap is closed<br />
NOTE: IF YOU USE A CRANE TO HANDLE THE <strong>LOG</strong> <strong>SPLITTER</strong> USE A SUITABLE LIFTING ROPE TO SLING THE<br />
HOUSING AND HOIST THE MACHINE CAREFULLY. NEVER HANG THE CRANE HOOK INTO THE TRANSPORT HANDLE.<br />
STARTUP<br />
Please follow the instructions given below before getting started:<br />
• The machine must be placed so as to be stable and secured against skidding. Provide sufficient room around your log splitter<br />
so that you can safely operate it.<br />
• Ensure that no unauthorized persons (especially children) can approach your working area.<br />
• Prior to startup, all guards and safety devices must have been properly attached. Check whether all screws, bolts, hydraulic<br />
couplings and pipe clamps have been properly tightened. Always make sure before each starting that the hydraulic oil level<br />
is sufficient.<br />
• This machine must never be used when it is in an inoperable condition or needs some maintenance. Before using this log<br />
splitter, get familiar with its controls and safety elements and with how they work.<br />
• Make sure that the data indicated on the type label conform with your mains data before you connect your log splitter.<br />
Size of Logs (Fig. 3)<br />
1. Choose your workplace in consideration of your safety regulations. Keep your logs to be split ready to hand. Remove the split<br />
logs from the working area.<br />
2. Before you split your logs, sort out those logs which are longer than 104 cm. If you want to split logs which are very big in<br />
diameter it is recommended that they should not exceed a maximum length of 100 cm. You can adjust three different table<br />
heights (Fig. 3): 52 cm, 78 cm and 104 cm. Always choose the suitable height for the respective log length. Always use the<br />
locking device to secure the table at the desired position.<br />
3. Do not run this log splitter under full load for more than 5 seconds.<br />
9