
You also want an ePaper? Increase the reach of your titles
YUMPU automatically turns print PDFs into web optimized ePapers that Google loves.
<strong>Broken</strong> <strong>Lozenge</strong> <strong>Twill</strong> <strong>Weaving</strong><br />
10 th Century – England<br />
(Glossary of weaving terms can be found on page 4)<br />
Introduction<br />
As part of the One Step Further Challenge for Arn<br />
Hold, I decided to try to weave enough fabric to<br />
actually make a dress out of (for me!). This project<br />
was fraught with complications from everything to me<br />
being scissors-happy while measuring/cutting the<br />
warp threads to major warp thread tension issues due<br />
to the winding process to my taking time off due to<br />
being elevated to Baroness and being pregnant, tired<br />
and cranky! But the weaving is DONE (and turned<br />
into a dress!)<br />
Project Information<br />
The weave for this project was based off of a tenth<br />
century textile find from Coppergate, York. I searched<br />
for a fine-spun strong wool yarn and chose a worsted<br />
20/2 Jaggerspun Maineline yarn (Claret and<br />
Raspberry colored). The yarn was fine enough that I<br />
decided on a sett of 27 EPI and PPI.<br />
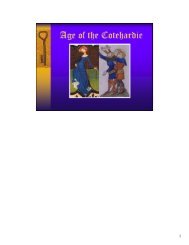
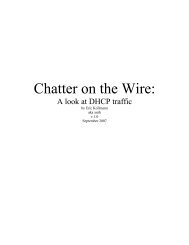
The weaving pattern that I based this off is a broken<br />
lozenge twill pattern (Fig.3). The pattern created is<br />
diamond (or lozenge) shaped but the “broken” refers to<br />
the fact that the various lines of the pattern are<br />
disconnected. (Fig. 2)<br />
The weaving was done on my (old!) four-harness jack<br />
floor loom, which can produce fabric up to 3’ wide<br />
(before fulling).<br />
Figure 3- <strong>Broken</strong> <strong>Lozenge</strong> <strong>Twill</strong> Pattern<br />
Figure 1 - The horizontal loom illustrated in the<br />
Romance of Alexander, ca. 1250 C.E. The loom has<br />
treadles bound to a pair of linked shafts and a reed<br />
while the weaver holds a boat shuttle. (The pattern<br />
even appears to be a lozenge!)<br />
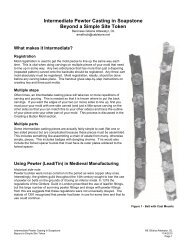
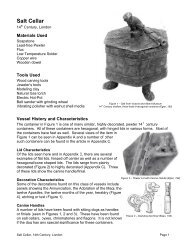
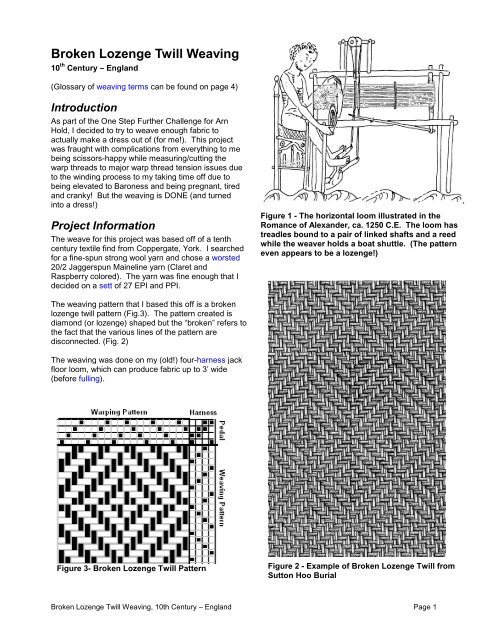
Figure 2 - Example of <strong>Broken</strong> <strong>Lozenge</strong> <strong>Twill</strong> from<br />
Sutton Hoo Burial<br />
<strong>Broken</strong> <strong>Lozenge</strong> <strong>Twill</strong> <strong>Weaving</strong>, 10th Century – England Page 1
<strong>Weaving</strong> History<br />
<strong>Broken</strong> <strong>Lozenge</strong> <strong>Twill</strong> Pattern<br />
The pattern used here has been found as early as an Iron Age burial in Karlby Mose, Denmark. Several<br />
examples have been found at Roman sites in Britain such as Hadrian’s Wall and Corbridge. Four examples<br />
were found in the Sutton Hoo Ship Burial (early Saxon England, East Anglia, ca. 625 AD). Dozens of<br />
examples have been found in wool and linen from Viking sites. Examples of this type of weave were found<br />
into the twelfth century. This project was based most specifically on one of the wool textiles found at<br />
Coppergate in York from the 10 th century (#1307 - Walton, Penelope). The sett of this project matches the<br />
same range of sett found on this Coppergate wool textile.<br />
Fabric of this sort would have been used in clothing such as cloaks,<br />
gowns, tunics and hose as well as items such as furnishings, wall<br />
hangings, beds and curtains.<br />
Equipment and Tools<br />
The type of loom that I used for this project is a floor loom that<br />
closely resembles the counterbalance floor loom (Fig. 1 and Fig. 4)<br />
that came into wide use in Europe during the 11 th century. While the<br />
technology involved in the counterbalance floor loom helped to<br />
streamline cloth production, it was much simpler on a loom of this<br />
type to create a tabby or simple weave using only two harnesses.<br />
Four harnesses would require three sets of pulleys where two<br />
harnesses required only one set. Once this type of loom took over<br />
there were considerably fewer examples of this broken lozenge twill<br />
weave, which requires four harnesses. This pattern was much more<br />
likely to be woven on an earlier period warp weighted loom (Fig 5).<br />
Extra harnesses simply required additional heddle rods.<br />
Constructing a warp weighted loom is one of my other projects but<br />
the end product is the same regardless of the loom that it was woven on.<br />
For the shuttle, used to carry the weft thread through the shed, I used a boat<br />
shuttle. This sort of shuttle has a bobbin wound with weft thread inside a<br />
boat shaped enclosure. As the shuttle passed through the shed, the bobbin<br />
unwinds and releases more weft thread. This can only work on a horizontal<br />
loom. This type of shuttle was in use by at least the 13 th century (Fig. 1).<br />
With a warp-weighted loom, a stick shuttle would have likely been used.<br />
This is basically a stick that the weft thread would be wound around and<br />
manually unwound before passing the shuttle through the shed.<br />
Additionally, the warp-weighted loom would have needed a weaver’s sword<br />
to pack the weft thread in. On a horizontal loom, the reed fills this function.<br />
The reed is a comb-like fixture that both evenly spaces the warp threads and<br />
is used to pack in the weft.<br />
Materials<br />
Figure 4 - Counterbalance Floor Loom<br />
Figure 5 – Warp Weighted<br />
Wool was one of the most prevalently available textiles in Europe throughout the Middle Ages. <strong>Weaving</strong><br />
was usually done with worsted yarn rather than woolen. Worsted yarn is spun from longer staple-length<br />
fibers that are combed so as to be parallel before the yarn is spun. This yarn (and fabric made from the<br />
yarn) tends to be strong and smooth. Woolen yarn is spun from the shorter fibers that are generally carded<br />
such that the fibers do not line up which results in yarn (and fabric) that is more suited to sprang or knitting<br />
as it is less strong and tends to be fuzzier. Worsted yarn is needed especially for the warp threads because<br />
of the tension put on the threads during the weaving process either by the attached weights or by winding<br />
up the excess on the horizontal loom. The yarn that I used is worsted wool. The colors that I chose were<br />
two shades of a maroon color (to better show the weave pattern). This type of color would have been<br />
achieved with madder and/or brazilwood, possibly with an iron post-mordant, or from a dye extracted from<br />
bugs such as kermes, lac or cochineal.<br />
<strong>Broken</strong> <strong>Lozenge</strong> <strong>Twill</strong> <strong>Weaving</strong>, 10th Century – England Page 2
Selvedges<br />
There are a number of ways to reinforce the selvedge (edge) of the fabric. One of the simplest ways is to<br />
use a floating warp thread cord. This is a cord of several warp threads (in this case, two) that is threaded<br />
through the reed but not through any heddles. The weft thread is sent around the floating warp cord on<br />
every pass. Otherwise, depending on the pattern, there may be warp threads on the outside that are left<br />
outside the weave on a pass. This technique is seen in many 13 th century weaving fragments. I do not<br />
currently have information on the selvedges found at the Coppergate site, but the technique would be as<br />
easy to do on a warp weighted loom as on a floor loom, so it is reasonable to assume that it would have<br />
been used. Because of the slight draw-in on the selvedges, it was also custom to double up the pattern on<br />
the outer 6-8 threads, which I also did here.<br />
Process – “I am smarter than the string. (barely)”<br />
The lengthiest and most difficult part of any weaving project is warping the loom. The first step to this was<br />
to measure and cut my warp threads. I used a simple warping board (after adding some more pegs for<br />
additional length) as found all throughout period to cut my 972 ends 11.5 yards long. There are various<br />
tricks to doing this that help in containing the rat’s nest of string that every weaving project wants to turn<br />
into. Properly tying the bundle of warp threads as well as creating a tight warp chain are two valuable skills!<br />
The next step is to sley the reed. The reed is used both as a beater as well as a guide for the warp<br />
spacing. My reed has a spacing of 10 dents (or holes) per inch. In order to get a spacing of 27 ends per<br />
inch, I sleyed the reed with a pattern of 2-3-3 warp threads per hole.<br />
The most concentration is required when threading the heddles. Threading the warp threads into heddles<br />
on the correct harness (in the correct order, even!) is what creates the pattern when various harnesses are<br />
raised. My beloved and patient husband was my String Monkey and helped me for the project by handing<br />
me the next thread in line so I could add it to the correct harness.<br />
Finally the warp threads are tied on to the back beam and wound up, taking all of the warp thread bundles<br />
through the reed and heddles, so they are straight and even. This is where another trick came in. If there<br />
are tangles building up in your warp threads, rather than trying to comb them out (Noooo!) take the whole<br />
bundle and give it a good yank. This loosens the tangles so the winding can continue. Once that is done,<br />
the warp threads are tied onto the front beam at an even tension. There was a bit of trouble in the winding<br />
of this project, as the warp threads on the ends did not stay lined up properly on top of the bundle (like a<br />
cylinder). They fell off and, consequentially, had a smaller diameter circle than the inner threads. This<br />
created major warp thread tensioning issues that required most of my household’s dishtowels to solve! (I<br />
stuffed them in the center to take up the slack created by this issue). This made weaving go rather slowly<br />
and caused some unevenness in the pattern.<br />
Now weave…<br />
…a lot.<br />
<strong>Weaving</strong> on a horizontal loom involves pressing down the appropriate treadles, per the desired pattern,<br />
which will raise up a set (or sets) of warp threads, creating an opening between the top and bottom threads<br />
called the shed. The shuttle is passed through the shed. The next treadle(s) is then pressed. After using<br />
the reed to pack in the previous pass, the shuttle is sent through again.<br />
The difference in the actual weaving process between my floor loom and a warp-weighted loom (other than<br />
the mechanism itself) is mainly that, on a floor loom, I pack the weave toward me. The woven fabric is<br />
gathered by rolling it up on the front beam. On a warp-weighted loom, the weave is packed upward and the<br />
woven fabric is gathered by rolling it on the top beam (which is a considerably more involved process).<br />
Rather than finishing my fabric by waulking it (wetting it and stomping on it to get the fabric to full), due to<br />
time constraints I chose to use a washing machine to full it. This process took about 10 minutes, rather<br />
than all day.<br />
<strong>Broken</strong> <strong>Lozenge</strong> <strong>Twill</strong> <strong>Weaving</strong>, 10th Century – England Page 3
Lessons Learned<br />
<strong>Weaving</strong> is all about attention to detail. Details like, in your excitement about finishing the measuring of the<br />
last bunch of warp threads on the warping board, do not miss the trailing thread with your scissors and,<br />
instead, cut halfway through the bundle itself. Also, when using a devoted and dedicated best friend as<br />
your string monkey during the winding on phase of warping the loom, do not assume that she knows what<br />
you want and then later find out that your tension is going to have major issues because it was wound on all<br />
wonky! It’s all about the details!<br />
Glossary<br />
Dent - One space in a reed. Each space can hold one or more threads. Most fabrics are evenly spaced, i.e.<br />
two threads per dent or double-sleyed, three threads per dent or triple-sleyed.<br />
Dents Per Inch (DPI) - On a reed, the number of spaces in one inch. See Dent.<br />
Ends Per Inch (EPI) - See Sett. The number of warp threads in an inch.<br />
Float - A thread which is not caught at every intersection. Can be warp floats or weft floats. Long floats tend<br />
to catch on things and weaken the fabric.<br />
Full - Fulling is the process of fluffing up an already woven or knitted piece of woolen cloth. It's to be<br />
distinguished from felting, which takes raw fleece and puts it through the same process without having any<br />
initial structure.<br />
Harness - A device on a horizontal loom that holds a set of heddles. Doesn't really apply to smaller looms.<br />
Heddle - Anything you put warp threads through to create a shed; rigid heddles are usually made of wood,<br />
bone or (modernly) plastic or metal. Heddles on warp weighted looms, inkle looms, tapestry looms, and<br />
some horizontal looms are made of string.<br />
Picks Per Inch (PPI) - The number of weft threads in an inch.<br />
Reed - A comb that goes in the warp and is used to beat the fabric as it is woven. Only applies to horizontal<br />
looms. They are usually metal today but were originally made by fixing slats of reeds between two bars at<br />
even intervals.<br />
Sett - The spacing of the warp threads. The reed on a horizontal loom determines this.<br />
Shed - The opening created when you pull some warp threads up and some down. Different types of looms<br />
create sheds with different methods.<br />
Sley – A verb used to describe the process of pulling the warp threads through the reed.<br />
Thread Count - A sum of the warp threads plus the weft threads in one square inch or centimeter. EPI +<br />
PPI = Thread Count Per Inch.<br />
Warp - Warp threads are the threads that are held taut by the frame. If they're too tight they can "warp" your<br />
weaving frame. You can’t weave unless you are “warped”.<br />
Weft - Weft threads are the threads you manipulate through the warp to make fabric. They go from right to<br />
"weft". Sometimes also called "woof".<br />
Worsted - Yarn (and fabric) made of long fibers, combed, and tightly twisted in spinning.<br />
<strong>Broken</strong> <strong>Lozenge</strong> <strong>Twill</strong> <strong>Weaving</strong>, 10th Century – England Page 4
Bibliography<br />
Figure 6 - Loom Diagrams<br />
Carroll, Diane Lee. Dating the Foot-Powered Loom: The Coptic Evidence. American Journal of Archaeology<br />
> Vol. 89, No. 1, Centennial Issue (Jan., 1985), pp. 168-173<br />
Crowfoot, Elisabeth, Frances Pritchard, and Kay Staniland. The Museum of London: Textiles and Clothing c<br />
1150 – c 1450. London. The Boydell Press, 2001.<br />
Jenkins, David. The Cambridge History of Western Textiles. Cambridge University Press. 2003.<br />
Krupp, Christina. A Field Guide to <strong>Lozenge</strong> <strong>Twill</strong> Weave in Early Northern Europe. April 2006.<br />
http://www.mountainfreehold.org/arts/Loz<strong>Twill</strong>.pdf<br />
Romance of Alexander. Trinity College, Cambridge, MS O.9.34 f.32b.<br />
Walton, Penelope. Textiles, Cordage and Raw Fibre from 16-22 Coppergate. London, 1989.<br />
<strong>Broken</strong> <strong>Lozenge</strong> <strong>Twill</strong> <strong>Weaving</strong>, 10th Century – England Page 5
<strong>Weaving</strong> Project Info<br />
Project: One Step Further Project <strong>Weaving</strong><br />
Yarn Info:<br />
Yarn Jagerspun Maine Line<br />
Fiber Content Wool<br />
Color Raspberry/Claret<br />
Size 20/2<br />
Yards per Pound 5600<br />
Yarn Measurements:<br />
Desired Length (inches) 322<br />
Starting Width (inches) 36<br />
EPI 27<br />
PPI 27<br />
YPP 5600<br />
Pounds needed - Warp 1.97<br />
Pounds needed - Weft 1.83<br />
Total Pounds Needed 3.80<br />
# Ends Needed 972<br />
Warp Length (yds) 11.52<br />
Order of Sley in Reed 2-3-3<br />
Pattern Info:<br />
<strong>Broken</strong> Diamond <strong>Twill</strong><br />
(length/.85 + 36")*width*(sett)<br />
Pounds Needed = -------------------------------<br />
36*ypp<br />
<strong>Broken</strong> <strong>Lozenge</strong> <strong>Twill</strong> <strong>Weaving</strong>, 10th Century – England Page 6