Intermediate Pewter Casting in Soapstone Beyond a ... - Cable ONE
Intermediate Pewter Casting in Soapstone Beyond a ... - Cable ONE
Intermediate Pewter Casting in Soapstone Beyond a ... - Cable ONE

Create successful ePaper yourself
Turn your PDF publications into a flip-book with our unique Google optimized e-Paper software.
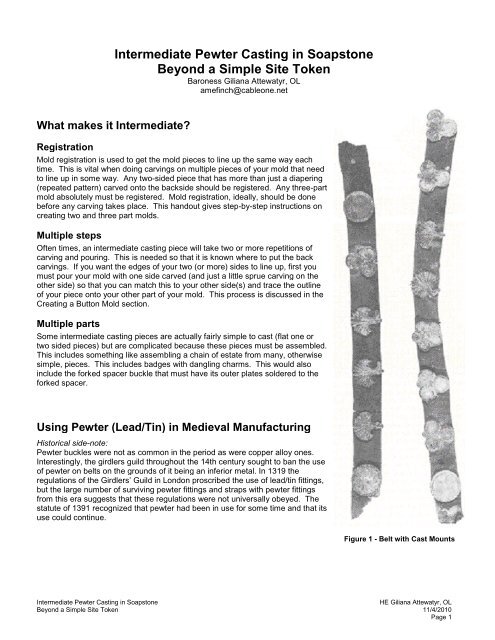
What makes it <strong>Intermediate</strong>?<br />
Registration<br />
<strong>Intermediate</strong> <strong>Pewter</strong> <strong>Cast<strong>in</strong>g</strong> <strong>in</strong> <strong>Soapstone</strong><br />
<strong>Beyond</strong> a Simple Site Token<br />
Baroness Giliana Attewatyr, OL<br />
amef<strong>in</strong>ch@cableone.net<br />
Mold registration is used to get the mold pieces to l<strong>in</strong>e up the same way each<br />
time. This is vital when do<strong>in</strong>g carv<strong>in</strong>gs on multiple pieces of your mold that need<br />
to l<strong>in</strong>e up <strong>in</strong> some way. Any two-sided piece that has more than just a diaper<strong>in</strong>g<br />
(repeated pattern) carved onto the backside should be registered. Any three-part<br />
mold absolutely must be registered. Mold registration, ideally, should be done<br />
before any carv<strong>in</strong>g takes place. This handout gives step-by-step <strong>in</strong>structions on<br />
creat<strong>in</strong>g two and three part molds.<br />
Multiple steps<br />
Often times, an <strong>in</strong>termediate cast<strong>in</strong>g piece will take two or more repetitions of<br />
carv<strong>in</strong>g and pour<strong>in</strong>g. This is needed so that it is known where to put the back<br />
carv<strong>in</strong>gs. If you want the edges of your two (or more) sides to l<strong>in</strong>e up, first you<br />
must pour your mold with one side carved (and just a little sprue carv<strong>in</strong>g on the<br />
other side) so that you can match this to your other side(s) and trace the outl<strong>in</strong>e<br />
of your piece onto your other part of your mold. This process is discussed <strong>in</strong> the<br />
Creat<strong>in</strong>g a Button Mold section.<br />
Multiple parts<br />
Some <strong>in</strong>termediate cast<strong>in</strong>g pieces are actually fairly simple to cast (flat one or<br />
two sided pieces) but are complicated because these pieces must be assembled.<br />
This <strong>in</strong>cludes someth<strong>in</strong>g like assembl<strong>in</strong>g a cha<strong>in</strong> of estate from many, otherwise<br />
simple, pieces. This <strong>in</strong>cludes badges with dangl<strong>in</strong>g charms. This would also<br />
<strong>in</strong>clude the forked spacer buckle that must have its outer plates soldered to the<br />
forked spacer.<br />
Us<strong>in</strong>g <strong>Pewter</strong> (Lead/T<strong>in</strong>) <strong>in</strong> Medieval Manufactur<strong>in</strong>g<br />
Historical side-note:<br />
<strong>Pewter</strong> buckles were not as common <strong>in</strong> the period as were copper alloy ones.<br />
Interest<strong>in</strong>gly, the girdlers guild throughout the 14th century sought to ban the use<br />
of pewter on belts on the grounds of it be<strong>in</strong>g an <strong>in</strong>ferior metal. In 1319 the<br />
regulations of the Girdlers’ Guild <strong>in</strong> London proscribed the use of lead/t<strong>in</strong> fitt<strong>in</strong>gs,<br />
but the large number of surviv<strong>in</strong>g pewter fitt<strong>in</strong>gs and straps with pewter fitt<strong>in</strong>gs<br />
from this era suggests that these regulations were not universally obeyed. The<br />
statute of 1391 recognized that pewter had been <strong>in</strong> use for some time and that its<br />
use could cont<strong>in</strong>ue.<br />
Figure 1 - Belt with Cast Mounts<br />
<strong>Intermediate</strong> <strong>Pewter</strong> <strong>Cast<strong>in</strong>g</strong> <strong>in</strong> <strong>Soapstone</strong> HE Giliana Attewatyr, OL<br />
<strong>Beyond</strong> a Simple Site Token 11/4/2010<br />
Page 1
Register<strong>in</strong>g the Mold<br />
Mold Registration Tips:<br />
Get your pieces very flat. The better your mold is registered, the less cleanup your end piece will need!<br />
Use a marker to note (roughly) how your mold will go together <strong>in</strong> the end as well as where you wish to drill your<br />
registration holes. This will avoid confusion dur<strong>in</strong>g drill<strong>in</strong>g that Murphy will use to make you drill your<br />
registration holes <strong>in</strong> the wrong place!!<br />
Use air vents from your registration drill holes.<br />
Open up the outer side of your registration drill holes to give your ladle a larger target.<br />
Get your pewter extra hot before pour<strong>in</strong>g.<br />
Registration Troubleshoot<strong>in</strong>g Tips:<br />
If you break your mold dur<strong>in</strong>g drill<strong>in</strong>g, sometimes there is room to move the hole further <strong>in</strong>.<br />
If you pour your p<strong>in</strong> but the nub doesn't form (and you can't get the p<strong>in</strong> out 'cause you drilled the extra angled<br />
bit like I told you to), you can drill or melt out the pewter of the poured p<strong>in</strong> and try aga<strong>in</strong>.<br />
If you do need to melt out a registration p<strong>in</strong> you will have to get it VERY HOT and then tap out the metal as it<br />
melts.<br />
Register<strong>in</strong>g a Two-Part Mold:<br />
Sand both pieces until fac<strong>in</strong>g sides are flat!<br />
o Use a flat surface and put sandpaper on top of it.<br />
o Run your soapstone piece along the sandpaper.<br />
o Pick it up and br<strong>in</strong>g it back and run it aga<strong>in</strong> <strong>in</strong> the same direction.<br />
o Trust me on this.<br />
Use a drill press and drill two holes <strong>in</strong> opposite corners of the "upper" piece.<br />
o Drill carefully a bit at a time. <strong>Soapstone</strong> crystallizes under pressure and your piece will break if you drill<br />
too much at once lead<strong>in</strong>g to gnash<strong>in</strong>g of teeth and such.<br />
Drill <strong>in</strong>to the top of the registration holes about ½” at an angle.<br />
o This undercut will ensure that the p<strong>in</strong> that you pour will not turn or fall out.<br />
Match up the two mold pieces and, with a smaller bit, mark the bottom of the drill hole on the "lower" piece.<br />
o This doesn't have to be exact.. the p<strong>in</strong>s just have to match up <strong>in</strong> some way.<br />
Us<strong>in</strong>g drill press, or just a drill bit, drill mark<strong>in</strong>gs on lower piece. Nub holes should be about ¼”.<br />
o Use a carv<strong>in</strong>g tool to *ensure* that the nub holes are not undercut. A nub hole can be somewhat<br />
tapered. The tool can also be used to open up the hole on the outside of the mold so that the pewter<br />
will flow <strong>in</strong> better.<br />
Use a carv<strong>in</strong>g tool to scratch air vents from the registration drill holes (on the <strong>in</strong>ner side) or the nub holes to the<br />
outside of the mold so pewter will flow <strong>in</strong> more easily.<br />
Match up the upper and lower pieces (the smaller bit can be used to ensure that the holes are l<strong>in</strong><strong>in</strong>g up).<br />
Follow all safety precautions! Clamp the pieces together and pour pewter <strong>in</strong>to the registration holes to create<br />
p<strong>in</strong>s.<br />
P<strong>in</strong>s should be formed and your mold is registered!!! (Ta da!)<br />
<strong>Intermediate</strong> <strong>Pewter</strong> <strong>Cast<strong>in</strong>g</strong> <strong>in</strong> <strong>Soapstone</strong> HE Giliana Attewatyr, OL<br />
<strong>Beyond</strong> a Simple Site Token 11/4/2010<br />
Page 2
Three-Part Mold Diagram<br />
Figure 2 - Diagram of Three-Part Mold Registration<br />
<strong>Intermediate</strong> <strong>Pewter</strong> <strong>Cast<strong>in</strong>g</strong> <strong>in</strong> <strong>Soapstone</strong> HE Giliana Attewatyr, OL<br />
<strong>Beyond</strong> a Simple Site Token 11/4/2010<br />
Page 3
Register<strong>in</strong>g a Three-Part Mold (follow<strong>in</strong>g tips from Two-Part Mold <strong>in</strong>structions):<br />
Sand the fac<strong>in</strong>g sides of the two upper pieces until flat (as described above).<br />
Sand the top of the lower piece until flat.<br />
Drill two holes <strong>in</strong> the side of one of the upper pieces, and form match<strong>in</strong>g nub holes on the match<strong>in</strong>g upper<br />
piece.<br />
o Drill an undercut <strong>in</strong>to the top of the registration drill holes about ½” at an angle.<br />
o Scratch air vents from registration drill holes (on <strong>in</strong>ner side) to edge of mold.<br />
o Open up registration nub holes slightly to ensure no undercuts.<br />
Follow all safety precautions! Clamp top pieces together and pour registration p<strong>in</strong>s.<br />
o Try to get the "bottom" edges of your upper pieces as l<strong>in</strong>ed up as possible (i.e. set them on a flat<br />
debris-free surface before clamp<strong>in</strong>g them together!)<br />
Sand the bottom edges of the two jo<strong>in</strong>ed upper pieces (sand them while together!) until flat.<br />
Drill four holes up from the bottom corners of your upper set about 1” deep.<br />
o Drill holes from the outer sides of the upper set, angl<strong>in</strong>g downward to meet<br />
your bottom holes.<br />
o Open up your outer registration holes <strong>in</strong>to a nice funnel to more easily pour<br />
<strong>in</strong>to.<br />
o Scratch air vents from registration drill holes (on bottom side) to edge of<br />
mold.<br />
In order to know where to drill your bottom registration nubs, use a marker to mark<br />
on the outer edges of your upper set (see Figure 3) where your hole is.<br />
o Place your upper set on the bottom piece and align the set to one corner<br />
of the bottom piece. Use a marker to mark that corner on the upper set<br />
and lower piece. This makes l<strong>in</strong><strong>in</strong>g the upper and lower set up while<br />
clamp<strong>in</strong>g everyth<strong>in</strong>g together <strong>in</strong>f<strong>in</strong>itely easier!<br />
o Mirror the hole mark<strong>in</strong>gs from the upper set onto the lower block.<br />
o Interpolate from these mark<strong>in</strong>gs and mark on the lower block where to put<br />
the registration nub holes.<br />
o Drill your match<strong>in</strong>g registration nubs and open them up slightly to avoid undercuts.<br />
Follow all safety precautions! Clamp the upper two pieces together. Use a larger clamp to clamp the top set to<br />
the bottom piece. Pour registrations holes.<br />
o Your clamps will obscure one side of the holes. Pour two p<strong>in</strong>s then reclamp to pour the other two.<br />
o When pour<strong>in</strong>g your p<strong>in</strong>s, tilt the mold slightly over so that you can pour <strong>in</strong>to the side of the mold.<br />
P<strong>in</strong>s should be formed and your three-part mold is registered! (Ta da!!!!)<br />
Alternate Method<br />
Figure 3 - Mark<strong>in</strong>g the<br />
Registration Drill Holes to<br />
transfer to bottom side<br />
You can also drill your bottom registration drill holes up from the bottom of the bottom piece and drill the registration<br />
nubs <strong>in</strong>to the bottom of the top pieces. Clamp all of these together and pour the registration p<strong>in</strong>s with the mold<br />
upside down. You must make sure that the mold is very securely clamped s<strong>in</strong>ce the top of the mold is generally<br />
uneven and it will want to sit oddly.<br />
Do NOT drill all the way down from the top to the bottom of your upper pieces. You are <strong>in</strong>f<strong>in</strong>itely more likely to<br />
break the edge of your mold, drill bits are often not long enough (at this diameter) so you have to drill from the<br />
bottom and meet from the top and you lose valuable real estate because your side holes can’t <strong>in</strong>tersect your bottom<br />
holes.<br />
<strong>Intermediate</strong> <strong>Pewter</strong> <strong>Cast<strong>in</strong>g</strong> <strong>in</strong> <strong>Soapstone</strong> HE Giliana Attewatyr, OL<br />
<strong>Beyond</strong> a Simple Site Token 11/4/2010<br />
Page 4
Creat<strong>in</strong>g a Three-Part Button Mold:<br />
Register a three-piece mold.<br />
Mark the centerl<strong>in</strong>e of the upper mold pieces on the lower mold piece.<br />
Carve the button face centered on l<strong>in</strong>e.<br />
Put one upper mold piece on lower mold piece and mark where you would like the dome of the button and the<br />
shank to be.<br />
Carve a small center portion the button dome as well as the shank (not too small or the center bit may break).<br />
This will be carved <strong>in</strong> one upper mold piece only.<br />
Carve the sprue up from the top of the shank.<br />
On the opposite upper mold piece, carve a small part of the match<strong>in</strong>g sprue.<br />
Follow<strong>in</strong>g all safety precautions, assemble mold and pour until you get a piece that at least has the shank<br />
poured. Hav<strong>in</strong>g the button face as well is better.<br />
Take the (cooled) cast piece and match it up aga<strong>in</strong>st the opposite upper mold piece. The small match<strong>in</strong>g sprue<br />
carv<strong>in</strong>g will help you match up the cast piece.<br />
Mark the edges of the sprue, shank and small dome on the opposite piece.<br />
Carve the match<strong>in</strong>g sprue, shank and small dome on the opposite piece from those mark<strong>in</strong>gs.<br />
If the button face poured (if not, re-pour until you get one,) match the button aga<strong>in</strong>st the bottom of each upper<br />
mold piece and mark how far out any dome should go.<br />
Carve any desired dome out to the button's edge. Be precise with this. You don’t want the back of your cast<br />
piece to go out further than the front. That looks silly.<br />
F<strong>in</strong>ick as needed.<br />
Figure 4 - Diagram of Three-Part Button Mold<br />
Once you have<br />
made a button mold,<br />
you have mastered<br />
the skills to tackle<br />
any <strong>in</strong>termediate<br />
mold!<br />
<strong>Intermediate</strong> <strong>Pewter</strong> <strong>Cast<strong>in</strong>g</strong> <strong>in</strong> <strong>Soapstone</strong> HE Giliana Attewatyr, OL<br />
<strong>Beyond</strong> a Simple Site Token 11/4/2010<br />
Page 5
A Small Survey of <strong>Pewter</strong> Cast Items <strong>in</strong> the<br />
Medieval Period<br />
More medieval examples can be found <strong>in</strong> the Appendix!!<br />
Buttons<br />
Buttons have been found with domed front, domed back, both front and back domed and flat on both sides. The<br />
shanks on most of them are bent. The thicker the shank is, the less likely that they would be bent or broken.<br />
A button mold could also be poured effectively from the side as well<br />
as from the top (see discussion under P<strong>in</strong>s)<br />
Annular Brooches<br />
Brooches are def<strong>in</strong>ed by Museum of London as an object with a p<strong>in</strong><br />
that is constricted somehow to a limited area of the piece. There are<br />
examples of brooches that serve as charm hangers. Brooches that<br />
are large enough can be functional as well as decorative. I would<br />
not recommend that the p<strong>in</strong> be cast pewter if you want it to hold<br />
together someth<strong>in</strong>g substantial. I used 16-gauge wire for my p<strong>in</strong>s.<br />
Buckles<br />
Double Oval Buckle<br />
Figure 7 -<br />
Annular Brooch<br />
This type of buckle is fairly simple. It would be carved just like the annular brooch.<br />
Once it is cast, your belt, with a slit cut <strong>in</strong> the middle for the p<strong>in</strong> to attach through, is<br />
looped around the middle bar and riveted to itself.<br />
Depend<strong>in</strong>g on the size of holes <strong>in</strong> the belt, your p<strong>in</strong> could also be cast <strong>in</strong> pewter or<br />
you could use a wire of a stronger metal.<br />
Figure 5- Medieval Cast Button<br />
Figure 6 - Diagram of Two-Part Brooch Mold<br />
Figure 8 - Double Oval<br />
Buckle<br />
<strong>Intermediate</strong> <strong>Pewter</strong> <strong>Cast<strong>in</strong>g</strong> <strong>in</strong> <strong>Soapstone</strong> HE Giliana Attewatyr, OL<br />
<strong>Beyond</strong> a Simple Site Token 11/4/2010<br />
Page 6
Forked Spacer Buckle<br />
The forked spacer buckle is fairly easy to carve and cast. The<br />
complexity here comes <strong>in</strong> the assembly. You will need to carve<br />
two separate pieces: The frame, with the buckle and the forked<br />
spacer would be carved much like the annular brooch. Then a<br />
separate sheet plate, with holes for rivets either <strong>in</strong>cluded <strong>in</strong> the<br />
mold or drilled later, is carved to match the outl<strong>in</strong>e of the forked<br />
spacer. Two sheet plates are poured and soldered onto the<br />
forked frame. The belt end is <strong>in</strong>serted and rivets are placed<br />
through the holes to secure the belt.<br />
A tip for this design is to make your sheet plate and your forked<br />
frame as symmetrical as possible. That will make it easier to use<br />
the same sheet plate on either side of the frame.<br />
Mounts<br />
Mounts are useful for decorat<strong>in</strong>g everyth<strong>in</strong>g from belts and harnesses to<br />
quivers and bookb<strong>in</strong>d<strong>in</strong>gs. A rivet can also be cast pretty much by mak<strong>in</strong>g a<br />
tack mount with a flat (or domed.. as desired) pla<strong>in</strong> head.<br />
Mounts with Integral Rivet (Tack Mounts)<br />
Figure 9 - Diagram of Forked Spacer Buckle<br />
Tack mounts are assembled much like p<strong>in</strong>s, but without the clasp. Make<br />
sure that the rivet is decently sturdy and centered on the mount face. Use a<br />
piece of sandpaper folded several times (so it has a nicely rounded crease)<br />
to get a rounded p<strong>in</strong>. The sprue for a tack mount can be carved <strong>in</strong>to the top<br />
or the side of the mold (see P<strong>in</strong>s). Carv<strong>in</strong>g from the top can <strong>in</strong>volve less<br />
cle<br />
Figure 10 - Tack Mounts<br />
anu<br />
p of<br />
the piece.<br />
Figure 11 - Diagram of Three-Part Tack Mount Mold<br />
<strong>Intermediate</strong> <strong>Pewter</strong> <strong>Cast<strong>in</strong>g</strong> <strong>in</strong> <strong>Soapstone</strong> HE Giliana Attewatyr, OL<br />
<strong>Beyond</strong> a Simple Site Token 11/4/2010<br />
Page 7
Badges with P<strong>in</strong>s<br />
To create a p<strong>in</strong> and clasp for your badge, you will want a two-sided<br />
upright p<strong>in</strong> com<strong>in</strong>g from the face of your mold. Round p<strong>in</strong>s are<br />
lovely. Use a piece of sandpaper folded several times (so it has a<br />
nicely rounded crease) to get a nice rounded p<strong>in</strong>. The clasp can be<br />
flat and only one-sided. It will be bent over so that the p<strong>in</strong> has a<br />
place to latch <strong>in</strong> to.<br />
A p<strong>in</strong> can be side-poured (with the sprue carved to the side, rather<br />
than on the top) if the face is simple enough. If do<strong>in</strong>g this, angle your<br />
p<strong>in</strong> carv<strong>in</strong>g away from the sprue to improve your p<strong>in</strong>’s pour<strong>in</strong>g.<br />
Do<strong>in</strong>g a diaper<strong>in</strong>g pattern on the bottoms of your upper mold pieces<br />
will provide good air vent<strong>in</strong>g and give the backs of your p<strong>in</strong>s a nicely f<strong>in</strong>ished look.<br />
Make sure that the p<strong>in</strong> is carved long enough to be able to bend under the clasp!<br />
Note: If you have the room and the piece call for it, do everyth<strong>in</strong>g. Put on a p<strong>in</strong> back and a tack mount and even a<br />
shank. Just cut off what you don’t want to use from each piece and re-melt!<br />
Figure 13 - Diagram of Three-Part P<strong>in</strong> Mold<br />
Figure 12 - Swan Livery Badge with P<strong>in</strong><br />
<strong>Intermediate</strong> <strong>Pewter</strong> <strong>Cast<strong>in</strong>g</strong> <strong>in</strong> <strong>Soapstone</strong> HE Giliana Attewatyr, OL<br />
<strong>Beyond</strong> a Simple Site Token 11/4/2010<br />
Page 8
Troubleshoot<strong>in</strong>g for Carv<strong>in</strong>g and Pour<strong>in</strong>g<br />
If your mold will not fill:<br />
Add air vents all around outside of mold.<br />
Poof baby powder (NOT the corn starch version!) on mold (bottom and sprue) to break up surface tension of<br />
the metal.<br />
Add another sprue route to a different spot on the mold.<br />
Carve a match<strong>in</strong>g channel on the back of the mold (bottom of the upper set) to the areas that will not fill. This<br />
does not have to be the whole width of your mold! (or particularly pretty!)<br />
Deepen the shank/p<strong>in</strong>/clasp/etc portion of the mold.<br />
Get the metal extra hot.<br />
Try tilt<strong>in</strong>g your mold one way or another as you pour.<br />
Try pour<strong>in</strong>g a slow steady stream of pewter vs. an abrupt dump.<br />
Deepen your actual carved face.<br />
If an (<strong>in</strong>ner) area will not fill:<br />
This may be because the air <strong>in</strong> the mold has no escape. If you can not get an air vent<br />
from the area to the outside of the mold (on the bottom piece or through the top set) and<br />
the other troubleshoot<strong>in</strong>g methods won’t work, try this:<br />
Use a very small drill bit and drill through the mold to an outer edge.<br />
o This may be from a spot <strong>in</strong>side the actual carved face, from the back of the<br />
mold set or (preferably) <strong>in</strong> the middle of an adjacent non-carved space so<br />
that no mark will appear on the poured piece.<br />
Shove some broom straw <strong>in</strong>to the hole so it is filled pretty thoroughly.<br />
Trim the straw so that it is flush with the face of the mold.<br />
This will provide an air vent from the middle of the mold but not enough space for metal<br />
to flow through. Don’t worry about the straw when heat<strong>in</strong>g up the mold. Occasionally the<br />
straw may have to be replaced but the effort is worth it!<br />
If your piece is very flimsy:<br />
Carve a match<strong>in</strong>g channel on the back of the mold (bottom of the upper set) to the areas that will not fill. This does<br />
not have to be the whole width of your mold! (or particularly pretty!)<br />
If you are hav<strong>in</strong>g excessive flash<strong>in</strong>g (extra material around the edges:<br />
Check that there is no debris between your mold pieces, keep<strong>in</strong>g them apart.<br />
Make sure that no outly<strong>in</strong>g areas of your registration nubs are stick<strong>in</strong>g up.<br />
This may be your actual carved face hav<strong>in</strong>g too many stray scratches/carv<strong>in</strong>g marks on the outer face. Your<br />
options here are:<br />
o Deal with it <strong>in</strong> post-production.<br />
o Melt out the registration nubs (which sucks!), sand down your blocks a bit and re-register (keep<strong>in</strong>g the<br />
stones aligned the same as before!<br />
If you are gett<strong>in</strong>g a lot of bubbl<strong>in</strong>g on the surface (from trapped air):<br />
Figure 14 – Example of Mold<br />
with Inner Air Vent Holes<br />
To help with this we need to get the air out somewhere other than the sprue. To do this:<br />
Carve air vent scratches ALL around/over your mold.<br />
Deepen your sprue so that it is a decent reservoir.<br />
When pour<strong>in</strong>g your mold, pour <strong>in</strong> (dump) all at once as quickly as possible. This will force the air only out the<br />
side vents and provide at least some help for this issue.<br />
<strong>Intermediate</strong> <strong>Pewter</strong> <strong>Cast<strong>in</strong>g</strong> <strong>in</strong> <strong>Soapstone</strong> HE Giliana Attewatyr, OL<br />
<strong>Beyond</strong> a Simple Site Token 11/4/2010<br />
Page 9
Recommended Read<strong>in</strong>g<br />
Egan, Geoff. Dress Accessories: c.1150 - c.1450. Stationery Office Books. London. 1996. ISBN 0-11-290444-0.<br />
H.J.E. van Beun<strong>in</strong>gen & A.M. Koldeweij, Heilig en Profaan. 1000 laat-middeleeuwse <strong>in</strong>signes uit de collectie H.J.E.<br />
van Beun<strong>in</strong>gen, Rotterdam Papers 8. Cothen. 1993. ISBN 90-9006769-8.<br />
H.J.E. van Beun<strong>in</strong>gen, A.M. Koldeweij & D. Kicken, Heilig en Profaan 2. 1200 laatmiddeleeuwse <strong>in</strong>signes uit<br />
openbare en particuliere collecties, Rotterdam Papers 12. Cothen. 2001. ISBN 90-9014881-7.<br />
Kunera. 27 April 2009. .<br />
Mitch<strong>in</strong>er, Michael. Medieval Pilgrim and Secular Badges. Sanderstead: Hawk<strong>in</strong>s Publications. 1986. ISBN:<br />
0904173194.<br />
Spencer, Brian. Pilgrim Souvenirs and Secular Badges (Medieval F<strong>in</strong>ds from Excavations <strong>in</strong> London) TSO. c1998.<br />
ISBN: 0112905749.<br />
Spencer, Brian. Salisbury Museum Medieval Catalogue. Pt.2. Salisbury. Salisbury and South Wiltshire Museum.<br />
1990. ISBN: 0947535128.<br />
Read, Brian. Metal Buttons c.900 BC - c. AD 1700. Huish Episcopi, Portcullis Publish<strong>in</strong>g, 2005. ISBN 0-9532450-4-<br />
7.<br />
Virtual Museum of the Strong Collection. http://talbotsf<strong>in</strong>eaccessories.com/cgi-b<strong>in</strong>/Strong_Collection.cgi<br />
Appendix of Examples<br />
Buttons<br />
<strong>Intermediate</strong> <strong>Pewter</strong> <strong>Cast<strong>in</strong>g</strong> <strong>in</strong> <strong>Soapstone</strong> HE Giliana Attewatyr, OL<br />
<strong>Beyond</strong> a Simple Site Token 11/4/2010<br />
Page 10
Annular Brooches<br />
Buckles<br />
Double Oval Buckle<br />
Mounts<br />
Mounts with Rivet Holes and Separate Rivets<br />
Mounts with Integral Rivet (Tack<br />
Mounts)<br />
<strong>Intermediate</strong> <strong>Pewter</strong> <strong>Cast<strong>in</strong>g</strong> <strong>in</strong> <strong>Soapstone</strong> HE Giliana Attewatyr, OL<br />
<strong>Beyond</strong> a Simple Site Token 11/4/2010<br />
Page 11
Badges<br />
Badge is a somewhat catchall term to refer to p<strong>in</strong>s and pendants that were worn for a variety of reasons.<br />
Sometimes brooches are <strong>in</strong>cluded <strong>in</strong> this category as well. Badges can be worn as a pendant, as a dangle<br />
attached to another p<strong>in</strong>, sewn to cloth<strong>in</strong>g or hat us<strong>in</strong>g loops on the badge or worn as a p<strong>in</strong>. Some badges we know<br />
a lot about and others we mostly guess what it was for and who would have worn it (and how).<br />
Pilgrim Badges<br />
Religion was a major part of everyday life <strong>in</strong> the Middle Ages. Travel often took the form of a pilgrimage. Major and<br />
m<strong>in</strong>or shr<strong>in</strong>es appeared all over Europe (to say noth<strong>in</strong>g of the Holy Land!). As proof that they had been there (as<br />
well as the orig<strong>in</strong>al souvenir) pilgrims would purchase badges at the shr<strong>in</strong>es. Wear<strong>in</strong>g these badges conveyed<br />
prestige, proclaimed wearer as sacrosanct and entitled to help and sustenance from other Christians. The holy<br />
relics at the shr<strong>in</strong>es were believed to have miracle work<strong>in</strong>g powers. The pilgrim badges were considered holy<br />
because the pilgrim touches it to the relic. To harness the power of the relics, badges cont<strong>in</strong>ued to be worn after<br />
pilgrimages, were given to sick friends and family or as gifts, dipped <strong>in</strong> water or w<strong>in</strong>e to produce a cure, buried <strong>in</strong><br />
foundations, used to ease the pa<strong>in</strong> of childbirth, displayed <strong>in</strong> homes, stables, beehives, dr<strong>in</strong>k<strong>in</strong>g troughs, buried <strong>in</strong><br />
gardens and deposited <strong>in</strong> water at river cross<strong>in</strong>gs<br />
Pilgrim badges general depicted some element of the lives (and deaths) of Christ, Mary, the sa<strong>in</strong>ts, etc or depictions<br />
of the shr<strong>in</strong>es themselves.<br />
Adrian as armed knight, lion<br />
underneath his feet, raised sword and<br />
scroll <strong>in</strong> right hand, anvil and hammer<br />
<strong>in</strong> left hand.<br />
Pelican (for Jesus) feed<strong>in</strong>g its three<br />
youngs with its own blood by peck<strong>in</strong>g<br />
open its chest, <strong>in</strong> round frame with<br />
pearl border<br />
Mary with Child on crescent on badge<br />
<strong>in</strong> the shape of an aureole<br />
Mary with Child stand<strong>in</strong>g <strong>in</strong> a porch or<br />
gateway with tower on both sides<br />
Crossed keys, attributes of Peter, and<br />
Vera Icon surmounted by tiara<br />
Charlemagne enthroned with sword<br />
ly<strong>in</strong>g across his lap<br />
<strong>Intermediate</strong> <strong>Pewter</strong> <strong>Cast<strong>in</strong>g</strong> <strong>in</strong> <strong>Soapstone</strong> HE Giliana Attewatyr, OL<br />
Pilgrim and Secular Badges 6/15/2009
Livery Badges<br />
Badges were also created denot<strong>in</strong>g secular items. This <strong>in</strong>cludes th<strong>in</strong>gs like heraldry and depictions of royalty and<br />
nobility as well as depictions of professions or pastimes. These were likely worn to show ties to ones lord as well as<br />
other attributes<br />
Knight <strong>in</strong> armour on horseback with<br />
raised sword and shield with three<br />
dot-<strong>in</strong>-circles<br />
Man and woman stand<strong>in</strong>g under<br />
crowned letter M<br />
P<strong>in</strong> with w<strong>in</strong>ged lion <strong>in</strong> round<br />
decorated frame<br />
Fleur-de-lis <strong>in</strong> round frame with<br />
pearl border surrounded by dots<br />
Star-shaped badge with twelve rays<br />
project<strong>in</strong>g outwards with circles at<br />
the ends<br />
Shield with fleurs-de-lis <strong>in</strong> first and<br />
last quarter and lions passant <strong>in</strong><br />
second and third quarter<br />
surmounted by emperor's crown<br />
with fleurs-de-lis<br />
Lion passant or salient guardant<br />
Man's or woman's head <strong>in</strong> round<br />
frame<br />
Man's or woman's head <strong>in</strong> starshaped<br />
frame with dot-<strong>in</strong>-circles on<br />
the ends<br />
<strong>Intermediate</strong> <strong>Pewter</strong> <strong>Cast<strong>in</strong>g</strong> <strong>in</strong> <strong>Soapstone</strong> HE Giliana Attewatyr, OL<br />
Pilgrim and Secular Badges 6/15/2009
Deep bowl with six spoons<br />
(sometimes attributed to the<br />
<strong>Pewter</strong>ers Guild)<br />
Archer with bow without arrow<br />
Love Tokens<br />
Badges were given and worn as love tokens (or favors).<br />
Crowned game board with five times<br />
five squares<br />
Man lift<strong>in</strong>g a bag above his head,<br />
mounts stairs of a w<strong>in</strong>dmill, while<br />
rid<strong>in</strong>g a donkey or a horse<br />
Swan Livery Badge with P<strong>in</strong><br />
Two feathers with scroll. AMOVRS Heart <strong>in</strong> frame of two <strong>in</strong>terlock<strong>in</strong>g squares surrounded<br />
by flowers<br />
<strong>Intermediate</strong> <strong>Pewter</strong> <strong>Cast<strong>in</strong>g</strong> <strong>in</strong> <strong>Soapstone</strong> HE Giliana Attewatyr, OL<br />
Pilgrim and Secular Badges 6/15/2009
Sexuality Badges<br />
There are hundreds of extant examples of badges depict<strong>in</strong>g various aspects (and acts!) of sexuality; the vast<br />
number of them found <strong>in</strong> the Netherlands. While we have many examples of the use of pilgrim and livery badges,<br />
we have no examples of the use of these sexuality badges so we can only speculate on what they may have been<br />
used for. Some of the theories that scholars are suggest<strong>in</strong>g <strong>in</strong>clude tokens to ward away bad luck or br<strong>in</strong>g good<br />
luck (<strong>in</strong> the biblical sense), fertility, Carnivál badges, badges to mock the more common pilgrimage tokens or even<br />
brothel tokens. It may be that these were worn <strong>in</strong>side the cloth<strong>in</strong>g rather than on a hat or other external item.<br />
Phallic animal with bell around its neck<br />
approaches a vulva figure,<br />
Pair of trousers with phallus<br />
W<strong>in</strong>ged phallic animal wear<strong>in</strong>g crown<br />
and bell around its neck<br />
Scene at an <strong>in</strong>n or brothel: Two floors,<br />
below a goblet, a carafe and a<br />
copulat<strong>in</strong>g couple, above the landlord<br />
with richly filled purse hang<strong>in</strong>g from his<br />
belt, a jug turned upside down on the<br />
roof<br />
Procession of three phallic figures<br />
carry<strong>in</strong>g crowned vulva on a litter<br />
Kneel<strong>in</strong>g man show<strong>in</strong>g his genitals to a<br />
half-naked jester sitt<strong>in</strong>g under a tree<br />
with large leaves<br />
<strong>Intermediate</strong> <strong>Pewter</strong> <strong>Cast<strong>in</strong>g</strong> <strong>in</strong> <strong>Soapstone</strong> HE Giliana Attewatyr, OL<br />
Pilgrim and Secular Badges 6/15/2009