tRiso-suPeR 10+ - Barbour Product Search
tRiso-suPeR 10+ - Barbour Product Search
tRiso-suPeR 10+ - Barbour Product Search

You also want an ePaper? Increase the reach of your titles
YUMPU automatically turns print PDFs into web optimized ePapers that Google loves.
<strong>tRiso</strong>-<strong>suPeR</strong> <strong>10+</strong><br />
t H i n M u l t i F o i l i n s u l a t i o n<br />
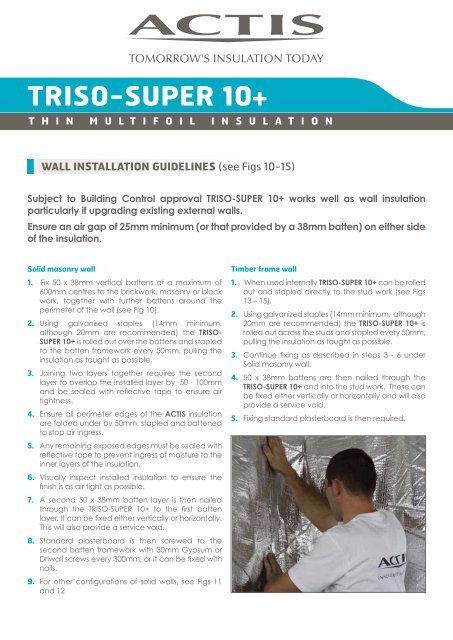
Wall installation guidelines (see Figs 10-15)<br />
Subject to Building Control approval TRISO-SUPER <strong>10+</strong> works well as wall insulation<br />
particularly if upgrading existing external walls.<br />
Ensure an air gap of 25mm minimum (or that provided by a 38mm batten) on either side<br />
of the insulation.<br />
solid masonry wall<br />
1. Fix 50 x 38mm vertical battens at a maximum of<br />
600mm centres to the brickwork, masonry or block<br />
work, together with further battens around the<br />
perimeter of the wall (see Fig 10).<br />
2. Using galvanised staples (14mm minimum,<br />
although 20mm are recommended) the TRISO-<br />
SUPER <strong>10+</strong> is rolled out over the battens and stapled<br />
to the batten framework every 50mm, pulling the<br />
insulation as taught as possible.<br />
3. Joining two layers together requires the second<br />
layer to overlap the installed layer by 50 - 100mm<br />
and be sealed with reflective tape to ensure air<br />
tightness.<br />
4. Ensure all perimeter edges of the ACTIS insulation<br />
are folded under by 50mm, stapled and battened<br />
to stop air ingress.<br />
5. Any remaining exposed edges must be sealed with<br />
reflective tape to prevent ingress of moisture to the<br />
inner layers of the insulation.<br />
6. Visually inspect installed insulation to ensure the<br />
finish is as air tight as possible.<br />
7. A second 50 x 38mm batten layer is then nailed<br />
through the TRISO-SUPER <strong>10+</strong> to the first batten<br />
layer. It can be fixed either vertically or horizontally.<br />
This will also provide a service void.<br />
8. Standard plasterboard is then screwed to the<br />
second batten framework with 30mm Gypsum or<br />
Driwall screws every 300mm, or it can be fixed with<br />
nails.<br />
9. For other configurations of solid walls, see Figs 11<br />
and 12<br />
timber frame wall<br />
1. When used internally TRISO-SUPER <strong>10+</strong> can be rolled<br />
out and stapled directly to the stud work (see Figs<br />
13 – 15).<br />
2. Using galvanized staples (14mm minimum, although<br />
20mm are recommended) the TRISO-SUPER <strong>10+</strong> is<br />
rolled out across the studs and stapled every 50mm,<br />
pulling the insulation as taught as possible.<br />
3. Continue fixing as described in steps 3 - 6 under<br />
Solid masonry wall.<br />
4. 50 x 38mm battens are then nailed through the<br />
TRISO-SUPER <strong>10+</strong> and into the stud work. These can<br />
be fixed either vertically or horizontally and will also<br />
provide a service void.<br />
5. Fixing standard plasterboard is then required.
<strong>tRiso</strong>-<strong>suPeR</strong> <strong>10+</strong><br />
t H i n M u l t i F o i l i n s u l a t i o n<br />
solid MasonRY Walls<br />
Fig 10<br />
Fig 11<br />
12.5mm plasterboard<br />
38mm batten<br />
Solid masonry wall<br />
38mm batten<br />
Solid masonry wall<br />
Fig 12<br />
Solid masonry wall<br />
38mm batten<br />
Breather membrane<br />
solid Masonry Wall internal insulation<br />
<strong>tRiso</strong>-<strong>suPeR</strong> <strong>10+</strong><br />
0.21 W/m 2 K u-value<br />
solid Masonry Wall internal insulation<br />
<strong>tRiso</strong>-<strong>suPeR</strong> <strong>10+</strong><br />
0.17 W/m 2 K u-value<br />
solid Masonry Wall external insulation<br />
<strong>tRiso</strong>-<strong>suPeR</strong> <strong>10+</strong> with dry-lining<br />
0.21 W/m 2 K u-value<br />
TRISO-SUPER <strong>10+</strong><br />
37.5mm insulated<br />
plasterboard<br />
TRISO-SUPER <strong>10+</strong><br />
12.5mm plasterboard<br />
drylining<br />
Ventilated air gap<br />
TRISO-SUPER <strong>10+</strong><br />
Cladding material<br />
It is recommended that the opinion of Building Control is obtained prior to specification or installation.
<strong>tRiso</strong>-<strong>suPeR</strong> <strong>10+</strong><br />
t H i n M u l t i F o i l i n s u l a t i o n<br />
tiMBeR FRaMe Walls<br />
Fig 13<br />
Fig 14<br />
Fig 15<br />
12.5 mm plasterboard<br />
38mm batten<br />
89x50 timber stud<br />
50mm cavity<br />
Facing brick<br />
external skin<br />
12.5 mm plasterboard<br />
38mm batten<br />
140x50 timber stud<br />
9mm OSB<br />
50mm min cavity<br />
Facing brick<br />
external skin<br />
12.5 mm plasterboard<br />
38mm batten<br />
140x50 timber stud<br />
9mm OSB<br />
25mm batten<br />
Cladding material<br />
timber Frame Wall<br />
<strong>tRiso</strong>-<strong>suPeR</strong> <strong>10+</strong> with 89mm stud frame<br />
0.22 W/m 2 K u-value<br />
timber Frame Wall<br />
<strong>tRiso</strong>-<strong>suPeR</strong> <strong>10+</strong> with 100mm sylvactis 55FX<br />
0.13 W/m 2 K u-value<br />
dormer / dwarf Wall<br />
<strong>tRiso</strong>-<strong>suPeR</strong> <strong>10+</strong> with 100mm sylvactis 55FX<br />
0.13 W/m 2 K u-value<br />
TRISO-SUPER <strong>10+</strong><br />
9mm OSB<br />
Breather membrane<br />
TRISO-SUPER <strong>10+</strong><br />
100mm SYLVACTIS 55FX<br />
BOOST ® 10<br />
insulating breather<br />
membrane<br />
TRISO-SUPER <strong>10+</strong><br />
100mm SYLVACTIS 55FX<br />
BOOST ® 10<br />
insulating breather<br />
membrane<br />
It is recommended that the opinion of Building Control is obtained prior to specification or installation.
<strong>tRiso</strong>-<strong>suPeR</strong> <strong>10+</strong><br />
t H i n M u l t i F o i l i n s u l a t i o n<br />
saFetY PReCautions and ReCoMMendations<br />
How to get the most from your ACTIS product<br />
IMPORTANT: in addition to the specific recommendations<br />
given by ACTIS below, your ACTIS product should be installed<br />
and used in compliance with (1) good building practice; (2)<br />
the most recent editions of any applicable regulations or<br />
relevant guidance and (3) any British or Eurpean Standards<br />
relating to the installation and use of insulation products,<br />
particulary in relation to safety precautions.<br />
Fire precautions<br />
Never expose ACTIS insulation to a direct heat source, sparks<br />
or naked flame.<br />
Keep blow torches well away from ACTIS insulation, even<br />
when using a flame guard or other protective device, and<br />
make sure that hot debris and sparks do not make contact<br />
with the insulation.<br />
Fireproof finishes and compartment walls<br />
As recommended by current regulatory guidance,<br />
do not leave insulation exposed in habitable rooms. We<br />
recommended that ACTIS insulation is always covered with<br />
a fire proof finish such as plasterboard (see, for example,<br />
the fire safety provisions contained in Approved Document<br />
B, which provides practical guidance on the fire safety<br />
requirements of the Building Regulations 2000 (as amended)<br />
in England and Wales; or refer to the relevant provisions in<br />
Scotland and Northern Ireland, as amended from time to<br />
time).<br />
To ensure that compartment walls achieve the requisite<br />
levels of fire resistance, the insulation should not be carried<br />
over junctions with such walls (again, please refer to the fire<br />
safety provisions contained in Approved Document B noted<br />
above, or to any applicable provisions in Scotland and<br />
Northern Ireland, as amended from time to time).<br />
TRISO-SUPER <strong>10+</strong> is not fire rated and has Euroclass<br />
classification F.<br />
Chimneys, flues, heat exchangers and other<br />
sources of heat<br />
Never use ACTIS insulation to insulate a chimney flue, heat<br />
exchanger or any other heat source above 80°C. Use a<br />
Euroclass A1 non-combustible insulation in compliance<br />
with British or European Standards. ACTIS advise leaving<br />
a minimum gap of 200 mm between the insulation and<br />
chimneys, flues, heat exchangers and all other sources of<br />
heat above 80°C.<br />
PLEASE SEEK ADVICE FROM ACTIS BY CALLING THE<br />
HELPLINE ON 01249 462 888 AND CHECK WITH YOUR LOCAL<br />
BUILDING CONTROL OFFICER BEFORE INSTALLING ACTIS<br />
INSULATION NEAR ANY SOURCE OF HEAT ABOVE 80°C.<br />
down-lighters and recess lighting<br />
The use of down-lighters or recess lighting in conjunction<br />
with ACTIS insulation is not recommended. Unless special<br />
precautions are taken, this poses an elevated fire risk.<br />
However, if the use of such recess lighting in conjunction<br />
with ACTIS insulation is desired, encasing the down-lighter<br />
appropriately with non-combustible material may provide<br />
adequate fire protection, but in all cases advice should be<br />
sought from the relevant Building Control officer who will give<br />
guidance on a case by case basis.<br />
Contact between materials and compatibility<br />
between products<br />
Avoid all contact between ACTIS insulation and lead, zinc,<br />
copper and its alloys as well as caustic products.<br />
sun protection<br />
When laying ACTIS insulation materials outside, remember<br />
that multi-foil insulation is highly reflective. Where the product<br />
is being installed in bright or sunny weather conditions,<br />
appropriate eyewear should be worn (such as sunglasses<br />
conforming to the most stringent requirements of BS EN 172,<br />
as amended from time to time) and protect against sunburn.<br />
Example of ACTIS “in-situ” test cells, Limoux, France.<br />
aCtis insulation ltd.<br />
Unit 1 Cornbrash Park – Bumpers Way<br />
Bumpers Farm Industrial Estate – Chippenham<br />
Wiltshire – SN14 6RA<br />
Tel. +44 (0) 1249 462 888 / Fax. +44 (0) 1249 446 345<br />
Email : solutions@actis-isolation.com<br />
www.insulation-actis.com