Creed Teleprinter Model 444 Bibliography - Sam Hallas
Creed Teleprinter Model 444 Bibliography - Sam Hallas
Creed Teleprinter Model 444 Bibliography - Sam Hallas

Create successful ePaper yourself
Turn your PDF publications into a flip-book with our unique Google optimized e-Paper software.
<strong>Creed</strong> <strong>Teleprinter</strong> <strong>Model</strong> <strong>444</strong> <strong>Bibliography</strong><br />
The following documents are collected from various issues of the BARTG journal, Datacom. They are<br />
almost all the references contained within Alan Hobb’s (G8GOJ) article, <strong>Teleprinter</strong>s for the Radio<br />
Amateur at http://www.rtty.com/England/creed1.html<br />
The bibliography for the <strong>Creed</strong> <strong>444</strong> is as follows. Although it is not in chronological order, the<br />
documents here are present in their original sequence. Each entry contains a hyperlink to the article.<br />
<strong>Creed</strong> model <strong>444</strong> <strong>Teleprinter</strong> <strong>Bibliography</strong><br />
Introduction to the <strong>Creed</strong> <strong>444</strong> BARTG Newsletter, Summer 1983, pp 16-20<br />
The <strong>Creed</strong> <strong>444</strong> <strong>Teleprinter</strong> Datacom, Autumn 1995, pp 69-70<br />
ITT <strong>Creed</strong> model <strong>444</strong> <strong>Teleprinter</strong> Datacom, Spring 1999, pp 28-37 – This is a much longer article in<br />
two parts consisting of a reprint from <strong>Creed</strong> publication 041-033-2E, 1970. It is available for download<br />
from<br />
http://www.rtty.com/England/creed<strong>444</strong>.html<br />
Maintaining the <strong>Creed</strong> <strong>444</strong> BARTG Newsletter, Spring 1983, pp 6-11<br />
Lubrication instructions for the <strong>Creed</strong> <strong>444</strong> Datacom, Winter 1988, pp 73-84<br />
The <strong>Creed</strong> <strong>444</strong> on 45 Bauds BARTG Newsletter, Winter 1983, pp 8-10<br />
The G3RED <strong>Teleprinter</strong> Synchronous Motor Speed Control BARTG Newsletter No.72, June 1977, pp<br />
21-26 – regrettably I do not have a copy of this edition of Datacom.<br />
Coding the Porcupine BARTG Newsletter, December 1982, pp 12-13<br />
More on the <strong>444</strong> Answer back Datacom, Spring 1984, p 19<br />
<strong>Creed</strong> <strong>444</strong> WRU Disable on Receive Datacom, Summer 1985, pp 64-65<br />
Using the Bell Contacts on the <strong>Creed</strong> <strong>444</strong> BARTG Newsletter, Summer 1983, pp 24-25<br />
The <strong>Creed</strong> <strong>444</strong> End of Line Lamp Datacom, Winter 1984, pp 33-34
CODING THE PORCUPINE – Stuart Dodson G3PPD<br />
[Published in the BARTG Journal Datacom December 1982]<br />
WHAT, you may ask is a Porcupine?<br />
Officially known as the 4404/304 ANSWER SACK DRUM CP these are used on the CREED <strong>444</strong> , so<br />
that when you press the HERE IS key 20 characters of your own choice including shifts are<br />
automatically transmitted.<br />
This useful little device can be used to send your callsign and QTH simply by pressing a key, and have<br />
provided more than a few Amateurs with an evenings entertainment, working out the codes and<br />
cutting the information on to the code rings.<br />
After a few of us had managed to destroy half a dozen porcupines in the attempt, we had a serious<br />
thought on the subject and realised it is not necessary to know the five unit code in order to undertake<br />
the job.<br />
The drum can be coded quite easily as follows:<br />
Switch on the <strong>444</strong> and type CR, LF and LTRS.<br />
Now press PERF ON and then type the characters of your choice.<br />
e. g. DE G3PPD HARROW<br />
Remove the tape from the machine and count the characters, as the above only uses 17 of the<br />
possible 20 characters I made another tape, but this time putting LTRS at the start and CR, and LF at<br />
the end.<br />
The seven parts of the porcupine:<br />
Just to verify the tape run it through the tape reader and if correct secure to<br />
the shack table as shown on the left.<br />
Now take the Porcupine and separate into its' seven parts: the body, five<br />
code rings and the cam.<br />
Have a look at one of these code rings, identify the GAP, Spigot, and the<br />
starting spike A.<br />
Also have a look at the punched tape, and identify the first column of<br />
Holes/spaces which is the left hand column. Note how the columns are<br />
numbered.
A B C D C F G H I J K L M N 0 P Q R S T<br />
Hold the first code ring flat side down in your left hand with your thumb over the<br />
spigot.<br />
Now have a look at the left hand column of holes/spaces in the tape and<br />
working from the top of the<br />
tape downwards, and at the same time starting from the gap in the code ring<br />
and working clockwise, cut off a spike whenever a hole appears in the tape.<br />
(see A, S, C, etc).<br />
Read this as: Cut 3, miss 2, cut 3, miss 2, cut 1, miss 2, cut 1, miss 3, cut 1, miss 2.<br />
Assemble the now coded ring on to the Porcupine body and slide to the left.<br />
Take the second code ring and looking this time at the second column of holes/spaces in the tape<br />
again cut off a spike whenever a hole appears in the tape. Slide ring on to the body.<br />
Repeat for code rings 3, 4 and 5, corresponding to columns 3, 4 and 5, of the punched tape.<br />
Fit cam onto the body, press the cam on so as to engage all the spigots of the code rings into their<br />
corresponding holes, and fit to the machine by keeping the cam to the rear and do not: forget to rotate<br />
the cam, and press the retaining lever so that the drive pin locates into the hole in the body.<br />
Now you are ready for a test, try holding the HERE is key down. and see what happens, message<br />
should repeat.<br />
Before throwing the porcupine into the dustbin, you will be please to know that spare code rings are<br />
available, these are part 4404/123A A/B CODE RING, but before contacting ITT CREED do remember<br />
they have a £10 minimum Invoice charge.
Maintaining the CREED <strong>444</strong> – Stuart Dodson, G3PPD<br />
[Published in the BARTG Journal Datacom Spring 1983]<br />
REPLACING A BROKEN DRIVE BELT ON THE TAPE READER<br />
Having heard of four <strong>444</strong> users whose Tape Readers had broken belts in the space of four days, 1<br />
thought this might be a suitable point to start an article on MAINTAINING THE <strong>444</strong>. So armed with the<br />
<strong>444</strong> WORKSHOP MANUAL, which incidentally can be obtained from BARTG at exhibitions,<br />
I offered to change a broken belt for a friend, as this would give me first hand experience of the work<br />
involved.<br />
After about half an hour and after I had already stripped off some of the bits and pieces so disturbing<br />
their adjustments, I realised that this Tape Reader was different from the one illustrated in the CREED<br />
WORKSHOP MANUAL, and that a different approach was needed. A quick check on three other<br />
machines revealing similar results. However if this article is to be of value I must start at the<br />
beginning.........<br />
REMOVING THE TAPE READER FROM THE MACHINE<br />
Lift the lid of the machine, undo two chrome oddie screws by turning through 90 degrees, remover the<br />
PAPER WINDER (KNOB) and lift off the cover. Switch the machine on press the FIGURES KEY and<br />
switch off. This will make the job of removing the KEYBOARD MASK a little easier. Do this by<br />
removing two large screws from immediately behind the MASK disconnecting the small plug on the<br />
END of LINE LAMP, depress some of the figure keys and lift the keyboard mask off.<br />
Just below and slightly to the right of the RUN OUT KEY you will see the DRIVE PULLEY that<br />
energises the TAPE READER, a toothed rubber belt fits over this pulley and its lower edge fits over a<br />
small GUIDE PULLEY.<br />
Now find the three long screws that secure the top of the rear casting of the Tape Reader and remove<br />
these screws. Lift the whole tape reader assembly just sufficiently enough to unplug the electrical<br />
connections, rotate the assembly slighty clockwise ( to lift the send/receive link clear of its roller) and<br />
withdraw towards the front, unhooking any part of the rubber drive belt that may remain.<br />
Have a look at the SEND/RECEIVE LINK, note that a GUIDE PIN runs in a slot in the LINK. (This is<br />
important when replacing the unit).<br />
IDENTIFYING WHICH METHOD TO USE BY EXAMINING THE REAR BEARING CASTING<br />
Fig 1 Fig 2<br />
Lay the TAPE READER on its RH SIDE, and turn it so that the black TAPE TRANS ON/ TAPE TRANS<br />
OFF KEYS point to the right and not at you. About 3 inches below the keys is the DRIVEN PULLEY
this has square teeth and it is around this pulley the rubber belt fits. To the left of this pulley is the<br />
BEARING and BEARING HOUSING or CASTING, and further to the left are the CAMS. Both methods<br />
of replacing the rubber DRIVE BELT involve removing all the CAMS, and the BEARING and the<br />
looping the DRIVE BELT OVER the exposed DRIVEN PULLEY.<br />
TRY AND IDENTIFY WHICH TYPE OF BEARING HOUSING IS USED<br />
It will be either as the Fig 1. or Fig 2.<br />
USING THE CREED METHOD ON TAPE READERS See Figure 1.<br />
1. Remove two screws and the backing plate securing the CAM LUBRICATOR to the bracket<br />
at the rear of the MAIN HOUSING CASTING, and remove the lubricator.<br />
2. Remove the screw from the rear end of the CAMSHAFT, and withdraw:-<br />
(a) a circular cam spacer,<br />
(b) the striker cam,<br />
(c) a hexagonal cam spacer,<br />
(d) the delay disc cam,<br />
(e) a circular cam spacer,<br />
(f) the send/receive cam,<br />
(g) a hexagonal cam spacer.<br />
3. Remove the two screws securing the bearing clamp (see Fig 1.) and remove the key from<br />
the keyway and also the REAR BEARING.<br />
4. Fit the NEW DRIVE BELT over the DRIVEN PULLEY.<br />
5. Replace the rear bearing, the bearing clamp and its two screws, and replace the KEY in the<br />
KEYWAY.<br />
6. Slide over the rear end of the CAMSHAFT<br />
(g) a hexagonal cam spacer,<br />
(f) the send/receive cam, with the Code 1 facing the rear or end<br />
(e) a circular cam spacer of the camshaft.<br />
(d) the delay disc cam No. 2. Code 2 facing the rear.<br />
(c) a hexagonal cam spacer.<br />
(b) the striker cam with the No. 3 to the rear.<br />
(a) a circular cam spacer.<br />
7. Re-fit the securing screw in the end of the CAMSHAFT.<br />
8. Re-fit the CAM LUBRICATOR.<br />
The SPLIT BEARING CLAMP of READERS as FIG 1. has the advantage that the adjustments are not<br />
disturbed. The three readers that I have seen have had serial numbers below 22,000 and have all<br />
been as FIG 2.<br />
TAPE READERS corresponding to FIG 2. have a one-piece BEARING HOUSING and disturb THREE<br />
adjustments, two are minor, and one is VERY IMPORTANT.
REPLACING A BROKEN DRIVE BELT IN A TAPE READER HAVING A ONE-PIECE REAR<br />
BEARING HOUSING AS SHOWN IN FIG 2.<br />
1. Locate the cable harness running down the SLOPING EDGE of the RH REAR side of the<br />
MAIN FRAME, either make a note of where the wires go and UNSOLDER, or remove the<br />
two screws holding the cable clamps.<br />
2. Lay the READER on its FRONT, identify the CAMS on the REAR of the CAMSHAFT and<br />
remove the CAM OILER from its MOUNTING BRACKET.<br />
3. Locate Three SPRINGS on the inside of the SLOPING EDGE of the REAR MAIN FRAME,<br />
unhook the centre one from the EYE in the LONG MARK SPACE CHANGE-OVER LEVER.<br />
4. Lay the READER on its LH SIDE, and remove three 2 BA bolts, but before doing this trace<br />
the MARK/SPACE CHANGE-OVER LEVER to locate its PIN and note where this fits into<br />
the CARRIER. NOW remove the three bolts and separate the READER into two halves.<br />
(are the wires in the way if so go back to (1).).<br />
5. The MARK/SPACE CHANGE-OVER LEVER IS VERY IMPORTANT so before going any<br />
further we will investigate its MOVEMENT. Make a punched tape about three inches long<br />
'RYRYRYRYRYRYRYRYRYRY' and insert into the tape reader. Now turn the READER so<br />
that the BLACK ON/OFF KEYS point away from you, press first the OFF key followed by<br />
the ON KEY, push your left thumb up under the EYE of the MARK/SPACE CHANGE-<br />
OVER LEVER (to simulate the spring that was removed) and turn the 4 BA nut in the end<br />
of the CAMSHAFT. The mechanism will rotate and the MARK/SPACE LEVER WILL MOVE<br />
from side to side, do this a few times and then SCRIBE a couple of lines on the MAIN<br />
FRAME to mark the extremes of its movement. (the CAMSHAFT rotates CLOCKWISE<br />
when seen from the rear).<br />
6. Turn the READER sound to face you and remove the paper tape until later, remove the<br />
chrome tape guide, and the grey FRONT TOP CAST COVER.<br />
7. We are going to remove the ON/OFF KEY ASSEMBLY now but first we must remove a<br />
small spring on the LONG PART OF THE START TRIP LEVER from the extreme end, also<br />
we must unhook the STOP RESET LEVER from its EYE, and undo two screws from<br />
immediately below the KEYS to allow us to dis-engage the CRANKED ARM of the START<br />
TRIP LEVER from the slot in the BELT TENSIONER MOUNTING BRACKET, preferably<br />
without disturbing this bracket, or if this is necessary, first mark its position, thus remove the<br />
KEY ASSEMBLY.<br />
8. Lay the READER ON ITS FRONT and remove from the end of the CAMSHAFT in turn:<br />
(a) a 4 BA locking screw and its washer,<br />
(b) a circular cam spacer,<br />
(c) the striker cam 3,<br />
(d) a hexagonal cam spacer,<br />
(e) the delay disc cam 2,<br />
(f) a circular cam spacer,<br />
(g) the send/receive cam 1,<br />
(h) a hexagonal cam spacer,<br />
(j) the KEY from the keyway.<br />
9. Remove the CAM OILER MOUNTING BRACKET by undoing one screw.<br />
10. Remove the MARK/SPACE CHANGE-OVER LEVER.
11. Remove 3 of the 4 screws holding the BEARING HOUSING, but do not touch the screw at<br />
4 O'Clock yet, that is remove the screws that hold the belt guide from 12 and 2 O'Clock,<br />
and remove the BELT GUIDE, ALSO remove the screw from 6 O'Clock.<br />
12. The screw at 4 O'Clock holds an important part called the SHOULDERED PIN, the<br />
POSITION of this part effects the START/STOP ACTION of the reader. Use the edge of a<br />
file to SCRIBE a line to mark the rotary position of the pin, then unhook a strong spring<br />
from it, insert a TWIST DRILL or ALLEN KEY into one of its holes to prevent more than half<br />
a turn movement, leave this in place and only then attempt to remove the screw at 4<br />
O'Clock, from the BEARING HOUSING.<br />
13. Use a screwdriver to 'lift' the BEARING HOUSING/BEARING free of the CAMSHAFT, thus<br />
exposing the DRIVEN PULLEY also note the SHIMS on the shouldered pin.<br />
14. NOW FIT THE REPLACEMENT RUBBER DRIVE BELT.<br />
FIG 3. The View from the rear of the Tape Reader (One-piece bearing housing)<br />
RE -ASSEMBLING THE TAPE READER<br />
15. Push the BEARING HOUSING back down over the DRIVEN PULLEY, make sure that the<br />
SHIMS are still on the SHOULDERED PIN.<br />
16. (Reverse steps 11 and 12). Re-fit the screw at 6 O'Clock, Replace the BELT GUIDE and its<br />
securing SCREWS at 12 and 2 O'Clock. Insert the SCREW at 4 O'Clock, turn the<br />
shouldered Pin with the TWIST DRILL or ALLEN KEY still in place until the Pin aligns with<br />
the SCRIBED LINE lock the SCREW at 4 O'Clock, and reconnect the HEAVY SPRING.
17. (Reverse Step 10), re-fit the MARK/SPACE CHANGE OVER LEVER at this stage setting<br />
its position only approximately.<br />
18. (Reverse step 9), replace the CAM OILER/MICROSWITCH BRACKET.<br />
19. (Reverse step 8), by fitting onto the CAMSHAFT in turn:<br />
(j) The KEY Into the KEYWAY,<br />
(h) a hexagonal cam spacer,<br />
(g) CAM No. 1. with the number facing the end of the camshaft.<br />
(f) a circular cam spacer,<br />
(e) CAM No. 2. with the number as in (g).<br />
(d) a hexagonal cam spacer.<br />
(c) CAM No 3, with the number as in (g).<br />
(b) a circular cam spacer.<br />
(a) the washer and the 4 BA locking screw.<br />
20. (Reverse step 7), by fitting the KEY ASSEMBLY back into place, first the CRANKED ARM<br />
of the START TRIP LEVER fits into the SLOT of the BELT TENSIONER BRACKET, then<br />
the HOOK of the STOP RESET LEVER engages with the EYE which can be lifted to help<br />
you, the LONG ARM of the START TRIP LEVER fits through a square hole in the CAM<br />
OILER MOUNTING BRACKET, now fit the two securing screws under the keys, and lastly<br />
reconnect the Small spring from the END of the LONG ARM to the BRACKET.<br />
21. (Reverse step 6), re-fit the grey CAST FRONT TOP COVER and the chrome tape guide.<br />
22. (repeat step 5). that is set the correct movement of the MARK/SPACE CHANGE OVER<br />
LEVER by fitting the short length of tape 'RYRYRYR' back into the reader, pressing the<br />
TAPE TRANS OFF KEY and then the TAPE TRANS ON KEY, turn the 4 BA screw on the<br />
rear of the CAMSHAFT clockwise at the same time pressing your left thumb upwards under<br />
the EYE of the MARK/SPACE CHANGE OVER LEVER, observe the movement of this<br />
lever, and make sure that it is the same as in step 5 and that the arm passes between<br />
CAMS 2 and 3.<br />
23. Be prepared to re-join the two halves of the reader, by passing the ARM of the<br />
MARK/SPACE CHANGE OVER LEVER up directly in front of the nylon STRIKER and<br />
engage its PIN into the OVAL HOLE in the CARRIER. Secure the two halves together by<br />
fitting ONE 2 BA screw. (see also FIG 4.).<br />
24. (Reverse step 3), by reconnecting the small spring to the EYE of the MARK/SPACE<br />
CHANGE OVER LEVER.<br />
25. With the PAPER TAPE still in position and the KEYS PRESSED in the order of OFF first<br />
then ON again turn the 4 BA SCREW to ROTATE the CAMSHAFT (clockwise from the<br />
rear) but turn the READER around so that you can observe the movement of the<br />
CARRIER. The MOVEMENT is restricted by a pin so it is less than a tenth of an inch but it<br />
should move from side to side under the influence of the MARK/SPACE CHANGE OVER<br />
LEVER, if not note which side the CARRIER is resting.<br />
26. When OK replace the CAM OILER and remake the ELECTRICAL CONNECTIONS.
IF THE CARRIER DOES NOT MOVE:<br />
This means that either the PECKERS are not coming up through the HOLES in the paper tape, or the<br />
MARK/SPACE CHANGE OVER LEVER is too far to one side. Decide which way this lever must be<br />
moved.<br />
Now disconnect the small spring from its EYE, and separate the two halves of the reader once again.<br />
Move the CAMSHAFT so that the ‘FLAT’ of CAM 3 is at the top, then move the MARK/SPACE LEVER<br />
in the DESIRED DIRECTION until you reach a stop. Hold the SPINDLE ON WHICH IT TURNS with a<br />
pair of PLIERS, slacken the locking screw and MOVE the LEVER about a quarter of an inch beyond<br />
the stop and re-lock.<br />
Reconnect the two halves of the reader and replace the spring.<br />
Repeat step 25 until the CARRIER moves from side to side. If you cannot see the movement remove<br />
the cover from the top of the reader to expose the electrical contacts and watch these instead of the<br />
carrier. REPLACING THE READER INTO THE MACHINE<br />
1. Locate the thin black LINK with the RIGHT ANGLED END that crosses over the top of the<br />
reader just in front of the electrical wires. This is the SEND/RECEIVE link operated by CAM<br />
1. A slot in this LINK runs either side of a PIN. Make sure that the PIN is in the SLOT.<br />
2. Keep the first finger of your right hand over the RH end of the SEND/RECEIVE LINK, so<br />
that it stays in place.<br />
3. Turn the unit slightly to the right.<br />
4. Move the unit towards the rear until the rubber DRIVE BELT can just be fed over the<br />
DRIVE PULLEY, then Lift the LOWER EDGE of the BELT over the BELT TENSIONER<br />
(See FIG ).<br />
5. Move the unit still towards the rear until the SEND/RECEIVE LINK can be lowered, by<br />
turning the unit to the left over the ROLLER of the SEND/RECEIVE SWITCH.<br />
6. Lower the UNIT so that the ELECTRICAL CONTACTS re-make, and fit the three securing<br />
bolts.<br />
Now test the TAPE READER in the machine, and if OK replace the KEYBOARD MASK and reconnect<br />
the END OF LINE LAMP.<br />
FIG 4. THE CARRIER AND MARK/SPACE CHANGEOVER LEVER VIEWED FROM THE FRONT OF<br />
THE READER.<br />
REPLACEMENT RUBBER DRIVE BELTS CAN BE OBTAINED FROM-.<br />
STUART DODSON, G3PPD, 01-422-4153.<br />
The BARTG STAND at EXHIBITIONS.
INTRODUCTION TO THE ITT CREED <strong>444</strong> - Stuart Dodson, G3PPD<br />
[Published in BARTG Journal Datacom, Summer 1983]<br />
The ITT-CREED TELEPRINTER TYPE <strong>444</strong> was produced for about £1860.<br />
It is, as far as I am aware the last of the ‘mechanical’ teleprinters in that it possesses no electronic<br />
parts. Thus an era which started in the late 1920's draws to a close, but not just yet. The model 7<br />
teleprinter introduced originally in the mid 1930's is still in use on Telex systems, and so we can expect<br />
the <strong>444</strong> to continue well into the next century.<br />
BUYING A CREED <strong>444</strong><br />
Well like used cars the buyer is supposed to be the judge of what he is buying, so before being<br />
dazzled by a shiny cabinet, check that all the expensive bits are there:<br />
A control knob, which is black and about 2½ , inches diameter should be on the left hand side.<br />
• Have a look at the glass window on the front of the machine, is it cracked, broken or badly<br />
scored?<br />
• Lift the lid of the cover, look down into the rear RH side of the chassis, make sure that there<br />
are two plugs there. These are the ac mains and signal supplies and they are not easily come<br />
by, and expensive to replace.<br />
• Is there a spindle on which to place a roll of paper? These are usually aluminium or nylon and<br />
have five flat sides at the ends.<br />
• Check that there is a spool on which to place the perforator tape.<br />
• Is there a ribbon, usually red/black fitted?<br />
All these things are necessary in order to work the machine, and when you are buying and therefore<br />
have a choice, go for a machine which is complete, and preferably one that has a sample of its printing<br />
on the paper already in the machine.<br />
BUYING USEFUL EXTRAS.<br />
When an amateur sells a machine, he has usually been using it and therefore is likely to have other<br />
things besides the basic machine. Inquire about these. You will need PAPER, PERFORATOR TAPE,<br />
SPARE RIBBONS, and if anything goes wrong a WORKSHOP MANUAL. Is it a machine like the <strong>444</strong><br />
where in order to work at different baud rates you have to change gears if so are there spare gears<br />
with the machine?<br />
Try and buy the machine from another amateur who has been using it.<br />
He is usually able to demonstrate it, and has some of the extra things mentioned. Providing you know<br />
what you are doing you can buy from a dealer at a rally, but this is risky as often the dealer himself has<br />
not seen them going.<br />
Spare parts are available for the <strong>444</strong>, and will be for some years to come but bear in mind that their<br />
source is the manufacturer who made the machine and you may be unpleasantly surprised at their<br />
cost.
GEARS<br />
CREED designed the machine to work at two speeds, 5C or 75 bauds, Radio Amateurs use the speed<br />
of 45.45 bauds on h.f. and either this or 50 bauds on vhf. Thus radio amateurs use a speed which<br />
involves a change of gear(s) not made by <strong>Creed</strong>. However these 45.45 gears are available. The point<br />
here is that the machine you are looking at may be fitted with 75 baud gears, this may suit a computer<br />
enthusiast, but will be useless for RTTY as seldom is this speed used. Thus you are faced with buying<br />
a set of gears and these will be around £25 pair unless you know someone with a spare set. It is<br />
probably better to buy a machine already on 45.45 bauds, and this is likely to have the 50 baud gears<br />
spare as well. If not go for a machine on 50 bauds as you need then only to change one gear to come<br />
onto 45.45 bauds.<br />
GETTING THE MACHINE GOING<br />
Having got a machine, you naturally want to be able to use it.<br />
So before worrying about what speed it is on, or using it over radio, it will be nice just to sit and type on<br />
it and try out the perforator and tape reader.<br />
Not all machines have the perforator and or tape reader:<br />
<strong>444</strong> RO This is read only machine, or rather receive only, it has no keyboard or tape reader,<br />
but may have the perforator. Nevertheless is very useful for commercial copy at 50<br />
bauds.<br />
<strong>444</strong> KSR This is 'keyboard send/receive' thus it has a keyboard, and sometimes a perforator.<br />
<strong>444</strong> ASR Automatic send/receive. This is the most popular version of all and includes the tape<br />
reader and the perforator as well as the keyboard.<br />
When used as a Telex machine over lines the <strong>444</strong> like other teleprinters was used with a LINE<br />
TERMINAL UNIT. When used over RADIO it must have an RTTY TERMINAL UNIT. To work at all<br />
without either of these it will need a power supply besides ac mains.<br />
Keep your eyes open for what is called an 80+80 power supply, there are nearly as many of these<br />
about as there are teleprinters. These power supplies give +80 volts and also -80 volts with respect to<br />
a common point which is usually earth. They can be obtained for about £4.<br />
80 -0 – 80<br />
Power supply<br />
Without an 80+80 power supply or a terminal of some sort you will not be able to use the teleprinter,<br />
other than to run the motor.<br />
If you have the power supply available, then only five wires need to be connected to give you ‘LOCAL<br />
COPY’
THE BASIC CIRCUIT OF THE CREED <strong>444</strong><br />
Here is the 50-way Free D socket that is used for the<br />
signal connections to the CREED <strong>444</strong>. You will note<br />
that it is only necessary to make connections to<br />
sockets No 1, 2, 3, 7, 9, and to short circuit No's 12<br />
and 13.<br />
Holding the 50-way D Free Socket so that the<br />
connecting holes face you and the cable coming out of<br />
the bottom the sockets are numbered from the top left.<br />
There are numbers on them but you may need a good<br />
magnifying glass to see them.<br />
If you are unlucky enough not to have the 50-way Free<br />
D Socket, you will not be pleased to find that they used<br />
to cost us £13 from <strong>Creed</strong> and have since gone up<br />
80%. However RS components supply a 50-way D<br />
socket and this has the order code 468-585. Farnell<br />
also I believe can also supply. But before trying these<br />
give me a ring as our Radio Constructors club G4DEJ<br />
also stocks useful items like this.
LOCAL COPY CIRCUIT FOR THE CREED <strong>444</strong><br />
This circuit utilises one of the many surplus 80+80 power supplies. If you haven't got one then the<br />
quickest way to obtain one of these is to let it be known that you are looking for one when in<br />
conversation on two metres, and this goes for any other equipment as well. Radio amateurs are a<br />
helpful lot and someone will know someone else who knows where there was one.<br />
CIRCUIT FOR WORKING TWO CREED <strong>444</strong> MACHINE TO EACH OTHER
OBTAINING LOCAL COPY WITHOUT A BALANCED POWER SUPPLY:<br />
MACHINE RACING ALL THE TIME<br />
This useful circuit appears on page 4 of that extremely useful<br />
booklet RTTY - the Easy Way.<br />
It uses something less than 70mA. and this sort of current is readily<br />
available from power supplies used with valve type equipment and<br />
found in old record players radio's etc.<br />
The numbers given in the BARTG diagram in RTTY the Easy Way,<br />
referred to the Series 7-type teleprinter, the numbers on the<br />
diagram opposite refer to the <strong>444</strong> socket connections on the 50-way<br />
D Plug.<br />
When this happens the magnet is receiving the wrong sense, that is it should rest on Mark and not<br />
race. To cure reverse the connections to the magnet.<br />
For the sake of COMPLETION I am including the following:<br />
LOCAL COPY IS OK but …<br />
… TRANSMIT TONES from the terminal are 'REVERSED'.To correct the reverse tones you must<br />
change over the wires to numbers 1 and 3 of the 50-way D Free Socket, but as this will upset your<br />
local copy you must also changeover 7 and 9.<br />
Connecting the CREED <strong>444</strong> to the ST5<br />
50-way D Socket on the <strong>444</strong> pcb connections on the ST5<br />
1<br />
2<br />
3<br />
7<br />
9<br />
12 Short circuit these<br />
13 together.<br />
28<br />
33 and 17<br />
29<br />
21<br />
20
USING THE "BELL" CONTACTS ON THE CREED <strong>444</strong> - G8RY<br />
[Published in the BARTG Journal Datacom Summer 1983]<br />
Take the covers off the teleprinter and locate, on the left hand- side at the top, a hexagon knob which<br />
will. have a single stripe on it at the twelve o'clock position Turn this knob so that there are three (3)<br />
stripes in the top position. This will enable the "BELL" character to be punched without the need to<br />
disengage the perforator as detailed in my previous article concerning the <strong>Creed</strong> 7E RP. The <strong>444</strong> will<br />
perform all the normal functions even though the knob has been repositioned.<br />
When the teleprinter was used in Post Office service, a condition could exist whereby the tape reader<br />
was being used for checking a prepared tape on "Local" service. The tape reader may be switched off<br />
remotely by the incoming call thus attracting the attention of the operator to revert back to normal<br />
service and take the incoming message. This is done by energising a small electro-magnet which<br />
disengages the tape transmitter clutch thus stopping the tape. The operating speed of the mechanism<br />
is so fast that energising the electromagnet via the "Bell" contacts does not give the clutch arm time to<br />
fall. Therefore a delay must be introduced and this is done very simply by connecting a Post Office<br />
type relay with two normally open contacts. One pair is used to latch in the relay and the other pair to<br />
energise the electro-magnet<br />
With a prepared tape in the tape transmitter, the "TAPE TRANS ON" key is pressed and the auxiliary<br />
contacts on this key will provide a voltage for the PO type of relay which will be energised when the<br />
"Bell" contacts close on receipt of the characters "FIGS BELL" which will have been punched into the<br />
tape at the appropriate place in the message, i.e., "Your signals. are-----". The relay now maintains<br />
itself via its own contacts and at the same time via the second pair of contacts energises the electromagnet.<br />
This will now stop the tape because the electro-magnet remains energised and gives the<br />
clutch arm time to drop.<br />
Due to the excellent interlocking of the mechanism of the <strong>444</strong>, it will be necessary to press the "TAPE<br />
TRANS OFF" key so that the other stations report may be typed out. This action will then de-energise<br />
the electro-magnet and restore things to normal. After the report has been sent, the tape may be<br />
started once more and the station details or whatever may be sent until the tape comes to the end and<br />
the "BELL" contacts once more do their job and stop the tape. Figure 1 shows the circuit.<br />
END OF LINE INDICATOR LAMP<br />
Due to the excellent noise silencing of the covers on the <strong>444</strong>, a conventional bell. would not be heard<br />
when the 55th character had been sent so an indicator light has been provided. This is normally<br />
connected across the Tongue and Space contacts where 80 Volts is available. In amateur operations<br />
this voltage is not normally available so an external voltage is required. This is introduced via pins 10<br />
and 11 on the 50 pin plug. These pins will be found to be jumpered across at the back of the machine<br />
mounted plug.
The <strong>444</strong> on 45 bauds - Stuart Dodson, G3PPD<br />
[Published in the BARTG Journal Datacom Winter 1983]<br />
The ITT-<strong>Creed</strong> <strong>444</strong> <strong>Teleprinter</strong> is designed to run on either of 2 speeds: 50 bauds or 75 bauds. In<br />
addition, in order to remove the ‘motor hash’ or radio interference problems that are encountered with<br />
governed motors, the motor used on the <strong>444</strong> is of the synchronous type which produces no<br />
interference, but which is locked to the frequency of the mains.<br />
To change a <strong>444</strong> from 50 bauds to 75 bauds it is necessary to change 2 gears. This is a simple job,<br />
particularly as the gears have been designed so that one gets smaller as the other gets larger, and so<br />
the centre-to-centre spacing remains the same, and no adjustments are necessary, except when the<br />
machine first leaves the factory.<br />
The most widely used speed for HF working and for a lot of QSO's on VHF has for years been 45.45<br />
bauds, but the problem is that <strong>Creed</strong> do not make gears for this speed. However, pairs of gears for<br />
45.45 bauds have been made privately, and have been successful even though the extra number of<br />
teeth has made the larger gear teeth very fine. These gears can also be changed like the others<br />
without any adjustments. Unfortunately their cost has risen to about £25 per pair, and at this price<br />
there is little demand.<br />
One solution arrived at independently by 2 or 3 groups was to use the existing 50-baud motor pinion<br />
and replace one gear only. This one gear had to be specially designed, as the teeth angles are<br />
different to mesh with the 50-baud pinion, and as it must have 44 teeth of a set size the finished<br />
diameter is slightly larger than the 40-tooth 50-baud gear it replaces. Thus a small adjustment is<br />
necessary, which will take you 5-10 minutes at first, and 2 minutes once you know how to do it.<br />
Thus all you need to do is to purchase one gear which currently costs £9.25 (including packing and<br />
postage) - this compares favourably with the 50-baud gear it replaces, which currently costs £14. Your<br />
machine must, of course, be on 50 bauds already, or you will need a 50-baud motor pinion which is<br />
£11.<br />
EXAMINING THE <strong>444</strong> AND FINDING OUT WHAT SPEED IT IS ON<br />
Stand in front of the machine, lift the cover and locate 2 chrome screws in the top side edges of the<br />
grey cabinet. Turn these 90 degrees, remove the paper winder knob from the left-hand side, and lift off<br />
the whole top of the machine cabinet.<br />
Now turn the machine around so that you are standing behind it. Locate the grey diecast box, which is<br />
the motor assembly and which has the drive shaft coming out on your left-hand side. Remove a red<br />
plastic dust cover from over the gears immediately to the left of the motor. This will expose a small<br />
black gear which is the motor pinion, and a larger 'nylon' or composite nylon/aliuminium gear. Remove<br />
a 4BA bolt in each gear, and so remove both gears. Count the teeth, and hence determine the speed<br />
from the table below:<br />
Baud Rate<br />
(Speed)<br />
Number of Teeth<br />
(Motor pinion)<br />
75 9 30<br />
50 8 40<br />
45 9 50<br />
45.45 8 44<br />
Number of Teeth<br />
Gear
FITTING INSTRUCTIONS FOR USING THE SINGLE GEAR WITH 44 TEETH<br />
Having confirmed that the machine is in working order and already on 50 bauds, remove the paper<br />
winder knob from the left-hand side, turn 2 chrome screws in the top edge of the sides of the cabinet<br />
through half a turn and lift off the top half of the machine cabinet.<br />
Now turn the machine around so that you are behind it. Locate the grey diecast box that is the motor<br />
assembly and find the 2 large securing screws that hold this assembly to the main chassis of the<br />
machine. You will also find provision for adjustment just below the right-hand securing screw, but<br />
leave this for now.<br />
Remove the red dust cover from over the gears on the left-hand side of the motor. Locate the 4BA bolt<br />
in the larger 40-tooth gear. Undo and remove this gear. Leave the existing 8-tooth motor pinion on the<br />
motor shaft.<br />
Now undo the large securing screw on the left-hand side about 2 turns. Also undo the large right-hand<br />
securing screw about the same amount. Insert your screwdriver between the adjusting screw and<br />
casting on the right-hand side, and so lift the right-hand side of the motor assembly about a quarter of<br />
an inch. You now have room to slide on the slightly larger and tougher 44tooth gear. Do this and<br />
secure with the 4BA screw.<br />
THE ADJUSTMENT - Let the right-hand side of the motor assembly go back towards its original<br />
position. Hold the larger gear in your left hand and rock the gear backwards and forwards - there will<br />
be no play. Try lifting the right-hand side of the motor assembly and rock the gear again. There will be<br />
a clonk-clonk as there is some play or clearance. Tighten the large securing screws a small amount<br />
and raise or lower the right-hand side of the motor assembly to detect the barest possible play, then<br />
secure the screws. Leave the adjusting screw setting on the right-hand side as it was, in case you<br />
want to return to 50 bauds.<br />
RETURNING TO 50 BAUDS - Remove the 44-tooth gear, replace the 40-tooth gear, undo the lefthand<br />
large screw 2 turns, and undo the right-hand large screw. There will be a clonk as the motor<br />
assembly falls back to its original position. Tighten the securing screws and you are back on 50 bauds.<br />
Those amateurs such as RAYNET people who need to change back in a hurry will manage this in<br />
about 60 seconds I expect!<br />
The 44-tooth gears for 45.45 baud are obtainable direct from Stuart Dodson, G3PPD, 63 Malvern<br />
Avenue, South Harrow, Middlesex (Tel: 01-422 4153) at £9.25 including packing and postage.
More on the <strong>444</strong> Answerback - Frank Wyer, G8RY<br />
[Published in the BARTG Journal Datacom Spring 1984]<br />
Those of our readers who have managed to encode the porcupine Answer-Back unit (as described in<br />
Stuart Dodson's article in the December 1982 BARTG Newsletter) will doubtless have been annoyed<br />
by it triggering off and printing whilst the machine is receiving text from the station in the QSO.<br />
This condition may be inhibited very simply, but not on all machines, by raising the bright metal pawl<br />
located behind the Answer-Back unit. This pawl lies parallel with the front of the machine, and at its left<br />
hand end it is formed back on itself, so that in plan view it looks Like a letter ‘J’. The folding back<br />
feature forms a very convenient bearing for the pivot.<br />
It will be observed that if the “Figs/Who Are You” keys are pressed, the transverse rod to the rear will<br />
momentarily move to the Left, carrying with it an arm which is at right angles to the rod. This arm will<br />
come in contact with the pawl pivot end and trigger off the<br />
Answer-Back unit, which will go through its sequence and then stop. If, as mentioned above, the pawl<br />
is raised, the arm will move underneath it and will not operate the AnswerBack unit, but only if the pawl<br />
is raised and NOT moved to the Left. Otherwise the triggering will take place.<br />
Some machines have a deep section arm with a hole in it, and will not pass freely under the pawl.<br />
Close inspection will soon make it obvious. In order to keep the pawl raised, the end of the spring<br />
should be Lifted from the short arm of the pawl, and then the arm on the rod will pass underneath<br />
without triggering the mechanism. I am indebted to the close cooperation of Eddy, G5YM, for this<br />
information. If any readers have any other ideas on inhibiting this action, they are warned not to<br />
release the clamp on the arm attached to the rod, as this will upset the black and red printing<br />
changeover.<br />
More on the <strong>444</strong> Bell - Frank Wyer, G8RY<br />
In the article on using the Bell contacts on the <strong>Creed</strong> <strong>444</strong> (in the Summer 1983 issue of the BARTG<br />
Newsletter), there was a wire missing from the diagram on page 25.<br />
A wire must be connected from the left hand side of the relay coil to the right hand contact on the top<br />
pair of contacts, otherwise the relay will not latch in.
CREED <strong>444</strong> END OF LINE LAMP - G3PPD<br />
[Published in the BARTG Journal Datacom Winter 1984]<br />
If you have one of these machines and your red lamp doesn't come on to warn you that you are<br />
getting near to the end of a line. You will find it useful to get it working. Please check the following.<br />
First of all, make sure that there is a lamp in position, or have you simply an empty red plastic cover?<br />
The lamp normally fitted is a NEON with a series resistor.<br />
This lamp usually works from the 80 volt supply feeding the 'Here-is" transmitter contacts. As neons<br />
need at least a 65V supply, little response can be expected from the 12V used in the ST5.<br />
In the past, someone simply fitted a 1.2V bulb, this then worked, but as you typed nearer to the right<br />
hand side, the lamp came on, the ST5 12V line dropped and the MARK Frequency changed, so this is<br />
not recommended.<br />
One method that has proved to be satisfactory is<br />
to run the lamp off of normal 240V ac mains. To<br />
do this you will need to remove the paper winder<br />
control knob from the left hand side of the <strong>444</strong>, lift<br />
the lid and turn two chrome 'oddie' screws<br />
through 90 degrees, these are located in the top<br />
left and right edges of the cabinet, and then lift off<br />
the machine cover.<br />
Now locate two black plastic covers, see sketch above. Remove the securing screw from the top and<br />
lift off cover A. Now remove the securing screw from the front and so remove cover B. Under cover B<br />
there are two insulated tag blocks, we are interested in the left hand one, which is above the 'Here Is'<br />
transmitter, and we are only concerned with the three left hand tags.<br />
Connect a 47K resistor to each of these, that is<br />
the free GREY and connect the other ends of the<br />
by running insulated extension wires input to the<br />
machine underneath the and the free<br />
BLUE/WHITE, resistors to the ac mains, to<br />
connect with the mains 6-way mains connector.<br />
Identify the rear left hand tag. This will have a<br />
yellow and a grey wire connected to it. Cut the<br />
grey wire about 1/2 inch from the tag. Now<br />
identify a blue and a blue/white wire on the centre<br />
left hand tag, cut the blue/white wire about 1/2<br />
inch from the tag. Ignore the tag end and instead<br />
concern yourself with the 'free' ends of the GREY<br />
and BLUE/WHITE wires that used to go to the<br />
tags.<br />
Now when the machine is used and the carriage moves to the right hand side, the lamp should glow.<br />
Re-fit cover B then cover A, replace the machine cover, lock the oddie screws by simply pressing<br />
down, or turn through 90 degrees and then press down. Close the lid and replace the paper winder<br />
control knob.
<strong>Creed</strong> <strong>444</strong> WRU Disable on RX<br />
In response to a request to remove the "HERE IS" or "WHO ARE YOU" action on the CREED <strong>444</strong>,<br />
during reception. Yet to leave the "HERE IS" ANSWER BACK DRUM operational when transmitting so<br />
preventing any spurious operation of this device from unwanted operation when on receive and the<br />
consequent loss of 20 received characters. I made a request for information on how to do just this.<br />
I am indebted to Ted Hatch, G3ISD, who immediately sent a rather old photostat, from an earlier time,<br />
when adjustments and alterations to machines were all the rage.<br />
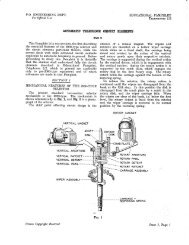
From the sketch on the adjoining page, you will see that it is first necessary to identify a small subassembly<br />
just above the motor. This sub assembly carries eight operational 'levers' which I have<br />
labelled A, B, C, D, E, F, G, and H.<br />
Apparently, we are concerned with lever "C" only.<br />
In the days when these machines were used on important TELEX business, it was necessary for them<br />
to confirm their unique 'IDENTIFICATION' by releasing the WRU or who are you action when the<br />
appropriate command character was received. (Indeed many of these machines are still in use, but<br />
they are gradually being replaced by the all singing all dancing computer imitation).<br />
In the original use, a nylon answer back drum was coded with a 20 character identification, indeed<br />
some of our members have their callsign and QTH on this answer back drum. So that when they press<br />
the HERE is key it transmits this information.<br />
The trouble is that when a random corruption of ONE character takes place, this can cause the WRU<br />
action to run through its sequence and so destroy 20 incoming characters.<br />
The way to cure it, is to arrange that 'lever C' cannot fall. This is done by unhooking the spring, that<br />
would normally pull lever C down when the WRU command is received, and instead arrange the<br />
spring to keep this lever in the 'UP' position.<br />
Of course, there is nothing to connect the spring to, and so resourceful amateurs of a previous<br />
generation, would decide where they wanted to fix the spring, and 'tap' an SBA hole, and fit an 8BA<br />
anchor screw.<br />
If you have an uncoded Answer Back Drum, then it is possible to code this with your own 20<br />
characters, which will include FIGURE and LETTER shifts. The information on how to do this<br />
appeared in the December 82 BARTG Magazine. However in case of difficulty I will send you a<br />
photocopy on receipt of an S.A.E. - Editor.<br />
PLEASE NOTE: More articles on MACHINE ADJUSTMENTS or MODIFICATIONS are required. The<br />
CREED <strong>444</strong> is still very popular and the easiest way of getting going on RTTY is to use a machine and<br />
an ST5.
LUBRICATION INSTRUCTIONS FOR THE CREED <strong>444</strong> - G4VSZ<br />
[Published in the BARTG Journal Datacom Winter 1988]<br />
I have been running a <strong>Creed</strong> <strong>444</strong> for several years now but to date I have not seen any article that<br />
gives reference to the lubrication of the <strong>Creed</strong> <strong>444</strong>. These notes are not intended to be exhaustive but<br />
an initial guide. I have found that application of oil and grease on a regular basis greatly improves the<br />
operation of the unit.<br />
The workshop manual for the machine gives in excess of 130 oiling points and 10 greasing points.<br />
To mention all the oiling points without reference to diagrams would lead to confusion, so I will outline<br />
those which, in my opinion, attention should be given to as a matter of priority.<br />
It is the opinion of an amateur friend, that the maintenance of the machine should be tackled in a<br />
single continuous period, as attempts to continue maintenance after packing away a partially disassembly<br />
machine have resulted in much hair pulling trying to work out where parts go after an<br />
absence of, say, a week.<br />
WARNING<br />
Do be careful just poking about, it is easy to dislodge a component from its normal operating position<br />
and then very difficult to relocate it if you don't know fromwhere you have moved it.<br />
TURN OFF ALL POWER (eg 240 VOLTS AND SIGNALS LINE 80 80 etc ) TO THE MACHINE<br />
BEFORE OPENING THE CASE. ENSURE THAT THERE CAN BE NO CIRCUMSTANCE THAT<br />
WOULD CAUSE THE MACHINE TO SUDDENLY OPERATE.<br />
Care must be exercised when the type basket is not in its fully returned position, ie that position in<br />
which it lies after operating the Manual CR.<br />
TO AVOID ACCIDENT, REMOVAL OF THE BASKET RETURN SPRING IS A WISE PRECAUTION.<br />
This can be done by operating the Manual CR and then lowering the spring off the right hand end of<br />
the type basket. Relaxing the spring will allow it to lie in it operating position unextended.<br />
During the oiling operation the type basket will of necessity have to be moved from end to end of the<br />
silver roller bars.<br />
SPECIAL SERVICE EQUIPMENT.<br />
With early models of the <strong>Creed</strong> <strong>444</strong> the black manual line feed paper advance winder could be used to<br />
turn the machine by removal of the winder from its normal position and locating it in the right hand end<br />
of the extension of the gear pinion at the end of the main assembly shaft.<br />
On the later models this convenient arrangement was altered by the removal of the extension of the<br />
pinion and therefore to enable you to turn the machine by hand it will be a good idea to obtain a 1/2"<br />
box spanner that can be inserted into the right hand side of the machine to mate with the nut head<br />
seen on the end of the gear pinion located just above the lifting handle. When turning this handle<br />
ONLY TURN IT ANTI CLOCKWISE else damage to the machine might result.<br />
Remove the main top casing and put to one side. You will require access to all sides of the machine<br />
and a good light source to enable you to locate the felts etc.
GREASE APPLICATION.<br />
It is recommended that the following parts are lightly greased :<br />
On the main assembly.<br />
(the cross shaft located behind the type carriage.)<br />
G1. Motor pinion<br />
G2. Motor gear on lay shaft (G1 & G2 Mesh).<br />
G3. Main camshaft drive pinion on lay shaft<br />
G4. Main camshaft drive gear (G3 & G4 Mesh).<br />
G5. Transmitter gear on lay shaft.<br />
G6. Feed unit drive gear on main camshaft.<br />
On the feed unit<br />
G7. Feed unit drive gear (G6 & G7 Mesh). G8. Counter unit drive pinion<br />
OILING THE FELTS<br />
On the Main assembly.<br />
(the cross shaft located behind the type carriage.)<br />
1. Felt washer between the friction plates, this is located in the centre of the shaft just to the left of<br />
the main drive cog and its adjacent spring. It is easier to locate the cog by turning the shaft with<br />
the box spanner mentioned earlier (ANTI CLOCKWISE) as this is the only cog that turns on the<br />
shaft whilst the machine is in its rest position.<br />
2. Main clutch coupling felt washers ( access to one through the oil tube ) these are located at the<br />
extreme left hand end of the shaft, observe by looking at the left hand side of the machine<br />
below the white hexagon adjuster, and through the PLASTIC TUBE adjacent to the main<br />
structural support about 4" to the left of the felt washer in 1. Note THE REGULAR OILING<br />
THROUGH THE PLASTIC TUBE HAS BEEN FOUND TO BE THE MOST IMPORTANT<br />
LUBRICATION POINT ON THE WHOLE MACHINE AND IF MISSED COULD LEAD TO<br />
SEIZURE OF THE MAIN ASSEMBLY SHAFT.<br />
3. Selector camsleeve felt, located to the left hand side of the machine just above 2 above.<br />
Main base and side casting.<br />
4. Main clutch detent felt pads, located as you look into the machine on the left hand side<br />
between the silver running bar and the plastic pipe, a group of felts about 1/2" wide.<br />
5. Main clutch detent pivot felt, just a little in front and to the left of 4 between the side casing and<br />
below the plastic pipe.<br />
6. Latch reset arm pivot felt, located behind 4; two circular felts on a pin.<br />
7. Code read level pivot felts, difficult to locate this one. You will have to look into the unit from the<br />
back of the machine. It is then located near to the motor housing on the right hand as you look<br />
into the machine adjacent to the end fixing of a spring.<br />
8. Code read link felt, they are difficult to locate and could only be seen by looking between the<br />
two silver roller bars towards the rear. If you locate the piece of metal with the two screw bolts
in front of 1 and with these take a line from the manual CR to the rear of the machine. The felts<br />
will be seen as a row of 4, closely packed together.<br />
9. Pull bar felts, this unit is located on the base board behind the manual return switch and behind<br />
the end of the operating lever for the MAN CAR RET. The front felts are easy to reach but that<br />
at the back I have yet to be able to reach.<br />
Feed unit<br />
Looking into the front of the machine this is the unit that links to the hours counter.<br />
10. Felt washer between friction plates, are on the shaft and easily seen from the front being below<br />
the front, silver roller bar.<br />
11. Clutch detent felts, difficult to locate but about 2" behind 10 and in front of a clutch above a<br />
lever resting on the assembly with a hole in it. The felts are just below thislever and a second<br />
felt below that also. Access for oiling is through the hole in the lever.<br />
12. Trip latch felt, located just above 11 and immediately below the spring that returns the carriage.<br />
8y gently pushing the spring to the rear the felt can be more easily seen.<br />
1. Function unit.<br />
13. Carriage feed trip lever felts and felt pad, to be able to see these, you have to be a<br />
contortionist. Facing the back of the machine they are located behind the motor cover and<br />
above the two gears that mesh.<br />
14. Carriage return lever felt pad, adjacent to 13.<br />
15. Felts around each end of the shift beam pivot shaft, these are either end of the shaft that run<br />
just above the location of 14.<br />
Code control unit<br />
16. Pivot felts between the control levers. The most difficult to locate. Go to the back of the<br />
machine. Looking over the top of the motor housing you will see several bent pieces of metal<br />
that protrude over the motor housing. The rod upon which they pivot has felts between the<br />
pieces of metal.<br />
To be able to oil these you will have to remove the motor by releasing the two large screw bolts and<br />
pulling the motor away from the back of the machine. To fail to do this and attempt to access in any<br />
other way is likely to lead to disarrangement of the arms and thus make the unit fail.<br />
Type carriage and ribbon unit<br />
To access the felts, remove the paper platen by releasing the two screw bolts on the top and releasing<br />
the ribbon lift and paper feed rods at the right hand side.<br />
17. Ribbon jumper pivot felts (two central and two at the rear) located on the top and easily seen.<br />
18. Ribbon jumper guide pin felt, located under the type carriage look from the right hand side.<br />
19. Type bar casting guide pin felts (located underneath keep plates which are located each side<br />
of the basket behind each of the ribbon carriers, lubricate through the top via the gap around<br />
the black guide rods. DO NOT try to access by disassembly.<br />
Selector unit.
20. Drive link anchor pin felts, located on the left hand side of the machine towards the lower end<br />
of the vertical metal pieces making up the five selector levers almost adjacent to the black<br />
timing control knob.<br />
21. Sequential levers pivot felts, looking a little to the right and below the hexagonal knob you will<br />
see four felts separating the actuating levers.<br />
Trarnsmitter unit.<br />
The transmitter unit cover is located above the HERE IS knob on the right hand side of the machine<br />
with the cover knurled locking nut on the front (these have been known to have a slotted nut). Remove<br />
the cover to exposed working parts.<br />
22. Oiling felt for cam faces, the felt can be seen on the front of the unit low down about 1" long<br />
below the electrical mark space unit.<br />
23. Striker cam lever roller felt, looking from the front of the machine located behind the rear of the<br />
transmitter unit but in front of the front silver roller bar lying just above the main power shaft, a<br />
rectangular felt.<br />
24. Common frame and sequential lever pivot felts, located to the left of and below 22. They are<br />
the felts at the bottom of the teeth for the answer back drum. Access only possible when the<br />
answer back drum has been removed.<br />
25. Lock frame pivot spindle felts, most difficult to locate, right beneath the power shaft and can<br />
only be seen when you look in from the right hand side of the machine.<br />
26. Send/ receive lever pivot felt, located on the front of the lever.<br />
27. Tape reader delay pivot felts, located on the pivot arm observed to the left of 26.<br />
28. Answer back trip shaft felts, located below the answer back drum on the outside of the casing,<br />
the rear one is difficult to see.<br />
Tape reader<br />
For access to this area for lubrication, removal of the keyboard cover is required and, in addition,<br />
removal of the tape reader cover.<br />
To remove the KEY HOARD COVER loosen the two retaining screws located behind the cover and<br />
fixing into the base of the machine and gently ease the cover away. It is sometimes necessary to<br />
depress the figures shift key to allow the figures keys to depress slightly.<br />
Then remove the TAPE READER COVER, first remove the screw retaining the pecker cover but do<br />
not remove until you have removed the three retaining screws for the tape reader cover. Make sure<br />
that none of them or the accompanying washers are dropped into the machine. Most carefully remove<br />
the code pecker cover as it is very easy to damage/break a code pecker or peckers!!!!<br />
29. Clutch coupling felt, believed to be located between the two toothed dog clutch plates.<br />
30. Oiling felt for the cam faces, located below the peckers, a large felt, laid horizontally.<br />
31. Reset alarm stop lever felt, located at the bottom end of the two levers that close, near to the<br />
clutch mentioned in 29.<br />
32. Sequential lever felts, located on the levers just towards the front of machine from 31.
33. Alarm stop lever felts, located on the end of the shaft upon which 32 runr about 1" to the rear of<br />
the machine.<br />
34. Alarm trip lever felts, to see this one you will have to lift up the machine on the right hand side<br />
and look across the bottom and the circular felt will be seen on a lever just inside the edge of<br />
the mechanism.<br />
35. Pawl carrier felts, easy one, look for the paper advance wheel with its many spikes and it is the<br />
felt adjacent.<br />
36. Feed pawl felts, just to the other side of the wheel mentioned in 35 and a little below will be<br />
found this felt.<br />
37. Pecker rack roller and pivot felts, located easily, to be seen from the top to the rear of the<br />
Pecker rail.<br />
Carefully replace the reader cover being very care thatthe peckers and the striker are not damaged.<br />
Punch Tape Unit<br />
38. Code reading bars pivot felts, located behind the punch tape maker between the long arms.<br />
39. Punch suppression frame pivot felt, located about 1" below 38 and against the casting of the<br />
frame.<br />
40. Punch suppression latch pivot felts, on about the same level as 39 and a little in front.<br />
41. Punch suppression reset frame pivot and felt, looking in at the side of the machine you will see<br />
a hexagon shaped knob just to the right. Below, near to the frame, you can see this felt.<br />
42. ON/ OFF remote control lever felts, located below the micro switch on the left hand side of the<br />
machine.<br />
Carriage return Piston.<br />
43. Loosen the bolt holding the lever that actuates a plunger, you do not need to completely<br />
remove the bolt. Move the lever aside and withdraw the plunger.. After withdrawing the plunger<br />
the felt is located. By lubrication the dampening action is improved.<br />
Oil holes<br />
Main Assembly<br />
H1. Two oil holes in the main camsleeve assembly (in cam spacer) you will have to turn the<br />
shaft to expose (ANTI-CLOCKWISE DIRECTION).<br />
Main base and sides casting<br />
Feed unit .<br />
H2. Oil hole in the latch reset arm, located adjacent to the left side casting at the rear.<br />
H3. Oil hole in camsleeve, a rectangular hole just in front of the rear large spring which is<br />
forward of the toothed clutch plates.<br />
Function Unit
H4. Oil hole in the power bail, located just behind the motor.<br />
H5. Oil hole and felt pad on the function reset lever, the long round bar right beneath the<br />
location to the paper feeder. Seen only with paper roll.and platen removed.<br />
UNLESS THEY ARE ANYTHING TO DO WITH THE ELECTRICAL SIDE OF THE MACHINE for the<br />
remainder I suggest that IF IT MOVES and there are TWO METAL SURFACES in contact OIL IT<br />
however be most careful to ensure that NO OIL/ GREASE finds its way onto the ELECTRO MAGENT<br />
POLE PIECES to the left hand side of the machine, in fact application of a degreasing agent in the<br />
area could be considered (definitely ! Ambertron).<br />
Replace all items in their proper places and remember do not operate the machine with the lid off else<br />
things tend to fall in doing great damage and you also get splashed with oil!!! The paper roller handle<br />
is the last thing to be put back in.<br />
I hope that I have not left out any felts or oil holes nor have wrongly identified them.<br />
Finally may I give acknowledgment to GOAMZ for some passing comments, G1LHD who had the task<br />
of carrying out the maintenance of his machine using the notes and gave comments to aid<br />
identification of the locations and to G4EVY who keeps me supplied with specialist commodities for<br />
the <strong>Creed</strong> <strong>444</strong> and who has available the correct lubricants, paper rolls/tape (cash with order after<br />
phone contact on (0634) 716463.<br />
MACHINE ASSEMBLY
THE CREED <strong>444</strong> TELEPRINTER By Alan Hobbs G8GOJ<br />
The Summer 1995 issue of Datacom contained an article from G4RUZ (1) which detailed the problems<br />
that he faced in connecting a <strong>Creed</strong> <strong>444</strong> teleprinter to an ST5 terminal unit. G4RUZ is correct when he<br />
states that the information has been published before (2) although there were some errors in the listed<br />
connections. The following issue of the BARTG Newsletter (3) contained additional information on<br />
connecting to the <strong>444</strong>, and a corrected list of ST5 connections. With the resurgence in interest in<br />
mechanical RTTY perhaps this would be the time to republish the information.<br />
No matter how many pins are fitted to the teleprinter signals plug only five of them are actually<br />
required. The remaining pins are normally associated with functions specific to the operation of the<br />
machine within the U.K. Telex network, and are of no further interest to us. Of these five connections,<br />
two are required for the receiving electromagnet, and three are required for the transmitter contact.<br />
The receiving electro-magnet may be thought of as a relay which responds to the magnitude and<br />
direction of the current flow, and which remains in its last position when the current flow is removed.<br />
The normal current flow is 20mA, which would be provided by switching a high voltage, usually 80<br />
volts, through a series current limiting resistor in order to minimise the overall circuit time constants.<br />
The transmitter contact consists of a single changeover contact driven from the machine keyboard,<br />
with the two fixed contacts being designated "Mark" and "Space", and the contact which moves<br />
between them being known as the "Tongue". In the rest condition, the tongue is in contact with the<br />
mark contact, irrespective of whether the machine is connected to the mains supply.<br />
For <strong>Creed</strong> machines, the signals connection was standardised as a 12 pin “Multicon” or miniature<br />
“Jones” plug, and the pin connections used, together with their respective connections to the ST5<br />
printed circuit board, are:<br />
Function Plug ST5<br />
Mark 1 29<br />
Tongue 2 17<br />
Space 3 28<br />
Magnet 7 21<br />
Magnet 9 20<br />
This standard was also followed with the model <strong>444</strong> teleprinter which was fitted with a 50 way plug.<br />
Many <strong>444</strong>'s were also fitted with punched tape facilities, in the form of a tape punch mechanically<br />
driven from the receiving mechanism, and a tape reader unit driving a second single changeover<br />
contact. In order to inter-connect the tape reader and keyboard contacts, so that they can both be<br />
used for transmitting without any additional switching, it is necessary to link pins 12 and 13 on the 50<br />
pin plug.<br />
As mentioned above, the receiving electro-magnet is polarity sensitive. Once the connections shown<br />
above have been made, it may be found that the teleprinter receiving mechanism “chatters” when the<br />
ST5 is selected to local copy. If this should occur, the two connections to the magnet, pins 7 and 9,<br />
should be inter-changed.<br />
For anyone contemplating the use of a <strong>444</strong> teleprinter, or any similar mechanical RTTY equipment, the<br />
reader is strongly urged to obtain a copy of RTTY The Easy Way (4) from the BARTG publications
manager. This booklet also contains the full signals circuit diagram of the <strong>444</strong> teleprinter, and full<br />
constructional details of the ST5 terminal unit.<br />
Ordering details of this, and all other BARTG publications, will be found towards the back of this issue<br />
of Datacom.<br />
(1) RTTY the Un-Easy Way, by A P Athawes, G4RUZ, Datacom Summer 1995 p30-31.<br />
(2) Connections for the <strong>Creed</strong> <strong>444</strong>, by Tony Oakley, G4HYD, BARTG Newsletter Spring 1983 p5.<br />
(3) Introduction to the ITT-<strong>Creed</strong> <strong>444</strong>, by Stuart Dodson G3PPD, BARTG Newsletter Summer 1983<br />
p16-20.<br />
(4) RTTY The Easy Way, 5th edition March 1985, Edited by A G Hobbs, G8GOJ.<br />
Alan G8GOJ