

Clack WS1 Install instructions - Discount Water Softeners
Clack WS1 Install instructions - Discount Water Softeners
Clack WS1 Install instructions - Discount Water Softeners

You also want an ePaper? Increase the reach of your titles
YUMPU automatically turns print PDFs into web optimized ePapers that Google loves.
CLACK <strong>WS1</strong> WATER SOFTENER INSTALLATION<br />
<strong>Discount</strong> <strong>Water</strong> <strong>Softeners</strong> recommends using a licensed plumber to install your<br />
water softener. The following installation <strong>instructions</strong> are for use with the water<br />
softener system you now own. <strong>Discount</strong> <strong>Water</strong> <strong>Softeners</strong> assumes no responsibility<br />
for improper installation or injury.<br />
Additional <strong>instructions</strong> are also in your water softener manufacturers’ manual on<br />
page 7 Please print these <strong>instructions</strong> and use them in conjunction with your manual<br />
for installing and programming your system.<br />
Step 1:<br />
Location of your softener is important. It should be in a protected dry, level and<br />
non-freezing area (34-120 degrees F). The 2 tanks should be set close to each other.<br />
The round tank is your salt (brine) tank (for softener salt or potassium chloride) and<br />
it is the tank that you will have to refill with salt from time to time, so make it the<br />
more accessible of the 2 tanks. Do not put salt in this tank until you have put the<br />
softener into service and have tested the cycles.<br />
Step 2:<br />
You will need a standard outlet that is not controlled by a switch. You should also<br />
have a floor drain located nearby. Avoid running your water softener drain up. This<br />
could lead to future problems during regeneration.<br />
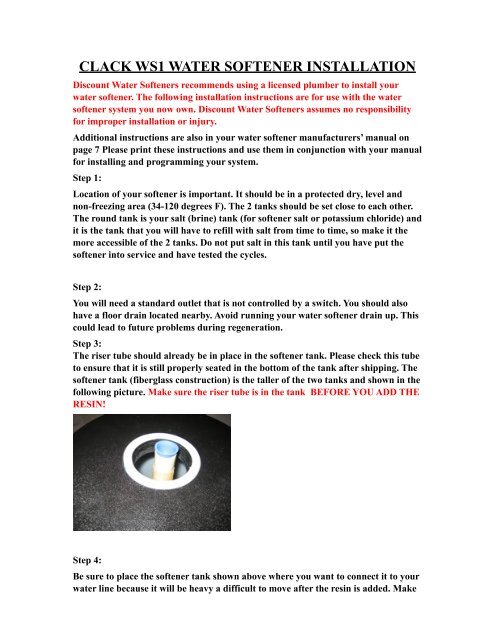
Step 3:<br />
The riser tube should already be in place in the softener tank. Please check this tube<br />
to ensure that it is still properly seated in the bottom of the tank after shipping. The<br />
softener tank (fiberglass construction) is the taller of the two tanks and shown in the<br />
following picture. Make sure the riser tube is in the tank BEFORE YOU ADD THE<br />
RESIN!<br />
Step 4:<br />
Be sure to place the softener tank shown above where you want to connect it to your<br />
water line because it will be heavy a difficult to move after the resin is added. Make
sure you install your softener in line before your hot water heater to insure that you<br />
have full benefit of the softener system.<br />
Step 5:<br />
Be sure to cover the open upper end of the riser tube with tape (or temporary plug)<br />
provided as shown to keep any resin from falling into the riser tube while pouring<br />
the resin into the softener tank. Remove the tape or cap after filling the tank with<br />
resin.<br />
Step 6:<br />
Place the funnel into the softener tank as shown, and slowly pour the resin into the<br />
mineral tank. Some of our larger orders already come with the resin added to the<br />
tank and this step is not necessary<br />
Step 7:<br />
Carefully remove the tape or cap from the riser tube. Do not pull upwards on the<br />
distributor tube.<br />
Step 8:<br />
The control valve head can now be screwed onto the softener tank. Be sure the large<br />
O-ring is in place, and lubricated. As you start to screw the control valve onto the<br />
tank, make sure the hole in the center of the control valve fits over the riser tube.<br />
The control valve should be hand tightened, snug and tight to eliminate a possible<br />
leak, clockwise.
Step 9:<br />
You are now ready to install the bypass valve to the control valve. Turn off main<br />
water valve. <strong>Water</strong> connections to and from softener should now be connected. For<br />
Premier Performance systems you will need to install your bypass along with either<br />
your plastic connections or brass “sweat” fittings. The plastic fittings will need to be<br />
wrapped with Teflon tape or pipe dope to prevent leaks before connecting to your<br />
existing pipes. Brass connections will need to be “sweated” in. CAUTION: YOU<br />
MUST PAY ATTENTION TO THE IN AND OUT ARROWS ON THE VALVE TO<br />
BE SURE THE SOFTENER IS PIPED PROPERLY.<br />
or<br />
Step 10:
You will need a drain for the backwashing cycles. This should be no longer than 20<br />
feet from the water softener. You will need to purchase this flexible 1/2 i.d. plastic<br />
pipe (can be vinyl, polyethylene etc. and same size will be used for the brine tank<br />
overflow ) and a small clamp to hold the tubing over the fitting. This backwashing<br />
drain line will be under high pressure when the backwash cycle is working. Make<br />
sure the drain line is secured. The drain line will need to drain into a drain, which<br />
should be a minimum of 1 1/2” size, and ideally be below the top of the head of your<br />
softener. Local codes should be adhered to. On the Premier Performance system<br />
there is a side connection where you will connect this drain line. The white fitting<br />
shown in picture<br />
Note: Never connect the drain line directly<br />
into a drain. Allow an air-gap between the drain line and waste line to prevent<br />
possibility of back- siphoning.<br />
Step 11:<br />
You will now need to connect the brine tank line to the water softener valve. Attach<br />
the clear tubing provided from the brine tank to the connection fitting on the valve<br />
that has the black compression fitting in the picture First attach the connection<br />
fitting to the valve then attach the tubing to the valve with the insert in place as<br />
directed. On the other end, attach the tubing to the brine tank as shown.<br />
Step 12:<br />
INITIAL POWER UP<br />
1. Add salt to the salt tank after moving it to the desired spot that is accessible for<br />
refill. With a bucket or hose, add approximately 4 to 6 gallons of water to the salt<br />
tank or until the water is at least 1 inch above the salt grid.
2. Set your bypass in bypass mode and slowly turn on the main water valve to your<br />
home until all pipes are pressurized. Now open the bypass valve SLOWLY. You do<br />
not want to be surprised by leaks. Let the resin tank fill completely, then open the<br />
bypass valves the rest of the way. CAUTION: If opened too rapidly or too far, resin<br />
may be lost out of the tank into the valve or the plumbing. In the 1/4 open position,<br />
you should hear air slowly escaping from the valve drain line.<br />
3. Plug the power supply transformer into a socket that is not controlled by a switch<br />
or timer.<br />
IMPORTANT NOTES BEFORE PROGRAMMING:<br />
Make sure you know your system capacity and program it (refer to your mfg.<br />
manual here) for 90% of your total capacity for reserve water in case you have<br />
excessive water uses from time to time. Ex: 32,000 grains 90% = Approx 29,000<br />
grains capacity.<br />
Once you program in the system capacity the control will divide your total available<br />
capacity by your grains per gallon of hardness to get your gallons of water.<br />
Ex: 32,000 grain unit x .90 equals 29,000 available grains per cycle. If you divide<br />
that by your grains per gallon in hardness say it’s 20 gpg. You will have approx.<br />
1450 gallons of water between regenerations.<br />
4. Program your water softener by also setting the time of day and hardness. Here<br />
is also where you will need to refer your manufacturers owner's manual for your<br />
particular water softener settings and programming. Your only changes should be<br />
on the capacity, hardness, time of day and salt setting (if desired).<br />
5. Once your softener is programmed advance your controller to manual<br />
regeneration. The regeneration process can take about 90 minutes.<br />
6. Check for any leaks during this initial regeneration. Also make sure that there is<br />
water being drawn from the salt tank during brine draw and water back in the salt<br />
tank after the regeneration is complete.<br />
7. After the initial regeneration it is always a good idea to put your water softener<br />
into a second manual regeneration to ensure that the salt has dissolved making a full<br />
brine solution. Space out any manual regenerations by at least 4 hours for proper<br />
brine creation.<br />
8. Your softener should now be providing you with softened water.