K13-N17 Training Manual.pdf - DOTS - Nissan
K13-N17 Training Manual.pdf - DOTS - Nissan
K13-N17 Training Manual.pdf - DOTS - Nissan

Create successful ePaper yourself
Turn your PDF publications into a flip-book with our unique Google optimized e-Paper software.
www.nissanlearningacademy.com.au<br />
training@nissan.com.au
Foreword<br />
The information in this <strong>Training</strong> <strong>Manual</strong> should not be interpreted as a basis for<br />
warranty or goodwill claims against <strong>Nissan</strong> Motor Co. (Australia) Pty. Ltd. (NMA)<br />
unless so designated.<br />
This Technical <strong>Training</strong> <strong>Manual</strong> is intended for use by NMA & <strong>Nissan</strong><br />
Dealership Technical Personnel. It is not designed for the use by press or for<br />
customer distribution.<br />
Before quoting any specifications be sure to check the relevant Service <strong>Manual</strong><br />
and Technical Bulletins.<br />
Right for alteration to data and specifications at any time is reserved. Any such<br />
alterations will be advised by <strong>Nissan</strong> through Technical and Sales Bulletins.<br />
©2012 <strong>Nissan</strong> Motor Company (Australia) Pty. Ltd.<br />
Inc. Victoria<br />
Ref: Technical <strong>Training</strong> Department.
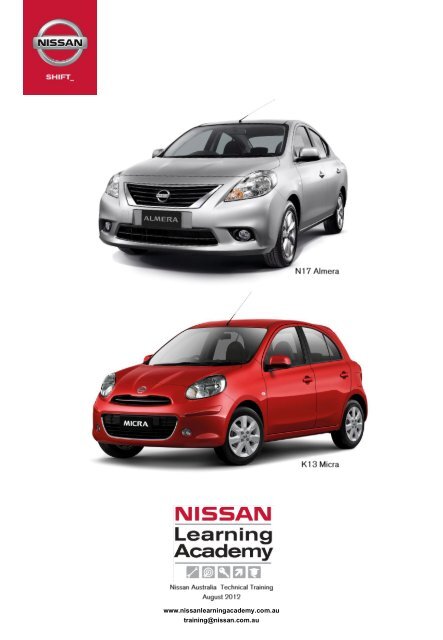
<strong>K13</strong> Micra & <strong>N17</strong> Almera New Model Introduction<br />
<strong>Nissan</strong> Australia. August 2012<br />
ABOUT THIS TRAINING MANUAL<br />
The purpose of this document is for <strong>Nissan</strong> Dealer Technical Staff self study purposes. If anything<br />
contained within this document gives any doubt, please contact <strong>Nissan</strong> via a Non Vehicle related<br />
TechLine enquiry to clarify the information contained within this document.<br />
The information in this <strong>Training</strong> <strong>Manual</strong> should not be interpreted as a basis for warranty or goodwill<br />
claims against <strong>Nissan</strong> Motor Co. (Australia) Pty. Ltd. (NMA) unless so designated.<br />
FUTURE UPDATE’S OF THIS TRAINING MANUAL?<br />
Additional information will be collated & added to this document at a later date. When this does occur, a<br />
special amendment document will be published on the new <strong>Nissan</strong> Learning Academy.<br />
Log onto www.nissanlearningacademy.com.au for more detail or e-mail training@nissan.com.au<br />
This actual <strong>Training</strong> <strong>Manual</strong> will also be readily available at anytime for download & printing within each<br />
<strong>Nissan</strong> Dealership.<br />
OTHER INFORMATION TO SUPPORT THIS TRAINING MANUAL<br />
This <strong>Training</strong> <strong>Manual</strong> should be used in conjunction with the “Almera / Micra” online training module. This<br />
is located on the “<strong>Nissan</strong> Learning Academy”.<br />
The <strong>K13</strong> & <strong>N17</strong> “PDI Pack Insert” should also be referred to. This is also available for download from the<br />
NLA. See over page for more details.<br />
<strong>K13</strong> / <strong>N17</strong> SERVICE MANUAL (ESM) (Correct as of August 2012)<br />
<strong>K13</strong> Micra; SM0E-1<strong>K13</strong>G0 <strong>N17</strong> Almera; SM2E-1<strong>N17</strong>G1<br />
These ESM‟s have been automatically issued to all <strong>Nissan</strong> dealers. (via the parts distribution system).<br />
If your dealership does not have any of them, they can be ordered via normal parts channels using the<br />
above quoted publication numbers.<br />
This <strong>Training</strong> <strong>Manual</strong> is designed for the purpose of relaying information about the vehicle & the systems<br />
within it. This <strong>Training</strong> <strong>Manual</strong> is not to be used as the Service <strong>Manual</strong>. Throughout this <strong>Training</strong> <strong>Manual</strong>,<br />
references are made to the Service <strong>Manual</strong> for additional information regarding fault diagnosis, repairs<br />
&/or maintenance.<br />
Once again should there be any doubt, please contact TechLine.<br />
SERVICE TECHNICAL BULLETINS (STB’s)<br />
Please ensure you familiarise yourselves with all<br />
STB‟s relating to <strong>K13</strong> & <strong>N17</strong>.<br />
Once on the screen where all STB‟s are accessed, click<br />
on the “by Model” link & then all the STB‟s will be<br />
re-sorted so that all the <strong>K13</strong> or <strong>N17</strong> STB‟s are together.<br />
1
<strong>K13</strong> Micra & <strong>N17</strong> Almera New Model Introduction<br />
<strong>Nissan</strong> Australia. August 2012<br />
PRE DELIVERY INSPECTION<br />
Pre Delivery Inspection Guide<br />
All <strong>Nissan</strong> vehicles have a strict Pre Delivery Inspection<br />
(PDI) policy that must be adhered to. This package<br />
contains detailed information about the exact PDI<br />
requirements of all <strong>Nissan</strong> vehicles.<br />
A PDI is not just a matter of removing the plastic<br />
protective covers & giving the car a bit of a wash!<br />
Pre Delivery Inspection Guide Updates<br />
From time to time new models will appear & model<br />
changes will occur Therefore updates to the folder will be<br />
required.<br />
These updates are available on the <strong>Nissan</strong> Learning<br />
Academy (NLA) website as follows;<br />
www.nissanlearningacademy.com.au<br />
Log onto your own NLA account, then click on:<br />
- COLLABORATION – tab at the far top right of screen<br />
- Search Libraries – lower left panel<br />
- Service Library folder – central on screen<br />
- Pre Delivery Inspection sub folder – central on screen<br />
Front pages of the PDI inserts shown right<br />
Grey coloured binder was distributed to all<br />
dealer Service Managers in 2008.<br />
E-mail; training@nissan.com.au for replacement<br />
binders
<strong>K13</strong> Micra & <strong>N17</strong> Almera New Model Introduction<br />
<strong>Nissan</strong> Australia. August 2012<br />
2011 ~ 2013MY <strong>K13</strong> Micra Overview<br />
The all-new 2011 ~ 2012 <strong>K13</strong> Micra represents the 3 rd major change to the model since the K11 was<br />
launched in 1994. Although an all new model – the <strong>K13</strong> continues with the same theme as previously;<br />
Summary of the vehicle & features as follows;<br />
- Expanded range of engines; HR12DE (3 cyl ) & HR15DE (4 cyl)<br />
- Transmission options of 5 sp. M/T or 4 sp. E-A/T available across the range<br />
- VDC as standard on all models<br />
- 6 Airbags / 2 seat belt pre tensioners are standard on all models<br />
- I-KEY with “Push Button” ignition system<br />
- Bluetooth phone compatibility<br />
- Auxiliary Audio input capability<br />
- Steering wheel mounted Audio controls<br />
- Drive Computer with Service Reminder & Calendar function (Birthday / Anniversary / NYD reminder)<br />
- Auto Headlights<br />
- Auto A/C<br />
- Speed sensitive Door locks (lock / unlock)<br />
- 9.0M Turning Circle<br />
Spec Levels, Features & Capacities<br />
Reference should be made to the most current New Vehicle Sales brochure in order to determine the most<br />
current Specification Levels & features.<br />
The brochure will also contain information regarding Weights, Dimensions & Capacities.<br />
Country of Manufacture<br />
For the initial production vehicles, <strong>K13</strong> was sourced from Thailand from late 2010 until the end of 2011.<br />
For 2012MY, all <strong>K13</strong> models are now sourced from Indonesia. See page 8 for more details.<br />
3
<strong>K13</strong> Micra & <strong>N17</strong> Almera New Model Introduction<br />
<strong>Nissan</strong> Australia. August 2012<br />
2012 ~ 2013MY <strong>N17</strong> Almera Overview<br />
The all-new <strong>N17</strong> Almera is introduced as an additional passenger vehicle to the <strong>Nissan</strong> model line-up.<br />
Summary of the vehicle & features as follows;<br />
- Engine; HR15DE (4 cyl)<br />
- Transmission options of 5 sp. M/T or 4 sp. E-A/T<br />
- VDC as standard on all models<br />
- 6 Airbags / 2 seat belt pre tensioners are standard on all models<br />
- I-KEY with “Push Button” ignition system<br />
- Bluetooth phone compatibility<br />
- Auxiliary Audio input capability<br />
- Steering wheel mounted Audio controls<br />
- Drive Computer<br />
- Auto A/C<br />
Spec Levels, Features & Capacities<br />
Reference should be made to the most current New Vehicle Sales brochure in order to determine the<br />
most current Specification Levels & features.<br />
The brochure will also contain information regarding Weights, Dimensions & Capacities.<br />
Country of Manufacture<br />
<strong>N17</strong> is currently sourced from Thailand.<br />
4
<strong>K13</strong> Micra & <strong>N17</strong> Almera New Model Introduction<br />
<strong>Nissan</strong> Australia. August 2012<br />
GENERAL INFORMATION<br />
PRECAUTIONS<br />
1. Precautions for Procedures without Cowl Top Cover<br />
When performing the procedure after removing cowl top cover, suitably protect the lower end of<br />
windshield with urethane, etc.<br />
BEWARE;<br />
Take extreme caution when working in the<br />
region of the windscreen as shown left.<br />
The windscreen can be easily broken if the<br />
appropriate cautions are not taken.<br />
2. Other General Precautions<br />
Please make yourself aware of general safety & vehicle handling precautions outlined in section<br />
“GENERAL INFORMATION” of the Service <strong>Manual</strong>.<br />
VEHICLE HANDLING.<br />
1. Towing<br />
Please refer to section “GENERAL INFORMATION” of the Service <strong>Manual</strong> for detailed instructions<br />
regarding Towing of the vehicle.<br />
The tow hook should be used with extreme caution. Vehicle towing MUST be carried out with ALL wheels<br />
raised off the ground.<br />
Short Distance & Emergency use only Recommended Methods<br />
5
<strong>K13</strong> Micra & <strong>N17</strong> Almera New Model Introduction<br />
<strong>Nissan</strong> Australia. August 2012<br />
GENERAL INFORMATION<br />
VEHICLE HANDLING<br />
2. Lifting<br />
Please refer to section “GENERAL INFORMATION” of the Service <strong>Manual</strong> for detailed instructions<br />
regarding Lifting of the vehicle.<br />
In order to avoid serious vehicle damage, please observe these precautions.<br />
Pantograph Jack Lift Points<br />
Use the points that are indicated for the safety<br />
stands.<br />
6
<strong>K13</strong> Micra & <strong>N17</strong> Almera New Model Introduction<br />
<strong>Nissan</strong> Australia. August 2012<br />
Control Units and other Electrical Parts<br />
• Disconnect Battery prior to Disconnection & Connection of ECM.<br />
Never reverse polarity of battery terminals.<br />
• Install only parts specified for the vehicle in question.<br />
• Before replacing the control unit, check the input and output and<br />
functions of the components.<br />
• Do not shock the control unit by dropping or hitting it.<br />
• Be careful to prevent condensation in the control unit due to rapid<br />
temperature changes and do not let water get on it.<br />
• Do not let oil to get on the control unit connector.<br />
• Do not disassemble the control unit.<br />
GENERAL INFORMATION<br />
HANDLING OF ELECTRICAL COMPONENTS<br />
• When using a Digital Multi Meter (DMM), be careful not to let test<br />
probes touch each other. Short circuiting will otherwise result.<br />
• Do not apply excessive force when disconnecting a connector.<br />
• If a connector is installed by tightening bolts, loosen bolt mounting it,<br />
then take it out by hand.<br />
• When installing a connector by tightening bolts, fix it by tightening the<br />
mounting bolt until the painted projection of the connector becomes<br />
even with the surface.<br />
• Before installing a connector, make sure the terminal is not bent or<br />
damaged, and then correctly connect it.<br />
• For removal of the lever type connector, pull the lever up to the<br />
direction pointed to by the arrow A in the figure, and then remove the<br />
connector.<br />
• For installation of the lever type connector, pull down the lever to the<br />
direction pointed by the arrow B in the figure, and then push the<br />
connector until a clicking noise is heard.<br />
7
<strong>K13</strong> Micra & <strong>N17</strong> Almera New Model Introduction<br />
<strong>Nissan</strong> Australia. August 2012<br />
GENERAL INFORMATION<br />
<strong>K13</strong> Vehicle Identification Number Arrangement<br />
8
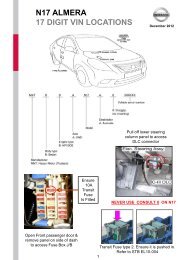
<strong>K13</strong> Micra & <strong>N17</strong> Almera New Model Introduction<br />
<strong>Nissan</strong> Australia. August 2012<br />
GENERAL INFORMATION<br />
<strong>N17</strong> Vehicle Identification Number Arrangement<br />
9
<strong>K13</strong> Micra & <strong>N17</strong> Almera New Model Introduction<br />
<strong>Nissan</strong> Australia. August 2012<br />
Using the <strong>K13</strong> ESM<br />
The ESM for <strong>K13</strong> is no different to other<br />
ESM‟s such as T31 / J32 / Z51.<br />
Reference to section EC for HR12 engine<br />
Take note that the HR12 engine for Australia<br />
is “Type 2”<br />
At the beginning of each section – always<br />
ensure that you refer to the link titled;<br />
“How to check vehicle type”<br />
This 1 off ESM describes <strong>K13</strong> for all markets<br />
globally.<br />
<strong>K13</strong> for Australia comes from the Thailand /<br />
Indonesia factory.<br />
<strong>K13</strong> for Europe comes from the new India<br />
factory<br />
<strong>K13</strong> for China comes from the China factory.<br />
For HR15 – there is only the 1 engine to<br />
select from.<br />
Ignore K9K as this is a small diesel engine<br />
for Europe only<br />
<strong>N17</strong> ESM<br />
The ESM for this model is very similar to the<br />
above described <strong>K13</strong> ESM. At the beginning<br />
of each section – always ensure that you<br />
refer to the link titled;<br />
“How to check vehicle type”<br />
<strong>K13</strong> / <strong>N17</strong> & CONSULT III plus<br />
There is nothing unique or special about<br />
using CONSULT III plus on these models.<br />
Reference notes as follows;<br />
- Software version 22.1 or higher is required.<br />
- The DLC for C-III is on the drivers side<br />
lower dash. Pull off the panel under the<br />
steering column to access.<br />
- When locating <strong>K13</strong> in the list of models –<br />
look for the link “MARCH / MICRA”. It‟s<br />
separate to the “MICRA” (K11 / K12) link.<br />
- When locating <strong>N17</strong> in the list of models –<br />
look for the link “ALMERA”. (Do not select<br />
“SUNNY / ALMERA”)<br />
NEVER USE CONSULT II<br />
ON THESE VEHICLES<br />
ESM & CONSULT III ACCESS<br />
10
<strong>K13</strong> Micra & <strong>N17</strong> Almera New Model Introduction<br />
<strong>Nissan</strong> Australia. August 2012<br />
HR12DE & HR15DE<br />
ENGINE MECHANICAL<br />
<strong>K13</strong> only<br />
HR12DE 3 cylinder<br />
The <strong>K13</strong> Micra utilises 2 different Petrol Engines & the <strong>N17</strong> Almera utilises only 1 engine type as follows:<br />
HR12DE 3 cylinder (<strong>K13</strong> ST only); A 1.2 Litre compact & efficient all alloy, DOHC engine. Available with a<br />
5 speed M/T as standard or 4 speed E-A/T is optional.<br />
HR15DE 4 cylinder (<strong>K13</strong> ST-L & Ti + all <strong>N17</strong>); A 1.5 Litre all alloy DOHC engine. Available with a 5 speed<br />
M/T as standard or 4 speed E-A/T is optional.<br />
The HR series of engines is very closely related to the MR series of engine from the C11 Tiida / J10 Dualis<br />
models. Therefore the design & operation the 2 engine families is near identical.<br />
11<br />
<strong>K13</strong> & <strong>N17</strong><br />
HR15DE 4 cylinder
<strong>K13</strong> Micra & <strong>N17</strong> Almera New Model Introduction<br />
<strong>Nissan</strong> Australia. August 2012<br />
<strong>K13</strong> HR12DE Technical Features<br />
• Displacement (Litres); 1.2L.<br />
• Bore x Stroke (mm); 78.0 × 83.6<br />
• Firing Order; 1 – 2 – 3. (3 Cylinder Engine)<br />
• Compression Ratio; 9.8:1<br />
• Maximum Power (kW); 56 @ 6000 rpm.<br />
Maximum Torque (Nm); 100 @ 4000 rpm.<br />
• Sequential multi-point fuel injection<br />
• Electronic Throttle Control (ETC)<br />
• Valve train DOHC 4-valves-per-cylinder with<br />
Continuously Variable Valve Timing Control<br />
(C-VTC)<br />
• Silent type Timing Chain<br />
• Micro finished Camshaft and Crankshaft surfaces<br />
• Iridium / Platinum tipped Spark Plugs. 100,000km<br />
service intervals<br />
• Chain driven Oil Pump unit attached to the base of<br />
the engine.<br />
• All new pendulum type engine mounting<br />
• Minimum Fuel requirements; RON 91 Unleaded<br />
• Engine Oil specification; 7.5W 30. 10,000km<br />
Service Interval<br />
ENGINE MECHANICAL<br />
12<br />
<strong>K13</strong> / <strong>N17</strong> HR15DE Technical Features<br />
• Displacement (Litres); 1.5L.<br />
• Bore x Stroke (mm); 78.0 × 78.4<br />
• Firing Order; 1 – 3 – 4 – 2. (4 Cylinder Engine)<br />
• Compression Ratio; 10.1:1<br />
• Maximum Power (kW); 75 @ 6000 rpm.<br />
Maximum Torque (Nm); 136 @ 4000 rpm.<br />
• Sequential multi-point fuel injection<br />
• Electronic Throttle Control (ETC)<br />
• Valve train DOHC 4-valves-per-cylinder with<br />
Continuously Variable Valve Timing Control<br />
(C-VTC)<br />
• Silent type Timing Chain<br />
• Micro finished Camshaft and Crankshaft surfaces<br />
• Iridium / Platinum tipped Spark Plugs. 100,000km<br />
service intervals<br />
• Chain driven Oil Pump unit attached to the base of<br />
the engine.<br />
• All new pendulum type engine mounting<br />
• Minimum Fuel requirements; RON 91 Unleaded<br />
• Engine Oil specification; 7.5W 30. 10,000km<br />
Service Interval
<strong>K13</strong> Micra & <strong>N17</strong> Almera New Model Introduction<br />
<strong>Nissan</strong> Australia. August 2012<br />
ENGINE CONTROL SYSTEM<br />
HR12 3 cylinder Engine Control System<br />
- The engine utilises a MAP sensor to measure air quantity. (Like the CR14 engine from K12)<br />
- O2 content is measured via a heated O2 sensor in the exhaust manifold.<br />
(Like the MR engines in C11 / J10)<br />
- Fuel system operation is the same as all other current <strong>Nissan</strong> Gasoline engines. („Returnless‟ system.<br />
Max / constant Fuel Pressure of 350kPa)<br />
- CKPS / CMPS operation & layout is the same as the CR14 engine in K12 (CKPS from transmission<br />
flywheel / driveplate. CMPS is located at rear of cylinder head)<br />
13
<strong>K13</strong> Micra & <strong>N17</strong> Almera New Model Introduction<br />
<strong>Nissan</strong> Australia. August 2012<br />
ENGINE CONTROL SYSTEM<br />
HR15 4 cylinder Engine Control System<br />
The EC system of this engine is near identical to the MR18 engine in Tiida.<br />
14
<strong>K13</strong> Micra & <strong>N17</strong> Almera New Model Introduction<br />
<strong>Nissan</strong> Australia. August 2012<br />
Engine Control POWER SUPPLY<br />
1. IPDM E/R<br />
Power supply for Engine Control is housed<br />
within the IPDM E/R (Intelligent Power<br />
Distribution Module Engine Room).<br />
Major components powered from here are;<br />
ECM Relay (ECM, Ignition Coils, sensors &<br />
actuators)<br />
Fuel Injectors<br />
Fuel Pump Relay (Fuel pump)<br />
ETC Relay (ETC unit via the ECM)<br />
Access to the IPDM is a lot simpler than K12.<br />
The <strong>K13</strong> / <strong>N17</strong> IPDM is located underneath a<br />
cover behind the battery.<br />
Simply lift off the top & then slide up the<br />
IPDM unit out of the plastic brackets.<br />
ENGINE CONTROL SYSTEM<br />
15
<strong>K13</strong> Micra & <strong>N17</strong> Almera New Model Introduction<br />
<strong>Nissan</strong> Australia. August 2012<br />
Engine Control POWER SUPPLY<br />
2. Fuse Block J/B<br />
Various accessory related fuses are located<br />
here. There are no fuses in this location that<br />
relate to engine operation.<br />
It is located on the left side of the dash<br />
assembly. (Open front passenger door to<br />
access)<br />
ENGINE CONTROL SYSTEM<br />
16
<strong>K13</strong> Micra & <strong>N17</strong> Almera New Model Introduction<br />
<strong>Nissan</strong> Australia. August 2012<br />
GROUND - 1 (Engine Control)<br />
The Ground for the Ignition Coils is located<br />
on the LH front side of the cylinder head.<br />
Look behind the alternator – left of the dip<br />
stick. Similar location to the MR engine<br />
Ignition Coil Ground.<br />
GROUND - 2 (Engine Control)<br />
The main GROUND for IPDM, Engine &<br />
Transmission Control is in the LHS of the<br />
Engine Bay. (<strong>K13</strong>: E38 / <strong>N17</strong>: E78)<br />
GROUND - 3 (Lights, Cooling Fan)<br />
The main GROUND for the Headlights &<br />
Cooling Fan is located in the RHS of the<br />
engine bay (<strong>K13</strong>: E21 / <strong>N17</strong>: E79)<br />
ENGINE CONTROL SYSTEM<br />
17
<strong>K13</strong> Micra & <strong>N17</strong> Almera New Model Introduction<br />
<strong>Nissan</strong> Australia. August 2012<br />
GROUND - 4 (ABS / EPS)<br />
The Ground (<strong>K13</strong>: E35 & E42 / <strong>N17</strong>: E80 &<br />
E81) for the ABS / VDC system is located<br />
inside the cabin on the lower part of the A<br />
Pillar (in behind the glovebox)<br />
The Ground (<strong>K13</strong>: E63 / <strong>N17</strong>: E82) for the<br />
Electric Power Steering system is located<br />
higher up the A Pillar behind the glovebox.<br />
Main GROUND - 1<br />
The Main Ground cable connected to the<br />
Battery negative terminal is connected to the<br />
transmission housing.<br />
Ensure it is clean & tight.<br />
Main GROUND - 2<br />
A Ground cable is connected from the engine<br />
cylinder head to the vehicle body.<br />
Ensure it is clean & tight.<br />
ENGINE CONTROL SYSTEM<br />
18
<strong>K13</strong> Micra & <strong>N17</strong> Almera New Model Introduction<br />
<strong>Nissan</strong> Australia. August 2012<br />
Main GROUND - 3<br />
The Ground cable connected to the Battery<br />
negative terminal is linked to the body as well<br />
as connected to the transmission housing.<br />
Ensure the connection is clean & tight.<br />
Look down below the battery. It is connected<br />
to the LHF chassis rail. (Look down between<br />
the battery & the coolant bottle)<br />
ENGINE CONTROL SYSTEM<br />
19
<strong>K13</strong> Micra & <strong>N17</strong> Almera New Model Introduction<br />
<strong>Nissan</strong> Australia. August 2012<br />
HR12 Sensor / Actuator Locations<br />
1. Crankshaft Position Sensor (CKPS)<br />
The CKPS is located at the rear of the engine<br />
on the transmission bell housing. The sensor<br />
detects the speed & position of the<br />
crankshaft via teeth on the transmission<br />
driveplate.<br />
YOU MUST REMOVE THIS SENSOR<br />
PRIOR TO REMOVAL OF THE<br />
TRANSMISSION!<br />
2. Camshaft Position Sensor (CMPS)<br />
The CMPS is located at the rear of the<br />
cylinder head. It protrudes through the<br />
Rocker Cover & it detects the position &<br />
speed of the camshaft via a plate on the rear<br />
of the inlet camshaft.<br />
3. Manifold Air Pressure / Intake Air<br />
Temperature Sensor (MAPS / IATS)<br />
This sensor is used in place of a MAFS.<br />
Manifold Air Pressure (manifold vacuum) is<br />
measured to determine the quantity of air<br />
entering the engine.<br />
ENGINE CONTROL SYSTEM<br />
20
<strong>K13</strong> Micra & <strong>N17</strong> Almera New Model Introduction<br />
<strong>Nissan</strong> Australia. August 2012<br />
HR15 Sensor / Actuator Locations<br />
1. Crankshaft Position Sensor (CKPS)<br />
Like the MR18 / MR20 engines, the CKPS is<br />
located at the rear of the engine crank case.<br />
The sensor protrudes through the crankcase<br />
& it detects the speed & position of the<br />
crankshaft via teeth on a plate attached to<br />
the rear counter weight.<br />
2. Camshaft Position Sensor (CMPS)<br />
Like the MR18 / MR20 engines, the CMPS is<br />
located at the rear of the cylinder head. It<br />
detects the position & speed of the camshafts<br />
via a plate on the rear of the inlet camshaft.<br />
3. Mass Air Flow Sensor (not shown)<br />
Like the MR18 / MR20 engines, the HR15<br />
MAFS is located between the Air Filter<br />
housing exit & ETC unit.<br />
ENGINE CONTROL SYSTEM<br />
21
<strong>K13</strong> Micra & <strong>N17</strong> Almera New Model Introduction<br />
<strong>Nissan</strong> Australia. August 2012<br />
Idle Air Volume Learn<br />
1. Reference to the ESM<br />
Refer to “BASIC INSPECTION” in Section<br />
EC of the ESM.<br />
NOTE:<br />
For <strong>K13</strong>, refer to HR12DE TYPE 2 for<br />
Australia.<br />
For <strong>N17</strong>, refer to HR15DE TYPE 2 for<br />
Australia.<br />
Click on the “Work Procedure” and carefully<br />
read the procedure. Note that there is a<br />
different “THROTTLE VALVE CLOSED<br />
POSITION LEARNING” procedure. The use<br />
of CONSULT III is required.<br />
The “ACCELERATOR PEDAL RELEASED<br />
POSITION LEARNING” procedure is<br />
unchanged . (Ign. OFF for 10 seconds – ON<br />
for 3 seconds repeated at least 5 times)<br />
2. CONSULT III plus Engine Work Support<br />
By following the process in the ESM – you<br />
will see that you need to perform the<br />
“THROTTLE VALVE CLOSED POSITION<br />
LEARNING” procedure before the IAVL<br />
procedure.<br />
What to do if you cannot get the “CMPLT”<br />
to appear<br />
The primary cause is that the “Ign. OFF for<br />
10+ seconds / Ign. ON for 3 seconds”<br />
procedure has not been properly carried out.<br />
Continually repeat this over & over & then try<br />
again.<br />
Otherwise refer to the ESM as described<br />
above. (Work Procedure step 1.<br />
“Preconditioning” )<br />
ENGINE CONTROL SYSTEM<br />
22
<strong>K13</strong> Micra & <strong>N17</strong> Almera New Model Introduction<br />
<strong>Nissan</strong> Australia. August 2012<br />
Clutch Disc & Cover<br />
The design is similar to that on C11.<br />
Dual Mass Flywheel (HR15 only)<br />
The design & repair / serviceability is similar<br />
to that on C11.<br />
Concentric Slave Cylinder (CSC)<br />
A CSC type of clutch slave cylinder is now<br />
utilised on <strong>K13</strong> & <strong>N17</strong>.<br />
Models that utilise the CSC unit;<br />
• C11 Tiida<br />
• 2007MY Z33 350Z with VQ35-HR engine<br />
• Z34 370Z<br />
• T31 X-TRAIL<br />
• J10 Dualis<br />
PLEASE NOTE:<br />
Once the Transmission has been removed<br />
from the vehicle for ANY reason – ALWAYS<br />
replace the CSC (Concentric Slave Cylinder)<br />
for the Clutch. DO NOT RE-USE IT.<br />
CLUTCH<br />
23
<strong>K13</strong> Micra & <strong>N17</strong> Almera New Model Introduction<br />
<strong>Nissan</strong> Australia. August 2012<br />
MANUAL TRANSMISSION<br />
RS5F91R<br />
A conventional 5 speed <strong>Manual</strong> Transmission is utilised for <strong>K13</strong> & <strong>N17</strong>. The transmission is a Renault<br />
sourced unit. (JH3)<br />
It is similar in construction & design to the 6 speed M/T unit in C11 Tiida, J10 Dualis 2WD & T31 X-TRAIL<br />
MR20 2WD.<br />
NOTE:<br />
FOR HR12 MODELS, ENSURE THAT THE CRANKSHAFT POSITION SENSOR (CKPS) IS REMOVED<br />
PRIOR TO REMOVING THE TRANSMISSION FROM THE VEHICLE.<br />
MT Oil Fill & Check Point<br />
A plastic “Wing Nut” style of plug is utilised<br />
for checking the MT Oil Level as well as<br />
filling the transmission.<br />
Oil Capacity: 2.6L<br />
Oil Type: API GL-4, Viscosity SAE 75W-85<br />
24
<strong>K13</strong> Micra & <strong>N17</strong> Almera New Model Introduction<br />
<strong>Nissan</strong> Australia. August 2012<br />
AUTOMATIC TRANSMISSION<br />
RE4F03C<br />
A newly designed 4 speed automatic transmission is utilised for <strong>K13</strong> & <strong>N17</strong>. This new A/T unit is based on<br />
the transmission also fitted to K12 Micra, C11 Tiida & the N16 Pulsar.<br />
Revisions to this new Transmission have been made for efficient operation as follows;<br />
- Friction Reduction (Simplification of power transmission route)<br />
- Expansion of Lock Up ON time<br />
- Change in control system<br />
- Compact & Light Weight (Relocation of gear layout. Decreased AT fluid quantity. Reduction of component<br />
parts. Actual exterior dimensions are smaller & transmission weighs less)<br />
NOTE 1;<br />
USE ONLY NISSAN MATIC S TRANSMISSION FLUID.<br />
NOTE 2;<br />
FOR <strong>K13</strong> HR12 MODELS, ENSURE THAT THE CRANKSHAFT POSITION SENSOR (CKPS) IS<br />
REMOVED PRIOR TO REMOVING THE TRANSMISSION FROM THE VEHICLE.<br />
25
<strong>K13</strong> Micra & <strong>N17</strong> Almera New Model Introduction<br />
<strong>Nissan</strong> Australia. August 2012<br />
AUTOMATIC TRANSMISSION<br />
A/T Fluid Level Check<br />
1. Check for A/T fluid leakage. Ensure that there are no<br />
leaks & if a leak is detected – confirm what fluid it is that<br />
appears to be leaking.<br />
2. Park vehicle on level surface and set parking brake.<br />
3. Start engine.<br />
4. Move selector lever through each gear position &<br />
then return the gear lever to the “P” position.<br />
5. Ensure that the A/T fluid temperature is exactly<br />
40°C.<br />
• Connect CONSULT-III<br />
• Select “TRANSMISSION”<br />
• Select “DATA MONITOR”.<br />
• Read out the value of “ATF TEMP SE 1”.<br />
• A/T fluid temperature reaches 30°C in approximately<br />
five minutes after idling and 40°C after approximately<br />
ten minutes of idling. The level checking operation must<br />
be performed quickly.<br />
6. Remove Fill plug.<br />
7. Check A/T fluid level as follows;<br />
• If ATF overflows from the drain hole, adjust A/T fluid<br />
level to the correct level by allowing the fluid to continue<br />
draining until the fluid is slowly dripping.<br />
• If ATF does not overflow from the drain hole & fluid is<br />
not consistently dripping, more fluid will need to be<br />
added. Refer to the Changing Fluid instructions for<br />
information on how to add fluid.<br />
WARNING<br />
This operation must be carried out with the fluid temp<br />
set at 40°C<br />
• If the fluid is too COLD at the time – the level will<br />
appear to be too LOW.<br />
• If the fluid is too HOT at the time – the fluid level will<br />
appear to be too HIGH.<br />
For additional detail, refer to ESM section;<br />
> D TRANSMISSION & DRIVELINE > TM TRANSAXLE &<br />
TRANSMISSION > ON-VEHICLE MAINTENANCE<br />
26<br />
Engine must be idling in P<br />
whilst checking fluid level<br />
A: SST # KV311039S0<br />
B: Fluid Charging Hose / Pipe<br />
SST # KV311039S0
<strong>K13</strong> Micra & <strong>N17</strong> Almera New Model Introduction<br />
<strong>Nissan</strong> Australia. August 2012<br />
AUTOMATIC TRANSMISSION<br />
A/T Fluid Changing<br />
1. Warm up ATF by running the engine & then stop the<br />
engine.<br />
2. Remove drain plug & drain fluid & the re-fit drain plug.<br />
3. Remove Fill plug.<br />
4. Inject ATF via the fill tube hole located in the<br />
transmission pan.<br />
5. Refer to the “Fluid Level Check” (previous page) to<br />
ensure that the level is correct. Ensure to warm the<br />
transmission up to 40°C. Use CONSULT III to confirm.<br />
NOTES:<br />
• If whole quantity of ATF has been discharged, add<br />
500ml of ATF to total fluid capacity and inject the whole<br />
amount via the fill tube in the base of the pan.<br />
• Since the ATF in the A/T assembly cannot be fully<br />
drained in a single operation, the steps (from 3 to<br />
5) may need to be performed up to 3 times or so.<br />
• Replace O-ring of the filler plug with a new one. Apply<br />
ATF to O-rings. Replace the drain plug gasket as well.<br />
• If the special procedure for Checking the A/T Fluid is<br />
not followed then the risk of over filling the transmission<br />
can occur. Fluid leakage will occur if the Transmission is<br />
overfilled.<br />
• It will NOT be necessary to replace the Transmission<br />
Fluid Filter when changing the A/T fluid. The filter is NOT<br />
available as a separate part, it comes complete with the<br />
Control Valve (valve body) assembly.<br />
• Only use <strong>Nissan</strong> Matic S Transmission Fluid<br />
For additional detail, refer to ESM section;<br />
> D TRANSMISSION & DRIVELINE > TM TRANSAXLE &<br />
TRANSMISSION > ON-VEHICLE MAINTENANCE<br />
27<br />
A: SST # KV311039S0<br />
B: Fluid Charging Hose / Pipe<br />
SST # KV311039S0
<strong>K13</strong> Micra & <strong>N17</strong> Almera New Model Introduction<br />
<strong>Nissan</strong> Australia. August 2012<br />
AUTOMATIC TRANSMISSION<br />
Special Procedure for Transmission Control<br />
Module (TCM) Replacement<br />
Always perform the following items when the TCM is<br />
replaced.<br />
Check Loading Of Calibration Data<br />
The TCM acquires calibration data (individual<br />
characteristic value) of each solenoid that is stored in the<br />
ROM assembly (in the control valve).<br />
This enables the TCM to perform accurate control. After<br />
the TCM is replaced, check that the TCM has correctly<br />
loaded the calibration data.<br />
■ CAUTION ■<br />
When replacing TCM and transaxle assembly as a<br />
set, replace transaxle assembly first and then<br />
replace TCM.<br />
If the TCM is replaced in advance, perform<br />
"TRANSAXLE ASSEMBLY REPLACEMENT: Special<br />
Repair Requirement".<br />
> D TRANSMISSION & DRIVELINE > TM TRANSAXLE &<br />
TRANSMISSION > BASIC INSPECTION<br />
Special Procedure for Transmission<br />
Assembly Replacement<br />
Perform the following work after the transaxle assembly<br />
is replaced.<br />
Erasing the calibration data<br />
The TCM acquires calibration data (individual<br />
characteristic value) of each solenoid that is stored in the<br />
ROM assembly (in the control valve). This enables the<br />
TCM to perform accurate control. For this reason, after<br />
the transaxle assembly is replaced, it is necessary to<br />
erase the calibration data that is stored in the TCM and<br />
load new calibration data.<br />
Erasing the learned value data<br />
TCM learns indicated pressure for appropriate control of<br />
the transaxle assembly and records the learned values.<br />
For this reason, the leaned values stored in TCM must<br />
be erased after replacing a transaxle assembly.<br />
> D TRANSMISSION & DRIVELINE > TM TRANSAXLE &<br />
TRANSMISSION > BASIC INSPECTION<br />
28<br />
SPECIAL PROCEDURES FOR TRANSMISSION<br />
&/OR TCM REPLACEMENT<br />
> D TRANSMISSION & DRIVELINE > TM TRANSAXLE<br />
& TRANSMISSION > BASIC INSPECTION
<strong>K13</strong> Micra & <strong>N17</strong> Almera New Model Introduction<br />
<strong>Nissan</strong> Australia. August 2012<br />
FLUID<br />
TYPE<br />
3 & 4sp A/T’s.<br />
*4x4 Transfers<br />
K11-K12 Micra, All<br />
Pulsar until 2005,<br />
All Tiida, T30 X-TRAIL,<br />
All Maxima to end<br />
05MY, All Patrol<br />
except TB48.<br />
Transmission<br />
5sp A/T RWD<br />
(RE5R05A)<br />
6sp A/T FWD<br />
(RE6F01A)<br />
Patrol TB48,<br />
350Z,<br />
R51 Pathfinder<br />
D40 Navara<br />
T31 X-TRAIL Diesel<br />
New CVT<br />
(RE0F09A/10A)<br />
06~08MY J31+J32<br />
Maxima<br />
Z50+Z51 Murano<br />
T31 X-TRAIL Petrol<br />
J10 Dualis<br />
7sp A/T RWD<br />
(RE7R01A/B)<br />
Z34 370Z, R51 / D40<br />
V9X & 10MY> YD25<br />
4sp A/T FWD<br />
(RE4F03C)<br />
<strong>K13</strong> Micra /<br />
<strong>N17</strong> Almera<br />
MATIC D YES NEVER NEVER NEVER<br />
MATIC J NEVER YES NEVER NEVER<br />
NS-2 NEVER NEVER YES NEVER<br />
MATIC S NEVER NEVER NEVER YES<br />
* Use Matic D in Part Time / All-mode Transfer units on Y61, D22, D40, R50 & R51. Do NOT use Matic D<br />
however in R51 V9X. Only use Gen. Oil KLD22-00001. Also refer to STB: MA11-005.<br />
GL-5 Gear Oil must be used in the Transfer unit attached to the Transaxle unit on “AWD only” type systems<br />
fitted to T30, Z50, Z51, T31 & J10. These models do not have a “4Lo” function. The transfer (electric) coupling<br />
unit attached to the Rear Final Drive is a sealed unit.
<strong>K13</strong> Micra & <strong>N17</strong> Almera New Model Introduction<br />
<strong>Nissan</strong> Australia. August 2012<br />
BRAKE SYSTEM<br />
30
<strong>K13</strong> Micra & <strong>N17</strong> Almera New Model Introduction<br />
<strong>Nissan</strong> Australia. August 2012<br />
BRAKE SYSTEM<br />
Front Brake<br />
All <strong>K13</strong> / <strong>N17</strong> variants have the same type of Front Disc<br />
Brake system.<br />
When inspecting the Front Brakes as part of routine<br />
maintenance, ensure to view the thickness of both the<br />
brake pads through to top of the brake calliper.<br />
Refer to the picture shown right.<br />
For more details, refer to the ESM as follows:<br />
F BRAKES > BR BRAKE SYSTEM<br />
Rear Brake<br />
All <strong>K13</strong> / <strong>N17</strong> variants have the same type of Rear Drum<br />
Brake system.<br />
When inspecting the Rear Brakes as part of routine<br />
maintenance, it will be necessary to remove the drum &<br />
wheel hub assembly as 1 part.<br />
As a result of this, the large nut & small hub cap should<br />
be replaced as these 2 items are one use items only.<br />
Alternatively, the Brake Shoe thickness can be inspected<br />
via the removal of a small rubber blanking plug located<br />
on the backing plate. It is only possible to inspect the<br />
thickness of the leading brake shoe however.<br />
For more details, refer to the ESM as follows:<br />
D TRANSMISSION & DRIVELINE > RAX REAR AXEL<br />
F BRAKES > BR BRAKE SYSTEM<br />
31
<strong>K13</strong> Micra & <strong>N17</strong> Almera New Model Introduction<br />
<strong>Nissan</strong> Australia. August 2012<br />
PARKING BRAKE SYSTEM<br />
Park Brake Adjustment Precautions<br />
Handbrake adjustment (as is the case with ALL <strong>Nissan</strong><br />
models) is not a simple case of simply tightening the<br />
adjuster nut at the Handbrake Lever.<br />
In principle you first must loosen the adjuster nut at the<br />
Handbrake Lever & then adjust the brake shoe to Drum<br />
clearance.<br />
Finally, re-tighten the cable adjustment at the Handbrake<br />
Lever until the right setting is achieved as per the<br />
directions in the Service <strong>Manual</strong>.<br />
NOTES:<br />
- The Drum to shoe clearance adjustment involves the<br />
simple process of repeatedly depressing the brake<br />
pedal. As a result the brake shoes will self adjust. The<br />
Park Brake cable adjusting nut must 1 st be loosened<br />
however.<br />
- Always ensure that there is a small but notable amount<br />
of free-play evident in the Park Brake Lever.<br />
- Always ensure that the RED coloured Parking Brake<br />
Warning Lamp illuminates after the 1 st click of the<br />
parking brake lever.<br />
Refer to the ESM as follows for more details:<br />
F BRAKES > PB PARKING BRAKE SYSTEM > PERIODIC<br />
MAINTENANCE<br />
WARNING:<br />
If the Handbrake requires adjustment, follow the procedure as<br />
advised above. DO NOT ADJUST THE HANDBRAKE BY<br />
TIGHTENING THE CABLE AT THE LEVER UNTIL IT APPEARS<br />
TO “FEEL BETTER!”<br />
Severe Driveline Vibration will otherwise result!<br />
32
<strong>K13</strong> Micra & <strong>N17</strong> Almera New Model Introduction<br />
<strong>Nissan</strong> Australia. August 2012<br />
ABS / VDC System<br />
ABS / VDC is fitted to all <strong>K13</strong> & <strong>N17</strong> variants.<br />
CONSULT III plus reference; ABS<br />
For specific information about DTC‟s & DATA MONITOR reference values, refer to the ESM as follows;<br />
> F BRAKES > BRC > WITH VDC (ESP) > ECU DIAGNOSIS INFORMATION<br />
> F BRAKES > BRC > WITH VDC (ESP) > DTC/CIRCUIT DIAGNOSIS<br />
CONSULT III WORK SUPPORT<br />
There is 1 x operation that should be carried out in the WORK SUPPORT mode on CONSULT as follows;<br />
Adjustment Of Steering Angle Sensor Neutral Position (same as all VDC equipped models)<br />
Ensure this is carried out after the following operations have been completed on the vehicle<br />
- ABS system trouble diagnosis activity<br />
- Front Wheel alignment<br />
- Re-fitment / Replacement of steering & suspension components<br />
- Re-fitment / Replacement of steering angle sensor<br />
- Re-fitment / Replacement of ABS Actuator / Control Unit<br />
Refer to the ESM as follows;<br />
> F BRAKES > BRC > WITH VDC (ESP) > SYSTEM DESCRIPTION > DIAGNOSIS SYSTEM<br />
For Wiring Diagram info, refer to the ESM as follows<br />
> F BRAKES > BRC > WITH VDC (ESP) > WIRING DIAGRAM<br />
BRAKE CONTROL SYSTEM<br />
33
<strong>K13</strong> Micra & <strong>N17</strong> Almera New Model Introduction<br />
<strong>Nissan</strong> Australia. August 2012<br />
SRS AIRBAG SYSTEM<br />
All <strong>K13</strong> Micra & <strong>N17</strong> Almera variants receive the “6 Air Bag” compliment along with Front Seat pretensioners<br />
as standard equipment.<br />
The configuration of the system is the same as most other nissan passenger vehicles.<br />
34
<strong>K13</strong> Micra & <strong>N17</strong> Almera New Model Introduction<br />
<strong>Nissan</strong> Australia. August 2012<br />
VENTILATION HEATING & AIRCONDITIONING<br />
<strong>K13</strong> / <strong>N17</strong> HVAC<br />
Air Conditioning is standard fitment across<br />
the <strong>K13</strong> / <strong>N17</strong> range. ST / ST-L variants<br />
have <strong>Manual</strong>ly operated A/C.<br />
Air Conditioner Micro Filter<br />
Ensure that it is REPLACED EVERY<br />
20,000km‟s. It is EASILY ACCESSED from<br />
behind the glove box.<br />
NOTE:<br />
Apart from some early build <strong>K13</strong> variants, all<br />
models have a filter installed by the factory.<br />
Auto A/C (Ti only)<br />
Operation of the Auto A/C in Micra Ti is very<br />
much the same as J32 Maxima ST-L / ST-S<br />
variants.<br />
35
<strong>K13</strong> Micra & <strong>N17</strong> Almera New Model Introduction<br />
<strong>Nissan</strong> Australia. August 2012<br />
VEHICLE SECURITY (NATS)<br />
NATS (<strong>Nissan</strong> Anti Theft System)<br />
The NATS on <strong>K13</strong> Micra & <strong>N17</strong> Almera Ti variants is a V5.0B BCM controlled system. The system is similar<br />
to that found on J32 Maxima, Z51 Murano & Z34 370Z<br />
Refer to the documents discussed over page for more information on the servicing of NATS (replacing /<br />
adding keys etc.)<br />
How to Start <strong>K13</strong> / <strong>N17</strong> Ti with Flat I-KEY Battery<br />
For <strong>K13</strong> / <strong>N17</strong> Ti variants, if the I-KEY units battery has<br />
failed, the engine can still be started by applying the<br />
brake pedal & then pressing the I-KEY unit against the<br />
Ignition (push button) Switch. An antenna amplifier<br />
forms part of the Ignition (push button) Switch<br />
For J32, Z51 & Z34 models, if the battery has failed in<br />
the I-KEY, the “Emergency” starting procedure is simply<br />
a matter of inserting the I-KEY into the slot on the dash,<br />
applying the brake pedal & starting the Engine.<br />
36
<strong>K13</strong> Micra & <strong>N17</strong> Almera New Model Introduction<br />
<strong>Nissan</strong> Australia. August 2012<br />
VEHICLE SECURITY (NATS)<br />
NATS (<strong>Nissan</strong> Anti Theft System)<br />
The NATS on <strong>K13</strong> Micra & <strong>N17</strong> Almera ST / ST-L variants is a V5.0B BCM controlled system. The system<br />
is the same as that found on T31 X-TRAIL, C11 Tiida & K12 Micra,<br />
The procedure to program the keyless entry functionality is a separate operation. Refer to the following<br />
documents for more information on the Servicing of NATS (replacing / adding keys etc.)<br />
1a. The NATS Operation <strong>Manual</strong> (C-III only).<br />
This publication is located on the CONSULT III machine.<br />
The NATS Security card is need to be installed in the<br />
machine to access the it.<br />
1b. The NATS Operation <strong>Manual</strong> for C-III plus<br />
The NATS Operation <strong>Manual</strong> forms part of the actual<br />
process being followed on the C-III plus program. (The<br />
<strong>Manual</strong> is embedded into the NATS process)<br />
2. The NATS Application Chart.<br />
(Example shown right). This is located on iNISCOM.<br />
Look on the Service Homepage under “NATS”. It‟s just<br />
below where Tech Bulletins are found.<br />
Contact TechLine if you are unsure of how to locate this<br />
VERY IMPORTANT CHART.<br />
The chart shown right simply prints out onto an A4 sheet<br />
of paper.<br />
37<br />
SAMPLE<br />
ONLY<br />
C-III only
<strong>K13</strong> Micra & <strong>N17</strong> Almera New Model Introduction<br />
<strong>Nissan</strong> Australia. August 2012<br />
Keyless Entry System<br />
BODY / ELECTRICAL<br />
Keyless Entry for <strong>K13</strong> & <strong>N17</strong> ST / ST-L is the same as that utilised on K12 & C11 etc. There is 1 key with<br />
built in Lock / Unlock / Panic Alarm functions. The 2 nd key is a conventional type NATS key. (It has no<br />
Keyless entry functionality)<br />
Remote Keyless Entry Receiver unit<br />
This small unit is located to the right of the steering<br />
column. It retrieves the signal from the key unit when the<br />
button for LOCK / UNLOCK / PANIC / BOOT is received<br />
& transfer‟s it over to the BCM. In turn the BCM operates<br />
the central locking & boot lock solenoid as well as the<br />
hazards & horn where required.<br />
The I-KEY Receiver Unit is also located in this location<br />
on Ti variants.<br />
38
<strong>K13</strong> Micra & <strong>N17</strong> Almera New Model Introduction<br />
<strong>Nissan</strong> Australia. August 2012<br />
Keyless Remote Programming<br />
The process required for programming<br />
Keyless remotes for ST / ST-L <strong>K13</strong> & <strong>N17</strong> is<br />
the same as the K12 / C11 procedure.<br />
NOTE:<br />
A separate procedure is required to program<br />
the Engine Immobiliser (NATS) function of the<br />
Key.<br />
BODY / ELECTRICAL<br />
Access the “Work Support” menu for BCM > Multi<br />
Remote Entry in CONSULT III plus.<br />
39<br />
This function (door locks will re-lock<br />
themselves) only activates if the doors are<br />
unlocked via the remote but the door is not<br />
actually opened.
<strong>K13</strong> Micra & <strong>N17</strong> Almera New Model Introduction<br />
<strong>Nissan</strong> Australia. August 2012<br />
Auto Door Lock / Unlock<br />
All <strong>K13</strong> variants have an Automatic Door Lock<br />
/ Unlock feature (*1).<br />
The doors will lock themselves once the<br />
vehicle reaches 10 km/h (*2).<br />
They will unlock themselves once the Gear<br />
lever has been returned to the P position (A/T<br />
only *3)<br />
NOTES:<br />
(*1). System defaulted to OFF from the<br />
Factory<br />
(*2). Can also LOCK by moving the Gear<br />
Lever from P to another position (A/T only)<br />
(*3). For M/T, doors will unlock once the<br />
Ignition has been switched off or if the ignition<br />
key is removed from the switch.<br />
BODY / ELECTRICAL<br />
Recommended settings to be carried out by Dealer with CONSULT III plus<br />
At the Pre-delivery, it is recommended to activate the system with CONSULT III plus as follows;<br />
(*1) Set to “Lock/Unlock” for all variants.<br />
(*2) Set to “VH SPD” for all variants. Doors will lock once vehicle speed reaches 10km/h.<br />
(*3) Set to “MODE 1” for M/T variants. Doors will unlock when the ignition is switched OFF.<br />
(*3) Set to “MODE 2” for A/T variants. Doors will unlock when the gear lever is returned to the „P‟ position.<br />
Procedure Without CONSULT III plus (procedure from section 3 of the Owners <strong>Manual</strong>)<br />
The customer can cancel or activate the system by simply switching in the ignition from OFF to ON. In less<br />
than 20seconds, hold down the LOCK button on the power window switch for more than 5 seconds.<br />
The indicators will flash once to indicate that the feature is de-activated.<br />
Repeat this procedure to re-activate the feature. The indicators will flash twice to indicate that the feature is<br />
activated.<br />
(*2)<br />
(*3)<br />
(*1)<br />
Access the “Work Support” menu for BCM > Door<br />
Lock in CONSULT III plus.<br />
40
<strong>K13</strong> Micra & <strong>N17</strong> Almera New Model Introduction<br />
<strong>Nissan</strong> Australia. August 2012<br />
Auto Headlamps<br />
<strong>K13</strong> ST-L & Ti variants have an Automatic<br />
Headlamp ON / OFF feature (Auto Lights).<br />
The system is near identical to J32 Maxima<br />
ST-L / ST-S variants.<br />
Auto ON;<br />
The Head Light Switch needs to be in the<br />
“Auto” position. The sensor that detects the<br />
loss of light is on the dash pad, drivers side.<br />
The sensitivity of the system can be adjusted if<br />
so desired. See below for more details.<br />
Auto OFF;<br />
1. Once the light sensor on the dash pad<br />
detects an increase in natural light the<br />
headlamps will turn OFF automatically<br />
(Headlight switch needs to be in the “Auto”<br />
position)<br />
2. <strong>K13</strong> ST (HR12) & all <strong>N17</strong> variants do not<br />
have “Auto” headlights, however - if the<br />
headlights are ON (any switch position) & the<br />
door is opened, then shut & locked via the<br />
Keyless-Remote, the headlights will switch off.<br />
(Same for C11, J31, T31, Z50 & K12)<br />
3. For ST-L / Ti (HR15) <strong>K13</strong> variants, if the<br />
headlights are ON in Auto mode, the<br />
headlights will immediately turn OFF when the<br />
ignition is turned OFF.<br />
BODY / ELECTRICAL<br />
Access the “Work Support” menu for BCM ><br />
Headlamps in CONSULT III plus.<br />
AUTO LIGHT LOGIC SET (<strong>K13</strong> only):<br />
Mode 1 = Normal (factory Setting)<br />
Mode 2 = More Auto Light sensitivity<br />
Mode 3 = More sensitivity than Mode 2<br />
Mode 4 = Less Sensitivity than Mode 1<br />
(This is the same for J32 models)<br />
BATTERY SAVER SET (All <strong>K13</strong> / <strong>N17</strong> variants):<br />
Always leave set to ON.<br />
41
<strong>K13</strong> Micra & <strong>N17</strong> Almera New Model Introduction<br />
<strong>Nissan</strong> Australia. August 2012<br />
BODY / ELECTRICAL<br />
Body Control System<br />
The BCM performs the same functions as most other<br />
<strong>Nissan</strong> models.<br />
It‟s located behind the glovebox mounted on a bracket.<br />
BCM Configuration<br />
Like much of the current range of <strong>Nissan</strong> vehicles, if the<br />
BCM is to be replaced, the new unit will need to be<br />
configured with CONSULT III<br />
Refer to the ESM as follows for more detail;<br />
> M ELECTRICAL & POWER CONTROL > BCS > BASIC<br />
INSPECTION<br />
For Wiring Diagrams, refer to the ESM as follows;<br />
> M ELECTRICAL & POWER CONTROL > BCS > WIRING<br />
DIAGRAMS<br />
<strong>K13</strong> Configuration Lists<br />
For <strong>K13</strong> Micra Ti variants with I-KEY (Intelligent Key /<br />
Push Button start) – refer to the list shown right.<br />
Ensure the settings for the Transmission is correct.<br />
For <strong>K13</strong> Micra ST (HR12 3 cyl) & ST-L (HR15 4 cyl)<br />
variants (with conventional ignition keys), refer to the list<br />
shown right.<br />
Note that ST-L has Auto Headlights.<br />
<strong>N17</strong> Configuration Lists<br />
Almera Ti is shown right.<br />
Almera ST is shown right<br />
42
<strong>K13</strong> Micra & <strong>N17</strong> Almera New Model Introduction<br />
<strong>Nissan</strong> Australia. August 2012<br />
Power Windows<br />
Anti Pinch Function<br />
Like many <strong>Nissan</strong> Models, the drivers window will<br />
reverse it‟s direction automatically if any obstruction<br />
stops the glass from raising itself to the closed position.<br />
(Only when the Auto Up function has been activated)<br />
If the <strong>Manual</strong> Up function is selected (switch held) it will<br />
NOT operate.<br />
The system on *<strong>K13</strong> & <strong>N17</strong> is the same system fitted to<br />
C11 Tiida, J10 Dualis, T31 X-TRAIL, J32 Maxima & Z51<br />
Murano etc.<br />
Window Reset (All except <strong>K13</strong> Micra ST)<br />
Operate the switch (hold it) until the window fully shuts<br />
itself. Once the glass reaches the top of the door & stops<br />
– hold onto the switch in the Up direction for more than<br />
3 seconds.<br />
Operate the window downwards until it stops. Hold the<br />
switch for a further 3 seconds & then release the switch.<br />
Operate the window (up) in Auto mode & ensure that the<br />
window raises itself Automatically to the closed position.<br />
NOTE:<br />
*The <strong>K13</strong> Micra ST model with front only Power<br />
Windows does not have the “Auto-Up” feature. It only<br />
has Auto Down.<br />
BODY / ELECTRICAL<br />
43
<strong>K13</strong> Micra & <strong>N17</strong> Almera New Model Introduction<br />
<strong>Nissan</strong> Australia. August 2012<br />
MAINTENANCE<br />
General<br />
The Servicing for <strong>K13</strong> & <strong>N17</strong> is basically the same as the servicing for the previous K12 or the C11 Tiida.<br />
Pre Delivery Inspection<br />
Ensure that a Pre Delivery Inspection is correctly carried out. Refer to the “Dealer PDI Pack” for more details<br />
on the PDI of <strong>K13</strong> & <strong>N17</strong> vehicles<br />
Engine Oil for HR12 / HR15<br />
Ensure that a suitable quality engine oil is used. It is recommended to use <strong>Nissan</strong> 7.5W 30 & it is to be<br />
changed every 10,000km‟s or 6 months – whichever comes 1 st .<br />
Engine Oil Capacity including Filter; 3.0L. <strong>Nissan</strong> 7.5W 30<br />
Engine Coolant for HR12 / HR15<br />
Models with GREEN coloured Coolant:<br />
Ensure that the Coolant is not replaced until the 80,000km service or 4 years – whichever comes 1 st .<br />
Once it has been replaced the service interval for coolant is every 40,000km‟s or 2 years.<br />
Models with BLUE coloured Coolant:<br />
Ensure that the Coolant is not replaced until the 160,000km service or 8 years – whichever comes 1 st .<br />
Once it has been replaced the service interval for coolant is every 80,000km‟s or 4 years.<br />
NOTE:<br />
Always ensure that all of the old coolant has been drained / flushed from the engine. Only EVER use<br />
Genuine <strong>Nissan</strong> Long Life Coolant.<br />
Engine Cooling System Capacity; 5.5L / 6.0L. (Includes Reservoir Bottle which is 0.7L)<br />
MT Oil – API GL-4 SAE 75W-85<br />
There is no specific servicing requirement for the <strong>Manual</strong> Transmission. However if the vehicle is in harsh<br />
conditions it is STRONGLY RECOMMENDED that the fluid is closely inspected for colour / condition / level<br />
etc. every 10,000km‟s. (otherwise every 20,000km‟s). If it is discoloured or it appears to be contaminated,<br />
drain the fluid & refill with new oil.<br />
MT Oil Capacity; 2.6L. Only use M/T Oil; GL-4 SAE 75W-85.<br />
AT Fluid – <strong>Nissan</strong> Matic S<br />
There is no specific servicing requirement for the Automatic Transmission. However if the vehicle is<br />
operated in harsh conditions it is STRONGLY RECOMMENDED that the fluid is closely inspected for colour<br />
/ condition / level etc. every 10,000km‟s. (otherwise every 20,000km‟s). If it is discoloured or it appears to be<br />
contaminated, drain the fluid & refill with new <strong>Nissan</strong> Matic S fluid only.<br />
AT Fluid Capacity; 5.4L. Only use <strong>Nissan</strong> Matic S<br />
44
<strong>K13</strong> Micra & <strong>N17</strong> Almera New Model Introduction<br />
<strong>Nissan</strong> Australia. August 2012<br />
MAINTENANCE<br />
Brake Fluid<br />
Replace the brake fluid with a suitable DOT 4 type fluid every 40,000km‟s or 2 years.<br />
HR12 / HR15 Spark Plugs<br />
The Spark Plugs are Platinum type. They are to be replaced every 100,000km‟s. The process for removing<br />
the Spark Plugs is the same as the process required for the MR18 / MR20 engines in C11 & J10.<br />
Viscous Type Air Filter Element<br />
Like any viscous type air filter element – DO NOT BLOW IT WITH COMPRESSED AIR. Replace it after a<br />
maximum of 40,000km‟s or every 2 years. More frequently for dusty conditions.<br />
In tank Fuel Filter<br />
Like the C11 – the Fuel Filter is not serviceable. It is available as a separate part however.<br />
Tyre Rotation & Wheel Balance<br />
Ideally they should be rotated & balanced every 10,000km‟s. Ensure that the wheels are installed properly &<br />
that they are NOT tightened with an impact gun. Ensure that they are correctly tightened USING A<br />
TORQUE WRENCH or driveline vibration will result.<br />
Wheel Alignment<br />
A FRONT WHEEL ALIGNMENT MUST BE CARRIED OUT AT THE PRE DELIVERY. It is strongly<br />
recommended to inspect the front wheel alignment every 20,000km‟s or 1 year thereafter.<br />
HVAC system (in-cabin) Micro Air Filter<br />
A filter has not been installed at the factory, however one can be fitted if the customer chooses. Replace it<br />
every 20,000km‟s. More frequently in dusty conditions.<br />
45