Tongariro Northern Circuit
Tongariro Northern Circuit
Tongariro Northern Circuit

Create successful ePaper yourself
Turn your PDF publications into a flip-book with our unique Google optimized e-Paper software.
31. The <strong>Tongariro</strong> <strong>Northern</strong> <strong>Circuit</strong><br />
Reservations required in the Great<br />
Walks Season (see page 7).<br />
A range of trips can be planned around<br />
the <strong>Tongariro</strong> <strong>Northern</strong> <strong>Circuit</strong>. Day trips,<br />
overnight trips, or a three to four day walk<br />
around the complete circuit. The safest<br />
and most popular time of year to walk the <strong>Tongariro</strong> <strong>Northern</strong><br />
<strong>Circuit</strong> is during the summer months (December to March)<br />
when the tracks are normally clear of snow and the weather is<br />
less severe.<br />
The <strong>Tongariro</strong> <strong>Northern</strong> <strong>Circuit</strong> connects with the Round<br />
the Mountain Track at two points - Whakapapa Village and<br />
Waihohonu.<br />
More detailed information and maps are available at<br />
Whakapapa Visitor Centre:<br />
• <strong>Tongariro</strong> National Park 273/04 map<br />
• NZTopo50 series: BJ34 Mt Ruapehu, BH34 Raurimu, and<br />
BH35 Turangi<br />
• <strong>Tongariro</strong> <strong>Northern</strong> <strong>Circuit</strong> brochure (available online)<br />
Track description<br />
Whakapapa to Mangatepopo Hut<br />
3 hours (up to 5 hours in bad weather), 8.5 kilometres<br />
Begins 100 metres below the Whakapapa Visitor Centre at<br />
Ngauruhoe Place and along the lower Taranaki Falls Track.<br />
About 20 minutes from the village the Mangatepopo Track<br />
branches off the Falls Track. For the last hour the track skirts<br />
around Pukekaikiore until it reaches the Mangatepopo Valley.<br />
Mangatepopo Hut is five minutes off the main Mangatepopo<br />
to Ketetahi Hut Track.<br />
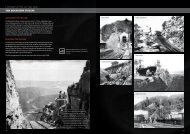
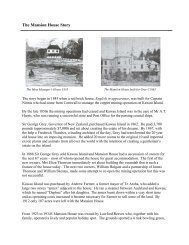
Red Crater<br />
30<br />
The <strong>Tongariro</strong> Alpine Crossing<br />
The track from Mangatepopo to Ketetahi (described in<br />
the next two sections and on page 22) is known as the<br />
<strong>Tongariro</strong> Alpine Crossing. It is one of the best one-day<br />
treks in the country and is a highlight of the <strong>Tongariro</strong><br />
<strong>Northern</strong> <strong>Circuit</strong>.<br />
Because much of the terrain is elevated and exposed it<br />
is essential to carry adequate clothing even on a day trip.<br />
See the recommended gear list on page 8.<br />
Mangatepopo Hut to Emerald Lakes<br />
3½ hours, 8 kilometres<br />
The track follows Mangatepopo Stream up the glacially<br />
carved valley, climbing over a succession of lava flows from<br />
Ngauruhoe. A five minute detour at the head of the valley<br />
leads to Soda Springs, cold springs which emerge beneath an<br />
old lava flow.<br />
The steep climb required to reach the Mangatepopo Saddle<br />
rewards climbers with views of the valley and if clear, Mt<br />
Taranaki to the west. From the saddle the track crosses South<br />
Crater, not a true crater but a drainage basin between the<br />
surrounding volcanic landforms.<br />
The climb to Red Crater offers splendid views of Oturere<br />
Valley and the Kaimanawa Ranges to the east. At the top of<br />
Red Crater (the highest point on the Crossing at 1886 metres)<br />
a poled route to the left leads to <strong>Tongariro</strong> Summit (1½ - 2<br />
hours return). The main track continues on along the crater<br />
rim. The large flat topped crater seen ahead is North Crater.<br />
A scoria covered ridge leads down to Emerald Lakes. These<br />
three lakes fill old explosion craters. Their brilliant colour is<br />
caused by minerals washed down from the thermal area of<br />
Red Crater. The lakes are tapu or sacred and also have a high<br />
mineral content so swimming in them is not recommended.<br />
Just beyond Emerald Lakes the track branches right, to<br />
Oturere Hut or continues straight ahead to Ketetahi Hut.<br />
Emerald Lakes to Ketetahi Hut<br />
1½ hours, 4.2 kilometres<br />
Leaving Emerald Lakes the track crosses Central Crater which<br />
like South Crater is actually another drainage basin. A short<br />
climb leads up to the ridge beside Te Wai-whakaiata-o-te-<br />
Ranihiroa (Blue Lake). The track then sidles around North<br />
Crater. Lakes Rotoaira (foreground) and Taupō are visible on<br />
31<br />
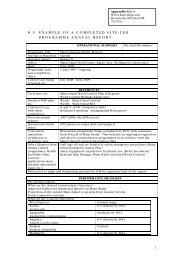
Morning view from<br />
Ketetahi Hut<br />
Crossing South Crater<br />
clear days. As the track loses altitude it enters vast areas of red<br />
tussock cloaking the hills. The track zigzags down to Ketetahi<br />
Hut. Please resist the temptation to take short cuts as it causes<br />
accelerated erosion.<br />
From Ketetahi Hut the <strong>Tongariro</strong> Alpine Crossing Track<br />
continues down the hill (see page 22). To complete the<br />
<strong>Northern</strong> <strong>Circuit</strong> make your way back to Emerald Lakes and<br />
take the turn off to Oturere Hut.<br />
Emerald Lakes to Oturere Hut<br />
1½ hours, 4.8 kilometres<br />
From Emerald Lakes the track descends steeply into the<br />
Oturere Valley with views of the valley and the Kaimanawa<br />
Ranges. The track weaves through an endless variety of<br />
unusual jagged lava forms created by early eruptions from<br />
Red Crater. A magical place to visit especially on a misty day.<br />
Oturere Hut is nestled on the eastern edge of these flows.<br />
Oturere Hut to Waihohonu Hut<br />
3 hours, 7.5 kilometres<br />
After leaving Oturere Hut the track undulates over a number<br />
of stream valleys and open gravel fields. The track gradually<br />
32
sidles around the foot hills of Ngauruhoe descending into a<br />
valley and crossing one of the branches of the Waihohonu<br />
Stream. Continue through a beech clad valley before climbing<br />
towards the ridge top. Waihohonu Hut is in the next valley.<br />
Waihohonu Hut to Whakapapa Village<br />
5½ hours, 14.3 kilometres<br />
From the historic hut the track follows the Waihohonu Stream<br />
gradually climbing to Tama Saddle. Tama Saddle is exposed<br />
and can be windy in bad weather.<br />
On reaching the saddle a track branches right to Tama Lakes,<br />
two partially infilled explosion craters. The lower lake is a ten<br />
minute side trip from the junction while the upper lake is up a<br />
steep ridge, a one and a half hour side trip.<br />
Whakapapa Village is approximately two hours from the<br />
Tama Lakes junction. After the first hour the track meets the<br />
Taranaki Falls loop walk. To view the falls, follow the lower<br />
track down a flight of stairs to a boulder-ringed pool at the<br />
base of the falls. The track then contin ues beside Wairere<br />
Stream through mountain beech forest.<br />
Alternatively, take the upper<br />
track through tussock and<br />
shrubland. Both options<br />
take about one hour to<br />
return to the village.<br />
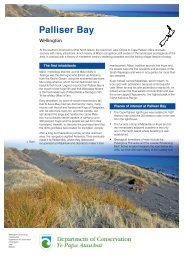
Emerald Lakes (right)<br />
Taranaki Falls from the<br />
lower track (below)<br />
33<br />
Summit routes (5- 12 hours)<br />
Warning: These summit climbing routes are unmarked and<br />
should only be undertaken by fit, experienced, well equipped<br />
people who can make effective judgments about alpine and<br />
volcanic hazards. Icy or ‘white out’ conditions can make all<br />
climbs a serious undertaking. Before setting out check at<br />
the Whakapapa Visitor Centre for current route and weather<br />
conditions, volcanic activity and avalanche risk.<br />
More detailed information and maps are available at<br />
Whakapapa Visitor Centre:<br />
• <strong>Tongariro</strong> National Park 273/04 map<br />
• NZTopo50 series: BJ34 Mt Ruapehu, BH34 Raurimu, and<br />
BH35 Turangi<br />
The weather may deteriorate during the trip – alpine weather<br />
can change very quickly. Attempt these trips only in good<br />
weather and be prepared to turn back if conditions change.<br />
During winter and times of snow, surface conditions will<br />
vary day to day. Depending on the time of year some of the<br />
following hazards may be encountered on Mounts Ruapehu,<br />
Ngauruhoe and <strong>Tongariro</strong>: icy slopes, ice cliffs, avalanches,<br />
waterfall holes, crevasses and schrunds.<br />
Do not climb above your level of experience. Turn back as soon<br />
as you feel uncomfortable with the weather or route conditions.<br />
If travelling alone tell a responsible person of your intentions.<br />
32. Ngauruhoe Summit (2287 metres)<br />
6-7 hours, 19 kilometres return on same route. Begins at<br />
Mangatepopo parking area. 3 hours return from South<br />
Crater.<br />
The 2500 year old near perfect cone of Mt Ngauruhoe entices<br />
many visitors to its summit. Relatively quiet since 1975, this<br />
parasitic cone of Mt <strong>Tongariro</strong> is traditionally one of New<br />
Zealand’s most active volcanoes.<br />
Follow the <strong>Tongariro</strong> Alpine Crossing Track up Mangatepopo<br />
Valley to the saddle between Ngauruhoe and <strong>Tongariro</strong>. A<br />
poled route leads to the foot of a ridge near the centre of<br />
Ngauruhoe’s northern slope. From here the route is not marked<br />
but climbs a band of red scoria to the summit. Be aware of<br />
falling rocks dislodged by others on the steep slopes above.<br />
Avoid entering the inner crater area, where volcanic fumaroles<br />
may emit overpowering gases. Descend via the red scoria, then<br />
on the loose scree to either side of the ridge.<br />
34<br />
33. <strong>Tongariro</strong> Summit (1967 metres)<br />
1½ - 2 hours return from the <strong>Tongariro</strong> Alpine Crossing<br />
From Red Crater a poled route branches off to the<br />
summit of <strong>Tongariro</strong>. The route offers some wonderful views<br />
of the area.<br />
34. Mt Ruapehu Crater Climb (2672 metres)<br />
7 hours, 10 kilometres, return via same route. Begins<br />
from Iwikau Village at the top of the Bruce Road.<br />
Or 5 hours, 7 kilometres, return via the same route. Take<br />
Whakapapa Ski Area chairlift from Iwikau Village. Walk<br />
begins at Knoll Ridge.<br />
This is NOT a marked route. You need to be able to find your<br />
own way, have a map (<strong>Tongariro</strong> National Park map 273-04)<br />
and be well equipped (see gear list in introduction). It is only<br />
suitable for fit, experienced, and well equipped people who<br />
can make effective judgments about alpine and volcanic<br />
hazards. If unsure, travel with a guided party. Whakapapa Ski<br />
Area offers guided trips to the Crater during summer months.<br />
Phone (07) 892 4000. www.mtruapehu.com<br />
If chairlifts or the guided summit walk are not operating, it is<br />
a clear indication that conditions are not suitable for tramping<br />
on Mt Ruapehu.<br />
Mountaineering experience and equipment (such as ice axes<br />
and crampons) are essential for winter climbing. Many people<br />
have enjoyed the climb to the Crater with its panoramic<br />
views and volcanic landscape. However, some have met with<br />
tragedy because they were either not experienced or were ill<br />
equipped to handle the conditions they encountered.<br />
The following descriptions are simplified route guides from<br />
Whakapapa Ski Area to Dome Ridge, where you can view the<br />
crater area. Two standard routes are marked on the illustration<br />
(see page 37). The most commonly used early summer route,<br />
when snow is still present in the valleys, follows up the lefthand-side<br />
of the Knoll Ridge T-bar line and continues up the<br />
valley above the last T-bar pylon. At the head of the valley<br />
climb up onto the ridge behind Glacier Knob. From this point<br />
follow the narrow foot track zigzagging up the side of and<br />
along Dome Ridge.<br />
Dome Ridge in winter<br />
35