automatische leiselaufkompressoren automatic silent ... - Thermopatch
automatische leiselaufkompressoren automatic silent ... - Thermopatch
automatische leiselaufkompressoren automatic silent ... - Thermopatch

You also want an ePaper? Increase the reach of your titles
YUMPU automatically turns print PDFs into web optimized ePapers that Google loves.
3 Betrieb<br />
3.1 Aufstellung<br />
Den Kompressor auf einer waagerechten<br />
Fläche in einem gut belüfteten, trockenen<br />
Raum geeigneter Größe und mit einer Raumtemperatur<br />
von unter 35°C aufstellen. Bei<br />
ungenügender Lu ist ein korrekt dimensionierter<br />
Absauger oder Ventilator<br />
vorzusehen.<br />
ACHTUNG!<br />
DER KOMPRESSOR ENTHÄLT KEIN ÖL.<br />
Während des Transports könnte sonst im<br />
Gerät befindliches Öl in die Kompressionskammer<br />
gelangen und dort Schaden anrichten.<br />
Den Gummipfropfen vom Ende der Saugleitung<br />
abnehmen und den Saugfilter und die<br />
Einfüllspitze aus dem Nylonbeutel nehmen.<br />
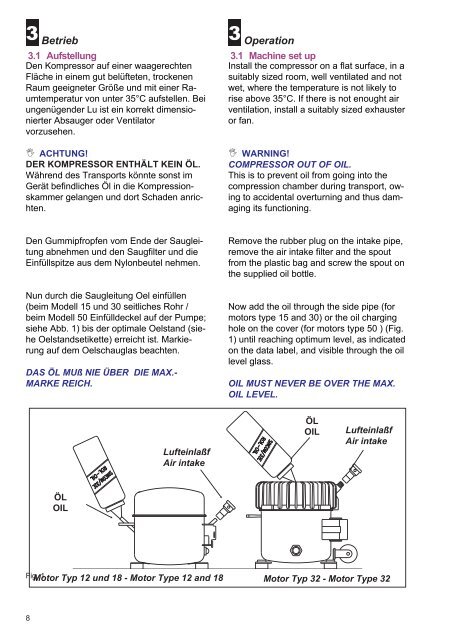
Nun durch die Saugleitung Oel einfüllen<br />
(beim Modell 15 und 30 seitliches Rohr /<br />
beim Modell 50 Einfülldeckel auf der Pumpe;<br />
siehe Abb. 1) bis der optimale Oelstand (siehe<br />
Oelstandsetikette) erreicht ist. Markierung<br />
auf dem Oelschauglas beachten.<br />
DAS ÖL MUß NIE ÜBER DIE MAX.-<br />
MARKE REICH.<br />
3 Operation<br />
3.1 Machine set up<br />
Install the compressor on a flat surface, in a<br />
suitably sized room, well ventilated and not<br />
wet, where the temperature is not likely to<br />
rise above 35°C. If there is not enought air<br />
ventilation, install a suitably sized exhauster<br />
or fan.<br />
WARNING!<br />
COMPRESSOR OUT OF OIL.<br />
This is to prevent oil from going into the<br />
compression chamber during transport, owing<br />
to accidental overturning and thus damaging<br />
its functioning.<br />
Remove the rubber plug on the intake pipe,<br />
remove the air intake filter and the spout<br />
from the plastic bag and screw the spout on<br />
the supplied oil bottle.<br />
Now add the oil through the side pipe (for<br />
motors type 15 and 30) or the oil charging<br />
hole on the cover (for motors type 50 ) (Fig.<br />
1) until reaching optimum level, as indicated<br />
on the data label, and visible through the oil<br />
level glass.<br />
OIL MUST NEVER BE OVER THE MAX.<br />
OIL LEVEL.<br />
Fig. Motor 1 Typ 12 und 18 - Motor Type 12 and 18 Motor Typ 32 - Motor Type 32<br />
8<br />
ÖL<br />
OIL<br />
Lufteinlaßf<br />
Air intake<br />
ÖL<br />
OIL<br />
Lufteinlaßf<br />
Air intake