

Download Installation Guidelines - Iplex Pipelines
Download Installation Guidelines - Iplex Pipelines
Download Installation Guidelines - Iplex Pipelines

You also want an ePaper? Increase the reach of your titles
YUMPU automatically turns print PDFs into web optimized ePapers that Google loves.
Step 3<br />
Once on site excavate installation pits and or lateral<br />
connections. Ensure the installation and receiving pits are 1-2<br />
pipe diameters below the existing host pipe invert.<br />
Figure 8.12 Figure 8.13<br />
<strong>Installation</strong> pit Receiving pit<br />
Step 4<br />
Select a mandrill or expander to suit the existing host pipe<br />
material. Allow for over expansion for a successful pull<br />
in. Over expansion will vary depending upon on factors<br />
including soil type, pipe diameter, pipeline length and tidal<br />
activity.<br />
Do not exceed the maximum allowable axial loads detailed<br />
in Table 5.<br />
Step 5<br />
Attach your Restrain socket starter pipe (refer Section 7.3)<br />
to the pull head.<br />
Step 6<br />
In high water table applications a wind up test plug can be<br />
installed inside the socket end of your Restrain lead pipe.<br />
This will prevent ground water invading your new pipe.<br />
Step 7<br />
Begin pull back. Follow the installation steps in Section 8.0.<br />
Step 8<br />
Sewer laterals can be replaced using Restrain Sewer<br />
Pipe. 1, 2 or 3m pipes are often used for the pull back. The<br />
Hammer Head PB-30 Static PB unit is ideal for installing<br />
Restrain Sewer lateral pipe.<br />
Figure 8.14 Figure 8.15<br />
<strong>Installation</strong> pit Receiving pit<br />
14<br />
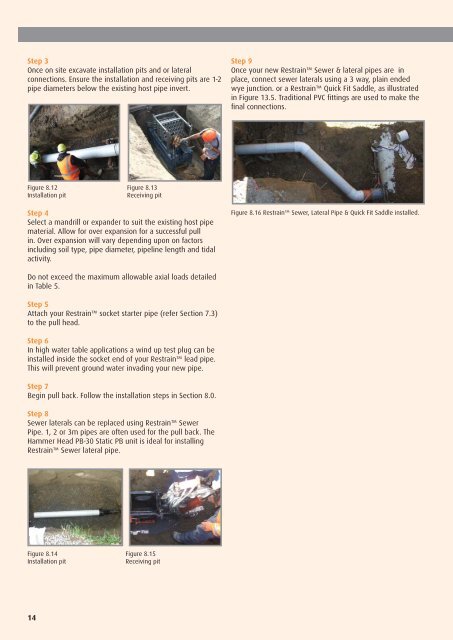
Step 9<br />
Once your new Restrain Sewer & lateral pipes are in<br />
place, connect sewer laterals using a 3 way, plain ended<br />
wye junction. or a Restrain Quick Fit Saddle, as illustrated<br />
in Figure 13.5. Traditional PVC fi ttings are used to make the<br />
fi nal connections.<br />
Figure 8.16 Restrain Sewer, Lateral Pipe & Quick Fit Saddle installed.