Manual Biostat Culti Bag RM600 SBT6008-e
Manual Biostat Culti Bag RM600 SBT6008-e
Manual Biostat Culti Bag RM600 SBT6008-e

You also want an ePaper? Increase the reach of your titles
YUMPU automatically turns print PDFs into web optimized ePapers that Google loves.
Operating <strong>Manual</strong><br />
BIOSTAT ® <strong>Culti</strong><strong>Bag</strong> RM 600<br />
85034-539-09 Vers. 10|2010
Introduction<br />
This operating manual describes the installation and operation of the bioreactor<br />
BIOSTAT ® <strong>Culti</strong><strong>Bag</strong> RM 600.<br />
Disclosures The bioreactor BIOSTAT ® <strong>Culti</strong><strong>Bag</strong> RM 600 has been designed for the development and<br />
optimization of processes for the cultivation of cells or microorganisms in disposable<br />
systems with low shear.<br />
The safe operation of the bioreactor assumes special knowledge in aseptic techniques<br />
for the safe handling of the microorganisms or cells.<br />
In order to prevent possible biohazards the cultures of microorganisms and cells may<br />
require special handling and waste disposal considerations for the equipment and for<br />
disposal of the culture contents and disposable bag bioreactors.<br />
This operating manual contains appropriate safety notes only on possible hazards<br />
and remedial measures if they apply to the users of this equipment and its associated<br />
equipment. Such safety notes are supplementary to regulations distributed by<br />
the company or local authority for the process. It does not refer to conditions and<br />
regulations on the protection of the staff and the work environment, whether they<br />
are legal or binding in any way.<br />
The production scale disposable bioreactor system BIOSTAT ® <strong>Culti</strong><strong>Bag</strong> RM 600 is<br />
part of the product range of Sartorius Stedim Systems GmbH.<br />
If you have questions on the BIOSTAT ® <strong>Culti</strong><strong>Bag</strong> RM 600 or further products of<br />
Sartorius Stedim Systems GmbH, please contact:<br />
Sartorius Stedim Systems GmbH<br />
Schwarzenberger Weg 73-79<br />
D – 34212 Melsungen<br />
Tel. +49.5661.713400<br />
Fax +49.5661.929945<br />
info@sartorius-stedim-systems.com<br />
www.sartorius-stedim.com<br />
Release Notes © Sartorius Stedim Systems GmbH. This documentation describes the devices<br />
at the time of its publication. Modifications of the technical design and of the<br />
documentation are reserved without prior notice.<br />
2 Introduction<br />
No part of the documentation may duplicated, changed or reprocessed for other<br />
purposes by third parties without written approval.
NOTICE<br />
Legend<br />
BIOHAZARD This symbol indicates process dependent risks for the staff.<br />
Possible hazards, either damages of equipment or effects on personal health,<br />
will depend on the process and the microorganisms or cells applied.<br />
This symbol indicates possible, either damages of equipment or effects on personal<br />
health caused by electricity.<br />
NOTICE indicates property damage to the equipment.<br />
This symbol indicates steps of operation which must be executed with special care or<br />
at which important aspects need to be considered, e.g. in order to avoid erroneous<br />
operation or malfunctions.<br />
The “button” indicates other noticeable information.<br />
1., 2., .. Numbered paragraphs show steps of operation, which need to be processed in<br />
the order, as indicated.<br />
This symbol refers to secondary information, which is given in this or in other<br />
documentations.<br />
Legend 3
General Safety Notes<br />
Organizational Issues The enterprise (i.e. the responsible authorities) shall ensure that the required<br />
(legal issues, staff & working place) conditions appropriate for the process are provided:<br />
1. The personnel shall be qualified for the process, for which the bioreactor is applied,<br />
they shall know the hazards possible, and carefully familiarize themselves with the<br />
handling of all equipment, which is associated with the bioreactor.<br />
BIOHAZARD 2. The access to the work place must be restricted for persons not authorized to<br />
work with the bioreactor. If the process can cause hazards, e.g. resulting from<br />
the culture or media, the work place shall be marked by appropriate safety labels,<br />
such as “BIOHAZARD”, and be isolated by appropriate barriers.<br />
[refer e.g., to<br />
“Legal regulations on<br />
biological safety”] 3. The work place shall be suitable for the process, i.e. be resistant against acids,<br />
alkaline solutions or the media. In the case of contamination, e.g. by the culture,<br />
it shall easily be possible to decontaminate, disinfect and clean the work place.<br />
4. The enterprise (i.e. the responsible authorities) must issue safety regulations about<br />
hazards which can occur in the process at the work place for the staff and work<br />
environment. Required safety facilities have to be provided.<br />
5. In general, the staff shall wear suitable working clothes and personal protective<br />
equipments (e.g. gloves, safety goggles as well as respiratory protection, if<br />
required).<br />
Installation at the working place The working place and the utility supplies shall fullfill the requirements according<br />
to the specifications of the bioreactor.<br />
4 General Safety Notes<br />
2. Provide that the laboratory mains and the supplies of gasses fulfil the specifications<br />
of the bioreactor.<br />
3. Only use equipment and peripheral devices which Sartorius Stedim Systems<br />
has released for the BIOSTAT ® <strong>Culti</strong><strong>Bag</strong> RM 600.<br />
4. Tighten all connections of the laboratory, of the <strong>Culti</strong><strong>Bag</strong> RM 600 and the<br />
peripheral devices especially carefully. Test for leaks and unintentional release.<br />
5. Ensure that all equipment and the peripheral devices of the bioreactor are in good<br />
condition. This is especially true for the <strong>Culti</strong><strong>Bag</strong> RM 600. Do not use damaged<br />
parts (even if damages are only suspected).
Contents<br />
1. Structure and Function . . . . . . . . . . . . . . . . . . . . . . . . . . . . 6<br />
1.1 Usage of BIOSTAT ® <strong>Culti</strong><strong>Bag</strong> RM 600 . . . . . . . . . . . . . . . 6<br />
1.2 <strong>Culti</strong><strong>Bag</strong> RM 600 . . . . . . . . . . . . . . . . . . . . . . . . . . . . . . . 6<br />
1.3 System Structure . . . . . . . . . . . . . . . . . . . . . . . . . . . . . . . 7<br />
1.4 Technical Data . . . . . . . . . . . . . . . . . . . . . . . . . . . . . . . . . 8<br />
1.4.1 Operation . . . . . . . . . . . . . . . . . . . . . . . . . . . . . . . 8<br />
1.4.2 Gassing module . . . . . . . . . . . . . . . . . . . . . . . . . . 8<br />
1.4.3 Rocking rate . . . . . . . . . . . . . . . . . . . . . . . . . . . . . 8<br />
1.4.4 Rocking angle . . . . . . . . . . . . . . . . . . . . . . . . . . . 8<br />
1.4.5 Temperature control . . . . . . . . . . . . . . . . . . . . . . 8<br />
1.4.6 Measurement of DO and pH . . . . . . . . . . . . . . . . 8<br />
1.4.7 Communication . . . . . . . . . . . . . . . . . . . . . . . . . . 9<br />
1.4.8 Materials of Construction . . . . . . . . . . . . . . . . . . 9<br />
1.4.9 Ingress Protection . . . . . . . . . . . . . . . . . . . . . . . . 9<br />
1.4.10 Dimensions|Weight . . . . . . . . . . . . . . . . . . . . . . 9<br />
1.4.11 Power supply . . . . . . . . . . . . . . . . . . . . . . . . . . . . 9<br />
1.4.12 Ambient temperature range . . . . . . . . . . . . . . . . 9<br />
1.4.13 Characteristics, Specification of <strong>Culti</strong><strong>Bag</strong> RM,<br />
operation modes RM Control Tower . . . . . . . . . 9<br />
1.5 Surface Temperature Sensors . . . . . . . . . . . . . . . . . . . . . 9<br />
1.6 Filter Heater . . . . . . . . . . . . . . . . . . . . . . . . . . . . . . . . . . . 9<br />
2. Delivery and Installation . . . . . . . . . . . . . . . . . . . . . . . . . . 10<br />
2.1 Delivery Checks . . . . . . . . . . . . . . . . . . . . . . . . . . . . . . . 10<br />
2.2 Space Requirements . . . . . . . . . . . . . . . . . . . . . . . . . . . 10<br />
2.3 Connection of the Supplies . . . . . . . . . . . . . . . . . . . . . 11<br />
2.3.1 Preparing the Work Place . . . . . . . . . . . . . . . . . 11<br />
2.3.2 Mains connection . . . . . . . . . . . . . . . . . . . . . . . 11<br />
2.4 BIOSTAT ® <strong>Culti</strong><strong>Bag</strong> RM 600 . . . . . . . . . . . . . . . . . . . . . . 12<br />
2.4.1 Connections, Interfaces . . . . . . . . . . . . . . . . . . 12<br />
2.4.2 Safety . . . . . . . . . . . . . . . . . . . . . . . . . . . . . . . . . 13<br />
3. Getting Started . . . . . . . . . . . . . . . . . . . . . . . . . . . . . . . . . . 14<br />
3.1 Overview . . . . . . . . . . . . . . . . . . . . . . . . . . . . . . . . . . . . . 14<br />
3.2 Installation Kit . . . . . . . . . . . . . . . . . . . . . . . . . . . . . . . . 14<br />
3.3 Transportation, Unpack Equipment . . . . . . . . . . . . . . . 15<br />
3.3.1 Transportation . . . . . . . . . . . . . . . . . . . . . . . . . . 15<br />
3.3.2 Place at Final Destination . . . . . . . . . . . . . . . . . 15<br />
3.3.3 Unpack Equipment . . . . . . . . . . . . . . . . . . . . . . 15<br />
3.3.4 Room of Installation . . . . . . . . . . . . . . . . . . . . . 16<br />
3.4 Equipping the system . . . . . . . . . . . . . . . . . . . . . . . . . . 16<br />
3.4.1 Mount BIOSTAT ® RM Control Tower . . . . . . . . 16<br />
3.4.2 Surface temperature sensor, plug in . . . . . . . . 16<br />
3.4.3 Filter heater, plug in . . . . . . . . . . . . . . . . . . . . . 17<br />
3.4.4 Aeration Tube . . . . . . . . . . . . . . . . . . . . . . . . . . 17<br />
3.4.5 Connect Optical Fibre Cables . . . . . . . . . . . . . . 17<br />
3.4.6 Connect Power Supply . . . . . . . . . . . . . . . . . . . 17<br />
3.4.7 Connect Pressurized Air, O 2, N 2 and<br />
CO 2 Supply . . . . . . . . . . . . . . . . . . . . . . . . . . . . . 17<br />
4. Preparation and Inflation of the <strong>Culti</strong><strong>Bag</strong> RM 600 . . . 18<br />
4.1 Unpacking the <strong>Culti</strong><strong>Bag</strong> RM 600 . . . . . . . . . . . . . . . . . 18<br />
4.2 Mounting the <strong>Culti</strong><strong>Bag</strong> RM 600L<br />
on the Rocking Table . . . . . . . . . . . . . . . . . . . . . . . . . . . 18<br />
4.3 Installing the Filter Heaters . . . . . . . . . . . . . . . . . . . . . 20<br />
4.4 Connect Air Supply . . . . . . . . . . . . . . . . . . . . . . . . . . . . 21<br />
4.5 Inflation of the <strong>Culti</strong><strong>Bag</strong> RM 600 . . . . . . . . . . . . . . . . . 21<br />
4.6 Connect Optical Sensors . . . . . . . . . . . . . . . . . . . . . . . . 22<br />
5. <strong>Culti</strong>vation . . . . . . . . . . . . . . . . . . . . . . . . . . . . . . . . . . . . . . 23<br />
5.1 Preparing for the <strong>Culti</strong>vation . . . . . . . . . . . . . . . . . . . . 23<br />
5.1.1 Filling the <strong>Culti</strong><strong>Bag</strong> RM 600<br />
with culture media . . . . . . . . . . . . . . . . . . . . . . 23<br />
5.1.2 Set cultivation parameters and start . . . . . . . . 24<br />
5.2 Sampling and Inoculation . . . . . . . . . . . . . . . . . . . . . . . 25<br />
5.2.1 Preparing for Sampling or Inoculation . . . . . . 25<br />
5.2.2 Inoculation . . . . . . . . . . . . . . . . . . . . . . . . . . . . . 26<br />
5.2.3 Sampling . . . . . . . . . . . . . . . . . . . . . . . . . . . . . . 26<br />
5.3 Media exchange . . . . . . . . . . . . . . . . . . . . . . . . . . . . . . . 27<br />
6. End of the process and putting out of service safely . . 28<br />
7. Cleaning and Maintenance Work . . . . . . . . . . . . . . . . . . 29<br />
7.1 Intermediate Cleaning . . . . . . . . . . . . . . . . . . . . . . . . . . 29<br />
7.2 Maintenance by operators . . . . . . . . . . . . . . . . . . . . . . 29<br />
7.3 Maintenance and calibration by<br />
authorized personnel . . . . . . . . . . . . . . . . . . . . . . . . . . 29<br />
8. Supplement . . . . . . . . . . . . . . . . . . . . . . . . . . . . . . . . . . . . . 30<br />
8.1 Optimize Wave Motion . . . . . . . . . . . . . . . . . . . . . . . . . 30<br />
8.2 Over Pressure Management . . . . . . . . . . . . . . . . . . . . . 31<br />
8.3 List of Alarm Messages . . . . . . . . . . . . . . . . . . . . . . . . . 31<br />
8.4 Trouble Shooting Disturbances and Measures . . . . . . 32<br />
8.5 Provisions . . . . . . . . . . . . . . . . . . . . . . . . . . . . . . . . . . . . 34<br />
8.5.1 Warranty Aggreements and Intended Use . . . 34<br />
8.5.2 Service . . . . . . . . . . . . . . . . . . . . . . . . . . . . . . . . 34<br />
8.5.3 Disposal of Equipment . . . . . . . . . . . . . . . . . . . 34<br />
8.6 Decontamination Declaration . . . . . . . . . . . . . . . . . . . 35<br />
Contents 5
1. Structure and Function<br />
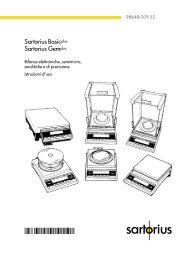
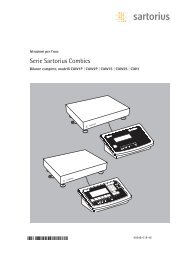
1.1 Usage of BIOSTAT ® <strong>Culti</strong><strong>Bag</strong> RM 600 The BIOSTAT ® <strong>Culti</strong><strong>Bag</strong> RM 600 is a large scale rocking platform for cultivation of cells<br />
and microbes in Disposable <strong>Bag</strong> Bioreactors (<strong>Culti</strong><strong>Bag</strong> RM 600). The Rocking platform<br />
is combined with the BIOSTAT ® RM Control Tower which allows monitoring and<br />
control for pH, DO, temperature, rocking angle and rocking rate.<br />
BioPat ® MFCS|DA software for external data logging is included.<br />
Fig 1: Set Up of BIOSTAT ® <strong>Culti</strong><strong>Bag</strong> RM 600<br />
optical<br />
Rocking motion mixing technology utilizes mechanical energy to ensure homogeneous<br />
mixing of cells with low shear. Energy input is effected by rocking the <strong>Culti</strong><strong>Bag</strong><br />
RM 600 side to side, generating a fluid movement in the cell culture and medium.<br />
In this way the surface of the medium is continuously renewed for bubble-free<br />
surface aeration.<br />
<strong>Culti</strong><strong>Bag</strong> RM 600 disposables bag for cultivations of up to 300 L of culture volume.<br />
The rocking platform, Rocker 600, is operated via the Control Tower.<br />
All set points and control functions will be controlled and displayed in the BIOSTAT ®<br />
RM Control Tower.<br />
For further information regarding connection of the Rocker 600 to the BIOSTAT ® RM<br />
Control Tower see associated manuals for Control Tower.<br />
1.2 <strong>Culti</strong><strong>Bag</strong> RM 600 Cell cultivation is performed inside the <strong>Culti</strong><strong>Bag</strong> RM 600 disposable bioreactor<br />
chambers, which are specially designed to work with the BIOSTAT ® <strong>Culti</strong><strong>Bag</strong> RM 600.<br />
These bags are delivered presterilized and ready for use. The <strong>Culti</strong><strong>Bag</strong> RM 600 is<br />
produced of multilayer film, USP class VI and is designed for single use operations.<br />
This feature eliminates the need for cleaning and sterilizing the bioreactor with<br />
considerable savings in labour, no danger of cross-contamination and greater<br />
assurance of sterile operation.<br />
5<br />
6 Structure and Function<br />
1<br />
2<br />
7<br />
3<br />
4 6<br />
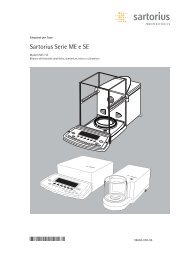
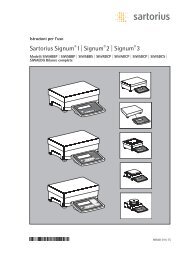
<strong>Culti</strong><strong>Bag</strong> RM 600L optical, mounted on table<br />
1 Fill port, C-Flex tubing with MPC coupling<br />
2 Spare port with luer connector<br />
3 Sample port, with luer-septum for sampling or inoculation<br />
4 Fill|drain port, C-Flex tubing with Luer<br />
5 Air outlet sterile filter<br />
6 pH and DO probes<br />
7 Fill port, C-Flex tubing with MPC coupling<br />
<strong>Culti</strong><strong>Bag</strong> RM 600L only are recommended for use with the BIOSTAT ® <strong>Culti</strong><strong>Bag</strong> RM 600.
1.3 System Structure The bioreactor BIOSTAT ® <strong>Culti</strong><strong>Bag</strong> RM 600 is compiled from the following<br />
components:<br />
Rocker 600<br />
BIOSTAT ® RM Control Tower 600 and the hexagonal frame<br />
Surface Temperature Sensor DS600L-RMPT<br />
2+ Filter Heater for BIOSTAT ® <strong>Culti</strong><strong>Bag</strong> RM 600 DS600L-RMFH<br />
Aeration tubes labelled<br />
Quick Installation Guide hard copy<br />
CD ROM including User <strong>Manual</strong> and Quick Installation Guide<br />
<strong>Culti</strong><strong>Bag</strong> RM is not a part of delivery!<br />
Please specify and order separately.<br />
For further information please contact your Sartorius Stedim Biotech representative.<br />
Structure and Function 7
1.4 Technical Data<br />
1.4.1 Operation The BIOSTAT ® <strong>Culti</strong><strong>Bag</strong> RM 600 is a fully automated, PLC controlled system.<br />
Operation is via BIOSTAT ® RM Control Tower.<br />
1.4.2 Gassing module The BIOSTAT ® <strong>Culti</strong><strong>Bag</strong> RM 600 contains a superior gassing system, which consists of<br />
4 rotameters (Air, O 2, N 2, CO 2), 1 mass flow controller for total flow and 1 mass flow<br />
controller for CO 2.<br />
Flexible hose with connectors to connect <strong>Culti</strong><strong>Bag</strong> RM with<br />
BIOSTAT ® RM Control Tower 600 are included.<br />
Mass flow controller (MFC 1) 0.4-20L for air, O 2, N 2<br />
Mass flow controller (MFC 2) 0.2-3 L for CO 2<br />
1.4.3 Rocking rate 2…16 ± 1 rocks/min, adjustable at BIOSTAT ® RM Control Tower.<br />
1.4.4 Rocking angle 4…10°, ± 0.5°, adjustable at BIOSTAT ® RM Control Tower.<br />
1.4.5 Temperature control PLC programmed PID controller built-in the BIOSTAT ® <strong>Culti</strong><strong>Bag</strong> RM 600.<br />
Set temperature is adjusted at BIOSTAT ® RM Control Tower.<br />
Cooling by ambient air only. No cooling device required.<br />
An electrical resistance heater plate is installed below the rocking table with<br />
a built-in safety temperature switch.<br />
Heating power: One section with 650 W.<br />
Temperature range set temperature +15…+44°C, ± 0.1°C.<br />
1.4.6 Measurement of DO and pH Two reusable non invasive optical fibres for pH|DO are inserted into the respective<br />
sensor ports of the <strong>Culti</strong><strong>Bag</strong> RM 600. The optical fiber transmits light of specific<br />
wavelength, to the sensor patch and returns the luminescence response from the<br />
sensor back to the measuring amplifier. The light fibre cables are marked with colours<br />
to avoid insert into the wrong port of the <strong>Culti</strong><strong>Bag</strong> RM 600.<br />
– DO (yellow)<br />
– pH (red)<br />
For further information please refer to BIOSTAT ® RM Control Tower manual.<br />
8 Structure and Function
1.4.7 Communication Ethernet connection in order in connect e.g. BioPAT ® MFCS/Win or BioPAT ® MFCS/DA.<br />
1.4.8 Materials of Construction Electrical cabinet and frame, housing BIOSTAT ® RM Control<br />
Tower 200: Stainless steel 1.4301 (304), brushed, electropolished.<br />
Rocking table: Stainless steel 1.4435, brushed, electropolished.<br />
Lid: ABS with UV layer.<br />
1.4.9 Ingress Protection IP 43 Minimum.<br />
1.4.10 Dimensions|Weight Dimension with mounted BIOSTAT ® RM Control Tower :<br />
– Rocking table in horizontal position: W + D + H 1.97 + 1.47 + 1.33 m.<br />
– Weight without <strong>Culti</strong><strong>Bag</strong> RM 600: 340 Kg.<br />
1.4.11 Power supply Only one power supply for the BIOSTAT ® <strong>Culti</strong><strong>Bag</strong> RM 600 is available: 3 + 400VAC,<br />
+N, +PE, 50-60Hz, 16A<br />
1.4.12 Ambient temperature range 0…+50°C.<br />
1.4.13 Characteristics, Specification <strong>Culti</strong><strong>Bag</strong> RM 600L Number of bags Min. working Max. working<br />
of <strong>Culti</strong><strong>Bag</strong> RM, operation mounted volume* in volume in<br />
modes RM Control Tower <strong>Culti</strong><strong>Bag</strong> RM 600 <strong>Culti</strong><strong>Bag</strong> RM 600<br />
[L] [L]<br />
1+ <strong>Culti</strong><strong>Bag</strong> RM 600L 1 60 L 300 L<br />
* <strong>Culti</strong><strong>Bag</strong> RM 600L with integrated disposable sensors pH and DO require higher min.<br />
working volume.<br />
1.5 Surface Temperature Sensors PT100 is a resistance thermometer class A (EN60751), 3-wire, which measures the<br />
temperature of the <strong>Culti</strong><strong>Bag</strong> RM 600.<br />
It is plugged into the BIOSTAT ® <strong>Culti</strong><strong>Bag</strong> RM 600 with a LEMO plug, and placed under<br />
the bag in the middle of the rocking table.<br />
1.6 Filter Heater Heating of <strong>Culti</strong><strong>Bag</strong> RM 600 generates small amounts of condensation rising into the<br />
air outlet filter. The filter heater keeps the vent filter dry and prevents plugging of<br />
the filter media. A green LED shows the heater is heating. The filter heater is placed<br />
at the lid. Magnets are used for easier fit.<br />
Temperature range: 35…50°C, ±5°C<br />
Heating power: 24V, 6W<br />
Structure and Function 9
2. Delivery and Installation<br />
2.1 Delivery Checks The BIOSTAT ® <strong>Culti</strong><strong>Bag</strong> RM 600 is delivered after careful functional tests. Should<br />
there be any damage in transit or if the system is inoperable after installation due<br />
to damaged and defective component parts, please follow the notes below.<br />
1. Check the order confirmation with the delivery documents according to the<br />
order placed.<br />
2. Check all units and component parts for damage.<br />
3. Report missing parts or damage in transit to your local Sartorius Stedim Biotech<br />
Representative.<br />
4. Check the proper function of all units and component parts before the first<br />
cultivation process.<br />
5. Record malfunctions carefully. Return the claim report to your local<br />
Sartorius Stedim Biotech Representative.<br />
2.2 Space Requirements The table below details the space requirements of bioreactor<br />
BIOSTAT ® <strong>Culti</strong><strong>Bag</strong> RM 600 units:<br />
10 Delivery and Installation<br />
Space requirements for W + D [m]:<br />
BIOSTAT ® <strong>Culti</strong><strong>Bag</strong> RM 600 2.5 + 1.5<br />
Operator needs in minimum at front side Recommended: approx. 1.5 m<br />
For installation|maintenance|calibration|<br />
repair around the unit<br />
Recommended: approx. 1.0 m<br />
Please verify your door opening is in minimum 1.5 m wide to transport the system<br />
into your operation room.<br />
If BIOSTAT ® <strong>Culti</strong><strong>Bag</strong> RM 600 RM is moved on its wheels; take its weight into<br />
consideration. Take precautions if moved up or down on a ramp and make sure<br />
the ground is strong enough to support the weight.
2.3 Connection of the Supplies Required fixtures and fittings are enclosed in the delivery. Additional connection<br />
fittings for special requirements are available; please contact your local Sartorius<br />
Stedim Biotech representative for details.<br />
2.3.1 Preparing the Work Place 1. During set up and installation of the bioreactor ensure that sufficient workspace<br />
is available: (See section space requirements).<br />
2.3.2 Mains connection<br />
Placement of the BIOSTAT ® <strong>Culti</strong><strong>Bag</strong> RM 600L<br />
Connection to the facilities<br />
Placement of the <strong>Culti</strong><strong>Bag</strong> RM 600L<br />
Additional peripheral devices.<br />
2. Check the mains connection:<br />
Mains supplies in at the work place must fit to the specifications of the<br />
bioreactor.<br />
CAUTION Risk of voltage damage to equipment!<br />
NOTICE<br />
The mains supply must fulfill the specifications of the units.<br />
Voltage fluctuations must not occur.<br />
Verify that correct and interference free mains supply is available.<br />
Never connect to wrong mains specifications.<br />
Interrupt power supply before opening the cover of electrical cabinet.<br />
Check the hardware labels to determine whether the correct mains version is supplied<br />
and the power cords are equipped with the plugs required for the supplies.<br />
If any of the units have incorrect mains version or power cords have wrong plugs,<br />
please contact your local Sartorius Stedim Biotech service person.<br />
The BIOSTAT ® <strong>Culti</strong><strong>Bag</strong> RM 600 is verified for electrical security from plant side.<br />
It is still necessary for customer to check the electrical security and electrical<br />
compatibility of the internal power mains.<br />
Delivery and Installation 11
2.4 BIOSTAT ® <strong>Culti</strong><strong>Bag</strong> RM 600<br />
2.4.1 Connections, Interfaces<br />
12 Delivery and Installation<br />
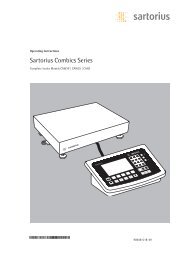
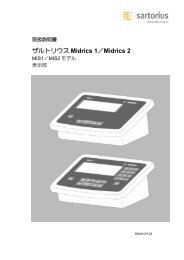
Fig 2: BIOSTAT ® <strong>Culti</strong><strong>Bag</strong> RM 600: Schematic rear side view of electrical cabinet<br />
1 2 3 4 5<br />
Fig 3: BIOSTAT ® <strong>Culti</strong><strong>Bag</strong> RM 600: Schematic view of the sockets<br />
Connectors and switches<br />
1 Socket to connect surface temperature sensor red<br />
2 Socket to connect filter heater<br />
3 Socket to connect filter heater<br />
4 Socket D-Sub RS232 to connect BIOSTAT ® RM Control Tower<br />
5 Socket to connect BIOSTAT ® RM Control Tower
2.4.2 Safety The area below the rocking table is protected by a laser scanner. It stops the rocking<br />
motion immediately when something enters the hazard area.<br />
For safety reasons you must switch off the system BIOSTAT ® <strong>Culti</strong><strong>Bag</strong> RM 600 before<br />
restarting the rocking motion after an Emergency stop.<br />
Attention! Do not touch the area showed in the picture at any time!<br />
It is not protected by the laser scanner and will cause serious injury.<br />
Attention! The yellow-black hazard area at the backside of the plant is not<br />
protected by the laser scanner. Do not touch the running unit.<br />
Delivery and Installation 13
3. Getting Started<br />
3.1 Overview The commissioning of the BIOSTAT ® <strong>Culti</strong><strong>Bag</strong> RM 600 and its operation for the<br />
respective process covers the following steps:<br />
1. Transportation, unpack equipment.<br />
2. Equipping the system<br />
3. Preparation and inflating of the <strong>Culti</strong><strong>Bag</strong> RM 600L<br />
4. <strong>Culti</strong>vation<br />
– Preparing for the cultivation<br />
– Sampling and Inoculation<br />
– Media exchange<br />
5. End of the process and putting out of service safely<br />
6. Cleaning and maintenance work<br />
3.2 Installation Kit The scope of the delivery includes a kit for the required fittings and connections.<br />
14 Getting Started<br />
1. Use only fixtures and fittings supplied by Sartorius Stedim Biotech and released<br />
for use with the BIOSTAT ® <strong>Culti</strong><strong>Bag</strong> RM 600.<br />
2. Replace damaged components and spare parts by components delivered or<br />
released by Sartorius Stedim Biotech.<br />
Malfunctions caused by the use of parts not approved for use with the BIOSTAT ®<br />
<strong>Culti</strong><strong>Bag</strong> RM 600 are not covered by warranty.
3.3 Transportation, Unpack Equipment<br />
3.3.1 Transportation 1. If BIOSTAT ® <strong>Culti</strong><strong>Bag</strong> RM 600 is moved on its wheels; take its weight into your<br />
consideration. Take precaution if moved up or down on ramp and make sure the<br />
ground is strong enough to support the weight.<br />
NOTICE<br />
2. If lifted by fork lift or pallet truck, please ensure BIOSTAT ® <strong>Culti</strong><strong>Bag</strong> RM 600 is<br />
lifted up by its frame. Lift up at rear or front side. Lift up at side towards control<br />
cabinet. If required, fix at fork. Please ensure you do not damage cables.<br />
Only lift with fork lift or pallet truck. Please do not use chain blocks or similar<br />
device. Please lift only at the lower frame.<br />
3. BIOSTAT ® RM Control Tower is mounted at pallet. Only transport with fork lift<br />
or pallet truck.<br />
4. Keep equipment dry while transportation or storage.<br />
Do not lift at the rocking table or at the control cabinet.<br />
Note the weight and the dimensions of all devices. Use appropriate transport<br />
carriers.<br />
Do not lift the Rocker 600 with the BIOSTAT ® RM Control Tower mounted<br />
and|or with liquid containing <strong>Culti</strong><strong>Bag</strong> RM inside.<br />
3.3.2 Place at Final Destination 1. Move the BIOSTAT ® <strong>Culti</strong><strong>Bag</strong> RM 600 to the final place where it will be installed.<br />
Lock all wheel breaks. Please make sure the rocking table is placed in horizontal<br />
position on an even surface.<br />
NOTICE<br />
Take care when moving onto inclined plane. Take it’s heavy weight into your<br />
consideration. Do not move the BIOSTAT ® <strong>Culti</strong><strong>Bag</strong> RM 600 mounted with liquid<br />
containing <strong>Culti</strong><strong>Bag</strong> RM inside.<br />
3.3.3 Unpack Equipment 1. Remove the carton closure from BIOSTAT ® <strong>Culti</strong><strong>Bag</strong> RM 600. Sink the BIOSTAT ®<br />
<strong>Culti</strong><strong>Bag</strong> RM 600 carefully from the pallet on a horizontal floor. A fork lift may<br />
be used. Lift only at the lower frame. Check that the equipment is intact and<br />
complete.<br />
2. Unpack BIOSTAT ® RM Control Tower carefully. Avoid any damage to front<br />
mounted air flow meters and connectors.<br />
Getting Started 15
3.3.4 Room of Installation 1. The operator needs only access at the front of the BIOSTAT ® <strong>Culti</strong><strong>Bag</strong> RM 600.<br />
For calibration and maintenance, access from the rear side and left side is also<br />
required.<br />
The BIOSTAT ® <strong>Culti</strong><strong>Bag</strong> RM 600 is mobile, but must not be moved with a filled<br />
bag inside.<br />
3.4 Equipping the system<br />
2. Place the BIOSTAT ® <strong>Culti</strong><strong>Bag</strong> RM 600 on a horizontal, safe and stable floor.<br />
3. Do not place any equipment close to the rocking table to avoid any blockage or<br />
damage. Also do not place the BIOSTAT ® <strong>Culti</strong><strong>Bag</strong> RM 600 to jut out from parts<br />
of wall which could be a hazard risk.<br />
4. The measurement of pH and DO is based on chemical sensors. The chemical pH<br />
sensor is susceptible to photo bleaching, keep it covered. Avoid intensive light<br />
such as sun beam shining on the BIOSTAT ® <strong>Culti</strong><strong>Bag</strong> RM 600 with mounted<br />
<strong>Culti</strong><strong>Bag</strong>s.<br />
Do not expose the <strong>Culti</strong>bag RM on direct sun beam.<br />
3.4.1 Mount BIOSTAT ® RM Control Tower 1. Connect the BIOSTAT ® RM Control Tower with BIOSTAT ® <strong>Culti</strong><strong>Bag</strong> RM 600 using<br />
included RS232 connection cable and power supply.<br />
Do not modify the BIOSTAT ® RM System and <strong>Culti</strong>bag RM 600 in any way.<br />
Modification may affect the safety of device.<br />
3.4.2 Surface temperature sensor, plug in The surface temperature sensor is mounted at rocking table.<br />
Connection cables have to be plugged in.<br />
16 Getting Started<br />
NOTICE<br />
NOTICE<br />
NOTICE<br />
NOTICE<br />
1. Correct placement means the surface of the sensor is visible on top so that it<br />
is in direct contact with the <strong>Culti</strong><strong>Bag</strong> RM 600 film as shown in the picture.<br />
2. Guide connection ribbon cables with plug through the opening of rocking<br />
table at the front side.<br />
Incorrect placement of the temperature sensor can cause overheating of the heater<br />
plate and the bimetal will disconnect the thermal energy after reaching 50–60°C.
3.4.3 Filter heater, plug in Two filter heaters are supplied in individual boxes. Connection cables have to be<br />
plugged in for operation. Both filter heaters are identical and are operated only<br />
while the gasflow is supplied into the bag.<br />
1. Place both filter heaters at the lid of the rocking table with corresponding<br />
magnets.<br />
2. Guide the connection cable with plug through the cable port on the lid.<br />
3. Plug in the LEMO plug of filter heaters into the BIOSTAT ® <strong>Culti</strong><strong>Bag</strong> RM 600<br />
as shown in the picture.<br />
3.4.4 Aeration Tube An Aeration tube is included with delivery to connect the air in filter of<br />
<strong>Culti</strong><strong>Bag</strong> RM 600 with the BIOSTAT ® RM Control Tower.<br />
1. Place the aeration tube on the rocking table.<br />
2. Guide the tube with plugs through the opening of rocking table at front side.<br />
3. Connect the tube into the corresponding tube connectors at left side of<br />
BIOSTAT ® <strong>Culti</strong><strong>Bag</strong> Control Tower.<br />
3.4.5 Connect Optical Fibre Cables Two optical fibre cables are included with delivery to connect <strong>Culti</strong><strong>Bag</strong> RM 600L<br />
with BIOSTAT ® RM Control Tower.<br />
1. Place both optical fibers cables on the rocking table.<br />
2. Guide both optical fibers cable through the opening of rocking table at front side.<br />
3. Connect the light fiber cables into the corresponding sockets at the rear side of<br />
BIOSTAT ® RM Control Tower.<br />
Please refer to the associated manuals for Control Tower.<br />
3.4.6 Connect Power Supply 1. Connect your power supply with BIOSTAT ® <strong>Culti</strong><strong>Bag</strong> RM 600 system. Also please<br />
refer to the sections on Power supply and Mains connection.<br />
2. Connect your power supply with BIOSTAT ® RM Control Tower.<br />
Also please refer to the sections on Power supply and Mains connection.<br />
3.4.7 Connect Pressurized Air, O 2, N 2 1. Connect the gas supply lines to the gas inlet ports on the of BIOSTAT ® RM<br />
and CO 2 Supply Control Tower 600.<br />
All gas types (Air, O 2, N 2, CO 2) need to be filtered and the inlet pressure reduced<br />
to 1.5 bar g.<br />
Please refer to the associated manuals for Control Tower.<br />
Getting Started 17
4.1 Unpacking the <strong>Culti</strong><strong>Bag</strong> RM 600<br />
NOTICE<br />
4.2 Mounting the <strong>Culti</strong><strong>Bag</strong> RM 600L on the Rocking Table<br />
NOTICE<br />
18 Preparation and Inflation of the <strong>Culti</strong><strong>Bag</strong> RM 600<br />
4. Preparation and Inflation of the<br />
<strong>Culti</strong><strong>Bag</strong> RM 600<br />
Risk of damaging the sterile cultivation chamber!<br />
Remove the outer protective plastic film carefully. Take extra care when using sharp<br />
objects that may puncture the bag film.<br />
Place the sterile disposable <strong>Culti</strong><strong>Bag</strong> RM 600L bioreactor chamber in the middle of<br />
the rocking table before removing the protective plastic foil!<br />
Remove the sterile disposable <strong>Culti</strong><strong>Bag</strong> RM 600L bioreactor from the protective<br />
plastic foil as delivered.<br />
Place the sterile disposable <strong>Culti</strong><strong>Bag</strong> RM 600L bioreactor chamber on the<br />
rocking table.<br />
Make sure, the heating sections are not switched on before touching the rocking<br />
table. Rocking table might be hot.<br />
Do not use any tools to mount the <strong>Culti</strong><strong>Bag</strong> RM to avoid damaging the bag.<br />
Avoid any folds at the lower side of bag.<br />
Do not start rocking motion while the cover of rocking table is opened. Risk of injury.<br />
Check visually that the bag is properly installed. Install the bag rods completely in<br />
the guides.
NOTICE<br />
NOTICE<br />
Insert the both bag holders into the mount on the left and right side of the<br />
<strong>Culti</strong><strong>Bag</strong> RM 600L. Please avoid any damage at <strong>Culti</strong><strong>Bag</strong> RM 600L while fitting<br />
it on the rocking table!<br />
Click the two holders into the corresponding lock on both site of the rocking table.<br />
Inflate the <strong>Culti</strong><strong>Bag</strong> RM 600L until the air outlet filter has turned into an<br />
upright position.<br />
Do not inflate the <strong>Culti</strong><strong>Bag</strong> RM 600L to the maximum pressure until the lid<br />
is closed safely.<br />
Risk of damaging the sterile cultivation chamber!<br />
Remove the outer protective plastic film carefully. Take extra care when using<br />
sharp objects that may puncture the bag film.<br />
Preparation and Inflation of the <strong>Culti</strong><strong>Bag</strong> RM 600 19
4.3 Installing the Filter Heaters Place the sterile gas outlet filter inside the filter heater unit. (The air outlet filter is<br />
positioned on the left side of the bag). The proportional valve is mounted on the back<br />
side of the air outlet supporting plate.<br />
NOTICE<br />
20 Preparation and Inflation of the <strong>Culti</strong><strong>Bag</strong> RM 600<br />
If the gas outlet filters are equipped with a tube extension with mounted female lure<br />
coupling, please remove the tube extension and the lure coupling, then connect the<br />
filter outlet to the delivered tube with a 90°-bend, as showed in the figure.<br />
After the 90°-bend and turn the tubing lightly downwards.<br />
The vertical part of the tube after gas outlet filter should be embedded in the filter<br />
heater as much as possible.<br />
It is necessary to use two gas outlet filters during aeration, so that the back pressure<br />
can be reduced through the outlet filters accordingly.<br />
Both ends of the air outlet tubes are connected with one Y-piece. Connect the outlet<br />
of the Y-piece to the inlet of the proportional valve for pressure control as showed in<br />
the figure.<br />
Please take care as the proportional valve can be very hot during operation.<br />
Check the exhaust gas assembly, that there are no kinks or blockages in airflow in<br />
the tubing.<br />
The both parts of the filter heater are connected by magnets, which are positioned<br />
at edge of the filter heater inside.<br />
Place the filter heater box at the magnet surface of supporting plate.<br />
Filter heaters are automatically switched on as soon as the gassing system of<br />
the BIOSTAT ® <strong>Culti</strong><strong>Bag</strong> RM 600 is switched on. The air outlet filter will be heated<br />
up >40°C to avoid filter blocking.<br />
Never run a cultivation without having mounted filter heaters at air outlet filter.
4.4 Connect Air Supply Connect tubing to the gas outlet port of the BIOSTAT RM Control Tower and connect<br />
that to the inlet port of the measurement and safety valve, which is mounted on the<br />
Safety<br />
valve<br />
Pressure<br />
Sensor<br />
NOTICE<br />
4.5 Inflation of the <strong>Culti</strong><strong>Bag</strong> RM 600<br />
NOTICE<br />
right side of the air inlet supporting plate.<br />
Connect the pressure sensor by using the delivered cable with M12 plug.<br />
Use a Y-piece to connect two gas inlet filters to the gas outlet from the measurement<br />
and safety valve at the same time. This will reduce the backpressure through the gas<br />
inlet filters to a suitable range.<br />
Check the gas inlet for any kinks or blockages in the tubing which may inhibit<br />
gasflow.<br />
<strong>Culti</strong><strong>Bag</strong> RM 600L has five identical air filters mounted.<br />
Three of them are grouped together (= air outlet filter).<br />
Two filters are grouped together (= air inlet filters).<br />
– Connect the air supply from the BIOSTAT ® RM Control Tower with the air filters<br />
using the tubes delivered.<br />
– Leave the air outlet filters open to allow air to leave the bag.<br />
Direct connection to a gas source or use of any other air pump may cause overpressure,<br />
rupture the bag and void the warranty. The inbuilt pressure transmitter cannot<br />
feedback to an external source to stop aeration if overpressure is reached.<br />
When there is no gas and liquid supply into the bag, we suggest clamping the tube<br />
between bag and gas outlet filters to avoid the filter blocking.<br />
Please ensure the both inlet and outlet filter tubing clamps are open.<br />
1. Switch on the main switch at front side of the rocking unit, the start menu will<br />
appear on the LCD-screen for a few seconds which shows the program version the<br />
system is working with. The display will then change to show the main menu.<br />
To inflate the <strong>Culti</strong>bag RM we recommend to activate the pressure control loop and<br />
gas flow control loop in that order.<br />
Please refer also to the section Over Pressure Management.<br />
2. Allow the <strong>Culti</strong><strong>Bag</strong> RM 600 to fully inflate and ensure it is secured by the bag<br />
holder of to the left- and right side.<br />
The <strong>Culti</strong><strong>Bag</strong> RM 600 should be inflated firmly without creases.<br />
Ensure the air outlet filter is working by pressing down gently on the bag chamber<br />
and observing a release of air through the outlet air filter and proportional valve.<br />
Once the <strong>Culti</strong><strong>Bag</strong> is inflated reduce air flow to process values.<br />
Please refer to the section Set cultivation parameters and start.<br />
Allgemein 21
4.6 Connect Optical Sensors<br />
22 <strong>Culti</strong>vation<br />
Observe the colour markers at the device, the aluminium clamp and the markers<br />
at the ends of the light fibre cables.<br />
The pH has a yellow sticker, the DO has a red sticker. Do not mix up the light fibre<br />
cables.<br />
Both ports are marked with a label with the inscriptions „pH“ and „DO“. Put the<br />
clamps on both ports of the pH und DO measurement.<br />
The colours of the label have to comply with the colour of the respective light fibre<br />
cable i.e. red to red for DO and yellow to yellow for pH.<br />
1. <strong>Culti</strong><strong>Bag</strong> RM 600 has to be inflated. It will not be possible to insert the optical<br />
fibre cables into the sensors ports of a <strong>Culti</strong><strong>Bag</strong> RM 600 that is not inflated.<br />
Put the clamps on both ports of the pH und DO measurement.<br />
2. Insert the optical fibre cables into the sensors ports on the bag.<br />
Insert the optical fibre cable of DO measurement into port with red label<br />
“OptiSens DO.<br />
Insert the optical fibre cable of pH measurement into port with yellow label<br />
“OptiSens pH”.<br />
3. The optical fibre cables are inserted until they touch the inner surface of the<br />
sensor caps. If there is no contact between the light fibre cable and the sensor<br />
cap no signal will be measured. Tighten the screws of the clamps to fix the<br />
cables in place.<br />
4. For accuracy and for validated processes, the pH should be calibrated with<br />
an additional reference measurement. A sample of the media has to be taken<br />
asceptically from the bag and the offline pH and DO should be measured.
5.1 Preparing for the <strong>Culti</strong>vation<br />
5.1.1 Filling the <strong>Culti</strong><strong>Bag</strong> RM 600 with culture media<br />
NOTICE<br />
5. <strong>Culti</strong>vation<br />
For information regarding use of the intuitive Touch screen, please refer to the<br />
associated manual for BIOSTAT ® RM Control Tower.<br />
The <strong>Culti</strong><strong>Bag</strong> RM 600 should be inflated prior to filling with media, see section<br />
Inflation of the <strong>Culti</strong><strong>Bag</strong> RM 600. This will reduce creases and reduce foaming.<br />
Continue air flow and activate the pressure control loop to the headspace to keep<br />
the bag rigidly inflated, whilst filling with media.<br />
Do not rock while filling.<br />
1. Aseptically, connect tubing from the media container to the <strong>Culti</strong><strong>Bag</strong> RM 600<br />
chamber using BioWelder, BioSealer, luer fittings or MPC couplings to connect<br />
two tubes together.<br />
Guide the tubes through the openings on the left and right sides of the rocking table.<br />
Use of luer and MPC couplings may require moving the <strong>Culti</strong><strong>Bag</strong> RM 600 <strong>Bag</strong> into<br />
a bio safety laminar flow cabinet for aseptic connection. The sampling luer may<br />
also be used.<br />
2. Pump the desired volume of media into the bioreactor, and then aseptically<br />
disconnect the <strong>Culti</strong><strong>Bag</strong> RM 600 from the media container.<br />
Do not use any tools to connect the <strong>Culti</strong><strong>Bag</strong> RM to avoid damaging the bag or tubes.<br />
Avoid any folds at the tubes and do not squeeze the tubes.<br />
Do not start rocking motion while the lid of the Rocker is opened. Risk of injury.<br />
Ensure that both valves mounted at inlet and outlet filter are open. Also ensure<br />
the filter heaters are mounted correctly.<br />
If the valves of the air filters are closed or are not connected while filling the bag<br />
with media, may result in overpressure inside the bag causing rupture of the bag.<br />
3. Close the lid and lock all closures.<br />
<strong>Culti</strong>vation 23
5.1.2 Set cultivation parameters and start<br />
24 <strong>Culti</strong>vation<br />
NOTICE<br />
For information regarding use of the intuitive Touch screen, please refer to the<br />
associated manual for BIOSTAT ® RM Control Tower.<br />
1. Adjust required aeration rate. Start aeration if aeration is not already activated.<br />
For minimum and maximum aeration rate see section Aeration control and<br />
Aeration Flow rate.<br />
When using low or middle gassing rate (below 20 lpm), we recommend activating<br />
the pressure control loop to hold a constant middle pressure in the bag.<br />
When using high gassing rate (20 lpm or higher) the pressure control can be<br />
deactivated, because the gas outlet filter and the proportional will produce a<br />
back pressure in the bag.<br />
We recommend starting the aeration process parameter first, so that the gas<br />
outlet filters are preheated.<br />
2. Adjust the rocking rate and rocking angle. A visible wave on the surface of the<br />
liquid is required. Reduce the speed if you see excessive foaming. Make sure<br />
that the bioreactor chamber is rigidly inflated; otherwise excessive foam will be<br />
generated from turbulence caused by creases in the bag.<br />
Start rocking motion.<br />
For preliminary estimation of rocking rate and rocking angle, see the section<br />
Optimize Wave Motion.<br />
For minimum and maximum rocking rate see section Rocking rate, for minimum<br />
and maximum rocking angle see section Rocking angle.<br />
Always close the lid while rocking motion is activated.<br />
Never put any objects on cover of rocking table while rocking motion is activated.<br />
Avoid placing hands in the danger area of moving parts.<br />
3. Adjust required set temperature.<br />
For minimum and maximum temperature see section Temperature control.<br />
Do not start heating unless the surface temperature sensor is correctly positioned<br />
under the <strong>Culti</strong><strong>Bag</strong> RM. Otherwise over heating may occur.<br />
Note that, if the rocking motion is started before you activate the heater, this will<br />
guarantee uniform temperature distribution in the medium.
5.2 Sampling and Inoculation<br />
5.2.1 Preparing for Sampling or Inoculation<br />
This operation requires a standard luer type syringe, whose luer septum is without<br />
hypodermic needle. It is not necessary to perform this procedure in a laminar flow<br />
cabinet.<br />
For information regarding use of the intuitive Touch screen, please refer to the<br />
associated manual for BIOSTAT ® RM Control Tower.<br />
1. Continue headspace aeration.<br />
2. Move the front side of rocking table down by adjusting the angle to keep<br />
the dip tube of the sample port in the media.<br />
Set angle in menu.<br />
For minimum and maximum of adjustable angle see section Rocking angle.<br />
Do not open lid of rocking table.<br />
3. Remove the protective cap from the luer septum sampling connector.<br />
4. Disinfect the septum: wipe or spray the top of the Luer septum with 70% alcohol<br />
(or equivalent).<br />
5. Connect the syringe: Using aseptic technique, attach a sterile disposable<br />
needleless syringe onto the luer connector.<br />
6. Open the hose clamp of the luer septum. Draw the sample, close the hose clamp<br />
of the luer septum and the remove the syringe carefully.<br />
<strong>Culti</strong>vation 25
5.2.2 Inoculation For information regarding use of the intuitive Touch screen, please refer to the<br />
associated manual for BIOSTAT ® RM Control Tower.<br />
1. Inoculate the contents of the syringe via the Luer-Septum into the<br />
<strong>Culti</strong><strong>Bag</strong> RM 600.<br />
2. Disinfect the Luer-Septum again and close it with the protective cap.<br />
3. Drain back the liquid in the tubing.<br />
Pinch the sampling connector tubing a few times to ensure that any liquid<br />
in the tubing drains back into the bioreactor. Close the tubing clamp.<br />
4. Restart the Rocking Motion<br />
Adjust the speed to get a visible wave on the surface of the liquid.<br />
Reduce the speed if you see excessive foaming.<br />
Inoculation can also be done by any other port of the <strong>Culti</strong><strong>Bag</strong> RM 600.<br />
Luer couplings and MPC couplings with their surfaces in contact with atmosphere<br />
have to connected in a laminar flow.<br />
Use of BioWelder or BioSealer allows simple, fast and reliable connections .<br />
5.2.3 Sampling The procedure is the same as that described for inoculation using a needle less<br />
syringe.<br />
26 End of the process and putting out of service safely<br />
The Luer septum is proven for 50 sterile samplings or inoculations. The connector<br />
contains a silicone septum, which automatically seals the device whenever it is<br />
disconnected.<br />
The sample is also completely contained as no aerosols are vented. At low rocking<br />
rates (
5.3 Media exchange For information regarding use of the intuitive Touch screen, please refer to the<br />
associated manual for BIOSTAT ® RM Control Tower.<br />
1. Stop the rocking motion.<br />
The rocking table will stop automatically at horizontal position.<br />
2. Clamp off the inlet and outlet filters.<br />
3. Move front side of rocking table down by adjusting the angle to 0.<br />
Do not open the lid of rocking table.<br />
3. Allow the cells or microcarriers 10 to 15 minutes to settle.<br />
4. Change the culture media:<br />
Connect tubing to the C-Flex line at the front fill line (without dip tube).<br />
The other end of this tubing should be connected to a sterile collection vessel.<br />
Using a peristaltic pump, remove the desired amount of supernatant culture<br />
liquid by manually manipulating the flexible bioreactor wall (if required).<br />
Then disconnect the tubing and reconnect to fresh media to refill the bioreactor.<br />
Open the inlet and outlet filter clamps and restart aeration and rocking motion.<br />
To avoid possible oxygen depletion, this entire operation should be performed<br />
in less than one hour.<br />
Cleaning and Maintenance Work 27
28 Supplement<br />
6. End of the process and putting<br />
out of service safely<br />
For information regarding use of the intuitive Touch screen, please refer to the<br />
associated manual for BIOSTAT ® RM Control Tower.<br />
1. Stop the rocking motion in main menu.<br />
The rocking table will stop automatically at the horizontal position.<br />
2. Switch heaters off.<br />
3. Stop aeration to interrupt air flow into the <strong>Culti</strong><strong>Bag</strong> RM 600.<br />
Do not open lid of rocking table.<br />
4. Clamp off the air inlet and outlet filters.<br />
5. Move the front side of the rocking table up by adjusting the angle to 0.<br />
For minimum and maximum of adjustable angle see section Rocking angle.<br />
6. To drain all the contents via the harvest port (with dip tube at rear side) use<br />
a suitable peristaltic pump to pump out the contents, lift the bag up vertically<br />
for complete drainage.<br />
7. To drain supernatant, follow procedure as per section Media exchange. Pump out<br />
the supernatant and add fresh media or transfer cell slurry into a larger <strong>Culti</strong><strong>Bag</strong><br />
RM 600 reactor.<br />
8. Store the <strong>Culti</strong><strong>Bag</strong> RM 600 under required process conditions before downstream<br />
processing.<br />
9. Remove the air supply tubing from the air inlet filter.<br />
10. Switch off pressurized air supply (if connected).<br />
11. Switch off the power.
7. Cleaning and Maintenance Work<br />
7.1 Intermediate Cleaning The BIOSTAT ® <strong>Culti</strong><strong>Bag</strong> RM 600 is a disposable bioreactor system so does not require<br />
cleaning and sterilizing like a conventional re-usable bioreactor. However, due to<br />
unavoidable spillages and associated aseptic techniques which are required for day<br />
to day operation, the equipment should be cleaned periodically:<br />
1. The BIOSTAT ® <strong>Culti</strong><strong>Bag</strong> RM 600 equipment can be cleaned using alcohol or<br />
commonly applicable detergents. Make sure the holder, which fixes the surface<br />
temperature sensor to the rocking table is not removed from the holder.<br />
7.2 Maintenance by operators Maintenance by operators is restricted to:<br />
2. Disconnect power supply first. Wipe the housing of the BIOSTAT ® <strong>Culti</strong><strong>Bag</strong> RM 600<br />
with a wet cloth. Use water or common disinfection solutions such as 70%<br />
Ethanol. Do not use solvents|liquids which may damage or dissolve the materials<br />
of construction.<br />
Do not wash or submerge the equipment in liquid. Use only a wet cloth.<br />
Avoid liquid entering the housing. Major damage can be caused to electrical<br />
equipment by liquids entering the housing.<br />
Replace aeration tubing connecting the “AIR OUT” port of BIOSTAT ® RM Control<br />
Tower and the sterile air in filter of <strong>Culti</strong><strong>Bag</strong>.<br />
There is no periodic lubrication required.<br />
Replace defective parts immediately such as:<br />
Filter heater<br />
Surface temperature sensor<br />
7.3 Maintenance and calibration by authorized personnel<br />
Service and calibration of BIOSTAT ® <strong>Culti</strong><strong>Bag</strong> RM 600 is restricted to qualified<br />
service personnel, trained and authorized to do so.<br />
Some components such as bearings require regular maintenance.<br />
The maintenance work is recommended every 4’000 working hours, this includes<br />
necessary calibration of all parameters.<br />
The battery powering the PLC built-in in the Rocker 600 has a life time longer<br />
than five years. It is recommended to replace this battery within five years.<br />
The maintenance work includes the replacement of battery if required.<br />
Service and calibration of BIOSTAT ® <strong>Culti</strong><strong>Bag</strong> RM 600 is restricted to qualified<br />
service personnel, trained and authorized to do so.<br />
Please contact your local Sartorius Stedim Biotech service engineer for more<br />
information.<br />
Supplement 29
8. Supplement<br />
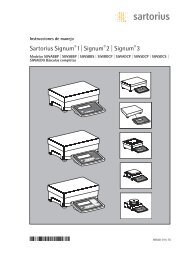
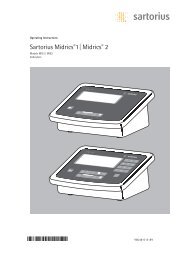
8.1 Optimize Wave Motion Every cell line requires optimization of operating conditions. The attached graphs<br />
reflect a guide line. Tests estimating optimum formation of wave mixing are required.<br />
Specification of the <strong>Culti</strong><strong>Bag</strong> RM 600L optical:<br />
Min. working volume: 60 L<br />
Max. working volume: 300 L<br />
30 Supplement<br />
Angle Rocking rate [Rocks/min]<br />
[°] 4 6 8 10 12 14 16<br />
10<br />
8<br />
6<br />
4<br />
Angle Rocking rate [Rocks/min]<br />
[°] 4 6 8 10 12 14 16<br />
10<br />
8<br />
6<br />
4<br />
Angle Rocking rate [Rocks/min]<br />
[°] 4 6 8 10 12 14 16<br />
10<br />
8<br />
6<br />
4<br />
Angle Rocking rate [Rocks/min]<br />
[°] 4 6 8 10 12 14 16<br />
10<br />
8<br />
6<br />
4<br />
Legend<br />
<strong>Culti</strong><strong>Bag</strong> RM 600L optical:<br />
Working volume: 60L<br />
<strong>Culti</strong><strong>Bag</strong> RM 600L optical:<br />
Working volume: 150L<br />
<strong>Culti</strong><strong>Bag</strong> RM 600L optical:<br />
Working volume: 240L<br />
<strong>Culti</strong><strong>Bag</strong> RM 600L optical:<br />
Working volume: 300L<br />
Minimal wave forces, below limit.<br />
Minimal oxygen transfer, no shear forces<br />
Low wave formation, no forming, minimal wave forces.<br />
Low oxygen transfer, minimal shear forces<br />
Ideal wave formation, no framing, minimal shear forces.<br />
Well oxygen transfer, minimal shear forces<br />
Well wave formation, slight foaming, small shear forces.<br />
Very well oxygen transfer, small shear forces<br />
Heavy wave formation with foaming, middle shear forces.<br />
Very well oxygen transfer, heavy shear forces<br />
To heavy wave formation, heavy foaming, heavy shear forces.<br />
Very well oxygen transfer, to heavy shear forces
8.2 Over Pressure Management A pressure transmitter monitors the feedback pressure from the <strong>Culti</strong><strong>Bag</strong> RM 600L.<br />
In case of overpressure above +45 mbar ± 5 mbar for more than 3 minutes, the<br />
metering valve will close until pressure drops less than +45 mbar ± 5 mbar. Thereby<br />
providing additional culture safety and bag seal integrity.<br />
8.3 List of Alarm Messages The DCU control system BIOSTAT ® RM Control Tower provides standard features<br />
for alarm monitoring for process values and digital inputs.<br />
Those standard features are described in the DCU operators manual.<br />
This chapter describes only additional functions relating to alarms.<br />
Process Value Alarms<br />
The process values will be monitored for high and low limits.<br />
The alarm indication will be performed with standardized text, e.g. "Process Value<br />
TEMP high alarm".<br />
The operator can change the alarm limits and can enable or disable each alarm via<br />
the touch panel, given appropriate security access.<br />
Please see also associated manuals for Control Tower.<br />
System Power Failure<br />
In case of power failure, the control tower keeps all controller states and setpoints<br />
within the FAIL TIME saved. The FAIL TIME alarm can be triggered via following<br />
operation:<br />
Set the FAIL TIME [FTIME]. Disconnect the mains supply.<br />
– If power supply comes back within the fail time, the system will reboot and all<br />
controllers will be still in the modes established before the reset, Alarm message<br />
“Power failure” will appear.<br />
– If the power supply comes back after the fail time, the system will reboot and all<br />
controllers will be in “OFF” Mode, Alarm message “Power failure, Fermentation<br />
Stopped” will appear.<br />
– In both cases the alarm message “System Power failure” will appear.<br />
The default setting for the fail time is 2:00 hours<br />
Motor Safety Stop Alarm<br />
Alarm event from Rocker which is connected via a serial interface. The operator<br />
cannot disable alarm, system restart is necessary.<br />
Overpressure ALarm<br />
See Chapter 8.3.<br />
The operator can only disable this alarm, if the pressure returns to a normal operating<br />
pressure situation.<br />
Supplement 31
8.4 Trouble Shooting Disturbances and Measures<br />
Frequently Asked Questions. For further information contact your local Sartorius Stedim Biotech representative.<br />
Disturbance Possible causes Measures<br />
<strong>Bag</strong> appears to be over inflated. The <strong>Culti</strong><strong>Bag</strong> RM 600 should be inflated If the bag is over inflated, check if<br />
firmly without creases. Nevertheless it there is air leaving the sterile air<br />
shouldn‘t be so full that it is over outlet filter. Connect the filter with<br />
pressurized and creates hinges at the a piece of hose and hold it in water<br />
fixing points. filled water glass. If you cannot see<br />
bubbles the air outlet filter is closed.<br />
<strong>Bag</strong> appears to be under inflated. If the <strong>Culti</strong><strong>Bag</strong> RM 600 is under inflated, Check the AIR OUT port of BIOSTAT ®<br />
it creates excessive foaming and bad RM Control Tower to ensure air is being<br />
mixing. “No airflow” alarm may be shown released. The sterile air inlet filter may<br />
on display. be clogged, slide clamp may be closed,<br />
or air supply tube may not be properly<br />
fixed. Use a spare filter as inlet or<br />
transfer your culture medium into a<br />
new bag.<br />
Excessive foam in <strong>Culti</strong><strong>Bag</strong> RM 600. A certain amount of foam is typical for If too much foam occurs check if the<br />
the BIOSTAT ® <strong>Culti</strong><strong>Bag</strong> RM 600. <strong>Culti</strong><strong>Bag</strong> RM 600 is correctly inflated.<br />
But the foam shouldn‘t cover more Under inflation generates a lot of foam.<br />
than 50% of the medium surface. Usually foam will disappear after a<br />
number of hours. If then the foam is<br />
still too high reduce the rocking rate.<br />
Check that the reduced rocking rate is<br />
high enough to guarantee a sufficient<br />
dissolved oxygen concentration in the<br />
media.<br />
If foam is still a problem reduce the<br />
rocking angle. The reduced rocking<br />
angle generates less foam and the<br />
rocking velocity can be enhanced again<br />
a little bit. For further information,<br />
contact your local Sartorius Stedim<br />
Biotech representative.<br />
Bioreactor heats too slowly. Media is not heating up or is heating Make sure that surface temperature<br />
very slowly. sensor is correctly positioned under<br />
the bag. Check that the set point is set<br />
correctly. Verify that BIOSTAT ® <strong>Culti</strong><strong>Bag</strong><br />
RM 600 is running in correct mode, see<br />
section Characteristics, Specification of<br />
<strong>Culti</strong><strong>Bag</strong>s RM, operation modes RM<br />
Control Tower . Check that BIOSTAT ®<br />
<strong>Culti</strong><strong>Bag</strong> RM 600 is rocking. Remember<br />
that the heater is intended to control<br />
temperature using gentle heating.<br />
To heat up 300 liters from ambient<br />
temperature to 37°C will take several<br />
hours.<br />
32 Supplement
Disturbance Possible causes Measures<br />
Temperature control not accurately Temperature of media is not Ensure that the surface temperature<br />
controlled accurately. sensor is correctly positioned under the<br />
bag. Check that BIOSTAT ® <strong>Culti</strong><strong>Bag</strong> RM<br />
600 is rocking. If the temperature is still<br />
not controlled properly, recalibration of<br />
temperature measurement might be<br />
required. Contact your local Sartorius<br />
Stedim Biotech representative.<br />
Temperature appears to be incorrect Actual temperature shown in main menu Make sure that surface temperature<br />
does not correspond with independent sensor is correctly po¬sitioned under<br />
measurement or ambient temperature. the bag. Check that BIOSTAT ® <strong>Culti</strong><strong>Bag</strong><br />
RM 600 is rocking. If actual temperature<br />
is still not correct, recalibration of<br />
temperature measurement might be<br />
required. Contact your local Sartorius<br />
Stedim Biotech representative.<br />
Supplement 33
8.5 Provisions<br />
8.5.1 Warranty Aggreements and All components of the BIOSTAT ® <strong>Culti</strong><strong>Bag</strong> RM 600 are designed for biotechnological<br />
Intended Use processes commonly applied in a corresponding laboratory environment. If questions<br />
arise, e.g. at use of aggressive media (such as corrosive media) with the <strong>Culti</strong><strong>Bag</strong> RM<br />
or in the environment you will have to test the corrosion resistance of all components.<br />
All products of Sartorius Stedim Systems have a warranty in accordance with the<br />
General Terms and Conditions of Business, unless other terms were agreed upon in<br />
writing.<br />
The warranty is granted against defects of construction, manufacture or<br />
in material and malfunctioning resulting therefrom.<br />
– Faulty equipment will be repaired or replaced.<br />
The warranty does not refer to consumables and parts, which are subject to usual<br />
wear and tear (e.g <strong>Culti</strong><strong>Bag</strong>s, Filterheater etc.).<br />
The warranty will lapse:<br />
at erroneous handling of the bioreactor and its equipment, if they are applied<br />
beyond their specifications or accompanying instructions are ignored;<br />
at operation under unsuitable ambient conditions, e.g. at the presence<br />
of corrosive acting media;<br />
at use of components from third party suppliers, for which Sartorius Stedim<br />
Biotech has not confirmed that they can be used.<br />
8.5.2 Service Defective equipment cannot be repaired in a customers service shop.<br />
Defective equipment can also be returned to Sartorius Stedim Biotech.<br />
Repairs will be carried out in accordance with Sartorius Stedim Biotech’ Terms<br />
of Maintenance. For return of equipment please contact local Sartorius Stedim<br />
Biotech Representative.<br />
34 Allgemein<br />
Biohazards possible. Risk of infections!<br />
On return the equipment must be clean, in good hygienic condition and carefully<br />
packed. Contagious parts must be disinfected or sterilized, according to the safety<br />
regulations related to the application, for which the devices are used.<br />
The sender has to prove compliance with the safety regulations.<br />
A „Declaration about decontamination and cleaning of equipment“,<br />
which can be used for return of equipment, is attached below.
8.5.3 Disposal of Equipment<br />
<strong>Culti</strong><strong>Bag</strong>s are disposable and are discharged after each cultivation. Sterilization<br />
may be required before disposal of bag. Treatment within national regulation<br />
of disposable of biohardazous equipment.<br />
1. Switch off the power. Disconnect from power supply.<br />
2. Disconnect pressurized air supply.<br />
3. Disinfect or decontaminate and clean contaminated devices if required.<br />
4. Dismantle BIOSTAT ® <strong>Culti</strong><strong>Bag</strong> RM 600 into its components:<br />
Stainless steel parts.<br />
Components made of plastic.<br />
Electrical components<br />
Electronical components<br />
Battery<br />
Observe the respective national regulations.<br />
8.6 Decontamination Declaration For return of faulty equipment to Sartorius Stedim Systems GmbH in case of warranty<br />
and for service the sender will have to enclose a decontamination declaration to<br />
the shipment. This declaration shall describe, which media, microorganisms or cells<br />
have come into contact with the equipment and what the sender has done for the<br />
disinfection or decontamination.<br />
The recipient (i.e the service of Sartorius Stedim Systems GmbH) must be able<br />
to see the decontamination declaration before unpacking.<br />
A form of the decontamination declaration for the return of equipment is<br />
attached below or available as separate document.<br />
For additional copies of this document please contact Sartorius Stedim Systems.<br />
Allgemein 35
Sartorius Stedim Biotech GmbH<br />
August-Spindler-Str. 11<br />
37079 Goettingen, Germany<br />
Phone +49.551.308.0<br />
Fax +49.551.308.3289<br />
www.sartorius-stedim.com<br />
Copyright by<br />
Sartorius Stedim Biotech GmbH,<br />
Goettingen, Germany.<br />
All rights reserved. No part of<br />
this publication may be reprinted<br />
or translated in any form or by any<br />
means without the prior<br />
written permission of Sartorius<br />
Stedim Biotech GmbH.<br />
The status of the information,<br />
specifications and illustrations<br />
in this manual is indicated by<br />
the date given below.<br />
Sartorius Stedim Biotech GmbH<br />
reserves the right to make changes<br />
to the technology, features,<br />
specifications and design of the<br />
equipment without notice.<br />
Status:<br />
January 2010,<br />
Sartorius Stedim Biotech GmbH,<br />
Goettingen, Germany<br />
Printed in Germany on paper that has<br />
been bleached without any use of chlorine<br />
W9A000 <strong>Culti</strong><strong>Bag</strong> RM · KT<br />
Publication No.: <strong>SBT6008</strong>-e10011≤≤<br />
Ver. 10 | 2010