Qig SMCGS16 24 SMART
Qig SMCGS16 24 SMART
Qig SMCGS16 24 SMART

Create successful ePaper yourself
Turn your PDF publications into a flip-book with our unique Google optimized e-Paper software.
After unpacking the <strong>SMCGS16</strong>/<strong>24</strong>-Smart, please check the contents of the<br />
box to be sure you have received the following components:<br />
• One <strong>SMCGS16</strong>-Smart or SMCGS<strong>24</strong>-Smart<br />
• Four rubber feet<br />
• One Power Cord<br />
• One Installation Guide<br />
• One CD-ROM containing the User Guide<br />
• One Warranty Card<br />
Immediately inform your dealer in the event of any incorrect, missing or<br />
damaged parts. If possible, please retain the carton and original packing<br />
materials in case there is a need to return the product.<br />
Please register this product to receive the full warranty at SMC's Web site:<br />
http://www.smc.com<br />
The following are required:<br />
• To attach a device (e.g. a PC) to your Smart switch, the device must<br />
have a working Ethernet port. Your Smart switch can communicate at 10,<br />
100 or 1000 Mbps.<br />
• To connect devices to your Smart switch at the maximum data rate you<br />
will need to use Cat 5 or 5e Ethernet cable; one cable for each device.<br />
• A PC with a CD-ROM drive is required to read the User Guide.<br />
Information furnished by SMC Networks, Inc. (SMC) is believed to be accurate<br />
and reliable. However, no responsibility is assumed by SMC for its use,<br />
nor for any infringements of patents or other rights of third parties, which<br />
may result from its use. No license is granted by implication or otherwise<br />
under any patent or patent rights of SMC. SMC reserves the right to<br />
change specifications at any time without notice.<br />
SMC Networks, Inc.<br />
38 Tesla<br />
Irvine, CA 92618<br />
Copyright © SMC Networks, Inc., 2005. All rights reserved.<br />
SMC is a registered trademark; Other product and company names are<br />
trademarks or registered trademarks of their respective holders.<br />
FOR TECHNICAL SUPPORT, CALL:<br />
From U.S.A. and Canada<br />
(<strong>24</strong> hours a day, 7 days a week)<br />
(800) SMC-4-YOU;<br />
Phn: (949) 679-8000; Fax: (949) 679-1481<br />
From Europe : Contact details can be found<br />
on www.smc.com<br />
INTERNET<br />
E-mail addresses:<br />
techsupport@smc.com<br />
World Wide Web:<br />
http://www.smc.com/<br />
If you are looking for further<br />
contact information, please visit<br />
www.smc.com<br />
38 Tesla<br />
Irvine, CA 92618<br />
Phone: (949) 679-8000<br />
Model Number: <strong>SMCGS16</strong>-Smart /<br />
SMCGS<strong>24</strong>-Smart<br />
Troubleshooting<br />
Initial Configuration<br />
Hardware Installation<br />
Menu Overview Troubleshooting<br />
Initial Configuration<br />
Hardware Installation<br />
Menu Overview<br />
Smart Gigabit Switches<br />
Using The EZ 3Click Wizard<br />
Your SMC Smart switch should be regarded as a managed switch, optimized<br />
for simpler and smaller network configurations. It provides sophisticated,<br />
user-configurable features well beyond the capability of an unmanaged switch.<br />
Your Smart switch supports security (VLANs), port aggregation (Trunking),<br />
detailed diagnostics (Statistics and Port Mirroring) and bandwidth control (QoS,<br />
Rate Limiting and Broadcast Storm Control). These features are described in<br />
detail in the User Guide.<br />
EZ Switch 10/100/1000 Troubleshooting 16/<strong>24</strong>-Port<br />
Smart Gigabit Switches<br />
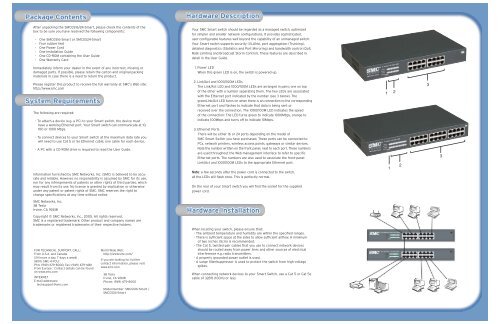
1. Power LED<br />
When this green LED is on, the switch is powered-up.<br />
Initial Configuration<br />
2. Link/Act and 1000/100M LEDs<br />
The Link/Act LED and 1000/100M LEDs are arranged in pairs; one on top<br />
of the other with a number separating them. The two LEDs are associated<br />
with the Ethernet port indicated by the number (see 3 below). The<br />
greenLink/Act LED turns on when there is an connection to the corresponding<br />
Ethernet port and flashes to indicate that data is being sent or<br />
received over the connection. The 1000/100M LED indicates the speed<br />
of the connection: The LED turns green to indicate 1000Mbps, orange to<br />
indicate 100Mbps and turns off to indicate 10Mbps.<br />
Using The EZ 3Click Wizard<br />
Hardware Installation<br />
Menu Overview<br />
3. Ethernet Ports<br />
There will be either 16 or <strong>24</strong> ports depending on the model of<br />
SMC Smart Switch you have purchased. These ports can be connected to<br />
PCs, network printers, wireless access points, gateways or similar devices.<br />
Note the number written on the front panel, next to each port. These numbers<br />
are used throughout the Web management interface to refer to specific<br />
Ethernet ports. The numbers are also used to associate the front-panel<br />
Link/Act and 1000/100M LEDs to the appropriate Ethernet port.<br />
Troubleshooting<br />
Note: a few seconds after the power cord is connected to the switch,<br />
all the LEDs will flash once. This is perfectly normal.<br />
Initial Configuration<br />
On the rear of your Smart switch you will find the socket for the supplied<br />
power cord.<br />
Hardware Installation<br />
Menu Overview<br />
When locating your switch, please ensure that:<br />
• The ambient temperature and humidity are within the specified ranges.<br />
• There is sufficient space at the sides to allow sufficient airflow. A minimum<br />
of two inches (5cm) is recommended.<br />
• The Cat 5, twisted-pair cables that you use to connect network devices<br />
should be routed away from power lines and other sources of electrical<br />
interference e.g. radio transmitters.<br />
• A properly grounded power outlet is used.<br />
• A surge filter/suppressor is used to protect the switch from high-voltage<br />
spikes.<br />
When connecting network devices to your Smart Switch, use a Cat 5 or Cat 5e<br />
cable of 328ft (100m) or less.<br />
EZ Switch 10/100/1000 16/<strong>24</strong>-Port<br />
Smart Gigabit Switches<br />
<strong>SMCGS16</strong>-Smart / SMCGS<strong>24</strong>-Smart<br />
EZ Switch 10/100/1000 16/<strong>24</strong>-Port<br />
Smart Gigabit Switches<br />
1 2<br />
<strong>SMCGS16</strong>-Smart / SMCGS<strong>24</strong>-Smart<br />
1<br />
2<br />
<strong>SMCGS16</strong>-Smart / SMCGS<strong>24</strong>-Smart<br />
3<br />
<strong>SMCGS16</strong>-Smart / SMCGS2<br />
3
d<br />
hooting<br />
/1000 16/<strong>24</strong>-Port<br />
uration ches<br />
allation<br />
EZ EZ Switch Switch 10/100/1000 10/100/1000 16/<strong>24</strong>-Port<br />
16/<strong>24</strong>-Port<br />
Smart Smart Gigabit Gigabit Switches<br />
Switches<br />
Troubleshooting<br />
Initial Configuration<br />
<strong>SMCGS16</strong>-Smart <strong>SMCGS16</strong>-Smart / / SMCGS<strong>24</strong>-Smart<br />
SMCGS<strong>24</strong>-Smart<br />
Hardware Installation<br />
Menu Overview<br />
Using The EZ 3Click Wizard<br />
All of the configuration of your SMC Smart Switch will be done using the Web,<br />
Management Interface. If you are familiar with the concepts of a Managed Layer 2<br />
switch, you should have no problem navigating the user interface; just open your<br />
Web Browser, enter the address of the switch, login and you are ready to go<br />
(http://192.168.2.10 is the default address and smcadmin is the default password).<br />
The screenshot on the right shows the first page that you will see after logging in.<br />
The page is laid out as follows:<br />
• At the top of the screen is the front-panel image. Ports on the image turn green<br />
to show that the port is connected to a network device. If you allow your mouse<br />
to hover over a port , the port-number will be displayed.<br />
• On the left of the screen is the Menu. Single-clicking on a Menu-choice will<br />
change the page displayed on the right-hand (Main Page) side of the screen.<br />
• The content of the Main Page (on the right) will change when you make<br />
different Menu choices. The Main Page is where switch parameters are<br />
displayed and edited. Not all pages can be edited but, where parameters can<br />
be changed, you will find three buttons at the bottom of the page; HELP,<br />
APPLY and CANCEL. Use the HELP button if you are unsure what you need<br />
to do. None of your edits will be saved until you click on the APPLY button and<br />
you can use the CANCEL button to discard all your edits.<br />
If you are new to managed switches, see the User Guide for a detailed<br />
explanation of:<br />
• Configuring ports and diagnosing network problems.<br />
• Creating and configuring Trunks (Link Aggregations) to improve network<br />
resilience and throughput.<br />
• Adding ports to VLANs to improve network security.<br />
• Configuring Quality Of Service to improve the throughput of key<br />
applications(e.g.VoIP)<br />
<strong>SMCGS16</strong>-Smart / SMCGS<strong>24</strong>-Smart<br />
Initial Configuration<br />
To make use of the management features of your SMC Smart Switch you must first<br />
give it an IP address. For simplicity, this should be done before you permanently<br />
install the switch in the network.<br />
Hardware Installation<br />
The following procedure is recommended:<br />
1. Place your Smart Switch close to the PC that you will use to configure<br />
it. It will help if you can see the front panel of the switch while working<br />
on your PC.<br />
Menu Overview<br />
EZ Switch 10/100/1000 16/<strong>24</strong>-Port<br />
Smart Gigabit Switches<br />
Menu<br />
Troubleshooting<br />
2. Connect the Ethernet port of your PC to any port on the front panel of<br />
your Smart Switch, start your PC (if it is not already running), connect<br />
power to the switch and, when your PC has finished its start-up<br />
sequence, verify that you have a link by checking the LEDs on the<br />
front-panel of the switch (see the Hardware Description for more<br />
information).<br />
3. The default IP address of the switch is 192.168.2.10 and the subnet mask<br />
is 255.255.255.0. If your PC has a different address from the switch but<br />
is on the same subnet (i.e. the PC and switch both have addresses that<br />
start 192.168.2.x but are different thereafter) you can skip directly<br />
to step 4. Otherwise you will have to set your PC’s IP address manually.<br />
If you are unfamiliar with this process, please refer to of the User<br />
Guide.<br />
<strong>SMCGS16</strong>-Smart / SMCGS<strong>24</strong>-Smart<br />
Main Page<br />
Top bar,<br />
displaying the<br />
front-panel<br />
image<br />
4. After changing your PC's IP address, open your web browser and enter<br />
the address http://192.168.2.10. If your PC is properly configured, you<br />
will see the login page of your Smart Switch. If you do not see the login<br />
page, please check your settings and repeat step 3.<br />
5. Enter the password (the default is smcadmin) and click on the Login<br />
button.<br />
<strong>SMCGS16</strong>-Smart / SMCGS<strong>24</strong>-Smart<br />
6. Click on the SYSTEM menu-choice then click on LAN Settings when it<br />
appears. On the LAN Settings page, enter the IP address, Subnet Mask<br />
and Gateway IP Address for the switch then click on the APPLY button.<br />
No other configuration changes are required at this stage but it is recommended that<br />
you change the administrator’s password before logging out. To change the password<br />
click on the SYSTEM¬ Password menu-choice and fill in all the fields on the Password<br />
Settings page before clicking on the APPLY button.<br />
Troubleshooting<br />
Initial Configuration<br />
If you forget your password or the IP address of your SMC Smart Switch, you will be<br />
unable to access the Web Management Interface. If this happens you can recover by<br />
taking the following steps:<br />
1. Remove the power cord from the back of the Switch.<br />
Hardware Installation<br />
Using The EZ 3Click Wizard<br />
2. Remove all cables from the front-panel ports.<br />
3. Connect port 1 to port 2, on the front panel, using a standard network cable.<br />
4. Reconnect the power cord to the rear of the Switch.<br />
Menu Overview<br />
5. Wait at least 40 seconds before disconnecting port 1 from port 2<br />
EZ Switch 10/100/1000 16/<strong>24</strong><br />
Smart Gigabit Switches<br />
Note that, after following this procedure, all of the switch’s configuration – including<br />
password and IP address will be reset to factory defaults; the password will be<br />
smcadmin and the Switch IP address will be reset to 192.168.2.10.