Download - SMC
Download - SMC
Download - SMC

Create successful ePaper yourself
Turn your PDF publications into a flip-book with our unique Google optimized e-Paper software.
<strong>SMC</strong>7004ABR
Barricade TM<br />
Broadband Router<br />
User Guide<br />
From <strong>SMC</strong>’s Barricade line of Broadband Routers<br />
38 Tesla<br />
Irvine, CA 92618<br />
Phone: (949) 679-8000<br />
March 2003<br />
Pub. # 149100011600A
COPYRIGHT<br />
Information furnished by <strong>SMC</strong> Networks, Inc. (<strong>SMC</strong>) is believed to be accurate and reliable.<br />
However, no responsibility is assumed by <strong>SMC</strong> for its use, nor for any infringements of patents<br />
or other rights of third parties which may result from its use. No license is granted by<br />
implication or otherwise under any patent or patent rights of <strong>SMC</strong>. <strong>SMC</strong> reserves the right to<br />
change specifications at any time without notice.<br />
Copyright © 2003 by<br />
<strong>SMC</strong> Networks, Inc.<br />
38 Tesla<br />
Irvine, CA 92618<br />
All rights reserved. Printed in Taiwan<br />
Licensed Under U.S.Patent Nos.4,603,320, 4,686,506, 4,972,470 and 4,543,450<br />
Trademarks:<br />
<strong>SMC</strong> is a registered trademark; and Barricade is a trademark of <strong>SMC</strong> Networks, Inc. Other<br />
product and company names are trademarks or registered trademarks of their respective<br />
holders.
FCC - Class B<br />
COMPLIANCES<br />
This equipment has been tested and found to comply with the limits for a Class B<br />
digital device, pursuant to Part 15 of the FCC Rules. These limits are designed to<br />
provide reasonable protection against harmful interference in a residential<br />
installation. This equipment generates, uses and can radiate radio frequency<br />
energy and, if not installed and used in accordance with instructions, may cause<br />
harmful interference to radio communications. However, there is no guarantee that<br />
the interference will not occur in a particular installation. If this equipment does<br />
cause harmful interference to radio or television reception, which can be<br />
determined by turning the equipment off and on, the user is encouraged to try to<br />
correct the interference by one or more of the following measures:<br />
Reorient the receiving antenna<br />
Increase the separation between the equipment and receiver<br />
Connect the equipment into an outlet on a circuit different from that to<br />
which the receiver is connected<br />
Consult the dealer or an experienced radio/TV technician for help<br />
Industry Canada - Class B<br />
This digital apparatus does not exceed the Class B limits for radio noise emissions<br />
from digital apparatus as set out in the interference-causing equipment standard<br />
entitled “Digital Apparatus,” ICES-003 of the Department of Communications.<br />
Cet appareil numérique respecte les limites de bruits radioélectriques applicables<br />
aux appareils numériques de Classe B prescrites dans la norme sur le matériel<br />
brouilleur: “Appareils Numériques,” NMB-003 édictée par le ministère des<br />
Communications.<br />
i
Compliances<br />
ii<br />
EC Conformance Declaration - Class B<br />
<strong>SMC</strong> contact for these products in Europe is:<br />
<strong>SMC</strong> Networks Europe,<br />
Edificio Conata II,<br />
Calle Fructuós Gelabert 6-8, 2 o , 4 a ,<br />
08970 - Sant Joan Despí,<br />
Barcelona, Spain.<br />
This information technology equipment complies with the requirements of the<br />
Council Directive 89/336/EEC on the Approximation of the laws of the Member<br />
States relating to Electromagnetic Compatibility and 73/23/EEC for electrical<br />
equipment used within certain voltage limits and the Amendment Directive 93/68/<br />
EEC. For the evaluation of the compliance with these Directives, the following<br />
standards were applied:<br />
RFI * Limit class B according to EN 55022:1998<br />
Emission: * Limit class B for harmonic current emission according to EN 61000-3-2/<br />
1995<br />
* Limitation of voltage fluctuation and flicker in low-voltage supply system<br />
according to EN 61000-3-3/1995<br />
Immunity: * Product family standard according to EN 55024:1998<br />
* Electrostatic Discharge according to EN 61000-4-2:1995<br />
(Contact Discharge: ±4 kV, Air Discharge: ±8 kV)<br />
* Radio-frequency electromagnetic field according to EN 61000-4-3: 1996<br />
(80 - 1000 MHz with 1 kHz AM 80% Modulation: 3 V/m)<br />
* Electrical fast transient/burst according to EN 61000-4-4:1995(AC/DC<br />
power supply: ±1 kV, Data/Signal lines: ±0.5 kV)<br />
* Surge immunity test according to EN 61000-4-5:1995(AC/DC Line to Line:<br />
±1 kV, AC/DC Line to Earth: ±2 kV)<br />
* Immunity to conducted disturbances, Induced by radio-frequency fields:<br />
EN 61000-4-6:1996(0.15 - 80 MHz with 1 kHz AM 80% Modulation: 3 V/m)<br />
* Power frequency magnetic field immunity test according to EN<br />
61000-4-8:1993(1 A/m at frequency 50 Hz)<br />
* Voltage dips, short interruptions and voltage variations immunity test<br />
according to EN 61000-4-11:1994(>95% Reduction @10 ms, 30%<br />
Reduction @500 ms, >95% Reduction @5000 ms)<br />
LVD: * EN60950(A1/1992; A2/1993; A3/1993; A4/1995; A11/1997)
TABLE OF CONTENTS<br />
About the Barricade Router . . . . . . . . . . . . . . . . . . 1<br />
LED Indicators . . . . . . . . . . . . . . . . . . . . . . . . . . . . . . . . . . . . . . 1<br />
Features and Benefits . . . . . . . . . . . . . . . . . . . . . . . . . . . . . . . . 2<br />
Installing the Router . . . . . . . . . . . . . . . . . . . . . . . . 3<br />
Package Contents . . . . . . . . . . . . . . . . . . . . . . . . . . . . . . . . . . . 3<br />
Hardware Description . . . . . . . . . . . . . . . . . . . . . . . . . . . . . . . . . 4<br />
System Requirements . . . . . . . . . . . . . . . . . . . . . . . . . . . . . . . . 6<br />
Connect the System . . . . . . . . . . . . . . . . . . . . . . . . . . . . . . . . . . 7<br />
Basic Installation Procedure . . . . . . . . . . . . . . . . . . . . . . . 7<br />
Configuring Client TCP/IP . . . . . . . . . . . . . . . . . . . 9<br />
Installing TCP/IP . . . . . . . . . . . . . . . . . . . . . . . . . . . . . . . . . . . . . 9<br />
Windows 95/98/ME . . . . . . . . . . . . . . . . . . . . . . . . . . . . . . 9<br />
Windows 2000 . . . . . . . . . . . . . . . . . . . . . . . . . . . . . . . . 10<br />
Setting Up TCP/IP . . . . . . . . . . . . . . . . . . . . . . . . . . . . . . . . . . 11<br />
Configuring Your Computer in Windows 95/98/Me . . . . . 12<br />
Configuring Your Computer in Windows 2000 . . . . . . . . 20<br />
Verifying Your TCP/IP Connection . . . . . . . . . . . . . . . . . 23<br />
Configuring the Barricade Router . . . . . . . . . . . . 25<br />
Browser Configuration . . . . . . . . . . . . . . . . . . . . . . . . . . . . . . . 25<br />
Disable Proxy Connection . . . . . . . . . . . . . . . . . . . . . . . . . . . . 26<br />
Internet Explorer (5 or above) . . . . . . . . . . . . . . . . . . . . . . . . . . 26<br />
Internet Explorer (For Macintosh) . . . . . . . . . . . . . . . . . . . . . . . 26<br />
Netscape (4 or above) . . . . . . . . . . . . . . . . . . . . . . . . . . . . . . . 26<br />
Navigating the Web Browser Interface . . . . . . . . . . . . . . . . . . . 28<br />
Making Configuration Changes . . . . . . . . . . . . . . . . . . . 28<br />
Setup Wizard . . . . . . . . . . . . . . . . . . . . . . . . . . . . . . . . . . . . . . 28<br />
Time Zone . . . . . . . . . . . . . . . . . . . . . . . . . . . . . . . . . . . . 28<br />
Broadband Type . . . . . . . . . . . . . . . . . . . . . . . . . . . . . . . 29<br />
Advanced Setup . . . . . . . . . . . . . . . . . . . . . . . . . . . . . . . . . . . . 31<br />
iii
TABLE OF CONTENTS<br />
iv<br />
System . . . . . . . . . . . . . . . . . . . . . . . . . . . . . . . . . . . . . . 33<br />
WAN . . . . . . . . . . . . . . . . . . . . . . . . . . . . . . . . . . . . . . . . 35<br />
LAN . . . . . . . . . . . . . . . . . . . . . . . . . . . . . . . . . . . . . . . . 42<br />
Network Address Translation (NAT) . . . . . . . . . . . . . . . 43<br />
Firewall . . . . . . . . . . . . . . . . . . . . . . . . . . . . . . . . . . . . . . 47<br />
DDNS (Dynamic DNS) Settings . . . . . . . . . . . . . . . . . . . 57<br />
UPnP (Universal Plug and Play) Setting . . . . . . . . . . . . 58<br />
Tools . . . . . . . . . . . . . . . . . . . . . . . . . . . . . . . . . . . . . . . 59<br />
Configuring the Print Server . . . . . . . . . . . . . . . .63<br />
Install the <strong>SMC</strong> Printer Port Monitor . . . . . . . . . . . . . . . . . . . . 63<br />
Configure the Print Server . . . . . . . . . . . . . . . . . . . . . . . . . . . . 66<br />
Configure the Network Printer<br />
in Windows 95/98/Me/2000 . . . . . . . . . . . . . . . . . 66<br />
Configure the Network Printer in Windows NT . . . . . . . . 68<br />
Configure the Network Printer in Unix Systems . . . . . . . 70<br />
Configure LPR port on Windows 2000/XP . . . . . . . . . . . 70<br />
Troubleshooting . . . . . . . . . . . . . . . . . . . . . . . . . .82<br />
Specifications . . . . . . . . . . . . . . . . . . . . . . . . . . . .86
ABOUT THE<br />
BARRICADE ROUTER<br />
Congratulations on your purchase of the Barricade Broadband<br />
Router. <strong>SMC</strong> is proud to provide you with a powerful yet simple<br />
communication device for connecting your local area network<br />
(LAN) to the Internet. For those who want to surf the Internet at<br />
the lowest possible cost, this Broadband Router provides a<br />
convenient and powerful solution.<br />
LED Indicators<br />
The <strong>SMC</strong>7004ABR includes four status LED indicators, as<br />
described in the following figure and table.<br />
<strong>SMC</strong>7004ABR<br />
Reset<br />
LED Status Description<br />
Power<br />
(Green)<br />
WAN<br />
(Green)<br />
Link/Act<br />
(Green)<br />
10/100<br />
(Amber)<br />
Power WAN<br />
LAN<br />
1 2 3 4<br />
On Barricade Router is receiving power.<br />
Link/Act<br />
10/100<br />
On The WAN port has established a valid network<br />
connection.<br />
Flashing The WAN port is transmitting or receiving traffic.<br />
On The indicated LAN port has established a valid<br />
network connection.<br />
Flashing The indicated LAN port is transmitting or receiving<br />
traffic.<br />
On The indicated LAN port is operating at 100 Mbps.<br />
Off The indicated LAN port is operating at 10 Mbps.<br />
1
About the Barricade Router<br />
Features and Benefits<br />
2<br />
Internet connection to DSL or cable modem via a<br />
10/100 Mbps WAN port<br />
Internet connection to ISDN TA or PSTN modem via an<br />
RS-232 console port<br />
Local network connection via 10/100 Mbps Ethernet ports<br />
Built-in print server for any client attached to the LAN<br />
DHCP for dynamic IP configuration, and DNS for domain<br />
name mapping<br />
Firewall with client privileges, hacker prevention, and NAT<br />
NAT also enables multi-user access with a single-user<br />
account, and virtual server functionality (providing protected<br />
access to Internet services such as Web, FTP, mail and<br />
Telnet)<br />
Virtual Private Network support using PPTP, L2TP or IPSec<br />
pass-through<br />
User-definable application sensing tunnel supports<br />
applications requiring multiple connections<br />
Supports CHAP authentication protocol for dial-up<br />
identification<br />
Supports PPP dial-out connection<br />
Easy setup through a Web browser on any operating system<br />
that supports TCP/IP<br />
Compatible with all popular Internet applications
INSTALLING THE ROUTER<br />
Before installing the Barricade Broadband Router, verify that<br />
you have all the items listed under “Package Contents.” If any of<br />
the items are missing or damaged, contact your local <strong>SMC</strong><br />
distributor. Also be sure that you have all the necessary cabling<br />
before installing the Barricade Router. After installing the<br />
Barricade Router, refer to the Web-based configuration program<br />
in “Configuring the Barricade Router” on page 25 for information<br />
on configuring the router.<br />
Package Contents<br />
After unpacking the Barricade Broadband Router, check the<br />
contents of the box to be sure you have received the following<br />
components:<br />
Barricade Broadband Router<br />
Power adapter<br />
One CAT-5 Ethernet cable<br />
Four rubber feet<br />
Installation CD containing this User Guide and EZ 3-Click<br />
Installation Wizard<br />
Quick Installation Guide<br />
Immediately inform your dealer in the event of any incorrect,<br />
missing or damaged parts. If possible, please retain the carton<br />
and original packing materials in case there is a need to return<br />
the product.<br />
Please register on <strong>SMC</strong>’s Web site at www.smc.com The<br />
Barricade Router is covered by a limited lifetime warranty.<br />
3
Installing the Router<br />
Hardware Description<br />
4<br />
The Barricade Router can be connected to the Internet or to a<br />
remote site using its RJ-45 WAN port or RS-232 serial port. It can<br />
be connected directly to your PC or to a local area network using<br />
any of the Fast Ethernet LAN ports. It can also function as a print<br />
server.<br />
Access speed to the Internet depends on your service type.<br />
Full-rate ADSL can provide up to 8 Mbps downstream and<br />
640 Mbps upstream. G.lite (or splitterless) ADSL provides up to<br />
1.5 Mbps downstream and 512 Kbps upstream. Cable modems<br />
can provide up to 36 Mbps downstream and 2 Mbps upstream.<br />
ISDN can provide up to 128 Kbps when using two bearer<br />
channels. PSTN analog connections can now run up to 56 Kbps.<br />
However, you should note that the actual rate provided by<br />
specific service providers may vary dramatically from these<br />
upper limits.<br />
Although access speed to the Internet is determined by the<br />
modem type connected to your Barricade Router, data passing<br />
between devices connected to your local area network can run<br />
up to 100 Mbps over the Fast Ethernet ports.<br />
The Barricade Router includes an LED display on the front panel<br />
for system power and port indications that simplifies installation<br />
and network troubleshooting. It also provides 4 RJ-45 LAN ports<br />
on the front panel, as well as one RJ-45 WAN port, one RS-232<br />
serial port and one parallel printer port on the rear<br />
panel.Full-duplex communications allow data to be sent and<br />
received simultaneously, doubling the effective throughput.
Hardware Description<br />
4 RJ-45 ports for connection to a 10BASE-T/100BASE-TX<br />
Ethernet Local Area Network (LAN). These ports can<br />
auto-negotiate the operating speed to 10/100 Mbps, the mode<br />
to half/full duplex, and the pin signals to MDI/MDI-X<br />
(i.e., allowing these ports to be connected to any network<br />
device with straight-through cable). These ports can be<br />
connected directly to a PC or to a server equipped with an<br />
Ethernet network interface card, or to a networking device<br />
such as an Ethernet hub or switch.<br />
One RJ-45 port for connection to a DSL or cable modem<br />
(WAN). This port also auto-negotiates operating speed to<br />
10/100 Mbps, the mode to half/full duplex, and the pin signals<br />
to MDI/MDI-X.<br />
One RS-232 serial port to connect to an ISDN Terminal<br />
Adapter (TA) or to a PSTN analog modem.<br />
One parallel printer port that can be connected to a printer.<br />
This printer can then be shared by any LAN users.<br />
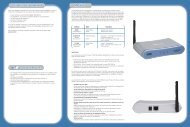
The following figure shows the components of the Barricade<br />
Router:<br />
<strong>SMC</strong>7004ABR<br />
Reset<br />
Power WAN<br />
PRINTER<br />
1 2 3 4<br />
Link/Act<br />
10/100<br />
Figure 1. Front and Rear Panels<br />
LAN<br />
1 2 3 4<br />
WAN COM<br />
12V 1A<br />
5
Installing the Router<br />
System Requirements<br />
6<br />
Item Description<br />
Reset<br />
Button<br />
Use this button to reset the power and restore the default<br />
factory settings.<br />
LEDs Power, WAN and LAN port status indicators.<br />
(See “LED Indicators” on page 1.)<br />
LAN<br />
Ports<br />
Printer<br />
Port<br />
WAN<br />
Port<br />
COM<br />
Port<br />
Power<br />
Inlet<br />
Fast Ethernet ports (RJ-45). Connect devices (such as a<br />
PC, hub or switch) on your local area network to these<br />
ports.<br />
Parallel port (25-pins, D-type, female). Connect the shared<br />
printer to this port.<br />
WAN port (RJ-45). Connect your cable modem, DSL<br />
modem, or an Ethernet router to this port.<br />
Serial port (9-pins, D-type, male). Connect your ISDN TA or<br />
56K analog modem to this port.<br />
Connect the included power adapter to this inlet.<br />
Warning: Using the wrong type of power adapter may<br />
cause damage.<br />
You must have an ISP that meets the following minimum<br />
requirements:<br />
Internet access from your local telephone company or Internet<br />
Service Provider (ISP) using a DSL modem, cable modem,<br />
ISDN TA, or PSTN analog modem. You may also have access<br />
over the telephone system to an analog modem at another<br />
site.<br />
A PC using a fixed IP address or dynamic IP address<br />
assigned via DHCP, as well as a Gateway server address and<br />
DNS server address from your service provider.<br />
A computer equipped with a 10 Mbps, 100 Mbps, or<br />
10/100 Mbps Fast Ethernet card, or a USB-to-Ethernet<br />
converter.
Connect the System<br />
TCP/IP network protocol installed on each PC that needs to<br />
access the Internet.<br />
A Java-enabled Web browser, such as Microsoft Internet<br />
Explorer 5.0 or above, or Netscape Communicator 4.0 or<br />
above installed on one PC at your site for configuring the<br />
Barricade Router.)<br />
Connect the System<br />
The Barricade Router can be positioned at any convenient<br />
location in your office or home. No special wiring or cooling<br />
requirements are needed. You should, however comply with the<br />
following guidelines:<br />
Keep the Barricade Router away from any heating devices.<br />
Do not place the Barricade Router in a dusty or wet<br />
environment.<br />
You should also remember to turn off the power, remove the<br />
power cord from the outlet, and keep your hands dry when you<br />
install the Barricade Router.<br />
Basic Installation Procedure<br />
1. Connect the LAN: You can connect the Barricade Router to<br />
your PC, or to a hub or switch. Run Ethernet cable from one<br />
of the LAN ports on the front of the Barricade Router to your<br />
computer’s network adapter or to another network device.<br />
2. Connect the WAN: Prepare an Ethernet cable for connecting<br />
the Barricade Router to a cable/DSL modem or Ethernet<br />
router. Prepare a serial cable for connecting the Barricade<br />
Router to an ISDN TA or PSTN modem.<br />
7
Installing the Router<br />
8<br />
3. Connect your printer: Use standard parallel printer cable to<br />
connect your printer to the printer port on the Barricade<br />
Router.<br />
4. Power on: Connect the power adapter to the Barricade<br />
Router.<br />
Internet<br />
Internet<br />
Access<br />
Device <strong>SMC</strong>7004ABR<br />
Broadband Router<br />
SOHO Office or Residence<br />
Figure 2. Connecting the Barricade Router<br />
<strong>SMC</strong>7004ABR<br />
Reset<br />
LAN<br />
Power WAN<br />
Link/Act<br />
10/100<br />
1 2 3 4<br />
1 2 3 4
CONFIGURING<br />
CLIENT TCP/IP<br />
If you have not previously installed the TCP/IP protocols on your<br />
client PCs, refer to the following section. If you need information<br />
on how to configure a TCP/IP address on a PC, refer to “Setting<br />
Up TCP/IP” on page 11.<br />
Installing TCP/IP<br />
Windows 95/98/ME<br />
1. Click Start/Settings/Control Panel.<br />
2. Double-click the Network icon and select the Configuration<br />
tab in the Network window.<br />
3. Click the Add button.<br />
4. Double-click Protocol.<br />
9
Configuring Client TCP/IP<br />
10<br />
5. Select Microsoft in the manufacturers list. Select TCP/IP in<br />
the Network Protocols list. Click the OK button to return to the<br />
Network window.<br />
6. The TCP/IP protocol will be listed in the Network window.<br />
Click OK. The operating system may prompt you to restart<br />
your system. Click Yes and the computer will shut down and<br />
restart.<br />
Windows 2000<br />
1. Click the Start button and choose Settings, then click the<br />
Network and Dial-up Connections icon.<br />
2. Double-click the Local Area Connection icon, and click the<br />
Properties button on the General tab.<br />
3. Click the install... button.
4. Double-click Protocol.<br />
Setting Up TCP/IP<br />
5. Choose Internet Protocol (TCP/IP). Click the OK button to<br />
return to the Network window.<br />
6. The TCP/IP protocol will be listed in the Network window.<br />
Click OK to complete the installation procedure.<br />
Setting Up TCP/IP<br />
To access the Internet through the Barricade Router, you must<br />
configure the network settings of the computers on your LAN to<br />
use the same IP subnet as the Barricade Router. The default<br />
network settings for the Barricade Router are:<br />
Gateway IP Address: 192.168.2.1<br />
11
Configuring Client TCP/IP<br />
12<br />
Subnet Mask: 255.255.255.0<br />
Note: These settings may be changed to suit your network<br />
requirements, but you must first configure at least one<br />
computer as described in this chapter to access the<br />
Barricade Router’s Web configuration interface.See<br />
“Configuring the Barricade Router” on page 25 for<br />
information on configuring the Barricade Router.)<br />
If you have not previously configured TCP/IP for your computer,<br />
refer to“Configuring Client TCP/IP” on page 9. The IP address of<br />
the connected client PC should be 192.168.2.x (where x means<br />
2–254). You can set the IP address for client PCs either by<br />
automatically obtaining an IP address from the Barricade<br />
Router’s DHCP service or by manual configuration.<br />
Configuring Your Computer in Windows 95/98/Me<br />
You may find that the instructions here do not exactly match your<br />
version of Windows. This is because these steps and<br />
screenshots were created in Windows 98. Windows 95 and<br />
Windows Millennium Edition are very similar, but not identical, to<br />
Windows 98.<br />
1. From the Windows desktop, click Start/Settings/Control<br />
Panel.<br />
2. In the Control Panel, locate and double click the Network icon.
3. On the Network window<br />
Configuration tab,<br />
double-click the TCP/IP<br />
entry for your network<br />
card.<br />
4. Click the IP Address tab.<br />
5. Click the “Obtain an IP<br />
address “option.<br />
Setting Up TCP/IP<br />
6. Next click on the Gateway<br />
tab and verify the Gateway<br />
field is blank. If there are<br />
IP addresses listed in the Gateway section, highlight each<br />
one and click Remove until the section is empty.<br />
7. Click the OK button to close the TCP/IP Properties window.<br />
13
Configuring Client TCP/IP<br />
14<br />
8. On the Network Properties Window, click the OK button to<br />
save these new settings.<br />
Note: Windows may ask you for the original Windows<br />
installation disk or additional files. Check for the files at<br />
c:\windows\options\cabs, or insert your Windows<br />
CD-ROM into your CDROM drive and check the correct<br />
file location, e.g., D:\win98, D:\win9x. (if D is the letter<br />
of your CD-ROM drive).<br />
9. Windows may prompt you to restart the PC. If so, click the Yes<br />
button. If Windows does not prompt you to restart your<br />
computer, do so to insure your settings.<br />
Obtain IP Settings from Your Barricade Router<br />
Now that you have configured your computer to connect to your<br />
Barricade Router, it needs to obtain new network settings. By<br />
releasing old IP settings and renewing them with settings from<br />
your Barricade Router, you will also verify that you have<br />
configured your computer correctly.<br />
1. Click Start/Run.<br />
2. Type WINIPCFG and click<br />
OK.<br />
3. From the drop-down menu,<br />
select your network card.<br />
Click Release and then<br />
Renew. Verify that your IP<br />
address is now<br />
192.168.2.xxx, your Subnet<br />
Mask is 255.255.255.0 and<br />
your Default Gateway is
Setting Up TCP/IP<br />
192.168. 2.1. These values confirm that your Barricade<br />
Router is functioning. Click OK to close the IP Configuration<br />
window.<br />
Configuring Your Computer in Windows NT 4.0<br />
1. From the Windows desktop click Start/Settings/Control Panel.<br />
2. Double-click the<br />
Network icon.<br />
3. Click on the<br />
Protocols tab.<br />
4. Double-click TCP/<br />
IP Protocol.<br />
15
Configuring Client TCP/IP<br />
16<br />
5. Click on the IP Address tab.<br />
6. In the Adapter drop-down list, be sure your Ethernet adapter<br />
is selected.<br />
7. Click on “Obtain an IP address from a DHCP server”.<br />
8. Click OK to close the window.<br />
9. Windows may copy files and will then prompt you to restart<br />
your system. Click Yes and your computer will shut down and<br />
restart.<br />
Obtain IP Settings From Your Barricade Router<br />
Now that you have configured your computer to connect to the<br />
Barricade Router, it needs to obtain new network settings. By<br />
releasing old IP settings and renewing them with settings from<br />
the Barricade Router, you will also verify that you have<br />
configured your computer correctly.<br />
1. On the Windows desktop, click Start/Programs/Command<br />
Prompt.<br />
2. In the Command Prompt window, type IPCONFIG /RELEASE<br />
and press the key.
Setting Up TCP/IP<br />
3. Type IPCONFIG /RENEW and press the key. Verify<br />
that your IP Address is now 192.168.2.xxx, your Subnet Mask<br />
is 255.255.255.0 and your Default Gateway is 192.168.2.1.<br />
These values confirm that the Barricade Router is functioning.<br />
4. Type EXIT and press to close the Command<br />
Prompt window.<br />
Configuring Your Computer in Windows 2000<br />
1. Access your Network settings by clicking Start, then choose<br />
Settings and then select Control Panel.<br />
2. In the Control Panel, locate and double-click the Network and<br />
Dial-up Connections icon.<br />
17
Configuring Client TCP/IP<br />
18<br />
3. Locate and double-click the<br />
Local Area Connection icon<br />
for the Ethernet adapter that<br />
is connected to the<br />
Barricade. When the Status<br />
dialog box window opens,<br />
click the Properties button.<br />
4. In the Local Area<br />
Connection Properties box,<br />
verify the box next to<br />
Internet Protocol (TCP/IP) is<br />
checked. Then highlight the Internet Protocol (TCP/IP), and<br />
click the Properties button.<br />
5. Select “Obtain an IP address automatically” to configure your<br />
computer for DHCP. Click the [OK] button to save this change<br />
and close the Properties window.<br />
6. Click the OK button again to save these new changes.<br />
7. Reboot your PC.<br />
8. To obtain new network settings see “Obtain IP Settings from<br />
Your Barricade Router” on page 14.<br />
Configuring Your Computer in Windows XP<br />
The following instructions assume you are running Windows XP<br />
with the default interface. If you are using the Classic interface<br />
(where the icons and menus look like previous Windows<br />
versions), please follow the instructions for Windows 2000<br />
outlined above.<br />
1. Access your Network settings by clicking Start, choose<br />
Control Panel, select Network and Internet Connections and<br />
then click on the Network Connections icon.
2. Locate and double-click the<br />
Local Area Connection icon<br />
for the Ethernet adapter that<br />
is connected to the<br />
Barricade Router. Next,<br />
click the Properties button.<br />
Setting Up TCP/IP<br />
3. the Local Area Connection Properties box, verify the box next<br />
to Internet Protocol (TCP/IP) is checked. Then highlight the<br />
Internet Protocol (TCP/IP), and click the Properties button.<br />
4. Select “Obtain an IP address automatically” to configure your<br />
computer for DHCP. Click the OK button to save this change<br />
and close the Properties window.<br />
5. Click the OK button again to save these new changes.<br />
6. Reboot your PC.<br />
Configuring a Macintosh Computer<br />
You may find that the instructions here do not exactly match your<br />
screen. This is because these steps and screenshots were<br />
created using Mac OS 8.5. Mac OS 7.x and above are all very<br />
similar, but may not be identical to Mac OS 8.5.<br />
1. Pull down the Apple Menu. Click Control Panel and select<br />
TCP/IP.<br />
19
Configuring Client TCP/IP<br />
20<br />
2. In the TCP/IP<br />
dialog box,<br />
make sure that<br />
Ethernet is<br />
selected in the<br />
Connect Via:<br />
field.<br />
3. Select Using<br />
DHCP Server<br />
in the<br />
Configure<br />
field.<br />
4. Close the TCP/IP dialog box.<br />
Configuring Your Computer in Windows 2000<br />
1. Access your Network settings by clicking Start, then choose<br />
Settings and then select Control Panel<br />
2. In the Control Panel, locate and double-click the Network and<br />
Dial-up Connections icon
3. Locate and<br />
double-click the Local<br />
Area Connection icon<br />
for the Ethernet<br />
adapter that is<br />
connected to the<br />
Barricade. When the<br />
Status dialog box<br />
window opens, click<br />
the Properties button.<br />
Setting Up TCP/IP<br />
4. On the Local Area Connection Properties box, verify the box<br />
next to Internet Protocol (TCP/IP) is checked. Then highlight<br />
the Internet Protocol TCP/IP, and click the Properties button.<br />
5. Select “Obtain an IP address automatically” to configure your<br />
computer for DHCP. Click the OK button to save this change<br />
and close the Properties window.<br />
6. Click the OK button again to save these new changes.<br />
7. Reboot your PC.<br />
21
Configuring Client TCP/IP<br />
22<br />
Manual IP Configuration<br />
1. Check Specify an IP<br />
address on the IP Address<br />
tab. Enter an IP address<br />
based on the default<br />
network 192.168.2.x (where<br />
x is between 2 and 254), and<br />
use 255.255.255.0 for the<br />
subnet mask.<br />
2. In the Gateway tab, add the<br />
IP address of the Barricade<br />
Router (default:<br />
192.168.2.1) in the New<br />
gateway field and click Add.
3. On the DNS Configuration tab,<br />
add the IP address for the<br />
Barricade Router and click<br />
Add. This automatically<br />
relays DNS requests to the<br />
DNS server(s) provided by<br />
your ISP. Otherwise, add<br />
specific DNS servers into the<br />
DNS Server Search Order<br />
field and click Add.<br />
Setting Up TCP/IP<br />
4. After finishing TCP/IP setup,<br />
click OK, and then reboot<br />
the computer. After that, set<br />
up other PCs on the LAN according to the procedures<br />
described above.<br />
Verifying Your TCP/IP Connection<br />
After installing the TCP/IP communication protocols and<br />
configuring an IP address in the same network as the Barricade<br />
Router, use the Ping command to check if your computer has<br />
successfully connected to the Barricade Router. The following<br />
example shows how the Ping procedure can be executed in an<br />
MS-DOS window. First, execute the Ping command:<br />
ping 192.168.2.1<br />
If a message similar to the following appears:<br />
Pinging 192.168.2.1 with 32 bytes of data:<br />
Reply from 192.168.2.1: bytes=32 time=2ms TTL=64<br />
a communication link between your computer and the Barricade<br />
Router has been successfully established.<br />
If you get the following message,<br />
23
Configuring Client TCP/IP<br />
24<br />
Pinging 192.168.2.1 with 32 bytes of data:<br />
Request timed out.<br />
there may be something wrong in your installation procedure.<br />
Check the following items in sequence:<br />
1. Is the Ethernet cable correctly connected between the<br />
Barricade Router and the computer?<br />
The LAN LED on the Barricade Router and the Link LED of<br />
the network card on your computer must be on.<br />
2. Is TCP/IP properly configured on your computer?<br />
If the IP address of the Barricade Router is 192.168.2.1, the<br />
IP address of your PC must be from 192.168.2.2 -<br />
192.168.2.254 and the default gateway must be 192.168.2.1.<br />
If you can successfully Ping the Barricade Router you are now<br />
ready to connect to the Internet!
CONFIGURING THE<br />
BARRICADE ROUTER<br />
The Barricade Router can be configured by any Java-supported<br />
browser including Internet Explorer 4.0 or above, or Netscape<br />
Navigator 4.0 or above. Using the Web management interface,<br />
you can configure the Barricade Router and view statistics to<br />
monitor network activity.<br />
Note: NOTE: Before you attempt to configure your router, if<br />
you have access to the Internet please visit<br />
www.smc.com and download the latest firmware<br />
update to insure your router is running the latest<br />
Before you attempt to log into the Barricades Web-based<br />
Administration, please verify the following.<br />
1. Your browser is configured properly (see below).<br />
2. Disable any firewall or security software that may be running.<br />
3. Confirm that you have a good link LED where your computer<br />
is plugged into the Barricade. If you don’t have a link light –<br />
then try another cable until you get a good link.<br />
Browser Configuration<br />
Confirm your browser is configured for a direct connection to the<br />
Internet using the Ethernet cable that is installed in the computer.<br />
This is configured through the options/preference section of your<br />
browser.<br />
25
Configuring the Barricade Router<br />
Disable Proxy Connection<br />
26<br />
You will also need to verify that the HTTP Proxy feature of your<br />
web browser is disabled. This is so that your web browser will be<br />
able to view the Barricade configuration pages. The following<br />
steps are for Internet Explorer and for Netscape. Determine<br />
which browser you use and follow the appropriate steps.<br />
Internet Explorer (5 or above)<br />
1. Open Internet Explorer. Click Tools, and then select Internet<br />
Options.<br />
2. In the Internet Options window, click the Connections tab.<br />
3. Click the LAN Settings button.<br />
4. Clear all the check boxes and click OK to save these LAN<br />
settings changes.<br />
5. Click OK again to close the Internet Options window.<br />
Internet Explorer (For Macintosh)<br />
1. Open Internet Explorer. Click Edit/Preferences.<br />
2. In the Internet Explorer Preferences window, under Network,<br />
select Proxies.<br />
3. Uncheck all checkboxes and click OK.<br />
Netscape (4 or above)<br />
1. Open Netscape. Click Edit, and then select Preferences.
Netscape (4 or above)<br />
2. In the Preferences window, under Category, double-click<br />
Advanced, then select the Proxies option.<br />
3. Check “Direct connection to the Internet.”<br />
4. Click the OK button to save the changes.<br />
To access the Barricade Router’s<br />
management interface, enter the<br />
Barricade Router IP address in your Web<br />
browser http://192.168.2.1. Then click<br />
LOGIN. (By default, there is no password.)<br />
The home page displays the Setup Wizard and Advanced Setup<br />
options.<br />
27
Configuring the Barricade Router<br />
Navigating the Web Browser Interface<br />
28<br />
The Barricade Router’s management interface features a Setup<br />
Wizard and an Advanced Setup section. Use the Setup Wizard if<br />
you want to quickly set up the Barricade Router for use with a<br />
cable modem or DSL modem.<br />
Advanced setup supports more advanced functions like hacker<br />
attack detection, IP and MAC address filtering, intrusion<br />
detection, virtual server setup, virtual DMZ hosts, and other<br />
advanced functions.<br />
Making Configuration Changes<br />
Configurable parameters have a dialog box or a drop-down list.<br />
Once a configuration change has been made on a page, be sure<br />
to click the APPLY or NEXT button at the bottom of the page to<br />
enable the new setting.<br />
Note: To ensure proper screen refresh after a command<br />
entry, ensure that Internet Explorer 5.0 is configured as<br />
follows: Under the menu Tools/Internet Options/<br />
General/Temporary Internet Files/Settings, the setting<br />
for “Check for newer versions of stored pages” should<br />
be “Every visit to the page.”<br />
Setup Wizard<br />
Time Zone<br />
Click on the Setup Wizard picture. The first item in the Setup<br />
Wizard is Time Zone setup.<br />
For accurate timing of client filtering and log events, you need to<br />
set the time zone. Select your time zone from the drop-down list,<br />
and click NEXT.
.<br />
Broadband Type<br />
Select the type of broadband connection you have.<br />
Setup Wizard<br />
For a cable modem connection see the following page. For a<br />
Fixed-IP xDSL connection see “Fixed-IP xDSL” on page 30, and<br />
for a PPPoE xDSL connection, see “PPPoE” on page 31.<br />
29
Configuring the Barricade Router<br />
30<br />
Cable Modem<br />
After selecting Cable Modem as the Broadband Type, a<br />
message will appear stating that your data has been successfully<br />
saved.<br />
Note: Select Home to return to the home page, then select<br />
Advanced Settings/WAN to configure the required<br />
parameters. (See “WAN” on page 35.)<br />
Fixed-IP xDSL<br />
Some xDSL Internet Service Providers may assign a fixed<br />
(static) IP address. If you have been provided with this<br />
information, choose this option and enter the assigned IP<br />
address, gateway IP address, DNS IP addresses, and subnet<br />
mask. Click FINISH to complete the setup.
PPPoE<br />
Setup Wizard<br />
Enter the PPPoE User Name and Password assigned by your<br />
Service Provider. The Service Name is normally optional, but<br />
may be required by some service providers.<br />
Leave the Maximum Transmission Unit (MTU) at the default<br />
value (1454) unless you have a particular reason to change it.<br />
Enter a Maximum Idle Time (in minutes) to define a maximum<br />
period of time for which the Internet connection is maintained<br />
during inactivity. If the connection is inactive for longer than the<br />
Maximum Idle Time, it will be dropped. (Default: 10)<br />
Enable the Auto-reconnect option to automatically re-establish<br />
the connection as soon as you attempt to access the Internet<br />
again. Click FINISH to complete the setup<br />
31
Configuring the Barricade Router<br />
Advanced Setup<br />
32<br />
Use the Web management interface to define system<br />
parameters, manage and control the Barricade Router and its<br />
ports, or monitor network conditions. The following table outlines<br />
the selections available from this program.<br />
Menu Description<br />
System Sets the local time zone, the password for administrator<br />
access, and the IP address of a PC that will be allowed to<br />
manage the Barricade Router remotely.<br />
WAN Specifies the Internet connection type:<br />
Dynamic IP host configuration and the physical MAC<br />
address of each media interface<br />
PPPoE configuration<br />
PPTP<br />
Static IP and ISP gateway address<br />
Specifies DNS servers to use for domain name<br />
resolution.<br />
LAN Sets the TCP/IP configuration of the Barricade Router’s<br />
LAN interface and all DHCP clients.<br />
NAT Shares a single ISP account with multiple users, sets up<br />
virtual servers.<br />
Firewall Configures a variety of security and specialized<br />
functions, including: Access Control, Hacker Prevention,<br />
and DMZ.<br />
DDNS Dynamic DNS provides users on the Internet with a<br />
method to tie their domain name(s) to computers or<br />
servers.<br />
UPnP With Universal Plug and Play, a device can automatically<br />
dynamically join a network, obtain an IP address,<br />
communicate its capabilities, and learn about the<br />
presence and capabilities of other devices. Devices can<br />
then directly communicate with each other. This further<br />
enables peer to peer networking.
System<br />
Time Zone<br />
Advanced Setup<br />
Menu Description<br />
Tools Contains options to backup & restore the current<br />
configuration, restore all configuration settings to the<br />
factory defaults, update system firmware, or reset the<br />
system.<br />
Status Provides WAN connection type and status, firmware and<br />
hardware version numbers, system IP settings, as well as<br />
DHCP, NAT, and Firewall information.<br />
Displays the number of attached clients, the firmware<br />
versions, the physical MAC address for each media<br />
interface, and the hardware version and serial number.<br />
Shows the security and DHCP client log.<br />
Sets the time zone for the Barricade Router. This information is<br />
used for log entries and client access control.<br />
33
Configuring the Barricade Router<br />
34<br />
Password Settings<br />
Use this menu to restrict access based on a password. By<br />
default, there is no password. For security you should assign one<br />
before exposing the Barricade Router to the Internet.<br />
Passwords can contain from 3–12 alphanumeric characters and<br />
are not case sensitive.<br />
Note: If your password is lost, or you cannot gain access to<br />
the user interface, press the Reset button on the front<br />
panel (holding it down for at least five seconds) to<br />
restore the factory defaults. (The default is no<br />
password.)<br />
Enter a maximum Idle Time Out (in minutes) to define a<br />
maximum period of time for which the login session is maintained<br />
during inactivity. If the connection is inactive for longer than the<br />
maximum idle time, it will perform system logout, and you have to<br />
login to the Web management system again. (Default: 10<br />
minutes)
WAN<br />
Remote Management<br />
Advanced Setup<br />
Remote Management allows a remote PC to configure, manage,<br />
and monitor the Barricade Router using a standard Web browser.<br />
Check Enable and enter the IP address of the remote host. Click<br />
APPLY.<br />
Note: If you specify 0.0.0.0 as this IP address, any host can<br />
manage the Barricade Router.<br />
Specify the WAN connection type provided by your Internet<br />
Service Provider, then click More Configuration to enter detailed<br />
configuration parameters for the selected connection type.<br />
35
Configuring the Barricade Router<br />
36<br />
Dynamic IP<br />
The Host Name is optional, but may be required by some ISPs.<br />
The default MAC address is set to the WAN’s physical interface<br />
on the Barricade Router. Use this address when registering for<br />
Internet service, and do not change it unless required by your<br />
ISP. If your ISP used the MAC address of an Ethernet card as an<br />
identifier when first setting up your broadband account, only<br />
connect the PC with the registered MAC address to the<br />
Barricade Router and click the Clone MAC Address button. This<br />
will replace the current Barricade Router MAC address with the<br />
already registered Ethernet card MAC address.<br />
If you are unsure of which PC was originally set up by the<br />
broadband technician, call your ISP and request that they<br />
register a new MAC address for your account. Register the<br />
default MAC address of the Barricade Router.
Point-to-Point Over Ethernet (PPPoE)<br />
Advanced Setup<br />
Enter the PPPoE User Name and Password assigned by your<br />
Service Provider. The Service Name is normally optional, but<br />
may be required by some service providers.<br />
The MTU (Maximum Transmission Unit) governs the maximum<br />
size of the data packets. Leave this on the default value (1454)<br />
unless you have a particular reason to change it.<br />
Enter a Maximum Idle Time (in minutes) to define a maximum<br />
period of time for which the Internet connection is maintained<br />
during inactivity. If the connection is inactive for longer than the<br />
Maximum Idle Time, it will be dropped. (Default: 10 minutes)<br />
37
Configuring the Barricade Router<br />
38<br />
Point-to-Point Tunneling Protocol (PPTP)<br />
Point-to-Point Tunneling Protocol (PPTP) can be used to join<br />
different physical networks using the Internet as an intermediary.<br />
Using the above screen allows client PCs to establish a normal<br />
PPTP session and provides hassle-free configuration of the<br />
PPTP client on each client PC.<br />
Enter the assigned IP address, subnet mask and default gateway<br />
IP address (usually supplied by your ISP), and then the PPTP<br />
User ID, Password and PPPTP Gateway IP address.<br />
Enter a maximum Idle Time Out (in minutes) to define a<br />
maximum period of time for which the PPTP connection is<br />
maintained during inactivity. If the connection is inactive for<br />
longer than the Maximum Idle Time, it will be dropped. (Default:<br />
10 minutes)
Static IP Address<br />
Advanced Setup<br />
If your Internet Service Provider has assigned a fixed IP address,<br />
enter the assigned address and subnet mask for the Barricade<br />
Router, then enter the gateway address of your ISP.<br />
You may need a fixed address if you want to provide Internet<br />
services, such as a Web server or FTP server.<br />
39
Configuring the Barricade Router<br />
40<br />
DNS<br />
Domain Name Servers map numerical IP addresses to the<br />
equivalent domain name (e.g., www.smc.com). Your ISP should<br />
provide the IP address of one or more domain name servers.<br />
Enter those addresses in this screen.
Dial-up<br />
Advanced Setup<br />
If you are accessing the Internet via an ISDN TA or PSTN<br />
modem attached to the serial port on the Barricade Router, then<br />
you must specify your account information on this screen as<br />
described below.<br />
Note: If not checked, then this connection will only be used<br />
for backup access if the primary WAN link fails<br />
Dial-Up Service Phone Number – Enter the phone number<br />
your service provider has given to you for Internet access.<br />
Dial-Up Account Information – Enter your ISP account user<br />
name and password<br />
Modem Initialization String – This is normally optional, but<br />
may be required by some service providers.<br />
MTU – Leave the Maximum Transmission Unit (MTU) at the<br />
default value (1454) unless you have a particular reason to<br />
change it.<br />
41
Configuring the Barricade Router<br />
LAN<br />
42<br />
Maximum Idle Time – Enter a maximum idle time (in minutes)<br />
to define a maximum period of time for which the Internet<br />
connection is maintained during inactivity (Default: 10). If the<br />
connection is inactive for longer than the Maximum Idle Time,<br />
it will be dropped. Enable the Auto-reconnect option to<br />
automatically re-establish the connection as soon as you<br />
attempt to access the Internet again.<br />
Has your Internet Service Provider given you an IP address?<br />
– If you are assigned a dynamic IP address every time you dial<br />
up, select No for this item. However, if your ISP has assigned<br />
a fixed IP address for you to use, select Yes for this item and<br />
enter the IP address and subnet mask.<br />
Note: If your ISP has given you a secondary phone number,<br />
or if you have a secondary Internet service account,<br />
then fill in the relevant fields under Secondary Dial-up.
Advanced Setup<br />
LAN IP – Use the LAN menu to configure the LAN IP address<br />
for the Barricade Router and to enable the DHCP server for<br />
dynamic client address allocation.<br />
Set a period for the lease time if required. For home networks<br />
this may be set to Forever, which means there is no time limit<br />
on the IP address lease.<br />
IP Address Pool – A dynamic IP start address may be<br />
specified by the user, e.g. 192.168.2.100 (default value).<br />
Once this start IP address has been assigned, IP addresses<br />
running from 192.168.2.100 to 192.168.2.199 will be part of<br />
the dynamic IP address pool. IP addresses from 192.168.2.2<br />
to 192.168.2.99, and 192.168.2.200 to 192.168.2.254 will be<br />
available as static IP addresses.<br />
Remember not to include the address of the Barricade Router in<br />
the client address pool. Also remember to configure your client<br />
PCs for dynamic IP address allocation.<br />
Network Address Translation (NAT)<br />
From this section you can configure the Address Mapping, Virtual<br />
Server, and Special Application features that provide control over<br />
the port openings in the router’s firewall. This section can be<br />
used to support several Internet based applications such as VPN<br />
43
Configuring the Barricade Router<br />
44<br />
Address Mapping<br />
Allows one or more public IP addresses to be shared by multiple<br />
internal users. Enter the Public IP address you wish to share into<br />
the Global IP field. Enter a range of internal IPs that will share the<br />
global IP.
Virtual Server<br />
Advanced Setup<br />
If you configure the Barricade Router as a virtual server, remote<br />
users accessing services such as Web or FTP at your local site<br />
via public IP addresses can be automatically redirected to local<br />
servers configured with private IP addresses. In other words,<br />
depending on the requested service (TCP/UDP port number), the<br />
Barricade Router redirects the external service request to the<br />
appropriate server (located at another internal IP address).<br />
For example, if you set Type/Public Port to TCP/80 (HTTP or<br />
Web) and the Private IP/Port to 192.168.2.2/80, then all HTTP<br />
requests from outside users will be transferred to 192.168.2.2 on<br />
port 80. Therefore, by just entering the IP Address provided by<br />
the ISP, Internet users can access the service they need at the<br />
local address to which you redirect them.<br />
The more common TCP service ports include:<br />
HTTP: 80, FTP: 21, Telnet: 23, and POP3: 110.<br />
45
Configuring the Barricade Router<br />
46<br />
Special Applications<br />
Some applications, such as Internet gaming, videoconferencing,<br />
Internet telephony and others, require multiple connections.<br />
These applications cannot work with Network Address<br />
Translation (NAT) enabled. If you need to run applications that<br />
require multiple connections, use the following screen to specify<br />
the additional public ports to be opened for each application.<br />
Specify the public port number normally associated with an<br />
application in the Trigger Port field. Set the protocol type to TCP<br />
or UDP, then enter the ports that the application requires. The<br />
ports may be in the format 7, 11, 57, or in a range, e.g., 72-96, or<br />
a combination of both, e.g., 7, 11, 57, 72-96.<br />
Popular applications requiring multiple ports are listed in the<br />
Popular Applications field. From the drop-down list, choose the<br />
application and then choose a row number to copy this data into.<br />
Note: Choosing a row that already contains data will<br />
overwrite the current settings.
Firewall<br />
Advanced Setup<br />
For a full list of ports and the services that run on them, see<br />
www.iana.org/assignments/port-numbers.<br />
The Barricade Plus firewall can provide access control of<br />
connected client PCs, block common hacker attacks, including IP<br />
Spoofing, Land Attack, Ping of Death, IP with zero length, Smurf<br />
Attack, UDP port loopback, Snork Attack, TCP null scan, and<br />
TCP SYN flooding. The firewall does not significantly affect<br />
system performance, so we advise leaving it enabled to protect<br />
your network users.<br />
Access Control<br />
Using this option allows you to specify different privileges based<br />
on IP address for the client PCs.<br />
47
Configuring the Barricade Router<br />
48<br />
Note: Click on Add PC and define the appropriate settings for<br />
client PC services (as shown in the following screen).<br />
MAC Filtering Table
Advanced Setup<br />
The MAC Filtering feature of the Barricade allows you to control<br />
access to your network to up to 32 clients based on the MAC<br />
(Media Access Control) Address of the client machine. This ID is<br />
unique to each network adapter. If the MAC address is listed in<br />
the table, that client machine will have access to the network.<br />
URL Blocking<br />
To configure the URL Blocking feature, use the table below to<br />
specify the websites (www.somesite.com) and/or keywords you<br />
want to filter on your network.<br />
To complete this configuration, you will need to create or modify<br />
an access rule in “Access Control” on page 47. To modify an<br />
existing rule, click the Edit option next to the rule you want to<br />
modify. To create a new rule, click on the Add PC option.<br />
From the Access Control Add PC section check the option for<br />
WWW with URL Blocking in the Client PC Service table to filter<br />
out the websites and keywords specified below.<br />
Use the above screen to block access to Web sites or to Web<br />
URLs containing the keyword specified in the table.<br />
49
Configuring the Barricade Router<br />
50<br />
Schedule Rule<br />
The Schedule Rule feature allows you to configure specific rules<br />
based on Time and Date. These rules can then be used to<br />
configure more specific Access Control.<br />
Enables Schedule-based Internet access control.<br />
1. Click Add Schedule Rule.<br />
2. Define the settings for the schedule rule (as shown on the<br />
following screen).<br />
3. Click OK and then click the APPLY button to save your<br />
settings.
Intrusion Detection<br />
Advanced Setup<br />
51
Configuring the Barricade Router<br />
52<br />
SPI and Anti-DoS firewall protection (Default: Enabled)<br />
–The Barricade Router Intrusion Detection Feature limits<br />
access for incoming traffic at the WAN port. When the SPI<br />
feature is turned on, all incoming packets will be blocked<br />
except for those types marked with a check in the Stateful<br />
Packet Inspection section.<br />
RIP Defect (Default: Enabled) – If an RIP request packet is<br />
not replied to by the router, it will stay in the input queue and<br />
not be released. Accumulated packets could cause the input<br />
queue to fill, causing severe problems for all protocols.<br />
Enabling this feature prevents the packets accumulating.<br />
Discard Ping from WAN (Default: Disabled)<br />
– Prevents a PING on the Gateway’s WAN port from being<br />
routed to the network.
Advanced Setup<br />
Stateful Packet Inspection – This is called a “stateful” packet<br />
inspection because it examines the contents of the packet to<br />
determine the state of the communications; i.e., it ensures that<br />
the stated destination computer has previously requested the<br />
current communication. This is a way of ensuring that all<br />
communications are initiated by the recipient computer and<br />
are taking place only with sources that are known and trusted<br />
from previous interactions. In addition to being more rigorous<br />
in their inspection of packets, stateful inspection firewalls also<br />
close off ports until connection to the specific port is<br />
requested.<br />
When particular types of traffic are checked, only the<br />
particular type of traffic initiated from the internal LAN will be<br />
allowed. For example, if the user only checks FTP Service in<br />
the Stateful Packet Inspection section, all incoming traffic will<br />
be blocked except for FTP connections initiated from the local<br />
LAN.<br />
Stateful Packet Inspection allows you to select different<br />
application types that are using dynamic port numbers. If you<br />
wish to use the Stateful Packet Inspection (SPI) to block<br />
packets, click on the Yes radio button in the “Enable SPI and<br />
Anti-DoS firewall protection” field and then check the<br />
inspection type that you need, such as Packet Fragmentation,<br />
TCP Connection, UDP Session, FTP Service, H.323 Service,<br />
and TFTP Service.<br />
When hackers attempt to enter your network, we can alert<br />
you by e-mail – Enter your E-mail address. Specify your<br />
SMTP and POP3 servers, user name, and password.<br />
53
Configuring the Barricade Router<br />
54<br />
Connection Policy – Enter the appropriate values for TCP/<br />
UDP sessions as described in the following table.<br />
Parameter Defaults Description<br />
Fragmentation<br />
half-open wait<br />
10 sec Configures the number of seconds<br />
that a packet state structure<br />
remains active. When the timeout<br />
value expires, the router drops the<br />
unassembled packet, freeing that<br />
structure for use by another packet.<br />
TCP SYN wait 30 sec Defines how long the software will<br />
wait for a TCP session to<br />
synchronize before dropping the<br />
session.<br />
TCP FIN wait 5 sec Specifies how long a TCP session<br />
will be maintained after the firewall<br />
detects a FIN packet.<br />
TCP connection<br />
idle timeout<br />
UDP session idle<br />
timeout<br />
H.323 data<br />
channel idle<br />
timeout<br />
3600<br />
seconds<br />
(1 hour)<br />
The length of time a TCP session<br />
will be maintained if there is no<br />
activity.<br />
30 sec The length of time a UDP session<br />
will maintained if there is no activity.<br />
180 sec The length of time an H.323<br />
session will be maintained if there<br />
is no activity.<br />
DoS Criteria and Port Scan Criteria<br />
Set up DoS and port scan criteria in the spaces provided (as<br />
shown below).<br />
Parameter Defaults Description<br />
Total incomplete TCP/<br />
UDP sessions HIGH<br />
300 sessions Defines the rate of newly<br />
unestablished sessions that<br />
will cause the software to<br />
start deleting half-open<br />
sessions.
Parameter Defaults Description<br />
Total incomplete TCP/<br />
UDP sessions LOW<br />
Advanced Setup<br />
250 sessions Defines the rate of newly<br />
unestablished sessions that<br />
will cause the software to<br />
stop deleting half-open<br />
sessions.<br />
Incomplete TCP/UDP 250 sessions Maximum number of<br />
sessions (per min.) HIGH<br />
allowed incomplete TCP/<br />
UDP sessions per minute.<br />
Incomplete TCP/UDP<br />
sessions (per min.) LOW<br />
Maximum incomplete<br />
TCP/UDP sessions<br />
number from same host<br />
Incomplete TCP/UDP<br />
sessions detect sensitive<br />
time period<br />
Maximum half-open<br />
fragmentation packet<br />
number from same host<br />
Half-open fragmentation<br />
detect sensitive time<br />
period<br />
Flooding cracker block<br />
time<br />
200 sessions Minimum number of<br />
allowed incomplete TCP/<br />
UDP sessions per minute.<br />
Set this to “0” if no minimum<br />
setting is required.<br />
10 sessions Maximum number of<br />
incomplete TCP/UDP<br />
sessions from the same<br />
host.<br />
300 msec Length of time before an<br />
incomplete TCP/UDP<br />
session is detected as<br />
incomplete.<br />
30 Maximum number of<br />
half-open fragmentation<br />
packets from the same<br />
host.<br />
1sec Length of time before a<br />
half-open fragmentation<br />
session is detected as<br />
half-open.<br />
300 sec Length of time from<br />
detecting a flood attack to<br />
blocking of the attack.<br />
55
Configuring the Barricade Router<br />
56<br />
DMZ<br />
If you have a client PC that cannot run an Internet application<br />
properly from behind the firewall, then you can open the client up<br />
to unrestricted two-way Internet access. Enter the IP address of<br />
a DMZ host to this screen. Adding a client to the DMZ<br />
(Demilitarized Zone) may expose your local network to a variety<br />
of security risks, so only use this option as a last resort.
DDNS (Dynamic DNS) Settings<br />
Advanced Setup<br />
Domain Name – A series of alphanumeric strings separated by<br />
periods, that is the address of a the Barricade Router network<br />
connection and that identifies the owner of the address.<br />
Dynamic DNS provides users on the Internet with a method to tie<br />
their domain name(s) to computers or servers. DDNS allows your<br />
domain name to follow your IP address automatically by having<br />
your DNS records changed when your IP address changes.<br />
The section also has a “Server Configuration” section that<br />
automatically opens the port options checked in the Virtual<br />
Server section. Simply enter in the IP Address of your server,<br />
such as a web server, and then click on the port option HTTP<br />
Port 80 so users can access your server from the WAN<br />
connection (Internet).<br />
57
Configuring the Barricade Router<br />
58<br />
This DNS feature is powered by TZO.com. With a DDNS<br />
connection you can host your own web site, email server, FTP<br />
site, and more at your own location even if you have a dynamic<br />
IP address. (Default: Disable)<br />
UPnP (Universal Plug and Play) Setting<br />
Enable UPnP by checking ON in the screen above. UPnP allows<br />
the device to automatically:<br />
dynamically join a network<br />
obtain an IP address<br />
convey its capabilities and learn about the presence and<br />
capabilities of other devices.(Default: OFF)
Tools<br />
Advanced Setup<br />
Use the Tools menu to backup the current configuration, restore<br />
a previously saved configuration, restore factory settings, update<br />
firmware, and reset the Barricade Router.<br />
Tools - Configuration Tools<br />
Backup – saves the Barricade’s configuration to a file.<br />
Restore – restores settings from a saved backup<br />
configuration file.<br />
Restore to factory defaults – restores the Barricade<br />
settings back to the factory default original.<br />
Firmware Upgrade<br />
59
Configuring the Barricade Router<br />
60<br />
Tools - Firmware Upgrade<br />
Use this screen to update the firmware or user interface to the<br />
latest versions. <strong>Download</strong> the upgrade file from the <strong>SMC</strong> Web<br />
site (www.smc.com) and save it to your hard drive. In the<br />
Upgrade Target field, choose Firmware. Then click Browse to<br />
look for the previously downloaded file. Click APPLY. Check the<br />
Status page Information section to confirm that the upgrade<br />
process was successful.
Tools - Reset<br />
Advanced Setup<br />
Click APPLY to reset the Barricade Router. The reset will be<br />
complete when the power LED stops blinking.<br />
Note: If you use the Reset button on the front panel, the<br />
Barricade Router performs a power reset. If the button<br />
is held depressed for over five seconds, all the LEDs<br />
will illuminate and the factory settings will be restored.<br />
Status<br />
The Status screen displays WAN/LAN connection status,<br />
firmware, and hardware version numbers, illegal attempts to<br />
access your network, as well as information on DHCP clients<br />
connected to your network.<br />
61
Configuring the Barricade Router<br />
62<br />
The following items are included on this screen:<br />
Section Description<br />
INTERNET Displays WAN connection type and status.<br />
GATEWAY Displays system IP settings, as well as DHCP<br />
and Firewall status.<br />
INFORMATION Displays the number of attached clients, the<br />
firmware versions, the physical MAC address<br />
for each media interface, as well as the<br />
hardware version and serial number.<br />
Security Log Displays illegal attempts to access your<br />
network.<br />
Save Click on this button to save the security log file.<br />
Clear Click on this button to delete the access log.<br />
Refresh Click on this button to refresh the screen.<br />
DHCP Client Log Displays information on all DHCP clients on<br />
your network.
CONFIGURING THE PRINT<br />
SERVER<br />
If you want to use the print server built into the Barricade Router,<br />
then you must first install the Port Monitor program as described<br />
in the following section for Windows 95/98/Me/NT/2000.<br />
To configure the Barricade Print Server for Windows 95/98/Me/<br />
NT/2000, or Unix, see “Configure the Print Server” on page 66.<br />
Install the <strong>SMC</strong> Printer Port Monitor<br />
Skip this section if you are using Unix.<br />
For Windows 95/98/Me/NT/2000 clients, you need to install the<br />
port monitor program as described in this section.<br />
1. Insert the installation CD-ROM into your CD-ROM drive.<br />
Under the Print Server directory, run the setup.exe program.<br />
The <strong>SMC</strong> Port Monitor installation program advises you to<br />
close all other Windows programs currently running on your<br />
computer. Click Next to continue.<br />
2. The next screen indicates that the print client uses TCP/IP<br />
network protocol to monitor print requests. Click Next.<br />
63
Configuring the Print Server<br />
64<br />
3. Select the destination folder and click on the Next button. The<br />
setup program will then begin to install the programs into the<br />
destination folder.<br />
4. Select the Program Folder that will contain the program icon<br />
for uninstalling the port monitor, and then click Next.
Install the <strong>SMC</strong> Printer Port Monitor<br />
5. Enter the printer port name that will be used to identify the<br />
port monitor in your system, and press Next.<br />
6. When the setup program finishes installing the port monitor,<br />
check the radio button to restart your computer and then click<br />
OK.<br />
7. After rebooting your computer, add the Barricade print server<br />
to your system as described in the following section.<br />
65
Configuring the Print Server<br />
Configure the Print Server<br />
66<br />
The Barricade’s print server supports Microsoft Windows 95/98/<br />
Me/NT/2000, and Unix. If you are using Windows 95/98/Me/NT/<br />
2000, first install the port monitor as described in the previous<br />
section before adding the Barricade’s print server to your<br />
operating system.<br />
Configure the Network Printer in Windows 95/98/Me/<br />
2000<br />
1. On a Windows 95/98/Me/2000 platform, open the Printers<br />
window in the My Computer menu, and double-click the Add<br />
Printer icon.
Configure the Print Server<br />
2. Follow the prompts to add a Local printer to your<br />
system.Specify the printer type attached to the Barricade.<br />
3. Select the monitored port (the default port name is <strong>SMC</strong>100)<br />
and then click the Create a new port button.<br />
4. Enter the IP address of the Barricade and click OK, and then<br />
click Next in the Add Printer Wizard dialog box.<br />
67
Configuring the Print Server<br />
68<br />
5. Continue following the prompts to finish installing the<br />
Barricade print server. The printer type you specified will now<br />
be added to your Printers menu.<br />
Configure the Network Printer in Windows NT<br />
1. On a Windows NT platform, open the Printers window in the<br />
My Computer menu, and double-click the Add Printer icon.<br />
2. Follow the prompts to add a local printer to your system.
Configure the Print Server<br />
3. Select the monitored port. The default port name is <strong>SMC</strong>100.<br />
Then click the Configure Port button.<br />
4. Enter the IP address of the Barricade and click OK, and then<br />
click Next in the Add Printer Wizard dialog box.<br />
69
Configuring the Print Server<br />
70<br />
5. Specify the printer type attached to the Barricade.<br />
6. Continue following the prompts to finish installing the<br />
Barricade print server. The printer type you specified will now<br />
be added to your Printers menu.<br />
Configure the Network Printer in Unix Systems<br />
Follow the traditional configuration procedure on Unix platforms<br />
to set up the Barricade print server. The printer name is lpt1.<br />
Configure LPR port on Windows 2000/XP<br />
The Barricade Printer function can also be used with the LPR<br />
port on Windows XP and Windows 2000 machines. Below is an<br />
outline on how to configure the LPR port on a Windows 2000<br />
machine; however the same steps will apply for a Windows XP.<br />
1. Open the Control Panel.<br />
2. Click on the Printers and Faxes or Printers icon.<br />
3. Click on the Add Printer icon to launch the Add Printer<br />
Wizard.
Configure the Print Server<br />
4. Click Next button to begin the printer installation process.<br />
5. On the next dialog box, choose the Local Printer option and<br />
verify the “Automatically detect and install my Plug and Play<br />
printer” option is unchecked.<br />
Note: On Windows XP check the “Local printer attached to<br />
this computer.”<br />
6. Click the Next button to create a new printer port.<br />
7. Select the Create a New Port option and then select the<br />
Standard TCP/IP Port option in the drop down menu.<br />
71
Configuring the Print Server<br />
72<br />
8. When you click the Next button the “Add Standard TCP/IP<br />
Printer Port Wizard” will launch.
Configure the Print Server<br />
9. To start this new installation wizard click the Next button.<br />
10. Provide the appropriate IP and Port name information for your<br />
new Printer port. If you are using default settings on the router<br />
you can use the following information:<br />
Printer Name or IP Address: 192.168.2.1 Port Name:<br />
IP_192.168.2.<br />
Note: This is the IP that you use to administer your router<br />
with (for example: 192.168.2.1). If you have changed<br />
this IP address then please use the new one that you<br />
have assigned to your router.<br />
73
Configuring the Print Server<br />
74<br />
11. Click the Next button to continue<br />
12. On the next dialog box, under the Device type choose the<br />
Custom option<br />
13. Then click the Settings… button to input the Specific<br />
Barricade Printer port information.
Configure the Print Server<br />
14. In the Configure Standard TCP/IP Port Monitor dialog box you<br />
will need to configure some additional settings. Please<br />
confirm these settings below:<br />
Port Name: IP_192.168.2.1*<br />
Printer Name or IP Address: 192.168.2.1*<br />
* This should be the same information that was configured in<br />
Step 7.<br />
In the Protocol section click on the LPR option<br />
The Raw Settings section should be grayed out<br />
The LPR Settings section should have the Queue Name set to<br />
one of 2 options depending on the version of Barricade you<br />
are using.<br />
75
Configuring the Print Server<br />
76<br />
The Queue Name is LPT1.<br />
Verify the LPR Byte Counting Enabled and SNMP Status<br />
Enabled options are unchecked.<br />
15. Once you have verified all of these settings, click the OK<br />
button to save these settings and close the “Configure<br />
Standard TCP/IP Port Monitor” window.<br />
16. Click Next to continue and view a summary of the<br />
configuration that you have just completed.<br />
17. Click the Finish button to complete the configuration process<br />
of the TCP/IP port<br />
18. The Add Printer Wizard will now guide you through the Printer<br />
Driver installation for the LPR port you just installed.<br />
19. In the dialog box listed below, choose the manufacturer of the<br />
printer that you have, and then choose your model of printer.<br />
If your printer is not listed here, then please refer to your<br />
printer documentation to get your printer installed.
Configure the Print Server<br />
20. Once you have your printer listed and selected in this dialog<br />
box click the Next button.<br />
77
Configuring the Print Server<br />
78<br />
21. Name your printer. In this dialog box you will give your<br />
installed printer a name; this will be the name this printer is<br />
referred to in your Printer folder.<br />
22. Once you have named your printer, click Next to continue.<br />
23. Choose the Do not share this printer option and click the Next<br />
button.<br />
24. Choose No to the Print Test Page option, and click the Next<br />
button.<br />
25. On the next screen, you should now see a dialog box with a<br />
summary of all the printer information that you have just<br />
configured. To complete the installation, click the Finish<br />
button.
Configure the Print Server<br />
Once you have completed the printer installation, you will need<br />
to configure some properties on your printer. To do so, please<br />
follow the steps listed below:<br />
1. If you closed out the Printers window, please re-open it from<br />
the control panel.<br />
2. Locate the printer that you just installed and right-mouse click<br />
on it and choose Properties.<br />
3. Click on the Advanced tab and verify the following settings:<br />
Both the “Spool print documents so program finishes printing<br />
faster” and the “Start printing after last page is spooled”<br />
options are selected.<br />
Both the “Print spooled documents first” and “Enable<br />
advanced printing features” options are checked.<br />
79
Configuring the Print Server<br />
80<br />
All of the other options should be disabled or unchecked.<br />
4. Click on the Ports tab and verify that you have the TCP/IP port<br />
that you just created selected and the Enable bidirectional<br />
support and Enable printer pooling options are unchecked.<br />
5. Click the Apply button to save the settings.<br />
6. Next click on the General tab and click on the Print Test Page<br />
button. This will verify that you have successfully setup your<br />
LPR printing port, and now you can print through the <strong>SMC</strong><br />
Barricade Router.
Confirm printer connection<br />
Configure the Print Server<br />
On the status page of the web-based login, you can confirm the<br />
printer connection to the Barricade.<br />
OK<br />
81
83<br />
TROUBLESHOOTING<br />
The information outlined in this section describes some useful<br />
steps for getting your computer and Barricade router online.<br />
Verify you are connected to the Barricade Router<br />
If you are unable to access the Barricade’s web-based<br />
administration pages then you may not be properly connected or<br />
configured. The screen shots in this section were taken on a<br />
Windows 2000 machine, but the same steps will apply to<br />
Windows 95/98/Me/XP.<br />
To determine your TCP/IP configuration status please follow the<br />
steps below:<br />
1. Click Start then choose Run.<br />
2. Type cmd or command to open a DOS prompt.<br />
3. In the DOS window, type ipconfig and verify the information<br />
that is displayed.<br />
4. If your computer is setup for DHCP, then your TCP/IP<br />
configuration should be similar to the information displayed:<br />
IP Address: 192.168.2.X (x is number between 100 and 199)<br />
Subnet: 255.255.255.0<br />
Gateway: 192.168.2.1
Troubleshooting<br />
84<br />
If you have any other IP address information listed see below.<br />
If you have an IP address that starts with 169.254.XXX.XXX then<br />
see the next section.<br />
If you have another IP address configured, then see section A.3<br />
I am getting an IP Address that starts with 169.254.XXX.XXX<br />
If you are getting this IP Address, then you need to check that<br />
you are properly connected to the Barricade Router.<br />
Confirm that you have a good link light on the Barricade for the<br />
port this computer is connected to. If not, please try another<br />
cable.<br />
If you have a good link light, please open up a DOS window as<br />
described in the previous section and type ipconfig/renew.<br />
If you are still unable to get an IP Address from the Barricade,<br />
reinstall your network adapter. Please refer to your adapter<br />
manual for information on how to do this.<br />
I have another IP Address displayed<br />
If you have another IP address listed then the PC may not be<br />
configured for a DHCP connection. Please refer to “Configuring<br />
Client TCP/IP” on page 9 for information.<br />
Once you have confirmed your computer is configured for DHCP,<br />
then please follow the steps below.<br />
1. Open a DOS window as described above.<br />
2. Type ipconfig/release.
3. Then type ipconfig/renew.<br />
Symptom<br />
Troubleshooting<br />
The 10/100 LED does not light after a connection is made.<br />
Possible Solutions<br />
Check that the host computer and hub are both powered on.<br />
Be sure the network cable is connected to both devices.<br />
Verify that Category 5 cable is used if you are operating at<br />
100 Mbps, and that the length of any cable does not exceed<br />
100 m (328 ft).<br />
85
Troubleshooting<br />
86<br />
Check the network card connections.<br />
The 10BASE-T/100BASE-TX hub/switch port, network card,<br />
or cable may be defective.
87<br />
SPECIFICATIONS<br />
Below is an outline of the Technical Specifications for the<br />
Barricade 4-Port Cable/DSL Broadband Router (<strong>SMC</strong>7004ABR)<br />
Standards<br />
IEEE 802.3 10BASE-T Ethernet<br />
IEEE 802.3u 100BASE-TX Fast Ethernet<br />
IEEE 802.11b<br />
LAN Interface<br />
4 - RJ-45 10/100 Mbps Auto MDI/MDI-X ports<br />
WAN Interface<br />
1- RJ-45 10/100 Mbps Auto MDI/MDI-X port<br />
Serial, 1 RS-232 DB-9 connector<br />
Printer Interface<br />
Parallel<br />
1 DB-25 printer port<br />
Management<br />
Web management<br />
Advanced Features<br />
Dynamic IP Address Configuration – DHCP, DNS<br />
Firewall – Client privileges, hacker prevention and logging<br />
Virtual Private Network – PPTP, L2TP, IPSec pass-through<br />
Backup Internet Connection –<br />
Dial-on-demand via secondary WAN port<br />
Printer server<br />
Indicator Panel<br />
Power<br />
WAN: Link/Activity<br />
LAN: Link/Activity, 10/100 (Mbps)
Specifications<br />
88<br />
Temperature<br />
Operating: 0 to 40 °C (32 to 104 °F)<br />
Storage: -20 to 70 °C (-4 to 158 °F)<br />
Dimensions<br />
19.05 x 11.43 x 3.31 cm (7.5 x 4.5 x 1.3 in.)<br />
Weight<br />
340 g (12 oz)<br />
Input Power<br />
12 V (1 A)<br />
Power<br />
12 Watts max. @ 100/240 V AC<br />
Heat Dissipation<br />
41 BTU/hour<br />
Internet Standards<br />
ARP (RFC 826), IP (RFC 791), ICMP (RFC 792), UDP (RFC<br />
768), TCP (RFC 793), Telnet (RFC 854-859), MD5 (RFC 1321),<br />
BOOTP Extension (RFC 1497), PPP LCP Extension (RFC 1570),<br />
PPPoE (RFC 2516), NAT (RFC 1631), PPP (RFC 1661), HTML<br />
(RFC 1866), HTTP (RFC 1945), CHAP (RFC 1944), DHCP (RFC<br />
2131), PPTP (RFC 2637)<br />
Temperature<br />
Operating (0 to 40 °C), 32 to 104 °F<br />
Storage (- 40 to 70 °C), - 40 to 158 °F<br />
Humidity<br />
5% to 95% (noncondensing)<br />
Compliances<br />
CE Mark<br />
Emissions<br />
FCC Class B<br />
VCCI Class B
Industry Canada Class B<br />
EN55022 (CISPR 22) Class B<br />
C-Tick - AS/NZS 3548 (1995) Class B<br />
Immunity<br />
EN 61000-3-2/3<br />
EN 61000-4-2/3/4/5/6/8/11<br />
Safety<br />
UL 1950<br />
EN60950 (TÜV)<br />
CSA 22.2 No. 950<br />
Specifications<br />
89
Specifications<br />
90
FOR TECHNICAL SUPPORT, CALL:<br />
From U.S.A. and Canada (24 hours a day, 7 days a week)<br />
(800) <strong>SMC</strong>-4-YOU; Phn: (949) 679-8000; Fax: (949) 679-1481<br />
From Europe (8:00 AM - 5:30 PM UK Time)<br />
44 (0) 118 974 8700; Fax: 44 (0) 118 974 8701<br />
INTERNET<br />
E-mail addresses:<br />
techsupport@smc.com<br />
european.techsupport@smc-europe.com<br />
Driver updates:<br />
http://www.smc.com/index.cfm?action=tech_support_drivers_downloads<br />
World Wide Web:<br />
http://www.smc.com/<br />
http://www.smc-europe.com/<br />
For Literature or Advertising Response, Call:<br />
U.S.A. and Canada: (800) <strong>SMC</strong>-4-YOU Fax (949) 679-1481<br />
Spain: 34-93-477-4935 Fax 34-93-477-3774<br />
UK: 44 (0) 118 974 8700 Fax 44 (0) 118 974 8701<br />
France: 33 (0) 41 38 32 32 Fax 33 (0) 41 38 01 58<br />
Italy: 39 02 739 12 33 Fax 39 02 739 14 17<br />
Benelux: 31 33 455 72 88 Fax 31 33 455 73 30<br />
Central Europe: 49 (0) 89 92861-0 Fax 49 (0) 89 92861-230<br />
Switzerland: 41 (0) 1 9409971 Fax 41 (0) 1 9409972<br />
Nordic: 46 (0) 868 70700 Fax 46 (0) 887 62 62<br />
Northern Europe: 44 (0) 118 974 8700 Fax 44 (0) 118 974 8701<br />
Eastern Europe: 34 -93-477-4920 Fax 34 93 477 3774<br />
Sub Saharan Africa: 27-11 314 1133 Fax 27-11 314 9133<br />
North Africa: 34 93 477 4920 Fax 34 93 477 3774<br />
Russia: 7 (095) 290 29 96 Fax 7 (095) 290 29 96<br />
PRC: 86-10-6235-4958 Fax 86-10-6235-4962<br />
Taiwan: 886-2-2659-9669 Fax 886-2-2659-9666<br />
Asia Pacific: (65) 238 6556 Fax (65) 238 6466<br />
Korea: 82-2-553-0860 Fax 82-2-553-7202<br />
Japan: 81-3-6545-5715 Fax 81-3-5645-5716<br />
Australia: 61-2-8875-7887 Fax 61-2-8875-7777<br />
India: 91-22-8204437 Fax 91-22-8204443<br />
If you are looking for further contact information, please visit www.smc.com or<br />
www.smc-europe.com.<br />
38 Tesla<br />
Irvine, CA 92618<br />
Phone: (949) 679-8000<br />
Model Number: <strong>SMC</strong>7004ABR<br />
Revision Number E03003-R01 F 1.0