Stratica Installation Guidelines Revision 04 21 10 - Amtico
Stratica Installation Guidelines Revision 04 21 10 - Amtico
Stratica Installation Guidelines Revision 04 21 10 - Amtico

Create successful ePaper yourself
Turn your PDF publications into a flip-book with our unique Google optimized e-Paper software.
General<br />
<strong>Stratica</strong> <strong>Installation</strong> <strong>Guidelines</strong><br />
COMMUNICATION: Contact <strong>Amtico</strong> Technical Services for guidance about subfloor testing and <strong>Stratica</strong> ®<br />
installation requirements. Technical Services can be reached Monday to Friday, 8:30 a.m. to 4:30 p.m. EST at<br />
(877) 238-7869.<br />
<strong>Stratica</strong> ® is recommended for use over properly prepared concrete, suspended wood, metal and other suitable<br />
substrates. Do not install <strong>Stratica</strong> ® until jobsite testing and subfloor preparations are finished and the work of all<br />
other trades is complete. <strong>Stratica</strong> ® requires special attention during installation as follows:<br />
• Only use <strong>Amtico</strong> ® Universal 2-Part Adhesive polyurethane adhesive or <strong>Amtico</strong> 373 Acrylic Adhesive.<br />
• CAUTION: Do not use Mineral Spirits or solvents to clean up adhesive from the surface of <strong>Stratica</strong>.<br />
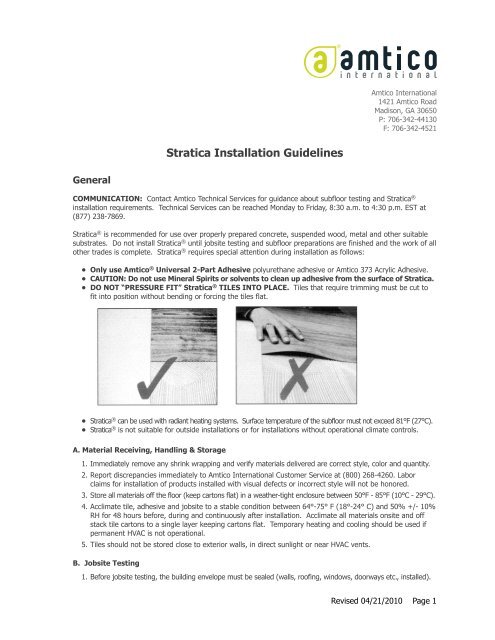
• DO NOT “PRESSURE FIT” <strong>Stratica</strong> ® TILES INTO PLACE. Tiles that require trimming must be cut to<br />
fit into position without bending or forcing the tiles flat.<br />
• <strong>Stratica</strong> ® can be used with radiant heating systems. Surface temperature of the subfloor must not exceed 81°F (27°C).<br />
• <strong>Stratica</strong> ® is not suitable for outside installations or for installations without operational climate controls.<br />
A. Material Receiving, Handling & Storage<br />
1. Immediately remove any shrink wrapping and verify materials delivered are correct style, color and quantity.<br />
2. Report discrepancies immediately to <strong>Amtico</strong> International Customer Service at (800) 268-4260. Labor<br />
claims for installation of products installed with visual defects or incorrect style will not be honored.<br />
3. Store all materials off the floor (keep cartons flat) in a weather-tight enclosure between 50°F - 85°F (<strong>10</strong>°C - 29°C).<br />
4. Acclimate tile, adhesive and jobsite to a stable condition between 64°-75° F (18°-24° C) and 50% +/- <strong>10</strong>%<br />
RH for 48 hours before, during and continuously after installation. Acclimate all materials onsite and off<br />
stack tile cartons to a single layer keeping cartons flat. Temporary heating and cooling should be used if<br />
permanent HVAC is not operational.<br />
5. Tiles should not be stored close to exterior walls, in direct sunlight or near HVAC vents.<br />
B. Jobsite Testing<br />
<strong>Amtico</strong> International<br />
14<strong>21</strong> <strong>Amtico</strong> Road<br />
Madison, GA 30650<br />
P: 706-342-44130<br />
F: 706-342-45<strong>21</strong><br />
1. Before jobsite testing, the building envelope must be sealed (walls, roofing, windows, doorways etc., installed).<br />
Revised <strong>04</strong>/<strong>21</strong>/20<strong>10</strong> Page 1
2. Anticipated environmental conditions must be maintained or 75°F +/- <strong>10</strong>°F (24°C +/- 6°C) and 50% +/-<br />
<strong>10</strong>% RH a minimum of 48 hours before and during testing (ASTM F 7<strong>10</strong>).<br />
3. Test sites must be properly prepared and protected for the duration of testing to achieve valid results.<br />
4. Surface Flatness for all Subfloors: The surface shall be flat to 1/8” in <strong>10</strong> ft (3 mm in 3 m). To check<br />
flatness, place a <strong>10</strong> ft straight edge on the surface and measure the gap or use another suitable method.<br />
5. Concrete Subfloors:<br />
a. Concrete subfloors must be finished and cured without additives, curing compounds, hardeners or surface<br />
treatments that may prevent proper bonding of the flooring materials (ACI 302.1 and ASTM F7<strong>10</strong>).<br />
b. Randomly check concrete subfloor for porosity using the drop water test. Place a 1 inch diameter drop of<br />
water directly onto the concrete subfloor. If the water droplet does not dissipated within 60 to 90<br />
seconds the subfloor is considered non-porous.<br />
c. Concrete subfloors must have a minimum compressive strength of 3000 psi.<br />
d. Concrete subfloors shall not consist of lightweight concrete or gypsum with less than <strong>10</strong>0 lbs. /cubic foot density.<br />
e. Moisture Testing: Perform either the preferred In-situ Relative Humidity (RH) Test (ASTM F<strong>21</strong>70) or the<br />
acceptable Moisture Vapor Emission Rate (MVER) Test (ASTM F1869). Internal RH readings above 75%<br />
or MVER readings above 3 lb/<strong>10</strong>00 SF/24 hours require a moisture suppressant system.<br />
f. Alkalinity: Must test surface alkalinity (ASTM F7<strong>10</strong>). A 7.0 to <strong>10</strong>.0 pH is acceptable. Reduce higher pH<br />
by mopping on a vinegar/water solution: 1 pint vinegar to 2 gallons water.<br />
6. Wood Subfloors and underlayment panels shall have the moisture content tested using a suitable wood pin<br />
meter. Readings between the wood subfloor and underlayment panels should be within 3% and have a<br />
maximum moisture content of 14% or less. Effective moisture control in basements and crawlspaces is<br />
essential for achieving a successful long term installation.<br />
C. Moisture Suppressant System<br />
Concrete subfloors that exceed 75% RH or 3 lbs MVER require a Moisture Suppressant System.<br />
Due to complexities associated with moisture vapor transmission, emissions and movement of soluble salts<br />
(alkalinity) in concrete subfloors, we do not offer, recommend or warranty a specific solution for excess moisture<br />
in concrete slabs. However, there are many companies that offer solutions with warranties for excess moisture<br />
in concrete slabs.<br />
<strong>Amtico</strong> International suggests that you reference the current ASTM F7<strong>10</strong>, “Standard Practice for Preparing<br />
Concrete Floors to Receive Resilient Flooring” and contact one or more of the following or other moisture<br />
suppressant system suppliers for assistance:<br />
Ardex (724) 203-5000 www.ardex.com<br />
Koester American Corp. (757) 425-1206 www.koesterusa.com<br />
Mapei (800) 426-2734 www.mapei.com<br />
<strong>Amtico</strong> International<br />
14<strong>21</strong> <strong>Amtico</strong> Road<br />
Madison, GA 30650<br />
P: 706-342-44130<br />
F: 706-342-45<strong>21</strong><br />
Uzin Ltd. (800) 505-48<strong>10</strong> www.ufloorsystems.com<br />
D. Subfloor Preparation<br />
Careful subfloor preparation is vital for an excellent floor appearance and good tile adhesion. The subfloor must<br />
be smooth, firm, flat, clean, dry, free from defects and fit for purpose. A suitable smoothing compound should<br />
be used to ensure that no irregularities show through to the surface of the finished floor. In all cases, the<br />
subfloor must meet the moisture and pH requirements before installation.<br />
Revised <strong>04</strong>/<strong>21</strong>/20<strong>10</strong> Page 2
<strong>Amtico</strong> International<br />
14<strong>21</strong> <strong>Amtico</strong> Road<br />
Madison, GA 30650<br />
P: 706-342-44130<br />
F: 706-342-45<strong>21</strong><br />
Below and On-grade concrete subfloors must have a suitable vapor retarder properly installed beneath the slab.<br />
Crawlspaces and basements directly beneath the new floor installation should be maintained with a relative<br />
humidity +/- <strong>10</strong>% of the room relative humidity where the flooring is installed. This can be accomplished by<br />
proper ventilation and air circulation or using a dehumidifier. Always follow other manufacturers’ written<br />
recommendations for the use and installation of their proprietary surface preparation materials.<br />
1. Record site conditions, test results and corrective action(s). <strong>Amtico</strong> International requires<br />
written documentation of site conditions, test results and corrective action(s) before<br />
processing claims.<br />
2. Subfloor must be clean (free of dirt, sealers, curing, hardening or parting compounds or any substance that<br />
may stain or prevent adhesion), smooth, flat, sound, fit for purpose, free of movement, excessive moisture<br />
and high alkalinity.<br />
3. Slick surfaces such as power troweled concrete shall be profiled to allow for a mechanical bond between<br />
the adhesive and subfloor.<br />
4. Remove existing resilient floor covering, <strong>10</strong>0% traces of old adhesives, paint or other contaminants by<br />
scraping, sanding, grinding, shot blasting or scarifying the substrate. The use of adhesive removers or<br />
solvents in the abatement or removal of existing or old adhesives is prohibited and will void<br />
the warranty.<br />
WARNING: ASBESTOS & SILICA - Refer to the current Resilient Floor Covering Institute (RFCI) document<br />
“Recommended Work Practices for Removal of Existing Resilient Floor Coverings” for guidance.<br />
5. Perform corrective actions necessary for elevated moisture or high alkalinity conditions.<br />
6. Surface Flatness for all Subfloors: The surface shall be flat to 1/8” in <strong>10</strong> ft (3 mm in 3 m). Bring high<br />
spots level by sanding, grinding etc. and fill low spots. Smooth surface to prevent any irregularities or<br />
roughness from telegraphing through the new flooring.<br />
7. Leveling and Patching:<br />
a. For concrete subfloors, use only high quality Portland cement based materials (minimum 3000 psi<br />
compressive strength according to ASTM C<strong>10</strong>9). Mix with water only, do not use latex. Caution: Do<br />
not lightly skim coat highly polished or slick power troweled concrete surfaces. A thin film of floor patch<br />
will not bond to a slick subfloor and may become a bond breaker causing tiles to release at the interface<br />
of the subfloor and patching material.<br />
b. Wood subfloors require an underlayment (double layer construction) with a minimum total thickness of<br />
1” (25 mm). Use minimum ¼” (6 mm) thick APA rated “underlayment grade” plywood with a fully<br />
sanded face or other underlayment panel that is appropriate for the intended usage. Install and prepare<br />
panels and seams according to the manufacturers’ instructions.<br />
E. <strong>Installation</strong> Procedures<br />
Before starting the <strong>Stratica</strong> installation, ensure the following are satisfactorily completed. Start of flooring<br />
installation indicates acceptance of current subfloor conditions and full responsibility for completed work.<br />
• Acclimation: Acclimate tiles (keep cartons flat), adhesive, jobsite and subfloor to a stable condition between<br />
64°-75° F (18°-24° C) and 50% +/- <strong>10</strong>% RH for a minimum of 48 hours before and after installation.<br />
• Flooring Materials: Check quantity of <strong>Stratica</strong> tile and adhesive are sufficient for area to be installed.<br />
Check tile for visual defects before installation. <strong>Installation</strong> of flooring acknowledges acceptance of<br />
materials.<br />
Revised <strong>04</strong>/<strong>21</strong>/20<strong>10</strong> Page 3
<strong>Amtico</strong> International<br />
14<strong>21</strong> <strong>Amtico</strong> Road<br />
Madison, GA 30650<br />
P: 706-342-44130<br />
F: 706-342-45<strong>21</strong><br />
• Expansion joints, isolation joints, or other moving joints are incorporated into concrete floor slabs in order<br />
to permit movement without causing random cracks in the concrete. These joints must be honored and<br />
not be filled with underlayment products or other materials, and floor coverings must not be laid over<br />
them. Expansion joint covering systems should be detailed by the architect or engineer based upon<br />
intended usage and aesthetic considerations.<br />
• Surface cracks, grooves, depressions, control joints or other non-moving joints, and other irregularities<br />
shall be filled or smoothed with high quality Portland cement based patching or underlayment compound<br />
for filling or smoothing, or both. Patching or underlayment compound shall be moisture, mildew, and<br />
alkali-resistant, and shall provide a minimum of 3000 psi compressive strength after 28 days, when tested<br />
in accordance with Test Method C <strong>10</strong>9 or Test Method C 472, whichever is appropriate.<br />
• Subfloor Preparation: Make sure all surfaces to be covered are completely clean, dry and smooth and that<br />
all necessary subfloor preparation has been properly completed and documented.<br />
• Inspect Substrate: Perform final acceptance inspection of substrate.<br />
• Adjacent Surfaces Protection: Protect adjacent work areas and finish surfaces from damage during product installation.<br />
• Flooring Protection: <strong>Stratica</strong> should be the last material installed to prevent other trades from disrupting<br />
the installation and adhesive set-up or damaging the floor.<br />
<strong>Stratica</strong> comes in plank, rectangle and square tile formats. Install tiles running in the same direction (block or<br />
staggered), quarter turned or as specified. <strong>Stratica</strong> plank flooring should have end joints offset by at least 6”<br />
and staggered to create a random appearance that avoids alignment of end joints. <strong>Stratica</strong> can be laid out to<br />
run either parallel or diagonal to the room or primary wall. The following conditions must be given consideration<br />
when determining how <strong>Stratica</strong> will be installed:<br />
1. Layout: Layout shall be specified by end user, architect or designer.<br />
a. Establish center marks and determine start point to balance installation in room and have equal tile<br />
widths on opposite sides of room. This can be facilitated by dry laying tiles and marking base<br />
lines.<br />
b. Wet-Set Application: The room layout must be set-up so that all flooring can be installed while<br />
staying off freshly installed tiles. This will minimize tile shifting, adhesive displacement and wet<br />
adhesive from oozing up and getting onto the face of the tiles. This can be accomplished by<br />
creating work zones outlined with chalk lines to spread adhesive aligned with established base<br />
lines. Create work zones that are no wider than the installers comfortable arm reach and in<br />
multiples of the tile width.<br />
c. All <strong>Installation</strong>s: Spread only the amount of adhesive that can be covered within the working time<br />
specific to the adhesive being used. Skinned over or dried Universal Two Part and <strong>Amtico</strong> 373<br />
Adhesive must be scraped off the subfloor and replaced with new adhesive before continuing the<br />
installation.<br />
When all preparatory work is satisfactorily completed, including dry fitting cut tiles (if applicable), proceed with<br />
installation. Inspect each tile for visual defects before installing. <strong>Installation</strong> of flooring implies acceptance of materials.<br />
2. Adhesives: <strong>Stratica</strong> must be installed with <strong>Amtico</strong> 373 Adhesive or <strong>Amtico</strong> Universal 2-part adhesive<br />
depending upon areas of usage. Only the recommended adhesives should be used. Other adhesives will<br />
not give adequate performance, may fail and are not warranted by <strong>Amtico</strong> International.<br />
a. <strong>Amtico</strong> 373 Adhesive: <strong>Amtico</strong> 373 is solvent-free, nonflammable, freeze/thaw stable and nearly odorfree<br />
acrylic latex Adhesive. It is suitable for both residential and commercial climate controlled<br />
Revised <strong>04</strong>/<strong>21</strong>/20<strong>10</strong> Page 4
<strong>Amtico</strong> International<br />
14<strong>21</strong> <strong>Amtico</strong> Road<br />
Madison, GA 30650<br />
P: 706-342-44130<br />
F: 706-342-45<strong>21</strong><br />
environments, including busy homes and apartments, retail stores, hotels, office buildings, hospitals,<br />
schools, restaurants and nursing homes, etc. <strong>Amtico</strong> 373 contains micro-biocides to inhibit the growth<br />
of mold and mildew. <strong>Amtico</strong> 373 can be used to install resilient tile over porous (using a<br />
1/16”x1/16”x1/16” square-notch trowel) and non-porous (using a 1/32”x1/32”x1/16” fine-notch trowel)<br />
subfloors. It should be used as a semi wet-set adhesive. DO NOT USE AMTICO 373 AS A PRESSURE<br />
SENSITIVE ADHESIVE. Over Porous Surfaces: After spreading the <strong>Amtico</strong> 373 adhesive allow 5 to <strong>10</strong><br />
minutes open time before installing the floor covering. Over Non-Porous Surfaces: After spreading the<br />
<strong>Amtico</strong> 373 adhesive allow <strong>10</strong> to 30 minutes open time before installing the floor covering. The working<br />
time will vary depending on the temperature, humidity, and porosity of the subfloor. <strong>Amtico</strong> 373 spreads<br />
easily, exhibits quick grab and has excellent resistance to moisture and plasticizer migration. Do Not use<br />
<strong>Amtico</strong> 373 adhesive in wet areas like locker rooms, in areas exposed to direct sunlight, areas with<br />
temperature fluctuations or in locations with heavy point loads.<br />
b. Universal 2-Part Adhesive: Universal 2-Part Adhesive is solvent-free and nearly odor free 2-component<br />
polyurethane adhesive for professional use only. Although primarily used for commercial applications, it<br />
is equally suitable for moisture and temperature sensitive residential environments. Universal 2-Part<br />
works well over both porous and non-porous substrates (using a 1/16” x 1/16” x 1/16” V-notch trowel).<br />
It is recommended for all areas subject to some heat and moisture variations like what may be found<br />
adjacent to sunny windows and bathrooms. Universal 2-Part must be used for installing <strong>Amtico</strong> and<br />
Spacia flooring in wet areas such as locker rooms and should also be used for areas with high point<br />
loads and direct sun exposure.<br />
3. Universal 2-Part Adhesive Preparation:<br />
a. The adhesive container consists of two separate units packaged inside each other. The upper portion contains<br />
the hardener and the lower portion contains the resin. Pierce upper container 2 or 3 times with a pointed tool<br />
or screwdriver. Push tip straight through center plastic seal and bottom of the upper container. Do not twist<br />
or pry sideways as this may prevent all of the hardener from flowing into resin container.<br />
b. Break seal between upper and lower container to allow hardener to flow into resin container.<br />
c. Remove plastic seal and visually inspect upper container to ensure that all hardener has flowed into<br />
lower resin container.<br />
d. Do not dilute or mix part of each can together. Mix entire contents of hardener (upper container) with<br />
entire contents of resin (lower container).<br />
e. Remove upper container when it is empty (2-3 min).<br />
f. Promptly mix both parts of adhesive together thoroughly (3-5 min) to a uniform color. Use low speed<br />
electric drill and clean mixing paddle. DO NOT MIX BY HAND. Immediately spread adhesive after mixing.<br />
CAUTION: Temperature directly affects adhesive working and setting times. Warmer temperatures shorten<br />
working times and colder temperatures lengthen working times of adhesive. Follow instructions on container for<br />
proper application.<br />
4. Adhesive Application: Follow the instructions on the adhesive labels.<br />
a. Use a trowel with appropriate notch size. Do not use worn trowels (approximately 600 s.f. usage on concrete).<br />
b. Spread adhesive evenly with proper trowel held at 60 degree angle avoiding skips or voids and excessive<br />
adhesive application.<br />
c. Only spread sufficient adhesive that can be covered within the adhesive working time.<br />
Revised <strong>04</strong>/<strong>21</strong>/20<strong>10</strong> Page 5
<strong>Amtico</strong> International<br />
14<strong>21</strong> <strong>Amtico</strong> Road<br />
Madison, GA 30650<br />
P: 706-342-44130<br />
F: 706-342-45<strong>21</strong><br />
d. Tiles must be placed into adhesive wet as specified (follow label directions). DO NOT BEND OR<br />
FORCE TILES INTO PLACE. Promptly remove all skinned over or dried Universal Two Part and <strong>Amtico</strong><br />
373 adhesive from the subfloor and replace with new adhesive before continuing the installation.<br />
e. Install rows to chalk line making sure tiles are precisely aligned with chalk line and adjacent tiles.<br />
f. Randomly check tiles for <strong>10</strong>0% transfer onto tile backing especially near the end of each adhesive<br />
spread. If there is little or no adhesive transfer, or the adhesive has flashed off adequate bonding will<br />
not be possible. Scrape the flashed off adhesive from the floor and spread fresh adhesive.<br />
g. If tiles shift, use releasable masking tape diagonally over seams to keep tiles tight and aligned.<br />
h. Do not work on top of freshly installed tiles. This will minimize tile shifting, adhesive displacement<br />
and wet adhesive from oozing up and getting onto the face of the tiles. If you must work on top of<br />
newly installed tiles, use kneeling and or walk boards.<br />
i. The floor must be rolled in both directions using a <strong>10</strong>0 lb 3-section roller. Roll floor as soon as<br />
conditions permit without tiles sliding or adhesive bleeding to the surface. Roll floor again 90 degrees to<br />
the first within 1 hour. Universal Two Part adhesive and <strong>Amtico</strong> 373 should provide <strong>10</strong>0% uniform<br />
adhesive transfer (no visible trowel ridges) onto the back of the tile (and not cause adhesive to squeeze<br />
out between tiles).<br />
j. Clean excess adhesive as you install before it is allowed to dry. Use a soapy clean soft cloth to remove<br />
wet excess 373 Adhesive and use a clean soft cloth moistened with Denatured Alcohol to remove wet<br />
excess Universal 2-Part Adhesive. Do not allow Universal Two Part adhesive to dry on the tile surface as<br />
it will become permanent. DO NOT USE MINERAL SPIRITS OR SOLVENTS ON STRATICA.<br />
k. Clean up all debris as you work.<br />
l. Wait 24 hours for normal foot traffic and wait 48 hours for point and rolling loads after installation.<br />
m. Wait 5 days after installation before washing finished floor.<br />
5. Special Considerations:<br />
a. Radiant Heat: Radiant heating systems must be switched off for a minimum of 48 hours before, during<br />
and 48 hours after the <strong>Stratica</strong> flooring installation. Use supplemental heat, if necessary to maintain a<br />
stable room temperature. When the radiant heat system is re-started, the temperature should be raised<br />
no more than 1° - 2° F (1° C) per day until reaching the desired temperature. The flooring surface<br />
should not go below 55° F (13° C) and not exceed 81° F (27° C) during its’ service life. Do not use<br />
<strong>Amtico</strong> 373 over floors with radiant Heating.<br />
b. Existing Resilient Flooring: Existing resilient flooring and adhesive should be mechanically removed. Do<br />
not use adhesive removers or solvents.<br />
c. Asbestos Abatement removal: <strong>Amtico</strong> International recommends following the Resilient Floor Covering<br />
Institute <strong>Guidelines</strong> for removal of existing tile and mastic. Do not use adhesive removers or<br />
solvents. Any mastic remover residue including Soy or Citrus products can attack and break down the<br />
new adhesive resulting in tiles releasing. Floor covering warranties do not cover instances where<br />
adhesive removers or solvents cause damage to the flooring or installation failure.<br />
d. Concrete Curing, Sealing, Hardening or Parting Compounds: <strong>Amtico</strong> International recommends wet<br />
curing concrete for 7 days if at all possible to avoid the use of Curing, Sealing, Hardening or Parting<br />
Compounds. If a chemical compound must be used, prior to use, obtain a written performance<br />
guarantee from the concrete compound manufacturer stating that the application of their product will<br />
not interfere with the adhesion of acrylic or polyurethane adhesives to the concrete slab or obtain their<br />
guaranteed removal process.<br />
e. Expansion Joints: Expansion joints are incorporated into concrete floor slabs in order to permit<br />
movement without causing cracks in the concrete. These joints must not be filled with underlayment<br />
Revised <strong>04</strong>/<strong>21</strong>/20<strong>10</strong> Page 6
products or other materials, and floor coverings must not be laid over them. Expansion joint covers<br />
should be detailed by the architect or engineer based upon intended usage and aesthetic considerations.<br />
f. Protecting New <strong>Installation</strong>s: New <strong>Installation</strong>s must be protected while the adhesive sets. For traffic<br />
areas that can’t be out of commission, use ½” thick plywood or a double layer of Masonite to disperse<br />
the load and protect the installation. Early foot traffic, point or rolling loads can cause adhesive<br />
displacement or breaking of the bond between the adhesive and the tile or substrate.<br />
F. <strong>Stratica</strong> Initial Maintenance<br />
To get your new <strong>Stratica</strong> ® Eco-Polymeric floor looking its best, and to keep it that way, <strong>Amtico</strong> International<br />
recommends the following initial maintenance procedures. Be sure to keep all traffic off of the newly installed<br />
floor for 1 day and avoid point loads for at least 2 days. Wait at least 5 days to wet clean the floor to allow<br />
adhesive to fully cure. Note: <strong>Stratica</strong> does not require the application of floor dressings.<br />
• Use non-staining matting system at exterior doors that is appropriate for soil load and weather conditions.<br />
• Use appropriate floor protectors, glides and wheels and do not drag or slide objects across the surface of the floor.<br />
• Do not use abrasive cleaners that can scratch the floor surface or detergent cleaners that leave a residue.<br />
SAFETY FIRST: Before commencing work, put out signs or safety cones to warn that cleaning is in progress.<br />
Day 1<br />
• Stay off the new floor.<br />
Day 2 to 4<br />
• Dust mop, sweep or vacuum the floor to remove loose dirt and grit.<br />
• Lightly damp mop (well wrung out mop) floor with properly diluted Neutral cleaner solution.<br />
Day 5 and After<br />
• Begin Routine Maintenance. Several daily cleanings may be necessary to achieve optimal results. If optimal<br />
results are still not achieved, perform Periodic Scheduled Maintenance (deep cleaning).<br />
Routine Maintenance<br />
Effective maintenance includes promptly removing all spills and then thoroughly cleaning with a diluted neutral<br />
cleaner or cleaner/maintainer solution. Failure to establish an effective routine maintenance program will not<br />
only detract from the appearance of the floor but may shorten its useful life.<br />
• Clean up all spills immediately.<br />
• Daily sweep or dust mop the floor.<br />
• Perform damp mopping or machine cleaning as needed.<br />
• Use a 3M ® Red pad or equivalent for normal cleaning or a 3M ® Blue pad or equivalent for heavy cleaning.<br />
• Mop floor with clean water or finish the cleaning in accordance with the manufacturers’ instructions.<br />
Maintenance Precautions and Safety Information<br />
<strong>Amtico</strong> International<br />
14<strong>21</strong> <strong>Amtico</strong> Road<br />
Madison, GA 30650<br />
P: 706-342-44130<br />
F: 706-342-45<strong>21</strong><br />
A slippery floor can cause accidents. This can be caused by poor maintenance, surface contamination, spills or<br />
when the floor is wet. All hard floors can be slippery when wet. Ensure the floor is clean and dry before<br />
resuming use. Use warning signs in commercial areas.<br />
Revised <strong>04</strong>/<strong>21</strong>/20<strong>10</strong> Page 7