MiniScan EZ - HunterLab
MiniScan EZ - HunterLab
MiniScan EZ - HunterLab

Create successful ePaper yourself
Turn your PDF publications into a flip-book with our unique Google optimized e-Paper software.
<strong>MiniScan</strong> ® <strong>EZ</strong><br />
Notice: Use of this equipment in a manner not specified by the manufacturer may<br />
impair the protection afforded by the equipment.<br />
Notice: Take care not to drop the <strong>MiniScan</strong> <strong>EZ</strong>. If it is dropped, have it evaluated for<br />
damage before operation.<br />
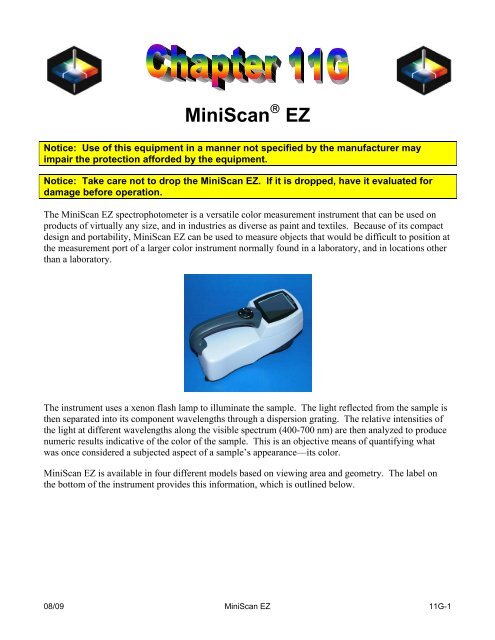
The <strong>MiniScan</strong> <strong>EZ</strong> spectrophotometer is a versatile color measurement instrument that can be used on<br />
products of virtually any size, and in industries as diverse as paint and textiles. Because of its compact<br />
design and portability, <strong>MiniScan</strong> <strong>EZ</strong> can be used to measure objects that would be difficult to position at<br />
the measurement port of a larger color instrument normally found in a laboratory, and in locations other<br />
than a laboratory.<br />
The instrument uses a xenon flash lamp to illuminate the sample. The light reflected from the sample is<br />
then separated into its component wavelengths through a dispersion grating. The relative intensities of<br />
the light at different wavelengths along the visible spectrum (400-700 nm) are then analyzed to produce<br />
numeric results indicative of the color of the sample. This is an objective means of quantifying what<br />
was once considered a subjected aspect of a sample’s appearance—its color.<br />
<strong>MiniScan</strong> <strong>EZ</strong> is available in four different models based on viewing area and geometry. The label on<br />
the bottom of the instrument provides this information, which is outlined below.<br />
08/09 <strong>MiniScan</strong> <strong>EZ</strong> 11G-1
MS<strong>EZ</strong> 45/0 L<br />
Model Geometry Viewing Area<br />
MS<strong>EZ</strong>-4500L 45°/0° Large<br />
MS<strong>EZ</strong>-4500S 45°/0° Small<br />
MS<strong>EZ</strong>-4000L Diffuse/8° (Sphere) Large<br />
MS<strong>EZ</strong>-4000S Diffuse/8° (Sphere) Small<br />
The <strong>MiniScan</strong> <strong>EZ</strong> may be operated using the keypad and display on the instrument itself, and it may also<br />
be operated while connected to a computer running EasyMatch QC. Therefore, having purchased both a<br />
<strong>MiniScan</strong> <strong>EZ</strong> and EasyMatch QC, you have two sources of information on the instrument in addition to<br />
this User’s Manual: the <strong>MiniScan</strong> <strong>EZ</strong> User’s Guide, which describes stand-alone operation, and the<br />
EasyMatch QC help file, which describes operation of the <strong>MiniScan</strong> <strong>EZ</strong> using the software. Refer to<br />
those information sources as required.<br />
11G-2 <strong>MiniScan</strong> <strong>EZ</strong> 08/09
<strong>MiniScan</strong> <strong>EZ</strong> Accessories<br />
The following accessories are included with the <strong>MiniScan</strong> <strong>EZ</strong> system and can be found in the provided<br />
carrying case:<br />
• Sample port cover - screws on over the sample port to protect the instrument’s optics when it is not<br />
in use.<br />
• Calibration cylinder - houses the NIST traceable white calibrated tile that is placed at the sample<br />
port during standardization to set the top of the scale, the black glass or light trap that is placed at the<br />
sample port during standardization to set the zero, and the green check tile that is used to assess<br />
long-term instrument performance during the green tile test.<br />
• Rechargeable batteries - a set of 6 rechargeable AA batteries and a charger (with 110V plug and<br />
220V adapter) are provided for continuing use of the <strong>MiniScan</strong> <strong>EZ</strong>.<br />
• USB cable for connecting the <strong>MiniScan</strong> <strong>EZ</strong> to the computer.<br />
• Certificate of traceability for the standard white tile.<br />
• Tile data sheet - provides NIST-traceable calibrated values for the standard white tile and values<br />
read at factory for the green tile.<br />
• <strong>MiniScan</strong> <strong>EZ</strong> User’s Guide.<br />
• Utility program and Diagnostics CD.<br />
08/09 <strong>MiniScan</strong> <strong>EZ</strong> 11G-3
<strong>MiniScan</strong> <strong>EZ</strong> Options and Sample Devices<br />
There are many options and devices available for positioning samples at the measurement port of the<br />
<strong>MiniScan</strong> <strong>EZ</strong> and for making the instrument easier to use. Any or all of the following options and<br />
sample devices may be purchased for use with your <strong>MiniScan</strong> <strong>EZ</strong>. <strong>HunterLab</strong> part numbers are<br />
included for your convenience in ordering.<br />
• External Printer (HL#A13-1014-259),<br />
• Keyboard (HL#A13-1014-294),<br />
• Bar Code Scanner (HL#A13-1014-254),<br />
• Standard-A to Mini-A USB Adapter (HL#A21-1013-859),<br />
• 45/0 LAV Fiber Package Adapter (HL#C02-1002-030),<br />
• Skein Holder (HL#02-7396-00),<br />
• 45/0 LAV Nose Cone with Lower Glass Assembly (HL#A02-1002-129) or Nose Cone with Lower<br />
Polycarbonate Assembly (HL#B02-1009-550),<br />
• 420-nm UV Filter Assembly (HL#A02-1009-954).<br />
External Printer<br />
Keyboard<br />
The external thermal printer connects to the <strong>MiniScan</strong> <strong>EZ</strong>’s USB port via<br />
Standard-A to Mini-A adapter (HL#A21-1013-859) and prints measurement<br />
data or product setup parameters on request. The communications cable<br />
supplied with the printer must be used to connect the printer to the <strong>MiniScan</strong><br />
<strong>EZ</strong>. More information on the external printer is provided in its separate User’s<br />
Manual.<br />
The printer is automatically detected by the <strong>MiniScan</strong> <strong>EZ</strong> once connected.<br />
The optional flexible keyboard connects to the <strong>MiniScan</strong> <strong>EZ</strong>’s<br />
USB port via Standard-A to Mini-A adapter (A21-1013-859)<br />
to allow easy entry of any alphanumeric information (such as<br />
setup names) required.<br />
11G-4 <strong>MiniScan</strong> <strong>EZ</strong> 08/09
The up, down, left, and right arrow keys on the keyboard correspond to the same buttons on the<br />
<strong>MiniScan</strong> <strong>EZ</strong> button pad. The Enter key on the keyboard emulates the center (Go) button on the<br />
<strong>MiniScan</strong> <strong>EZ</strong>’s button pad. Numbers and letters may be typed on the keyboard as usual.<br />
The keyboard is automatically detected by the <strong>MiniScan</strong> <strong>EZ</strong> once connected.<br />
Bar Code Scanner<br />
The optional bar code scanner connects to the <strong>MiniScan</strong> <strong>EZ</strong>’s USB port via<br />
Standard-A to Mini-A adapter (HL#A21-1013-859) to allow scanning of a bar code<br />
for the ID tag of a reading after the reading is made.<br />
The bar code reader is automatically detected by the <strong>MiniScan</strong> <strong>EZ</strong> once connected.<br />
Standard-A to Mini-A USB Adapter<br />
The optional Standard-A to Mini-A USB adapter allows USB devices—such as<br />
printers, keyboards, and the bar code scanner—that normally connect to Standard-A<br />
USB ports like those on computers, to connect to the <strong>MiniScan</strong> <strong>EZ</strong>’s Mini-A USB<br />
port. It also allows the standard <strong>MiniScan</strong> <strong>EZ</strong> USB cable to be used to connect two<br />
<strong>MiniScan</strong> <strong>EZ</strong> instruments together.<br />
45/0 LAV Fiber Package Adapter<br />
This option provides a special nose cone assembly and<br />
three removable adapters for measuring 6-inch (152mm),<br />
10-inch (254mm),<br />
and 12-inch<br />
(305-mm) cylindrical<br />
fiber or yarn package diameters. To use the assembly, snap the<br />
appropriate port adapter onto the nose cone of the <strong>MiniScan</strong> <strong>EZ</strong>.<br />
Position the port adapter over the cylindrical fiber or yarn package and<br />
proceed with measurements. Take care to position the <strong>MiniScan</strong> <strong>EZ</strong> so<br />
that it will not move during readings. Averaging is recommended when<br />
measuring fibers or yarns with large diameters.<br />
08/09 <strong>MiniScan</strong> <strong>EZ</strong> 11G-5
Skein Holder<br />
The skein holder is available only for 45°/0° <strong>MiniScan</strong> <strong>EZ</strong> models.<br />
This is a device for measuring yarn skeins. Wind the yarn around the skein holder in multiple taut layers<br />
until it is effectively opaque and is as flat as possible. Secure it in place with the detachable arms on the<br />
sides of the skein holder. Place the skein holder on a flat surface or the calibration tile holder and press<br />
the <strong>MiniScan</strong> <strong>EZ</strong>’s sample port flat against the sample. Make several measurements of the skein,<br />
rotating the holder 90° between measurements and averaging the readings for the final result.<br />
45/0 LAV Nose Cone with Lower Glass Assembly or Nose Cone with Lower<br />
Polycarbonate Assembly<br />
This option includes a special nose cone with a removable glass or plastic port cover assembly. The<br />
nose cone (black) portion is intended for permanent use on the instrument and should not be removed.<br />
Replacement cover assemblies (the lower portion of the device) are available from <strong>HunterLab</strong>. The<br />
assembly is sealed, but is not to be considered waterproof.<br />
11G-6 <strong>MiniScan</strong> <strong>EZ</strong> 08/09
Glass nose cone Replacement glass cover<br />
The nose cone/port cover is generally in place when the <strong>MiniScan</strong> <strong>EZ</strong> is shipped from the factory.<br />
However, if installation is required, place the assembly over the instrument port and secure it using three<br />
Phillips-head screws. If the glass or plastic cover is to be replaced, remove the three machine screws<br />
with lock washers, replace the window and the O-ring, and secure it using the machine screws.<br />
420-nm UV Filter Assembly<br />
This option provides a 420-nm UV filter in a replaceable assembly for 45/0 LAV <strong>MiniScan</strong> <strong>EZ</strong>s. The<br />
UV filter may be replaced or removed when necessary; however, the instrument is not to be used<br />
without the special nose cone in place.<br />
Note: The special nose cone required for use of this part is not included, but may be purchased<br />
separately.<br />
To install the UV filter assembly, secure it to the instrument nose cone using three 4-40 pan-head screws<br />
with split-lock washers.<br />
Replacement UV filter assemblies are available from <strong>HunterLab</strong> and are marked “UV” to differentiate<br />
them from cover glass assemblies. To replace the UV filter assembly, remove the screws and lift the<br />
assembly off the nose cone. Place the new UV filter assembly on the nose cone and replace the screws.<br />
08/09 <strong>MiniScan</strong> <strong>EZ</strong> 11G-7
<strong>MiniScan</strong> <strong>EZ</strong> Installation<br />
The <strong>MiniScan</strong> <strong>EZ</strong> is simple to set up and attach to your computer. Before operating the <strong>MiniScan</strong> <strong>EZ</strong><br />
with EasyMatch QC, you need only install the batteries and connect the instrument to your computer.<br />
These steps are outlined below.<br />
1. Unpack the carrying case and remove wrappings and cable ties. Inspect for damage and notify the<br />
carrier and <strong>HunterLab</strong> immediately if any is discovered. Save the packing materials in case it<br />
becomes necessary to return the instrument to the factory.<br />
2. Open the battery compartment on the bottom of the <strong>MiniScan</strong> <strong>EZ</strong>.<br />
3. Install the 6 AA batteries, observing the positive (+) and negative (-) polarity guides inside the<br />
battery compartment.<br />
Notice: The <strong>MiniScan</strong> <strong>EZ</strong> can use six standard AA alkaline batteries or six rechargeable<br />
AA NiMH batteries. Do not mix battery types in the instrument. To recharge the NiMH<br />
batteries, remove them from the instrument and recharge them using the supplied<br />
charger.<br />
4. Close the battery compartment.<br />
5. Plug the hexagonal (Mini-A) end of the USB cable into the USB port on the <strong>MiniScan</strong> <strong>EZ</strong>.<br />
11G-8 <strong>MiniScan</strong> <strong>EZ</strong> 08/09
6. Plug the flat end of the USB cable into the appropriate USB port on the computer. Windows’ plug<br />
and play feature automatically finds and installs the device. Let it do so until the “Found new<br />
hardware” message disappears.<br />
08/09 <strong>MiniScan</strong> <strong>EZ</strong> 11G-9
<strong>MiniScan</strong> <strong>EZ</strong> Standardization<br />
The <strong>MiniScan</strong> <strong>EZ</strong> must be standardized on a regular basis to keep it operating properly.<br />
Standardization on a <strong>MiniScan</strong> <strong>EZ</strong> model with 45°/0° geometry requires reading of the black glass and<br />
white tile that are contained in the calibration cylinder. Standardization on a diffuse/8° <strong>MiniScan</strong> <strong>EZ</strong><br />
requires you to read both the light trap and the white tile in the calibration cylinder.<br />
Standardization can be done through EasyMatch QC (by selecting Standardize from the Sensor menu<br />
or by clicking the Standardize button on the default toolbar) or directly through the <strong>MiniScan</strong> <strong>EZ</strong><br />
firmware.<br />
It is recommended that the instrument be standardized at least once every four hours. Then you may<br />
proceed with sample measurement.<br />
11G-10 <strong>MiniScan</strong> <strong>EZ</strong> 08/09
<strong>MiniScan</strong> <strong>EZ</strong> Maintenance and Testing<br />
The <strong>MiniScan</strong> <strong>EZ</strong> does require some maintenance. This chapter outlines the parts of the <strong>MiniScan</strong> <strong>EZ</strong><br />
you must maintain in order for the instrument to function properly and tests that you may run to assess<br />
its performance.<br />
Notice: The <strong>MiniScan</strong> <strong>EZ</strong> contains hazardous voltages and no user-replaceable parts. It<br />
should be disassembled only by <strong>HunterLab</strong> personnel.<br />
Running the Repeatability Test<br />
You may test the repeatability of your instrument as follows:<br />
1. Turn the <strong>MiniScan</strong> <strong>EZ</strong> on and allow it to warm it up for 2 hours. Meanwhile, clean the white tile as<br />
described on the next page and allow the tile to return to room temperature.<br />
2. Follow the instructions given in the Sensor Menu chapter, Diagnostics section to run the<br />
repeatability test that is built into EasyMatch QC.<br />
Recharging/Replacing the Batteries<br />
When the battery level indicator on the <strong>MiniScan</strong> <strong>EZ</strong> screen has decreased to outline only, you should<br />
replace the batteries with fresh or recharged ones.<br />
Notice: The <strong>MiniScan</strong> <strong>EZ</strong> can use six standard AA alkaline batteries or six rechargeable<br />
AA NiMH batteries. Do not mix battery types in the instrument. To recharge the NiMH<br />
batteries, remove them from the instrument and recharge them using the supplied<br />
charger.<br />
Replacing the Lamp<br />
Lamp replacement requires a trained technician. Contact <strong>HunterLab</strong> Technical Support to arrange for<br />
lamp replacement. Please read “When You Need Assistance” prior to contacting <strong>HunterLab</strong>.<br />
Cleaning the <strong>MiniScan</strong> <strong>EZ</strong><br />
Clean the outside surfaces of the <strong>MiniScan</strong> <strong>EZ</strong> using a soft cloth. Do not spray liquids directly on the<br />
instrument.<br />
Maintaining the Instrument Standards<br />
Before you standardize the <strong>MiniScan</strong> <strong>EZ</strong> each time, inspect the white tile and black glass (if included)<br />
for dust and fingerprints. If you have a light trap, inspect it for dust and scratches. Do the same for the<br />
green tile prior to running the green tile test. Keep the calibration cylinder in the carrying case when it<br />
is not being used. If a tile is lost or damaged, contact <strong>HunterLab</strong> as described in “When You Need<br />
Assistance” concerning replacement.<br />
08/09 <strong>MiniScan</strong> <strong>EZ</strong> 11G-11
Clean the tiles and black glass using a soft nylon bristle brush and a solution of warm water and a<br />
laboratory grade detergent such as SPARKLEEN. Rinse the tiles in a stream of warm tap water. Blot<br />
them dry using a clean, non-optically brightened, lint-free paper towel.<br />
Note: SPARKLEEN is manufactured by Fisher Scientific Co., Pittsburgh, PA 15219 and may be<br />
ordered from them using catalog number 4-320-4. One tablespoon of SPARKLEEN should be added<br />
to every gallon of water.<br />
11G-12 <strong>MiniScan</strong> <strong>EZ</strong> 08/09
<strong>MiniScan</strong> <strong>EZ</strong> Specifications<br />
The specifications and characteristics of your instrument are given in this section.<br />
Note: Every attempt at accuracy is made, but specifications are subject to change without notice.<br />
For best performance, your instrument should be placed where there is ample work space with medium<br />
or subdued illumination and no drafts. The operating conditions (temperature and humidity ranges) are<br />
given in the Operating Conditions section below.<br />
Operating Conditions<br />
<strong>MiniScan</strong> <strong>EZ</strong> can be stored in an area with a temperature range of -5°F to 150°F (-20°C to 65°C) for up<br />
to 3 weeks and can be operated under temperature conditions of 50°F to 104°F (10°C to 40°C). For<br />
specification-level performance, the recommended temperature range is 70-82°F (21-28°C). It may be<br />
operated under relative noncondensing humidity conditions of 10% to 90%. Do not leave <strong>MiniScan</strong> <strong>EZ</strong><br />
in an area where temperature or humidity extremes are possible.<br />
Physical Characteristics<br />
Weight 2.25 lb (1 kg)<br />
Dimensions 5.5” high x 4.3” wide x 10.5” long (14 cm x 11<br />
cm x 26.7 cm)<br />
Communications Interface USB to computer or printer<br />
RFI Compliance FCC Class A (Commercial), IEC, or equivalent<br />
Safety Compliance UL, CSA, IEC, or equivalent<br />
Conditions of Illumination and Viewing<br />
Light Source Pulsed xenon<br />
Source UV content Match to D65 with CIE rating of CC or better<br />
Lamp Life >1 million flashes<br />
45°/0° Illumination Circumferential, using a cylindrical mirror<br />
Integrating Sphere (diffuse/8°<br />
instruments only)<br />
2.5 inch (63.5 mm) diameter, coated with SpectraFlect<br />
Detection 2-channel polychromator with 256-element scanned array<br />
(half for sample channel, half for monitor)<br />
Port Diameters/View Diameters 45°/0° LAV model: 1.25" (31.8 mm)/1.0" (25 mm)<br />
45°/0° SAV model: 0.25" (6 mm)/0.20" (5 mm)<br />
Diffuse/8° LAV model: 1.0" (25 mm)/0.8" (20 mm)<br />
Diffuse/8° SAV model: 0.6" (14.3 mm)/0.3" (8 mm)<br />
08/09 <strong>MiniScan</strong> <strong>EZ</strong> 11G-13
System Power<br />
Instrument Performance<br />
Power Input Disposable or rechargeable AA batteries<br />
Battery Life >4,000 readings per charge<br />
Spectral Data Range: 400-700 nm<br />
Reporting Interval: 10 nm<br />
Bandwidth at Half-height 10 nm<br />
Wavelength Accuracy ≤0.75 nm<br />
Photometric Range 1-150% reflectance<br />
Photometric Resolution 0.01% reflectance<br />
Measurement Speed (at 23°C) ≤1.5 seconds<br />
Measurement Storage Capacity 800 spectral readings<br />
100 product setups<br />
Regulatory Notice<br />
A copy of the Declaration of Conformity according to ISO/IEC Guide 22 and EN 45014 follows on the<br />
next page.<br />
11G-14 <strong>MiniScan</strong> <strong>EZ</strong> 08/09
DECLARATION OF CONFORMITY<br />
according to ISO/IEC Guide 22 and EN 45014<br />
Manufacturer’s Name: Hunter Associates Laboratory, Inc.<br />
Manufacturer’s Address: 11491 Sunset Hills Road<br />
Reston, Virginia U.S.A. 20190<br />
Declares that the Product:<br />
Product Name: <strong>MiniScan</strong> <strong>EZ</strong><br />
Model: MS<strong>EZ</strong>-4500L, MS<strong>EZ</strong>-4500S, MS<strong>EZ</strong>-4000L, MS<strong>EZ</strong>-4000S<br />
Conforms to the following Product Standards:<br />
IEC 61326-1:2005 (CISPR 11:2003:A1:2004, EN 61000-4-2:1995, and EN 61000-4-3:2006 +<br />
A1:2008)<br />
EN 61010-1:2001<br />
Supplementary Information:<br />
This product herewith complies with the requirements of the EMC Directive 2004/108/EC<br />
and Council Directive 98/34/EEC, and carries the CE mark accordingly.<br />
(1) This product was tested using an IBM compatible computer.<br />
European Contact: Your local Hunter Associates Laboratory representative,<br />
or Christian Jansen<br />
Griesbraeustrasse 11<br />
82418 Murnau<br />
Germany<br />
Telephone: +49 (0) 8841 9464<br />
Fax: +49 (0) 8841 99472<br />
08/09 <strong>MiniScan</strong> <strong>EZ</strong> 11G-15
Sample Preparation and Presentation<br />
The <strong>MiniScan</strong> <strong>EZ</strong> spectrophotometer is a versatile color measurement instrument that can be used on<br />
products of virtually any size, in industries as diverse as paint and textiles. Because of its compact<br />
design, it can be used to measure objects that would be difficult to position at the sample port of a larger<br />
color measurement instrument. However, careful attention to proper sample preparation and<br />
presentation is required for consistent and accurate color measurements.<br />
It is important to select samples appropriately, use an established measurement method, and handle all<br />
samples in a consistent manner. The guidelines in this section will help you while taking measurements.<br />
Selecting Samples<br />
Choose samples that are representative of the material used. If samples are non-representative of the<br />
batch or are spoiled, damaged, or irregular, then the result may be biased. When choosing a sample,<br />
select randomly and examine the sample to avoid biased results. If your sampling procedure is<br />
adequate, another sample from the same batch should result in comparable measured values.<br />
Preparing Samples<br />
Prepare samples in exactly the same manner each time they are measured. Follow standard methods if<br />
they exist, such as ASTM or TAPPI methods.<br />
Sample Presentation<br />
Present the samples to the instrument in a standard, repeatable manner. Results obtained depend on the<br />
condition of the samples and their presentation. If you establish a method so that the same procedure is<br />
used each time specific samples or types of samples are measured, then you will have a valid basis for<br />
comparison of measured results. This also ensures repeatability of results when measuring the same<br />
sample. Make a checklist so that operators may simply check each step. The checklist will also help in<br />
the training of new operators.<br />
There are a variety of techniques that can be used in handling various forms of objects and materials so<br />
that the most valid and repeatable measurement of their appearance results. For example, when<br />
measuring the color of a sample, such as fabric, that is translucence, the sample should be folded into<br />
multiple layers to make it appear more opaque. Other materials, such as liquids or semi-solids, might be<br />
read through the glass of a sample cup, which presents a flat surface to the instrument.<br />
When taking readings, make sure that the <strong>MiniScan</strong> <strong>EZ</strong> sample port is flat<br />
against the sample surface. This may be difficult if the sample is curved or<br />
irregularly shaped. Look at the<br />
instrument from all angles to make sure<br />
the port makes as much contact as<br />
possible with the product. When<br />
measuring thin, soft materials (such as<br />
fabric or paper), place a hard, flat<br />
surface behind the product to ensure<br />
proper contact with the sample port and<br />
to ensure that it does not pillow into the<br />
11G-16 <strong>MiniScan</strong> <strong>EZ</strong> 08/09
sample port. Average several readings when measuring samples that are textured, patterned, or irregular<br />
in color.<br />
Examples of ways to measure several types of samples are given below.<br />
Directional Samples<br />
Directionality can be minimized by averaging several measurements with rotation of the sample<br />
between readings. Examination of the standard deviation displayed with the averaging function can<br />
guide you in selecting the appropriate number of readings to average.<br />
Non-opaque Samples<br />
Non-opaque samples must have consistent backings. A white<br />
uncalibrated tile is recommended. If the sample is such that it can be<br />
folded to give multiple layers, such as tissue or fabric, the number of<br />
layers for each sample should be noted.<br />
Translucent Samples<br />
Light trapped in a translucent sample can distort the color. The thickness<br />
of the sample presented should be chosen to maximize the haze or color<br />
difference and the sample should be backed, if possible, to eliminate the<br />
effects of ambient (room) light.<br />
08/09 <strong>MiniScan</strong> <strong>EZ</strong> 11G-17
11G-18 <strong>MiniScan</strong> <strong>EZ</strong> 08/09