Sandfish hatchery techniques - English version - ACIAR
Sandfish hatchery techniques - English version - ACIAR
Sandfish hatchery techniques - English version - ACIAR

You also want an ePaper? Increase the reach of your titles
YUMPU automatically turns print PDFs into web optimized ePapers that Google loves.
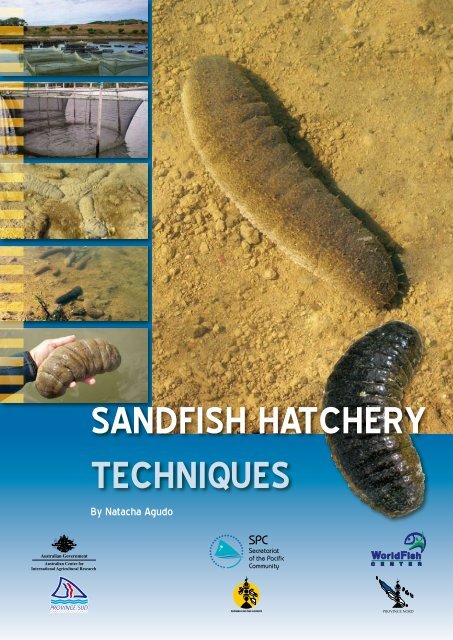
SANDFISH HATCHERY<br />
TECHNIQUES<br />
By Natacha Agudo<br />
PROVINCE DES ÎLES LOYAUTÉ
SANDFISH HATCHERY<br />
TECHNIQUES<br />
By Natacha Agudo
ii<br />
© Copyright Australian Centre for International Agricultural Research (<strong>ACIAR</strong>),<br />
the Secretariat of the Pacific Community (SPC) and the WorldFish Center, 2006<br />
All rights for commercial / for profit reproduction or translation, in any form, reserved. <strong>ACIAR</strong>, SPC and the WorldFish Center<br />
authorise the partial reproduction or translation of this material for scientific, educational or research purposes, provided that <strong>ACIAR</strong>,<br />
SPC, the WorldFish Center and the source document are properly acknowledged. Permission to reproduce the document and/or<br />
translate in whole, in any form, whether for commercial / for profit or non-profit purposes, must be requested in writing. Original<br />
<strong>ACIAR</strong>, SPC and the WorldFish Center artwork may not be altered or separately published without permission.<br />
Secretariat of the Pacific Community Cataloguing-in-publication data<br />
<strong>Sandfish</strong> <strong>hatchery</strong> <strong>techniques</strong> / by Natacha Agudo<br />
1. Holothurians – Spawning – Handbooks, manuals, etc.<br />
I. Agudo, Natacha II. Title.<br />
639.8 AACR2<br />
ISBN 978-982-00-0175-6<br />
<strong>ACIAR</strong>, GPO Box 1571, Canberra, ACT 2601, Australia<br />
SPC, B.P. D5, 98848 Noumea Cedex, New Caledonia<br />
WorldFish Center, c/SPC, B.P. D5, 98848 Noumea Cedex, New Caledonia<br />
Cover design and layout by Muriel Borderie<br />
Photos by Natacha Agudo, Cathy Hair and Steve Purcell<br />
Printed at SPC Headquarters, Noumea, New Caledonia
ABOUT THIS MANUAL<br />
<strong>Sandfish</strong> is arguably the most commercially valuable of the tropical species of sea cucumber that are processed into<br />
bêche-de-mer. It is widely distributed throughout the Indo-Pacific, occurring in shallow inshore areas where it is<br />
easily accessible to coastal fishers. A-grade bêche-de-mer processed from sandfish commands some of the highest<br />
prices on the international market. But these same attributes also make it vulnerable to overexploitation. Sadly,<br />
this has happened in most places where it occurs. While sandfish was an important component of bêche-de-mer<br />
fisheries 20 to 30 years ago, its contribution to bêche-de-mer exports is now relatively small, even trivial.<br />
Not surprisingly, there is widespread interest in restoring the production of sandfish, especially where it promises<br />
to deliver benefits to coastal fishing communities with few other options for earning livelihoods. Although<br />
improved management of capture fisheries, through measures designed to safeguard the remnant spawning<br />
adults, will always be key to restoring production, aquaculture has the potential to help restore production of<br />
this valuable species in three ways:<br />
h through production and release of cultured juveniles in restocking programmes to increase the number of<br />
spawners, but only where such releases are predicted to add value to other forms of management;<br />
h through ‘put and take’ sea ranching operations, where cultured juveniles are placed in the wild to be<br />
regathered at a larger size with no intention of allowing them to spawn;<br />
h through farming cultured juveniles in earthen ponds and sea pens.<br />
This manual is designed to help government agencies and members of the private sector interested in implementing<br />
any of these ways of increasing production of sandfish by outlining the basic methods for spawning and rearing<br />
juvenile sandfish. It builds on the pioneering work done in 1988 at the Tuticorin Research Centre of CMFRI<br />
(Central Marine Fisheries Research Institute) in India and is based largely on methods developed and applied<br />
by the WorldFish Center (formerly ICLARM) in Solomon Islands, Vietnam and New Caledonia.<br />
The information in the manual will enable hatcheries to produce sandfish suitable for release in the wild in<br />
relatively large numbers (tens of thousands) regularly. However, it does not pretend to be fully comprehensive.<br />
Rather, it is a reflection of current knowledge. We hope that it will soon be made out of date by those of you<br />
who apply and improve the methods described here.<br />
Figure 1. Bêche-de-mer.<br />
iii
iv<br />
ACKNOWLEDGEMENTS<br />
The preparation of this manual was made possible through dedicated research on various aspects of the<br />
culture and ecology of sandfish by two groups of people: firstly, those who contributed to basic knowledge on<br />
spawning and larval rearing, and the ecology of sandfish – Stephen Battaglene, Chantal Conand, Jean-François<br />
Hamel, D.B. James, Claude Massin, Annie Mercier, Andrew Morgan, Rayner Pitt, Chris Ramofafia and J.<br />
Evizel Seymour; and secondly, my colleagues at the Worldfish Center, staff at the Northern Fisheries Centre,<br />
Queensland Department of Primary Industries and Fisheries, and trainees from Conservation International,<br />
Papua New Guinea (Priscilla Eka, Pamela Mua), who helped me to refine and develop the basic methods.<br />
I would also like to thank Warwick Nash, Johann Bell, Steve Purcell, Cathy Hair, Gale Semmens and Richard<br />
Knuckey for their encouragement, comments on the content and editing, and Steve Purcell and Cathy Hair<br />
for their photos.<br />
This manual was funded by the Australian Centre for International Agricultural Research (<strong>ACIAR</strong>), the<br />
Secretariat of the Pacific Community (SPC) and the WorldFish Center.
CONTENTS<br />
Basic biology of sandfish .......................................................................................................................................... 7<br />
How to identify sandfish ..........................................................................................................................................................................................7<br />
More about the biology of sandfish ......................................................................................................................................................................8<br />
Where do sandfish occur? ........................................................................................................................................................................................8<br />
Broodstock .....................................................................................................................................................9<br />
When should broodstock be collected? ..............................................................................................................................................................9<br />
How many broodstock are needed? What size should they be? ................................................................................................................9<br />
Transport of broodstock to the <strong>hatchery</strong> ............................................................................................................................................................9<br />
Maintaining broodstock in tanks, sea pens and earthen ponds ............................................................................................................... 10<br />
Ways to increase spawning success ....................................................................................................................................................................11<br />
Spawning .......................................................................................................................................................13<br />
Preparing broodstock for spawning......................................................................................................................................................................13<br />
Inducing sandfish to spawn ....................................................................................................................................................................................13<br />
Observing the behaviour of broodstock .............................................................................................................................................................14<br />
Steps to take when spawning fails ......................................................................................................................................................................15<br />
The first female has just spawned! How should fertilisation be managed? ..........................................................................................15<br />
Collection of eggs from the spawning tank......................................................................................................................................................16<br />
Estimating egg density .............................................................................................................................................................................................17<br />
Larval rearing ...............................................................................................................................................19<br />
Transferring fertilised eggs to larval tanks ........................................................................................................................................................19<br />
Life cycle of sandfish ................................................................................................................................................................................................19<br />
How should larvae be reared? ..............................................................................................................................................................................22<br />
The first doliolaria larvae appear! What do they need to settle?............................................................................................................ 25<br />
Feeding pentactula larvae and juveniles ...........................................................................................................................................................26<br />
Review of daily tasks during larval rearing ......................................................................................................................................................27<br />
Nursery ........................................................................................................................................................ 29<br />
Culture of early juveniles ........................................................................................................................................................................................29<br />
Detaching and counting juveniles before transfer to nursery tanks ......................................................................................................30<br />
The two stages of the nursery phase .................................................................................................................................................................31<br />
Review of tasks during the nursery phase .......................................................................................................................................................32<br />
Grow-out of juveniles ................................................................................................................................33<br />
In net pens in ponds ................................................................................................................................................................................................33<br />
In ponds ........................................................................................................................................................................................................................34<br />
In sea pens ..................................................................................................................................................................................................................35<br />
Problems and possible solutions ............................................................................................................36<br />
Promising applications for <strong>hatchery</strong>-reared sandfish .........................................................................37<br />
Annex 1: Algal culture ................................................................................................................................39<br />
Maintenance of algal cultures ...............................................................................................................................................................................39<br />
Preparation and inoculation of algal cultures .................................................................................................................................................40<br />
Further reading .......................................................................................................................................... 43<br />
v
BASIC BIOLOGY OF SANDFISH<br />
How to identify sandfish<br />
The body of the sandfish is elongated, cylindrical and stout. The dorsal body surface is relatively smooth and<br />
has small papillae (i.e. sensory tube feet) with black dots; colour varies from grey to black with dark transverse<br />
wrinkles. The ventral surface of the body is flattened and is generally whitish in colour. The mouth is on the<br />
ventral surface at the anterior end of the body. It is oval in shape and has 20 short peltate tentacles. The anus is<br />
located dorsally at the posterior end of the body.<br />
<strong>Sandfish</strong> are Echinoderms, related to starfishes and sea urchins. The precise taxonomy of sandfish is:<br />
Phylum Echinodermata<br />
Class Holothuroidea (with tube feet)<br />
Order Aspidochirotida (with tentacles peltate)<br />
Family Holothuriidae (with body usually circular and gonads single)<br />
Genus Holothuria (Metriatyla) Rowe, 1969<br />
Holothuria (Metriatyla) scabra Jaeger, 1833<br />
Figure 2. <strong>Sandfish</strong>.<br />
Adult size range: 12–36 cm length<br />
Adult weight range: 200–1500 g<br />
BASiC BiOLOGY OF SANDFiSH
More about the biology of sandfish<br />
<strong>Sandfish</strong> have the same general anatomy as other sea<br />
cucumbers. The gonads (ovaries or testes) lie in one<br />
tuft and open dorsally at the anterior end of the body<br />
through a single gonopore (i.e. genital orifice). The<br />
digestive system is composed of a mouth, oesophagus,<br />
stomach, intestine, cloaca and anus. Respiratory<br />
trees, which sandfish use to obtain oxygen, lie in the<br />
posterior of the body and open to the cloaca. The body<br />
wall that is processed into bêche-de-mer accounts for<br />
about 56% of total weight.<br />
<strong>Sandfish</strong> move with the help of tube feet densely<br />
distributed on the ventral face, and through muscular<br />
action of the body wall.<br />
<strong>Sandfish</strong> feed on detritus, i.e. organic matter in the<br />
mud or sand. They appear to feed continuously using<br />
the peltate tentacles surrounding the mouth to place<br />
sediment into the mouth.<br />
<strong>Sandfish</strong> are usually observed partially buried in<br />
sediment. The daily burrowing cycle varies according<br />
to environmental conditions.<br />
The growth rate of sandfish depends on environmental<br />
conditions and the time of year. At medium size,<br />
sandfish grow on average 0.5 cm per month, corresponding<br />
to 14 g per month. Under good conditions<br />
they grow to a size of 300 g in one year. We still do<br />
not know how long sandfish live, but it may be around<br />
10 years.<br />
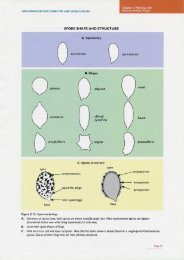
Sea cucumbers have tiny calcareous plates called spicules<br />
in their skin. Microscopic examination of spicules is<br />
used to distinguish species. <strong>Sandfish</strong> have many spicules<br />
in the shape of tables and knobbed buttons.<br />
Figure 3. Geographical distribution of sandfish.<br />
<strong>Sandfish</strong> can be sexually mature at a size as small<br />
as 200 g. There is no apparent relationship between<br />
fecundity (egg production) and body size.<br />
Like other sea cucumbers, sandfish can regenerate<br />
some of their organs. After spending long periods out<br />
of water, or being affected by the use of chemicals,<br />
being handled during collection and transport, or<br />
when stressed by predators, sandfish may eviscerate<br />
their internal organs. Regeneration of internal organs<br />
occurs within 2 months.<br />
<strong>Sandfish</strong> and other tropical sea cucumbers can produce<br />
numerous toxins from their skin and viscera. These<br />
toxins inflict distress, loss of equilibrium and death in<br />
fish, but do not affect humans.<br />
Where do sandfish occur?<br />
<strong>Sandfish</strong> are found in many countries in the Indo-<br />
Pacific, from east Africa to the eastern Pacific. They are<br />
usually found between the latitudes of 30°N and 30°S.<br />
The preferred habitats of sandfish are shallow tropical<br />
waters, usually less than 20 m deep, such as sheltered<br />
areas with high levels of nutrients, including muddy<br />
substrata and seagrass beds. They can tolerate reduced<br />
salinity (20 ppt) for short periods and so are sometimes<br />
found in brackish water.<br />
Figure 4. Wild sandfish in a seagrass habitat.
BROODSTOCK<br />
When should broodstock be collected?<br />
Broodstock should be collected during the reproductive<br />
season so that animals are ready for immediate<br />
spawning.<br />
The spawning season for sandfish varies among<br />
countries. In countries close to the Equator, sandfish<br />
spawn throughout the year. As the latitude approaches<br />
25°, spawning is restricted to a short summer period<br />
of 3 months. In some countries, there can be two<br />
spawning periods each year. It is important to<br />
determine when these periods occur.<br />
Figure 5. Collection of broodstock.<br />
How many broodstock are needed?<br />
What size should they be?<br />
Batches of 30–45 individuals are usually required to<br />
induce a small proportion of animals to spawn.<br />
Ideally, the average weight of broodstock should be<br />
around 500 g. However, the size of broodstock may be<br />
smaller in some places, e.g. 250–415 g in Vietnam.<br />
Broodstock should be undamaged, with no visible skin<br />
lesions. Skin appearance should be smooth and shiny,<br />
with a thin, transparent mucous layer. Animals should<br />
react by moving when you touch and disturb them.<br />
It is impossible to distinguish males and females<br />
externally. Sex can only be determined by biopsy or<br />
dissection of animals to examine the gonads, or by<br />
observation when they spawn.<br />
Transport of broodstock to the <strong>hatchery</strong><br />
At sea, collected broodstock should be kept in<br />
seawater in insulated containers. Aeration should be<br />
provided if the animals are to be held this way for<br />
more than 2 hours. Preferably, the animals should be<br />
left in the transport containers to defecate before they<br />
are transferred to plastic bags.<br />
To transfer the broodstock from the boat to a vehicle<br />
for transport to the <strong>hatchery</strong>, animals should be cleaned<br />
gently and packed individually in oxygen-filled bags<br />
with 1 L of seawater. The bags should be placed in<br />
insulated containers during transport. The containers<br />
should be protected against direct sunlight to maintain<br />
the temperature within the range of 27–30°C.<br />
Figure 6. Broodstock packed individually in plastic bags in an<br />
insulated container.<br />
<strong>Sandfish</strong> can tolerate low dissolved oxygen and high<br />
temperatures in static water (up to 30°C) for long<br />
periods (over 80 hours) without eviscerating. However,<br />
it is preferable to maintain them in optimal conditions<br />
to avoid stress, which can induce premature spawning.<br />
The transport of individual sandfish in damp teatowels<br />
for many hours has been practised with<br />
varying success.<br />
Avoid<br />
h Sudden temperature shocks and holding for<br />
long periods out of water, which can result in<br />
evisceration<br />
h Damaging the skin of the animals – handle<br />
them gently<br />
h Shocks during road transport<br />
BROODSTOCK
10<br />
Maintaining broodstock in tanks, sea pens and<br />
earthen ponds<br />
Broodstock that are not yet mature can be kept<br />
in captivity until they ripen. Similarly, following<br />
spawning, broodstock can be maintained near the<br />
<strong>hatchery</strong> for future use. These animals can be held in<br />
tanks, sea pens or earthen ponds.<br />
In tanks<br />
Figure 7. Broodstock maintained in tank with sand.<br />
Broodstock tanks should have a flat bottom with a<br />
volume of 1000 to 4000 L and be placed outdoors in<br />
shade. The tanks should contain a 10–15 cm layer of<br />
sand or mud. Feed for broodstock should be added<br />
at the rate of 50 g/day. Suitable feed ingredients are:<br />
prawn head waste, soya bean powder, rice bran and<br />
seagrass powder. Care should be taken to ensure that<br />
broodstock do not lose weight. Broodstock should be<br />
stocked at a density of 15–30 animals per 1000 L tank<br />
in static aerated water. Exchange the water each day.<br />
Broodstock held at low density in tanks with<br />
continuously flowing seawater, fed powdered dried<br />
algal preparations and ground-up prawn pellets, can<br />
often be spawned more than once.<br />
In sea pens<br />
Figure 8. Sea pen.<br />
Sea pens for holding broodstock should be located<br />
close to the <strong>hatchery</strong> so they can be monitored easily<br />
and regularly. Sea pens should be around 800 m 2 and<br />
the stocking density of the broodstock should be<br />
Possible problems: Heavy rain can lead to stratification of water in the pond. Stratification can be detected by<br />
the presence of a thin layer of low-salinity water at the surface. The consequences of stratification can include an<br />
increase in temperature, fall in dissolved oxygen especially in the bottom layers, and development of anaerobic<br />
areas in the sediment. The combination of these extreme conditions can be dangerous for sandfish, which are<br />
benthic and slow moving. It can lead to total loss of broodstock in a few days.<br />
High temperatures and<br />
low dissolved oxygen<br />
How to overcome tHese problems<br />
Regularly check water temperature and dissolved oxygen (especially in the early<br />
morning).<br />
Increase water flow, preferably continuously 24 hours per day.<br />
Set up paddle wheels or other pond aeration equipment; installation should provide<br />
aeration on the bottom where the animals are located.<br />
Heavy rain Remove the surface layer of freshwater by adjusting the height of the outlet pipe.<br />
If a cyclone is predicted, transfer the animals from ponds to indoor tanks (where<br />
possible).<br />
Figure 10. Feeding broodstock.<br />
Ways to increase spawning success<br />
Animals held in ponds or tanks for several months<br />
to 2 years are easier to spawn than broodstock<br />
maintained in sea pens or animals taken directly from<br />
the wild. Another advantage of holding broodstock<br />
in ponds is that they generally spawn earlier in the<br />
season than wild individuals, presumably because of<br />
the higher temperatures in ponds. Note, however,<br />
that holding broodstock in ponds or tanks for several<br />
months before spawning is not essential. In Solomon<br />
Islands, for example, newly collected sandfish were<br />
often induced to spawn.<br />
The advantages and disadvantages of keeping<br />
broodstock in captivity, or collecting individuals from<br />
the wild, should be evaluated for each location.<br />
Summary<br />
h<br />
h<br />
h<br />
h<br />
h<br />
h<br />
Batches of 30–45 individuals (average weight<br />
500 g) are needed to induce spawning.<br />
When relying on wild broodstock, ripe and<br />
healthy broodstock must be collected during<br />
the spawning season.<br />
Transport wild broodstock individually in<br />
oxygen-filled bags with seawater, using<br />
insulated containers at 27–30°C. Avoid<br />
changes in temperature and other shocks<br />
during transport.<br />
Broodstock can be conditioned by keeping<br />
them in: (a) tanks (15–30 animals/1000 L)<br />
with a sand or mud substratum, with flowthrough<br />
seawater and a supply of food; (b) sea<br />
pens of 800 m 2 at densities of
12<br />
Figure 11. Broodstock in a clean spawning tank before induction<br />
(30–45 animals are recommended).
SPAWNING<br />
Preparing broodstock for spawning<br />
1. Use a bare, flat-bottomed tank up to 2 m 3 . Provide<br />
cover and heaters to maintain constant water<br />
temperature at night.<br />
2. Clean the tank and disinfect with chlorine<br />
(sodium hypochlorite). Fill with 1-µm filtered and<br />
UV-sterilised seawater at ambient temperature<br />
(30°C, give<br />
a cold shock treatment for 1 hour before the<br />
heat shock. To do this, reduce the level of water<br />
in the spawning tank and add sealed plastic<br />
bags containing ice to quickly lower the water<br />
temperature by 5°C below ambient. Then apply<br />
heat shock as above.<br />
h After thermal stimulation, replace water with<br />
new water at ambient temperature, keeping the<br />
animals covered.<br />
Gonad extraction method<br />
h Dissect a few animals to extract gonads from 1 to<br />
2 ripe males.<br />
h Store the gonads at 5°C to extend the viability of<br />
the sperm.<br />
h Use the sperm as a spawning stimulant by adding<br />
blended fresh male gametes to the spawning tank<br />
at ambient water temperature.<br />
Water pressure<br />
h Leave broodstock to dry in the tank in the shade<br />
for about half an hour before subjecting them to a<br />
powerful jet of seawater for a few minutes.<br />
h Return broodstock to the spawning tank at<br />
ambient water temperature.<br />
SPAWNiNG<br />
13
14<br />
Figure 14. Dry treatment.<br />
Dry treatment<br />
h Leave animals completely dry, or in ˜ 2 cm of<br />
seawater in the tank for 30–45 minutes. Keep<br />
them in the shade.<br />
h Refill tank with water at ambient temperature.<br />
Figure 15. Spirulina bath.<br />
Food stimulants<br />
h Add dried algae (Spirulina at a rate of 30 g per<br />
300–500 L, or Algamac 2000 at a concentration<br />
of 0.1 g/L) for 1 hour. Stir the water.<br />
h After 1 hour, remove as much waste from the<br />
tank as possible and replace water with new water<br />
at ambient temperature.<br />
Combined treatments<br />
Often a combination of treatments is needed to induce<br />
spawning. The best combinations are given below:<br />
Possible problem: After two days of spawning<br />
attempts, broodstock can lose their mucus and<br />
the skin may show white lesions due to stress and<br />
handling. Avoid handling the animals too much.<br />
Observing the behaviour of broodstock<br />
Figure 16. Pre-spawning behaviour.<br />
The behaviour of sandfish often indicates that spawning<br />
is imminent. Pre-spawning behaviours include:<br />
h rolling movements<br />
h rhythmic contractions<br />
h lifting and swaying of the front end of the body<br />
h climbing the tank walls<br />
Figure 17. Animal stands erect ready to spawn.<br />
Treatment combinations<br />
A B C<br />
1. Dry treatment 1. Hot shock treatment 1. Dry treatment<br />
2. Cold shock treatment 2. Spirulina bath 2. Hot shock treatment<br />
3. Hot shock treatment 3. Spirulina bath
Males usually spawn before females, which start to<br />
release eggs 1 hour (sometimes sooner or later) after<br />
the first male releases sperm.<br />
Spawning males are erect and sway from side to<br />
side, releasing a continuous stream of sperm. Males<br />
spawn for several minutes to hours, even when they<br />
are disturbed. Spawning females erect their body<br />
before releasing eggs in a short powerful spurt from<br />
the bulging gonopore (i.e. genital orifice). Females can<br />
spawn 2–3 times over a period of an hour or more, but<br />
often stop spawning if disturbed.<br />
Record all information about spawning trials, including<br />
the unsuccessful attempts. This helps to improve future<br />
spawning success. Collect the following information:<br />
h<br />
h<br />
h<br />
h<br />
total number of males and females that spawned<br />
spawning time for each individual with<br />
comments<br />
observations of egg development (% regular and<br />
irregular shape, % fertilised, diameter)<br />
individual broodstock weight<br />
Natural fecundity ranges from 9 to 17 million eggs<br />
per female, but induced females generally release a<br />
fraction of this, i.e. 1 to 2 million, although some<br />
individuals can sometimes release up to 4 to 6<br />
million eggs.<br />
Steps to take when spawning fails<br />
h<br />
h<br />
h<br />
If broodstock do not respond during spawning<br />
induction, try different methods of stimulation.<br />
When broodstock demonstrate pre-spawning<br />
behaviour but do not spawn, biopsy or dissect<br />
a few animals and examine the gonads under a<br />
microscope to determine if they are ripe. Ripe<br />
ovaries look translucent and ripe testes are<br />
milky white.<br />
Commence spawning induction later at night.<br />
<strong>Sandfish</strong> usually spawn at night in the wild.<br />
Reduce the risk of losing eggs from spontaneous or<br />
delayed spawnings at night by:<br />
1. Maintaining broodstock in a spawning tank<br />
with a flow-through system.<br />
2. Installing a second tank in series with an<br />
internal 100-µm sieve at the outlet pipe, with<br />
moderate aeration, to retain eggs in suspension<br />
overnight until collection the following<br />
morning. Provide the tanks with air diffusers,<br />
heaters and covers to maintain constant water<br />
temperature overnight.<br />
The first female has just spawned!<br />
How should fertilisation be managed?<br />
Figure 18. A spawning sandfish.<br />
Management of males<br />
Note that too much sperm in the spawning tank causes<br />
polyspermy (i.e. multiple fertilisation). Polyspermy<br />
can reduce the rate of fertilisation and cause damage<br />
to egg development and induce larval deformities.<br />
h If the water in the spawning tank becomes cloudy<br />
due to excess sperm, reduce the amount of sperm<br />
by siphoning and adding new water, or use a flowthrough<br />
system.<br />
h To prevent excess sperm in the spawning tank,<br />
remove most males and transfer them to smaller<br />
containers shortly after they begin releasing<br />
sperm. Often they will continue releasing sperm.<br />
h Leave one or two males spawning in the tank<br />
until the first female releases eggs. Retain the<br />
more vigorous spawners.<br />
h Record the time that males start releasing sperm,<br />
and how many males spawn. Sperm stays active<br />
for several hours.<br />
SPAWNiNG<br />
15
16<br />
Management of females<br />
h Record the time that females begin spawning.<br />
This will be helpful in estimating the progress of<br />
egg stages.<br />
h Increase aeration to moderate levels to keep eggs<br />
in suspension.<br />
h Count and record the number of egg releases per<br />
female. Females usually spawn 2–3 times. Once<br />
females finish spawning (usually evident when<br />
they stop moving), remove all broodstock (males<br />
and females). Return the animals to their tank,<br />
sea pen or pond.<br />
Separation of males into a separate tank once they<br />
begin to spawn, and later addition of controlled<br />
amounts of sperm to the females’ tank, is a way<br />
to avoid polyspermy while maintaining a larger<br />
number of fathers.<br />
Avoid<br />
h Disturbing or moving females when removing<br />
surplus males so that spawning of eggs is not<br />
interrupted.<br />
Observation of egg development<br />
h After the first eggs are released, sample them<br />
from the water column in a small beaker.<br />
h Measure egg diameter, using a micrometer<br />
eyepiece placed in the lens of a microscope.<br />
h Record the measurements of the eggs and<br />
other observations such as: egg stages and size,<br />
percentage of regular round eggs, and fertilisation<br />
rate.<br />
h Repeat these observations every 20–30 minutes.<br />
Recently shed eggs are white, spherical and visible<br />
to the naked eye. The diameter of the eggs ranges<br />
from 80 to 200 µm, but this varies widely within the<br />
geographic range of sandfish.<br />
Spermatozoa are not visible to the naked eye; they<br />
appear as small, active dark dots clustered together<br />
around the eggs.<br />
Figure 19. Fertilised egg. Figure 21. Egg collector.<br />
Fertilised eggs have a swollen membrane. If many<br />
sperm continue to cluster around the egg (i.e.<br />
polyspermy), irregular egg development will occur.<br />
Figure 20. A fertilised egg, two cell, and four cell stages.<br />
Collection of eggs from the spawning tank<br />
h<br />
h<br />
h<br />
Use a small beaker to collect a sample of eggs from<br />
the water column to estimate the fertilisation<br />
rate and percentage of eggs with advanced cell<br />
division.<br />
Ensure that the fertilisation rate is high and the<br />
majority of eggs are at the advanced cell division<br />
stage. This is at least 1 hour after fertilisation.<br />
Wait at least 1 hour after fertilisation before<br />
collecting all the eggs.
h<br />
h<br />
h<br />
Siphon the eggs slowly from the tank into a 50–<br />
80 µm sieve placed in a bowl (Fig. 22). Make sure<br />
the water level is above the mesh of the sieve so<br />
that the eggs are not squashed onto the mesh.<br />
Introduce a gentle flow of filtered seawater, at<br />
ambient temperature, in the bowl. Rinse eggs to<br />
remove excess sperm and dirt. Maintain eggs in<br />
suspension in the sieve.<br />
Be patient! Collecting eggs takes time.<br />
Figure 22. Method of egg collection.<br />
Useful tips<br />
h Carry out spawning in shallow water, and use<br />
several siphons with sieves in bowls to reduce<br />
the time needed to collect eggs. This requires<br />
more <strong>hatchery</strong> staff for a shorter period.<br />
h Start by siphoning eggs from the water column;<br />
the eggs in the water column are cleaner<br />
(i.e. not surrounded by faeces or sediment).<br />
Distribute these batches of eggs in the larval<br />
tanks. If more eggs are required, then collect<br />
them from the bottom of the tank.<br />
Estimating egg density<br />
h<br />
h<br />
h<br />
h<br />
h<br />
h<br />
Transfer the collected eggs regularly and carefully,<br />
using beakers, into clean 10 L buckets, until the<br />
buckets are filled.<br />
Stir the water in the buckets gently to distribute<br />
the eggs uniformly.<br />
For each bucket, take three 1-ml subsamples.<br />
Estimate the egg density for each sample, using<br />
a counting cell (e.g. Sedgewick-Rafter chamber)<br />
under a microscope. Calculate the average density<br />
for each bucket. Estimate the fertilisation rate.<br />
Record all data.<br />
Transfer and distribute eggs from the buckets<br />
to the larval tanks quickly after determining the<br />
total number of eggs needed for each tank.<br />
Use egg densities from all buckets to estimate the<br />
total number of eggs spawned.<br />
Avoid<br />
h High densities of eggs in the sieve and buckets<br />
as this can damage eggs. Average egg density<br />
in the buckets should be
1<br />
Summary<br />
h<br />
h<br />
h<br />
h<br />
h<br />
h<br />
Batches of 30–45 clean broodstock are placed in a spawning tank, filled with 1-µm filtered and UV-sterilised<br />
seawater.<br />
Thermal shocks, extracts of male gonads, water pressure, dry treatment, and food stimulants used alone or<br />
in combination can induce spawning.<br />
Pre-spawning behaviours include rolling movements, rhythmic contractions, and lifting and swaying of the<br />
anterior end of the body. Males usually spawn first and females usually start one hour after the first male.<br />
It is important to record spawning data, i.e. induction method used, number of males and females, spawning<br />
time, and observations of eggs.<br />
Females usually release eggs 2 to 3 times. Moderate aeration maintains the eggs in suspension. Samples of<br />
eggs are regularly taken from the water column to examine the stage of egg development.<br />
After >1 hour post fertilisation, the eggs can be siphoned gently from the water column into a 50–80 µm<br />
sieve placed in a bowl. Flow-through seawater should be used to rinse the eggs. The eggs are transferred to<br />
buckets for counting before being placed in the larval tanks.<br />
Figure 24. Observation of eggs under a microscope.
LARVAL REARING<br />
Transferring fertilised eggs to larval tanks<br />
Figure 25. Larval tank.<br />
h<br />
h<br />
h<br />
h<br />
h<br />
h<br />
h<br />
h<br />
Prepare cylindrical tanks (up to 2 m 3 ) with conical<br />
bottoms and central drains. Set up 100-µm mesh<br />
outlet screens.<br />
Wash the tanks with chlorine (sodium hypochlorite),<br />
then rinse with freshwater.<br />
Fill the tanks with 1-µm filtered and UV-sterilised<br />
seawater.<br />
Ensure the water temperature is within the range of<br />
26 to 30°C, and salinity is between 32 and 36 ppt.<br />
Install two central air diffusers in each tank<br />
to insure medium aeration and gentle water<br />
circulation. Use two air diffusers as a precaution<br />
against failure.<br />
Immerse aquarium heaters with thermostats to<br />
maintain a constant water temperature in the<br />
larval tanks. Set up lids or covers for the night to<br />
retain the heat, if necessary.<br />
Maintain a minimum of 12 hours continuous<br />
artificial illumination per 24 hours, with 1–2<br />
fluorescent tubes (400 lux) per tank. Alternatively,<br />
expose larval tanks to natural photoperiod and<br />
daylight.<br />
Pour eggs carefully into the larval tanks, using<br />
buckets or beakers, to achieve a density of 0.3 to<br />
1 egg per ml.<br />
Avoid<br />
h Large differences in temperature (over 1–2°C)<br />
and salinity of water between buckets and<br />
larval tanks as this can affect survival of eggs.<br />
h High levels of aeration during transfer as<br />
this can trap the eggs and larvae in a strong<br />
current, which can throw them against the<br />
tank walls, damaging or killing them.<br />
h High initial egg density. Discard excess eggs.<br />
Lower egg densities are preferable because<br />
they reduce the risk of total mortality of larvae<br />
during the first days.<br />
Life cycle of sandfish<br />
Gastrula<br />
Figure 26. Life cycle of cultured sandfish.<br />
The larval development of sandfish consists of the<br />
auricularia (feeding stage) larvae transforming into<br />
non-feeding doliolaria larvae before settling as<br />
pentactula larvae. Figure 26 illustrates the life cycle of<br />
cultured sandfish from spawning to post-settlement.<br />
LARvAL REARiNG<br />
1
20<br />
Figure 27. Gastrula stage.<br />
Auricularia larvae<br />
Main features:<br />
h Transparent slipper-shaped larvae with ciliated<br />
bands (for locomotion)<br />
h A single pre-oral anterior lobe and anal posterior<br />
lobe<br />
h Digestive tract complete: mouth, oesophagus and<br />
stomach<br />
h Slow moving – continuous activity<br />
h Pelagic and actively feeding on microalgae<br />
Duration of this stage: 8 days<br />
Figure 28. Early auricularia larva.<br />
Fertilised egg<br />
Blastula<br />
Gastrula<br />
Auricularia larvae<br />
h<br />
h<br />
h<br />
Stage Time after fertilisation<br />
early<br />
mid<br />
late<br />
Doliolaria larvae<br />
Pentactula larvae<br />
Juvenile<br />
Size range: 700–750 µm<br />
Figure 29. Mid auricularia larva.<br />
Size range: 430–563 µm Size range: 853 µm–1.1 mm<br />
Diameter of hyaline spheres: 50–70 µm<br />
Figure 30. Late auricularia larva.<br />
0<br />
40 min to 3 hours<br />
24 hours<br />
2 days<br />
4 days<br />
5–6 days<br />
10 days<br />
12–13 days<br />
15 days
Doliolaria larvae<br />
Main features:<br />
h Dark-brown, barrel-shaped larvae with 5 ciliated<br />
bands around body<br />
h Rapid changes occur inside the body and all adult<br />
features begin to form<br />
h Larvae with 5 hyaline spheres on each side<br />
h Diameter of hyaline spheres: 60–80 µm<br />
h Short transitional phase with decreasing size<br />
before metamorphosis and settlement<br />
h Fast moving<br />
Duration of this stage: 2–3 days<br />
Pelagic and non-feeding larvae<br />
Size range: 420–620 µm<br />
Figure 31. Doliolaria larva.<br />
Pentactula larvae<br />
Main features:<br />
h Dark tubular-shaped larvae with 5 tentacles at<br />
the anterior end and a single posterior foot (for<br />
locomotion)<br />
h Rapid and differential growth<br />
h Moving and crawling over the edge and bottom of<br />
tank, and settlement surfaces (e.g. diatom plates)<br />
Duration of this stage: variable<br />
Benthic, crawling and feeding larvae<br />
(feed on benthic diatoms)<br />
Size range: 330–750 µm<br />
Figure 32. Pentactula larva.<br />
Juveniles<br />
Main features:<br />
h Same shape as adult but with two long tube feet<br />
at the posterior end for early juveniles<br />
h Slow moving and strongly attached to settlement<br />
substrata<br />
h Growth to 4–5 mm in 1 week<br />
Settled and feeding stage (feed on benthic algae and<br />
detritus)<br />
Average initial size: 1 mm<br />
Figure 33. Juvenile.<br />
LARvAL REARiNG<br />
21
22<br />
How should larvae be reared?<br />
Figure 34. Seawater filtration system.<br />
Seawater<br />
Seawater should be sand filtered, then passed through<br />
1-µm filter bags or cartridges and finally sterilised<br />
by UV.<br />
h<br />
Seawater parameters should be maintained as<br />
follows:<br />
Temperature 26–30°C<br />
Oxygen (DO) 5–6 ppm<br />
Salinity 27–35 ppt<br />
pH 6–9<br />
Ammonia 70–430 mg/m 3<br />
Cleaning tanks<br />
h Siphon the tank base and yellow patches of dead<br />
larvae daily for the first four days of larval rearing.<br />
Healthy larvae stay in the water column, whereas<br />
deformed or dead larvae are found in the lower<br />
water column or settled on the bottom.<br />
h Siphon any pink patches resulting from the<br />
development of bacteria. Dead larvae, faeces from<br />
larvae and overfeeding produce bacteria during<br />
the advanced stages of larval rearing.<br />
Illumination<br />
h Place a lid or a cover on top of the larval tanks for<br />
the first two days to keep eggs and early larvae in<br />
darkness.
Water change<br />
Add ethylenediaminetetraacetic acid (EDTA) (5 g/m3 h<br />
) when larval tanks are first filled. EDTA is a chemical<br />
used to bind with heavy metals naturally present in seawater; high concentrations of heavy metals can be<br />
harmful for larvae. EDTA renders heavy metals harmless.<br />
h Do not change the water in the larval tanks until day 2 (i.e. two days after fertilisation). There are three<br />
protocols for changing water:<br />
Protocol 1: Partial water change<br />
From Day 2<br />
to pentactula stage<br />
Protocol 2: Complete water change<br />
Day 2<br />
Day 4<br />
Day 6<br />
During and after late auricularia<br />
stage<br />
Protocol 3: Partial water change with the antibiotic Erythromycin<br />
Day 2<br />
Day 4<br />
Day 6<br />
Day 8<br />
Change 30% of the water using a 100-µm mesh outlet screen inside the larval tanks<br />
each day. Use a gentle water flow (maximum 2 L/min).<br />
Add EDTA after each water change at a rate of 5 g/m 3 of the added water until<br />
pentactula stage.<br />
Complete water change (100%) every second day until late auricularia stage.<br />
Drain the tank completely through a 100-µm sieve immersed in a bowl, at a<br />
maximum flow rate of 5 L/min. Transfer larvae periodically from sieve to aerated<br />
containers, using beakers. Clean the empty tank. Fill it with 1-µm filtered and UVsterilised<br />
seawater. Add EDTA at a rate of 5 g/m 3 . Transfer and stock larvae at a<br />
density of 0.1–0.5 larvae/ml.<br />
Change water daily using a flow-through system at a flow rate of 200 ml/min with<br />
a 100-µm mesh outlet screen inside the larval tanks.<br />
Change 30% of the water using a 100-µm mesh outlet screen inside the larval tanks.<br />
Use a gentle water flow (maximum 2 L/min).<br />
Add EDTA after each water change at a rate of 5 g/m 3 of the added water until<br />
pentactula stage.<br />
Add Erythromycin* at a rate of 2 g/m 3 after each water change.<br />
From Day 10 Carry out a daily water change (30%).<br />
* Handle the antibiotic carefully. Use protection for the hands and face (no direct inhalation). Erythromycin is used to prevent<br />
bacterial infection but is not always successful.<br />
Avoid<br />
h Introducing undesirable organisms, such as copepods and ciliates, during water changes, and from algal<br />
cultures. Practise water change with 1-µm filtered and UV-sterilised seawater. Use healthy algal cultures<br />
without ciliates. Copepods can be removed by chemical treatment with the insecticide Dipterex (common<br />
name, Trichlorfon) at 1–3 ppm for 1–3 hours followed by rapid dilution (50 to 100% water change); it is<br />
effective in killing the swimming stages of copepods but not the eggs.<br />
h<br />
Contamination from one tank to another by thoroughly rinsing all materials with freshwater before and after<br />
use and storing them in containers with chlorinated water.<br />
LARvAL REARiNG<br />
23
24<br />
Feeding<br />
Figure 35. Feeding auricularia larvae.<br />
h<br />
h<br />
h<br />
h<br />
Start feeding at day 2.<br />
Increase the quantity of microalgae gradually<br />
from 20 000 to 40 000 cells/ml. Continue feeding<br />
as long as auricularia larvae are still present in the<br />
water column.<br />
Examine the gut content of larvae under a<br />
microscope and estimate the residual algae in<br />
the water to adjust the amount of food. Wellfed<br />
larvae have guts that are brown or golden in<br />
colour.<br />
Provide food twice a day after the water change.<br />
For auricularia larvae, the main microalgae used are:<br />
Chaetoceros muelleri, C. calcitrans, Isochrysis aff. galbana,<br />
Rhodomonas salina and Tetraselmis sp. Availability of<br />
algal species may vary slightly between locations.<br />
A mixture of algae is better than using a single species<br />
for rearing larvae. C. muelleri and R. salina, given in<br />
equal parts, are optimal for larval culture of sandfish.<br />
Also, Isochrysis aff. galbana given for the first days and<br />
then mixed with Chaetoceros sp. four or five days later<br />
is an adequate diet.<br />
Feeding rates for microalgae commonly used for larval<br />
rearing:<br />
Hatching<br />
day*<br />
Larval stage Feeding rate<br />
(cells/ml)<br />
2 Early auricularia 20 000<br />
4 Mid auricularia 20 000–25 000<br />
6 Mid and late<br />
auricularia<br />
25 000–30 000<br />
8 Late auricularia 30 000–40 000<br />
*Day 0 is fertilisation.<br />
Avoid<br />
h High algal concentration (>40 000 cells/ml).<br />
This can inhibit growth and development of<br />
larvae and decrease the survival rate. In cases<br />
of overfeeding or algal blooms in high light<br />
areas, reduce the amount of feed given, and use<br />
a high rate of water change.
The first doliolaria larvae appear! What do they need to settle?<br />
Doliolaria larvae look for a favourable substratum<br />
to settle on and metamorphose into pentactula<br />
larvae. If suitable conditions are not found, doliolaria<br />
larvae continue swimming for a long time, delaying<br />
settlement. Suitable settlement surfaces must be<br />
provided. Covering larval tanks helps achieve<br />
settlement because doliolaria larvae are attracted to<br />
light and will otherwise aggregate near the surface.<br />
Methods used to induce settlement of doliolaria larvae<br />
include the addition of:<br />
Algamac 2000 at a concentration of 0.25–<br />
0.5 g/m3 h<br />
/day.<br />
h<br />
Seagrass leaves, which promote a distinctive<br />
biofouling layer.<br />
Possible problems<br />
h<br />
h<br />
Suitable settlement surfaces include: plastic sheets (PVC,<br />
polythene or polypropylene), fibreglass plates, mesh<br />
screens, and rough surface tiles suspended in the water.<br />
There are four ways to prepare the settlement surfaces:<br />
Immerse them in cultures of diatoms (Nitzschia<br />
sp., Navicula sp., or Platymonas sp.) for a few days.<br />
Add extracts of filtered seaweed Sargassum sp. or<br />
seagrass (Thalassia hemprichii, Enhalus acoroides)<br />
over a period of 4–5 days to form a fine coating<br />
on the settlement surfaces.<br />
Paint the surfaces with Spirulina (1–2 g dry powder/<br />
m2 h<br />
h<br />
h<br />
), and then leave them to air dry before use.<br />
h Immerse the surfaces for 4–10 days in outdoor<br />
tanks under partial shade (50–75%) in running<br />
1-µm filtered seawater to promote natural<br />
conditioning with diatoms.<br />
Settlement surfaces should be transferred into the<br />
larval tanks when the first doliolaria larva is observed.<br />
The biofilm on settlement surfaces comes off easily after 4–5 days in the larval tanks, in shady conditions.<br />
Settlement surfaces conditioned in unfiltered seawater can introduce predators to the larval tanks. Avoid<br />
contaminating larval tanks with unwanted organisms, such as copepods and protozoa.<br />
Figure 36. Settlement surface structure conditioned with cultured diatoms.<br />
LARvAL REARiNG<br />
25
26<br />
Feeding pentactula larvae and juveniles<br />
When conditions are suitable for settlement, doliolaria larvae usually disappear from the water column in<br />
around three days. At this stage, they are settled and begin to metamorphose into pentactula larvae. Pentactula<br />
larvae need food: fresh and dried algae are an important source of food for pentactula larvae, and for juveniles<br />
up to at least 50 mm in length.<br />
h<br />
h<br />
Feed with cultured diatoms (Nitzschia sp., Navicula sp.) daily from the doliolaria stage in larval tanks, and<br />
for the first month in nursery tanks. Add sodium metasilicate (5 g/m 3 ) and fertiliser (7 g/m 3 ) once a week<br />
to promote growth of diatoms in the tanks.<br />
Supplement feeding with commercial dried algae (Algamac 2000, Spirulina). Daily feeding rates are<br />
summarised in the table below.<br />
Hatching day Stage Algamac 2000 Spirulina<br />
10 Doliolaria<br />
12 Pentactula<br />
After 12<br />
Pentactula<br />
and juveniles<br />
0.25 g/m 3<br />
After 20 Juveniles 0.5 g/m 3<br />
0.25 g/m 3<br />
After 30 Juveniles Up to 1 g/m 3 Up to 1 g/m 3<br />
Other possible feeds:<br />
A fine paste of sieved (40–80 µm) seaweeds (Sargassum sp., Halimeda sp.) and seagrass (e.g. Syngodium<br />
isoetifolium).<br />
A fine-grade shrimp starter pellet at a daily rate of 1–1.5 g/m3 h<br />
h<br />
in the nursery tanks.<br />
Figure 37. Early juveniles in larval tank.
Review of daily tasks during larval rearing<br />
h<br />
h<br />
h<br />
h<br />
h<br />
h<br />
h<br />
h<br />
h<br />
h<br />
h<br />
Record temperature, oxygen and salinity twice a<br />
day, in the morning and afternoon.<br />
For the first 3–4 days, purge the tank bottom<br />
through the central drain pipe.<br />
Turn off the aeration for a few minutes. Wash the<br />
air diffusers with freshwater.<br />
Gently siphon the bottom of tanks, including<br />
any yellow or pink patches, into a 100-µm sieve.<br />
Examine the residual dirt under a microscope to<br />
check for dead larvae.<br />
Turn the aeration back on.<br />
Estimate larval density in the tanks:<br />
• Take a sample of the water column with a<br />
250 ml beaker. Pipette a 1 ml aliquot and<br />
place on a counting chamber (e.g. Sedgewick-<br />
Rafter chamber). Count the larvae in three<br />
samples of 1 ml,<br />
• Alternatively, take a sample of the water<br />
column in a test tube and count the larvae.<br />
Do this three times. Estimate average larval<br />
density per ml.<br />
Observe larval development: take a sample of<br />
larvae from the water column by gently submersing<br />
a small 100-µm sieve. Pipette a few of them and<br />
transfer into a small beaker. Transfer 1 ml of the<br />
sample to a counting chamber. Examine the larvae<br />
under a microscope. Formalin is usually added to<br />
fix the larvae.<br />
Record the lengths of 10 larvae per tank and the<br />
proportion of normal and abnormal larvae.<br />
Apply the water change protocol. On days when<br />
the water is changed, place an air diffuser below<br />
the 100-µm immersed sieve to avoid aggregation<br />
of larvae on the sieve.<br />
When the water change is finished, take a sample<br />
of the water column in a small beaker or test<br />
tube. Count the concentration of algae under<br />
a microscope. Add microalgae to the tanks to<br />
achieve the desired feeding rate.<br />
Remove the sieve at the outlet. Rinse it with<br />
chlorinated freshwater.<br />
Figure 38. Recording water parameters<br />
Summary<br />
h<br />
h<br />
h<br />
h<br />
h<br />
h<br />
h<br />
Maintain constant water temperature and<br />
salinity between buckets and larval tanks when<br />
transferring eggs.<br />
Early sandfish larvae, called auricularia larvae,<br />
are motile and planktonic. After 10–12 rearing<br />
days, auricularia larvae metamorphose into<br />
active swimming doliolaria larvae, which<br />
settle on the walls and floor of the tank and on<br />
other settlement surfaces. Doliolaria larvae<br />
metamorphose into benthic, slow-moving<br />
pentactula larvae. Juvenile sea cucumbers,<br />
shaped like adults, appear from day 15.<br />
Larval tanks should be cylindrical (up to 2<br />
m 3 ) with conical bottoms and supplied with<br />
moderate aeration. Seawater must be 1-µm<br />
filtered and UV-sterilised. Larval tanks should<br />
be illuminated for 12 hours a day, or have<br />
natural photoperiod. Lids or covers are used<br />
for the first two rearing days and during the<br />
doliolaria stage.<br />
Water change and feeding start at day 2. The<br />
water change can be partial or complete.<br />
Cultured microalgae are added at the rate of<br />
20 000 cells/ml, increasing to 40 000 cells/ml<br />
as long as auricularia larvae are still present<br />
ins the water column.<br />
After 10–12 rearing days, doliolaria larvae<br />
appear and look for suitable settlement<br />
surfaces before metamorphosing into benthic<br />
pentactula larvae. Stimulants and conditioned<br />
settlement surfaces encourage settlement.<br />
Pentactula larvae and juveniles feed mainly<br />
on diatoms (Nitzschia sp., Navicula sp.) and<br />
commercial dried algae (Algamac 2000,<br />
Spirulina).<br />
LARvAL REARiNG<br />
2
2<br />
Figure 39. Preparation of nursery tank includes inoculation with diatoms<br />
and insertion of settlement surfaces (plates).
NURSERY<br />
Culture of early juveniles<br />
At 25–35 days old, juveniles are transferred from<br />
larval tanks into nursery tanks. Nursery tanks are<br />
raceways, bigger pools or large tanks of 6 to 10 m 3 ,<br />
usually made of fibreglass, flexible PVC-cloth liner or<br />
concrete. The water in the nursery tanks should be at<br />
least 60 cm deep (maximum 1 m). Nursery tanks need<br />
to be conditioned prior to the transfer to ensure food<br />
is available for the juveniles.<br />
Procedure for conditioning nursery tanks:<br />
h Clean all tank surfaces. Install the aeration system<br />
and bare, clean settlement surfaces.<br />
h Fill the tank with 1-µm filtered and UV-sterilised<br />
seawater, fully immersing the settlement surfaces<br />
(i.e. a depth of 60–70 cm).<br />
Figure 40. Nursery tanks.<br />
h<br />
h<br />
h<br />
Inoculate the water with fresh diatom cultures at<br />
a rate of 6–7% of the total volume of water in<br />
the tank. Add sodium metasilicate (5 g/m 3 ) and a<br />
general fertiliser (7 g/m 3 ). Switch on the light.<br />
Turn off the water flow for the first 3–4 days to<br />
allow a diatom coating to develop on the plates or<br />
other settlement surfaces and tank walls. Maintain<br />
moderate aeration and mix the water daily.<br />
Keep the water temperature constant and warm<br />
(26–28°C).<br />
After conditioning, the nursery tanks are ready to<br />
receive pentactula larvae and early juveniles.<br />
NURSERY<br />
2
30<br />
Detaching and counting juveniles before transfer to nursery tanks<br />
Pentactula larvae and early juveniles are characterised by a very wide size range and are difficult to detach. The<br />
transfer procedure involves detaching juveniles from the larval tanks, estimating their abundance, and then<br />
putting them into the nursery tanks.<br />
Figure 41. Detachment by draining.<br />
Figure 42. Detachment by siphoning.<br />
h<br />
h<br />
h<br />
h<br />
h<br />
First, remove the settlement surfaces and attached<br />
animals from the larval tanks while holding a<br />
plastic tray underneath to catch any juveniles<br />
that fall off the plates. Transfer the plates and any<br />
loose juveniles to the nursery tanks.<br />
Second, remove the juveniles from the walls of the<br />
larval tanks. There are two methods for detaching<br />
juveniles from tank walls.<br />
1) Drain the larval tank completely through the<br />
bottom pipe and by siphoning the floor on to<br />
mesh sieves (0.3 to 1 mm) placed in bowls.<br />
Use a gentle jet of seawater to detach any<br />
remaining animals.<br />
2) Add potassium chloride (KCl) to the water<br />
using a 1% concentration. Leave for 10<br />
minutes and then replace with normal<br />
seawater. The juveniles will detach rapidly<br />
when the new seawater is added. Drain the<br />
tank onto mesh sieves placed in bowls. Use<br />
a spray of 1% KCl to detach any remaining<br />
animals.<br />
Estimate abundance by direct counts of juveniles<br />
on plates and sieves.<br />
1) For plates, count all juveniles on several<br />
individual plates, selected randomly.<br />
2) For sieves, count only a half or quarter of the<br />
total surface where there are high densities<br />
of juveniles.<br />
Use abundance estimates to calculate the survival<br />
from the egg to pentactula stage for each larval<br />
tank. Survival is usu ally variable and rarely higher<br />
than 1–2%.<br />
Use abundance estimates to calculate the initial<br />
density of juveniles placed in nursery tanks.<br />
Possible problem<br />
h The wide variation in the size distribution<br />
of juveniles can lead to brased estimates of<br />
abundance; thousands of pentactula larvae<br />
are too small to count without harming them.<br />
Estimates of abundance become more reliable<br />
as the juveniles grow larger.
The two stages of the nursery phase<br />
Figure 43. Nursery tank with settlement surfaces.<br />
First nursery phase (first month)<br />
The early juvenile stage (20 mm.<br />
NURSERY<br />
31
32<br />
Review of tasks during the nursery phase<br />
Daily tasks<br />
h Record temperature, oxygen and salinity twice a<br />
day, in the morning and afternoon.<br />
h Wash the screen placed at the tank outlet.<br />
h Change the water, using filtered seawater (1 µm<br />
for the first two months, 10–25 µm later), with<br />
constant flow-through of 6 L/min (100–200%).<br />
In case of restricted seawater supply, flow-through<br />
can be reduced to 3 L/min (40–50%) every night.<br />
High flow rates are generally better than low<br />
rates.<br />
h Stop the water flow for a few hours for feeding.<br />
Feed with diatom cultures, dried algae, seaweed<br />
paste and/or fine-grade starter shrimp pellet.<br />
Weekly tasks<br />
h For the first weeks, leave animals in shade; they<br />
avoid bright conditions and prefer shady sides of<br />
settlement surfaces.<br />
h Add diatom cultures during the first month.<br />
h Add sodium metasilicate and general fertiliser.<br />
Mix the water.<br />
h Invert all settlement surfaces. Diatoms grow in<br />
abundance on the upper side but not on the lower<br />
side. Pentactula larvae and juveniles stay at the<br />
bottom.<br />
h Take a sample of 30 juveniles per nursery tank<br />
to estimate the growth rate. Measure total and<br />
individual weights and calculate the average.<br />
Examine the physical condition of a few animals<br />
under a microscope.<br />
Monthly tasks<br />
h Estimate the number of juveniles per nursery<br />
tank to grade densities. Sample over 5% of the<br />
tank area, including the settlement surfaces, using<br />
small quadrats (20 cm x 20 cm). In cases of high<br />
density, collect juveniles with a siphon and hand<br />
nets. Distribute surplus juveniles to a new nursery<br />
tank.<br />
Possible problem<br />
h Unfiltered seawater can result in better<br />
growth than filtered seawater, but predators<br />
such as copepods can quickly contaminate<br />
the tank. Copepods compete for food with the<br />
juveniles.<br />
Figure 44. Copepod contamination.<br />
Summary<br />
h<br />
h<br />
h<br />
h<br />
h<br />
h<br />
Juveniles can be transferred to nursery tanks<br />
after 25–35 days.<br />
Nursery tanks are raceways, pools or tanks<br />
of 6 to 10 m 3 . They must be conditioned<br />
before transferring the animals. Conditioning<br />
consists of developing a diatom coating on the<br />
tank walls and settlement surfaces.<br />
Water exchange is flow-through or partial,<br />
with filtered seawater.<br />
Transfer of juveniles from larval tanks to<br />
nursery tanks requires detaching, counting<br />
and grading the animals. Spraying the<br />
walls of the tank with seawater after<br />
complete draining by siphoning, or chemical<br />
detachment using potassium chloride, are<br />
two methods of detachment.<br />
There are two nursery phases. During the first<br />
phase, the juveniles are held in bare tanks.<br />
After about one month, when they are 20 mm<br />
or 1 g, they are transferred to tanks with sand<br />
substrata (second nursery).<br />
Grading consists of reducing the density of<br />
juveniles over time. Initial densities range<br />
from 500 to 700 juveniles per m 2 in bare<br />
tanks; optimum densities vary from 100<br />
to 300 juveniles per m 2 in tanks with sand<br />
(second nursery).
GROW–OUT OF JUVENILES<br />
The following results are from experiments in Vietnam and New Caledonia. Results can be expected to vary<br />
from place to place.<br />
Figure 45. Hapas (1 m 2 ).<br />
In net pens in ponds<br />
Figure 46. Bag nets (4 m 2 ).<br />
In New Caledonia, to overcome space limitations in nursery tanks, juveniles 15–25 mm long (0.5–1 g), but<br />
as small as 5 mm were transferred to ‘hapas’ (1 m 2 net pens with fine mesh) in earthen ponds at densities of<br />
150 juveniles/m 2 . Survival averaged 97% over 23 days and growth rate was higher (0.1 g/day) in hapas with<br />
artificial seagrass.<br />
Larger juveniles (1–2 g) can be placed in ‘bag nets’ (4 m 2 net pens with coarse mesh) in earthen ponds at densities<br />
of 150 juveniles/m 2 . Feeding was not necessary in ponds with good natural productivity. When productivity<br />
was low, good growth was obtained by adding ground shrimp pellets (chicken manure or Sargassum sp. can also<br />
be used, but growth is not as good). Addition of sandy-mud substrate to the bag nets did not improve growth<br />
or survival. Growth rate averaged 0.08–0.1 g/day over 3 weeks.<br />
Weight range Net pens Net mesh<br />
0.5–1 g Hapa 1 m 2 , 1 m deep 660–670 µm<br />
1–2 g Bag net 1–4 m 2 , 1 m deep 1 mm<br />
Possible problems<br />
h To reduce risks of low oxygen levels, high temperature and anaerobic sediment, raise the floor of the hapas<br />
and bag nets off the substrata. Measure the temperature, oxygen and salinity of the pond water regularly.<br />
h Some netting materials are too abrasive for sandfish juveniles, or too fragile to be durable. Tentex is a suitable<br />
net material.<br />
h Nets become dirty after several weeks in ponds. Brush nets regularly to allow free water flow.<br />
GROW–OUT OF JUvENiLES<br />
33
34<br />
Figure 47. <strong>Sandfish</strong> juveniles grown in an earthen pond.<br />
In ponds<br />
In Vietnam, large sandfish (50–500 g) stocked in ponds<br />
had growth rates of 2.2–3.2 g/day. These growth rates<br />
varied inversely with stocking density in the range<br />
106–170 g/m 2 . Survival was high (88–97%) until<br />
the start of the wet season when massive mortality<br />
occurred due to stratification and lethally low salinity.<br />
In New Caledonia, juveniles of 1 g have been reared<br />
in earthen ponds at a density of 1.4 juveniles/m 2 . The<br />
growth rate observed over 1 year averaged 0.8 g/day<br />
(24 g/month).<br />
Mean water temperature (°C)<br />
28<br />
26<br />
24<br />
22<br />
20<br />
18<br />
16<br />
0<br />
1 2 3 4 5 6 7 8 9 10 11 12<br />
Grow out period (months)<br />
Possible problems<br />
h Quality and structure of sediment in ponds,<br />
and seawater supply, will affect growth and<br />
survival. Poor environmental conditions can<br />
lead to excessive growth of filamentous algae<br />
and anaerobic sediment.<br />
h Stratification of water from heavy rain leads<br />
to low oxygen levels, high temperatures and<br />
inadequate salinity (below 20 ppt).<br />
h Poor environmental conditions in ponds can<br />
lead to development of skin lesions.<br />
Figure 48. Growth rate of juveniles of 1 g reared in earthen ponds in New Caledonia, and mean temperature of pond water.<br />
1.2<br />
1.0<br />
0.8<br />
0.6<br />
0.4<br />
0.2<br />
0.0<br />
Growth rate (g/day)
In sea pens<br />
Figure 49. Sea pen of 500 m 2 .<br />
Various sea pens and cages have been used to grow out<br />
sandfish. These include 25 m 2 pens made from bamboo<br />
screens or palmirah rafters erected in shallow water with<br />
4 mm mesh; 0.6 m 2 rectangular iron cages with 2 mm<br />
mesh; 2 m 2 velon screen cages with 7 mm mesh; and 2<br />
m 2 netlon cages with 5 mm mesh. In general, growth<br />
and survival of sandfish in sea pens is much lower than<br />
in earthen ponds.<br />
In Vietnam, juveniles stocked at high density<br />
(500 g/m 2 ) in sea pens survived well (98%) but<br />
did not grow. Reducing the density to 390 g/m 2<br />
Figure 50. Juvenile sandfish (2.5 to 12 g).<br />
resulted in high survival (90%) and growth of<br />
1.7 g/day. Juveniles with an average weight of 84 g<br />
stocked at 0.73 juveniles/m 2 grew at a rate of 1.05<br />
g/day over 5 months when reared in a 2000 m 2 sea<br />
pen. The sea pen had 8 mm mesh and was placed in<br />
water 1.5–2.5 m deep with a silty-sand substratum<br />
and broken coral.<br />
In New Caledonia, survival 1–20 g juveniles placed in<br />
500 m 2 sea pens in shallow seagrass beds at densities of<br />
4 juveniles/m 2 was 5–9 % after 18 months.<br />
Summary<br />
h<br />
h<br />
h<br />
h<br />
h<br />
Juveniles as small as 5 mm can be transferred<br />
to hapas (net pens with fine mesh) in earthen<br />
ponds.<br />
At 1 g, juveniles can be reared in large bag nets<br />
with coarse mesh in earthen ponds.<br />
Hapas and bag nets should be kept off<br />
the bottom of the pond to reduce risks of<br />
unfavourable environmental conditions.<br />
Large juveniles (>1 g) can be released directly<br />
into earthen ponds.<br />
Juveniles can be stocked in sea pens. Less<br />
management is required, but growth and<br />
survival are far lower than in ponds.<br />
GROW–OUT OF JUvENiLES<br />
35
PROBLEMS AND POSSIBLE SOLUTIONS<br />
36<br />
PROBLEMS AND POSSIBLE SOLUTIONS<br />
h<br />
h<br />
h<br />
h<br />
Obtaining eggs: In many countries, eggs can only be obtained during a relatively short spawning season.<br />
This limits the scope for farming and sea ranching sandfish. Methods need to be developed to extend the<br />
spawning season by a few months.<br />
Size of rearing tanks: Small larval rearing tanks require considerable labour and are prone to variation in<br />
temperature. Use of larger larval tanks that require only partial water changes each day will improve the<br />
efficiency of larval rearing and lead to higher larval survival through reduced temperature-induced stress.<br />
Use of daylight instead of artificial light is also an advantage.<br />
Production of large volumes of algae: Algal production can be increased by using large outdoor cultures.<br />
However, keeping larger cultures free of contamination by copepods requires systems for adequate filtration,<br />
UV treatment and sterilisation by chlorination-dechlorination.<br />
Limited space for nursery tanks: As larger nursery tanks are required for the first nursery stage, this can<br />
often result in substantial costs. However, space can be saved by using additional conditioned plates and by<br />
grading to remove larger animals for the second nursery phase. For the second nursery, bag nets in ponds<br />
or seabed cages can be used to replace nursery tanks.<br />
Figure 51. Earthen pond suitable for installation of hapas and bag nets.
PROMISING APPLICATIONS FOR HATCHERY-REARED<br />
SANDFISH<br />
Provided methods can be developed for releasing cultured sandfish in the wild that ensure a high proportion<br />
of them survive, <strong>hatchery</strong>-reared juveniles could be used for restocking, stock enhancement and sea ranching<br />
programmes.<br />
h Restocking involves releasing cultured juveniles to restore the spawning biomass of a severely depleted<br />
fishery to a level where it can once again provide regular, substantial yields.<br />
h Stock enhancement is designed to increase the productivity of a fishery that is still operating reasonably<br />
well by overcoming shortfalls in the natural supply of juveniles.<br />
h Sea ranching differs from restocking and stock enhancement in that there is no intention of allowing the<br />
released animals to augment spawning biomass or particular age-classes within the population. Instead,<br />
animals are placed in the wild to be gathered at a larger size in ‘put and take’ operations.<br />
The availability of cultured juvenile sandfish also provides potential for farming this species in earthen ponds or sea<br />
pens. However, sandfish should not be reared in ponds together with shrimp because shrimp prey on sandfish.<br />
The following questions need to be answered to fully assess the potential for pond farming of sandfish:<br />
h What is the optimal density for stocking sandfish into ponds including those previously used to farm<br />
shrimp?<br />
h Do sandfish have a beneficial effect on the sediments of recently harvested and filled shrimp ponds?<br />
h Do sandfish need to be thinned out, or does food have to be added, later in the production cycle to<br />
maintain good growth rates?<br />
h If enrichment of sediments is needed, what is the best method?<br />
h Are some sediments better than others for rearing sandfish?<br />
Figure 52. Hatchery-reared sandfish.<br />
PROMiSiNG APPLiCATiONS FOR HATCHERY-REARED SANDFiSH<br />
3
3<br />
Figure 53. Large volumes of cultured microalgae in 150 L bags in an indoor<br />
culture room with artificial light.
ANNEX 1: ALGAL CULTURE<br />
Maintenance of algal cultures<br />
Purchase of stock algal cultures<br />
High quality algae to start new cultures are available<br />
from the following organisations:<br />
h CSIRO Marine and Atmospheric Research, GPO<br />
Box 1538, Hobart, Tasmania, 7001 Australia<br />
h Culture Collection of Algae and Protozoa, SAMS<br />
Research Services Ltd, Dunstaffnage Marine<br />
Laboratory, Oban, Argyll PA37 1QA, Scotland<br />
h Plymouth Culture Collection, Marine Biological<br />
Association, Citadel Hill, Plymouth, PL 2PB, U.K.<br />
Maintenance of stock cultures<br />
h Store the stock cultures in Erlenmeyer flasks<br />
(250 ml) in sterile and static conditions, close to<br />
artificial light in an air-conditioned room (20–<br />
24°C).<br />
h Keep two series of stock cultures of each species<br />
to reduce the risks of contamination and complete<br />
loss of algae.<br />
h Swirl the stock cultures by hand every day to<br />
maintain the algae in suspension.<br />
h Sub-culture the stock cultures once a week (or no<br />
longer than 2 weeks).<br />
Figure 54. Stock cultures of algae in Erlenmeyer flasks.<br />
Conditions required for the algal room (volumes of<br />
algae
40<br />
Preparation and inoculation of algal cultures<br />
Preparation or purchase of culture media<br />
The most common medium used in the culture of<br />
microscopic algae is Guillard’s f/2 medium. However,<br />
when using this medium the quantity of all ingredients<br />
should be doubled; f/2 medium becomes f medium.<br />
This f medium is more appropriate for culturing<br />
Rhodomonas salina.<br />
h Prepare the f/2 (Guillard’s) medium (nitrate,<br />
phosphate, trace metal mix, ferric citrate,<br />
vitamins). A solution of sodium metasilicate<br />
is added only for cultures of diatoms. Use the f<br />
medium for Rhodomonas salina culture.<br />
h Alternatively, the media can be purchased from:<br />
Culture Collection of Algae and Protozoa, SAMS<br />
Research Services Ltd, Dunstaffnage Marine<br />
Laboratory, Oban, Argyll PA37 1QA, Scotland.<br />
h Store the media in a dark, clean place in a fridge.<br />
Figure 55. Carboys (20 L).<br />
Preparation of flasks and 10-L carboys<br />
h Wash the culture vessels with detergent, rinse and<br />
leave to dry.<br />
h Fill flasks and carboys with 0.2–1 µm filtered<br />
and UV-sterilised seawater at low salinity (25–<br />
30 ppt).<br />
h Add the culture medium.<br />
h Add the glass tubes (aeration line), cotton and<br />
foil caps.<br />
h Autoclave at 121°C for 20 minutes.<br />
h Store flasks and carboys for at least 24 hours before<br />
use to overcome the temporary rise in pH.<br />
h Inoculate with algal cultures.
Preparation of 20-L carboys, bags and tanks<br />
h Wash with diluted chlorine (10%), rinse and leave<br />
to dry.<br />
h Fill with 1-µm filtered and UV-sterilised<br />
seawater.<br />
h Add chlorine (12.5% active) at a concentration of<br />
0.2 ml/L for a minimum of 4 hours, or overnight<br />
for up to 24 hours without aeration.<br />
h Turn on the aeration for 10–15 minutes to remove<br />
residual chlorine. Add sodium thiosulphate (stock<br />
Figure 56. Algal culture in a 500 L tank.<br />
h<br />
h<br />
solution at 250 g/L) at a rate of 0.2 ml/L for<br />
1 hour to neutralise residual chlorine. Conduct a<br />
chlorine test.<br />
After several minutes, add agricultural fertiliser<br />
such as Aquasol (2.5 g/100 L). For diatom cultures,<br />
also add sodium metasilicate (3.75 g/100 L).<br />
Inoculate with algal cultures.<br />
Sodium metasilicate is added for diatom cultures such as Chaetoceros sp., Navicula sp. and Nitzschia sp.;<br />
diatoms use the silicate for production of an external shell.<br />
ANNEX 1: ALGAL CULTURE<br />
41
42<br />
Inoculation method for flasks and carboys<br />
h Carry out inoculations in a laminar flow or simple<br />
glass cabinet.<br />
h Swab the cabinet work area and hands with 70%<br />
alcohol.<br />
h Place the culture volumes required for transfer<br />
in the cabinet close to the flame of a Bunsen<br />
burner.<br />
h Flame the mouths of the flasks before and after<br />
transfer.<br />
h Working close to the flame, remove the cap of<br />
the new flask and quickly add nutrients and algal<br />
inoculum.<br />
h Replace the cap immediately.<br />
h Label the flask with the date and the name of the<br />
algal species.<br />
Culture volumes Turnover time<br />
250 ml Erlenmeyer flasks 4–7 days<br />
2 L flasks 3–7 days<br />
10–20 L carboys 4–7 days<br />
150 L bags 7–14 days<br />
500 L tanks 4–7 days<br />
Summary<br />
h<br />
h<br />
h<br />
h<br />
h<br />
h<br />
h<br />
h<br />
Keep two series of stock cultures for each<br />
species of algae in Erlenmeyer flasks.<br />
Subculture once a week (or no longer than 2<br />
weeks).<br />
Maintain the cultures in flasks, carboys and<br />
bags in an air conditioned room (20–24°C)<br />
with lighting 14 hours per day. Swirl the stock<br />
cultures by hand daily and provide regular<br />
mixing for large volumes of cultures.<br />
Place a filter in the air line before it enters the<br />
culture to avoid contamination by ciliates.<br />
Preparation of an algal culture, and the<br />
sterilisation method used, depend on the<br />
culture volume.<br />
Sodium metasilicate should be added to the<br />
media for the culture of diatoms.<br />
Inoculation and transfer of algal cultures<br />
require a clean and sterilised environment.<br />
For outdoor cultures, water temperature must<br />
not exceed 32°C.
FURTHER READING<br />
Battaglene, S.C., 1999. Culture of tropical sea cucumbers<br />
for stock restoration and enhancement. Naga, The<br />
ICLARM Quarterly 22 (4): 4-11.<br />
Battaglene, S.C., Seymour, J.E., 1998. Detachment<br />
and grading of the tropical sea cucumber sandfish,<br />
Holothuria scabra, juveniles from settlement substrates.<br />
Aquaculture 159: 263-274.<br />
Battaglene, S.C., Seymour, J.E., Ramofafia, C., 1999.<br />
Survival and growth of cultured juvenile sea cucumbers,<br />
Holothuria scabra. Aquaculture 178: 293-322.<br />
Bell, J.D., Rothlisberg, P.C., Munro, J.L., Loneragan,<br />
N.R., Nash, W.J., Ward, R.D., Andrew, N.L., 2005.<br />
Restocking and stock enhancement of marine<br />
invertebrate fisheries. Advances in Marine Biology<br />
49: 1-370.<br />
Conand, C., 1989. Les holothuries aspidochirotes du<br />
lagon de Nouvelle-Calédonie : biologie, écologie et<br />
exploitation. Etudes et thèses ORSTOM,<br />
Paris, 393p.<br />
Hamel, J.-F., Conand, C., Pawson, D.L, Mercier, A., 2001.<br />
The sea cucumber Holothuria scabra (Holothuroidea:<br />
Echinodermata): Its biology and exploitation as<br />
beche-de-mer. Advances in Marine Biology 41:131-<br />
201.<br />
James, D.B., 1996. Culture of sea cucumber. Bulletin<br />
Central Marine Fisheries Research Institute 48:<br />
120-126.<br />
James, D.B., 1999. Hatchery and culture technology for<br />
the sea cucumber, Holothuria scabra Jaeger, in India.<br />
Naga, The ICLARM Quarterly 22 (4): 12-16.<br />
James, D.B., 2004. Captive breeding of the sea cucumber,<br />
Holothuria scabra, from India. Advances in sea<br />
cucumber aquaculture and management. FAO<br />
Fisheries Technical Paper 463: 385-395.<br />
James, D.B., Gandhi, A.D., Palaniswamy, N., Rodrigo,<br />
J.X., 1994. Hatchery <strong>techniques</strong> and culture of the sea<br />
cucumber Holothuria scabra. Central Marine Fisheries<br />
Research Institute Special Publication No. 57.<br />
Massin, C., 1999. Reef-dwelling holothuroidea<br />
(Echinodermata) of the spermonde archipelago<br />
Sulawesi, Indonesia. Zoologische Verhandelinger Leiden<br />
329: 4-144.<br />
Morgan, A.D., 1998. Husbandry and spawning of the<br />
sea cucumber Holothuria scabra (Echinodermata:<br />
Holothuroidea). Thesis submitted for the degree of<br />
Master of Science in Marine Science, University of<br />
Queensland, 20 November 1998.<br />
Morgan, A.D., 2001. Aspects of sea cucumber broodstock<br />
management (Echinodermata: Holothuroidea). SPC<br />
Bêche-de-mer Information Bulletin 13: 2-8.<br />
Pitt, R. 2001. Review of sandfish breeding and rearing<br />
methods. SPC Bêche-de-mer Information Bulletin 14: 14-21.<br />
Pitt, R., Duy, N.D.Q., 2003. How to produce 100 tonnes<br />
of sandfish. SPC Bêche-de-mer Information Bulletin<br />
18:15-17.<br />
Pitt, R., Duy, N.D.Q, 2004. Breeding and rearing of<br />
the sea cucumber Holothuria scabra in Viet Nam.<br />
Advances in sea cucumber aquaculture and<br />
management. FAO Fisheries Technical Paper 463:<br />
333-346.<br />
Pitt, R., Duy, N.D.Q., Duy, T.V., Long, H.T.C, 2004.<br />
<strong>Sandfish</strong> (Holothuria scabra) with shrimp (Penaeus<br />
monodon) co-culture tanks trials. SPC Bêche-de-mer<br />
Information Bulletin 20: 12-22.<br />
Pitt, R., Thu, N.T.X., Minh, M.D., Phuc, H.N., 2001.<br />
Preliminary sandfish growth trials in tanks, ponds<br />
and pens in Vietnam. SPC Bêche-de-mer Information<br />
Bulletin 15:17-27.<br />
Purcell, S., 2005. Developing technologies for restocking<br />
sandfish: Update on the WorldFish-SPC project<br />
in New Caledonia. SPC Bêche-de-mer Information<br />
Bulletin 22: 30-33.<br />
Ramofafia, C., Battaglene, S., Byrne, M., 2001. Larval<br />
development in the tropical sea cucumber Holothuria<br />
scabra. In Baker (ed.) Echinoderms 2000 Proceedings<br />
of the 10th International Echinoderm Conference, 28<br />
January to 5 February 2000, Dunedin, New Zealand,<br />
Swets and Zeitlinger, Lisse: 369-375.<br />
Shelley, C.C., 1985. Growth of Actinopyga echinites and<br />
Holothuria scabra (Holothurioidea: Echinodermata)<br />
and their fisheries potential (as beche-de-mer)<br />
in Papua New Guinea. Proceedings of the Fifth<br />
International Coral Reef Congress, 5: 297-302.<br />
FURTHER READING<br />
43
44<br />
NOTES