Operation manual - Werner Dosiertechnik
Operation manual - Werner Dosiertechnik
Operation manual - Werner Dosiertechnik

Create successful ePaper yourself
Turn your PDF publications into a flip-book with our unique Google optimized e-Paper software.
WDT Operating instructions GRANUDOS 10 TOP MC (04/06) page 10 of 18<br />
____________________________________________________________________________<br />
3. Installation<br />
3.1 Mounting the machine<br />
pack out the machine, lay down ist with the backside on zhe floor and support it at the lower part by<br />
about 5 cm. Now screw in the 4 feet with the screws on 1 side and female thread at the other into the<br />
moulded nuts in the bottom of the housing, do not turn them tight. Now adjust the tub to the 4 feet and<br />
fix it with the other 4 feet by screwing them through the bores in the tub. Then turn the machine up and<br />
settle it and the previewed place.<br />
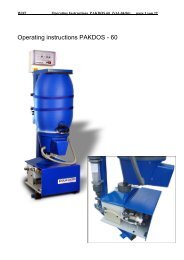
3.2 Tubing – please see installation diagram<br />
For satisfactory water flow through the dissolving system the supply pressure must be at least 0,2 bars. At<br />
low service pressure the counter pressure must be low, too. Counter pressure and pressure loss in the dosing<br />
line should be as low as possible. At works the GRANUDOS has been tested at following pressure<br />
conditions:<br />
Service pressure 1,2 bars Counter pressure 1,2 bars<br />
0,6 bars 0,8 bars<br />
0,3 bars 0,5 bars<br />
Within these ranges the GRANUDOS should function well. In addition please pay attention to the<br />
following:<br />
1. Tapping point for supply water to be before filter. Minimum pressure 2 mwg.. Measuring water<br />
supply directly from the booster pump or by an extra tapping point. In this case block the measuring<br />
water tapping above the booster pump by the attached PVC stopper 3/8”<br />
2. Dosing point after heat exchanger - a non return valve must be installed in the dosing tube.<br />
3. Ensure that the tapping/dosing points are free flowing and not blocked by scale or corrosion.<br />
4. Pipe runs to be kept as short as possible. PVC-tubing 25 mm or hose 1´´. For longer distances or<br />
poor pressure conditions use bigger tubing. If hoses are used do not kink them !!<br />
5. Piping should not go up and down as there could be formed “air bags” in the tubing preventing<br />
free water flow with consequently damage of the pump – especially at taking into operation.<br />
6. Use high quality PVC ball valves ¾”.<br />
7. If mounted above pool level please install non return valves into the supply and dosing tube, the<br />
latter spring loaded (0,3-0,5 bar) to prevent self empying of the flushing system<br />
Ballance<br />
tank<br />
circulation<br />
pump<br />
Main pool<br />
Filter<br />
Heat<br />
exchanger<br />
Dissolving water<br />
(measuring water)<br />
acid<br />
Measuring water<br />
pump<br />
Chlorine<br />
Acid<br />
GRANUDOS - TOP<br />
Autocontrol system for<br />
free chlorine, pH, ORP<br />
temperature<br />
Chemical dosing<br />
dry chlorine, acid<br />
flocculant<br />
chlorine<br />
flocculant