APRS©
APRS©
APRS©

Create successful ePaper yourself
Turn your PDF publications into a flip-book with our unique Google optimized e-Paper software.
<strong>APRS©</strong><br />
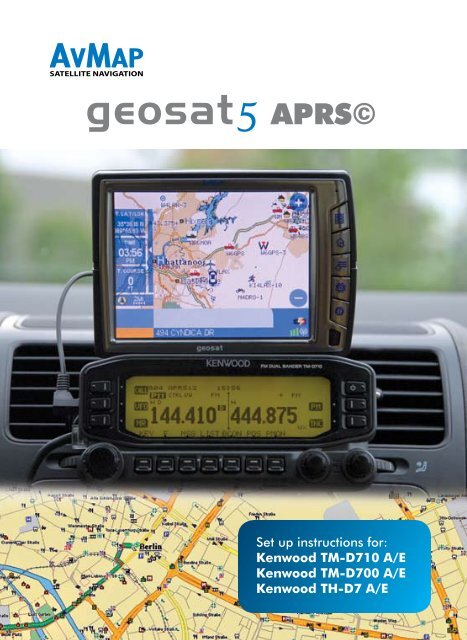
Set up instructions for:<br />
Kenwood TM-D710 A/E<br />
Kenwood TM-D700 A/E<br />
Kenwood TH-D7 A/E
Set up instructions for:<br />
Kenwood TM-D710 A/E<br />
Kenwood TM-D700 A/E<br />
Kenwood TH-D7 A/E
1. Introduction<br />
APRS is a method for sending and receiving position and other information over a radio transceiver.<br />
The Geosat 5 is ready to accept APRS inputs from a radio transceiver, and to provide fix position<br />
output data to the transceiver in order to transmit your current position.<br />
The Geosat 5 comes with a cable that is pre-wired for use with designated Kenwood radios. The<br />
input/output port used for APRS is the same port that is used for TMC, and is labeled TMC on the<br />
back of the Geosat 5. Due to the multi-use of the TMC port, it is not possible to operate APRS and<br />
TMC simultaneously.
Set-up for Kenwood TM-D710 A/E<br />
with the AvMap Geosat 5<br />
1. Kenwood TM-D710 A/E Radio set-up<br />
NOTE: These instructions assume you have basic familiarity with operation of both the TM-D710 A/E<br />
and the AvMap Geosat 5.<br />
a. Turn the radio ON.<br />
b. Press the “F” key to access the Setup Menu.<br />
c. Press the MHZ knob.<br />
d. Turn knob to select APRS.<br />
e. Press the MHZ knob again enter the menu selection mode<br />
Basic Setting Menu #600<br />
a. Enter your call sign.<br />
b. Set Beacon Type to APRS.<br />
c. Turn the MHZ knob to scroll through menus.<br />
Internal TNC Menu # 601<br />
a. Do not make any changes. Leave all settings at “Default.” Be sure that 1200 Bps is selected<br />
GPS Port Menu #602<br />
a. Change the Baud Rate to “9600”<br />
b. Set the Input to “GPS”<br />
c. Set the Output to “Waypoint”<br />
Waypoint Format Menu # 603<br />
a. Set Format to “Kenwood”<br />
b. Change NAME to “9-CHAR”<br />
c. The Output setting should be set to “ALL”<br />
Beacon Information Menu # 606<br />
a. Speed setting should be turned ON<br />
b. Altitude setting should be turned ON<br />
c. Position Ambiguity should be turned OFF<br />
Beacon TX Algorithm Menu # 611<br />
a. Set the Method to “Auto”
. Press ESC to return to the main page<br />
c. Change the APRS Frequency to: 144.390<br />
d. Select TNC and press to turn on APRS 12<br />
e. Press “BCON” to turn on -- BCON will appear in the upper right corner The Kenwood Radio is<br />
now ready to interface with the Geosat 5.<br />
2. Geosat 5 Setup<br />
a. Turn your Geosat 5 ON and press the MENU key<br />
b. Select “Settings” at the bottom of the menu<br />
c. Select “User Preferences”<br />
d. Touch the blue NEXT arrow to proceed to USER PREFERENCES 2/2<br />
e. Touch the INTERFACE button to go to the INTERFACE page<br />
f. On the INTERFACE page Select APRS 9600. It is highly recommended that you CYCLE the APRS<br />
9600 to APRS 4800 then back to APRS 9600 to insure that the Interface is locked to APRS 9600.<br />
This is highly recommended after any software updates.<br />
g. Select “OK” at the bottom right of the page The Geosat 5 is now setup and ready to interface with<br />
the Kenwood.<br />
3. Making it all work!<br />
a. Make sure both the Kenwood TM-D710 and AvMap Geosat 5 are turned OFF!<br />
b. Connect the four pole 2.5mm communication cable end to the Geosat 5’s TMC receptacle and<br />
the three pole 2.5 mm end to the D710’s GPS receptacle. IMPORTANT! These are easily reversed<br />
and hooked up backwards…also…when connecting to the Geosat 5 make sure you plug into the<br />
TMC receptacle…not the ANT receptacle which is right next to it and the same size! Check for a<br />
good click into the unit.<br />
c. NOW POWER UP BOTH UNITS!<br />
CAUTION! If you interface the units and do not see a flashing “GPS” signal on the upper right hand<br />
corner of the Kenwood, then the APRS cable may not be plugged-in all the way or correctly. Please<br />
check that the cord is plugged into the proper ports and plugged-in all the way. To ensure the APRS<br />
is plugged-in to the Geosat 5 all the way, press the cord again (may make a clicking noise 2 times).<br />
Also verify that the Geosat 5 is receiving a GPS fix.<br />
Once your G5 and radio are working properly together, you will see an indication on the radio (if<br />
it provides such) that it is receiving GPS position data. In addition, as the radio provides position<br />
information to the G5, stations will be plotted on the screen. Depending upon the location of plotted<br />
stations, you may need to expand the scale of the map, or translate the map to a different location<br />
in order to see them. You can also verify this in the CONTACTS folder, subfolder APRS. The G5 will<br />
detect whether a station is moving based on the data received from that station.<br />
If the G5 computes that a station is moving, it will be plotted as a red triangle with a call sign label.<br />
Stationary stations are plotted as a blue circle with a call sign label. To remove all APRS marks, enter<br />
the APRS folder you will have the option then to delete the folder. Once the folder is deleted, all APRS<br />
marks will be removed and the folder will be gone. When the first APRS mark is created, the G5 will<br />
create a new APRS labeled folder. To navigate to an APRS mark, select the desired APRS mark from<br />
the list and then press GO. You will get new routing instructions from the selected APRS mark when<br />
a new reposition packet is received.
Set-up for Kenwood TM-D700 A/E<br />
with the AvMap Geosat 5<br />
1. Kenwood TM-D700 A/E set-up<br />
NOTE: These instructions assume you have basic familiarity with operation of both the TH-D700 A/E<br />
and the AvMap Geosat 5.<br />
a. While programming the Kenwood TM-D700 and/or the AvMap Geosat 5, the communication cable<br />
should be disconnected. Strange and/or bad things can occur if you fail to head this warning!<br />
b. Starting with the Kenwood TM-D700. Note: Items in [ ] are buttons and { } are items you enter<br />
and/or ‘see’ on the radio screen.<br />
c. Turn on the radio.<br />
d. Make sure that {T}, {CT} and {DCS} do not appear at the top of your Kenwood TM-D700 screen,<br />
Table 1. Kenwood TM-D700 A/E Settings<br />
Screen # Item Select/Enter<br />
3-1 CALL SIGN {your call sign}<br />
3-2<br />
GPS UNIT- NEMA<br />
FORMAT<br />
{NEMA96}<br />
3-3 WAYPOINT {9 DIGITS NEMA}<br />
3-5 POS AMBIGUITY {OFF}<br />
3-7 POS LIMIT {OFF}<br />
3-B PACKET PATH {WIDE1-1,WIDE2-2}<br />
3-C<br />
3-D<br />
3-J<br />
PACKET TRANSMIT<br />
METHOD<br />
PACKET TRANSMIT<br />
INTERVAL<br />
PACKET TRANSFER<br />
RATE<br />
{AUTO}<br />
{3 MIN.} NOTE: Smaller times<br />
(
if they do press the [TONE] button until none of these appear.<br />
e. Press the menu button [MNU] and use the control knob to get to the APRS setup menu {APRS<br />
3-X} (the X here can be any letter or number) and press the [OK] button to select/enter.<br />
f. Use the [é] and [ê] buttons to go to different screens in the APRS menu and the [OK] button to<br />
select/enter that particular screen.<br />
g. Once you make your selection and/or entry push the [OK] button again to save the selection/<br />
entry. Then go back to ‘f.’ above to get to the next APRS screen and enter all the Table 1 settings<br />
below.<br />
h. Press the [ESC] button to leave the APRS setup screen and return the D700 user screen.<br />
i. You can now power down the radio and it will keep your settings.<br />
2. AvMap Geosat 5 set-up<br />
a. While programming the AvMap Geosat 5 and/or the Kenwood TM-D700, the communication<br />
cable should be disconnected. Strange and/or bad things can occur if you fail to head this<br />
warning!<br />
b. Items in [ ] are buttons and/or knobs and { } are items you enter/see on the Geosat 5 screen.<br />
c. Begin by pressing the [Page] button to turn the Geosat 5 on.<br />
d. After the “Welcome on board” On the {WARNING} page press [Accept] auto selects accept after<br />
5 seconds<br />
e. On the {MAIN MENU} page press [SETTINGS]<br />
f. On the {SETTNGS} page press [User Preferences]<br />
g. On the {USER PREFERENCES} page press [Interface]<br />
h. Press [=>] to go to 2/2 page.<br />
i. On the {INTERFACE} page press [APRS 9600] radial button 9600 seems to work best for the<br />
Kenwood APRS radios<br />
j. On the {INTERFACE} page press [OK]<br />
k. On the {USERPREFERENCES} page press [OK]<br />
l. On the {SETTINGS} page press [MAP]<br />
3. Making it all work!<br />
a. Make sure both the Kenwood TM-D700 and AvMap Geosat 5 are turned OFF!<br />
b. Connect the four pole 2.5mm communication cable end to the Geosat 5’s TMC receptacle and<br />
the three pole 2.5 mm end to the D700’s GPS receptacle. IMPORTANT! These are easily reversed<br />
and hooked up backwards; also when connecting to the Geosat 5 make sure you plug into the<br />
TMC receptacle, not the ANT receptacle which is right next to it and the same size! Check for a<br />
good click into the unit.<br />
c. NOW POWER UP BOTH UNITS!<br />
d. f your Kenwood D700 powers up in VFO mode (voice communications) push and hold the [F] button<br />
for 1 second and then push the [TNC] button. This will place your D700 in {TNC APRS} mode.<br />
e. GEOSAT 5. After the “Welcome on board” greeting use the [cursor knob] to select {YES} when<br />
asked about the {Would you like to drive in Passenger Mode?}.<br />
f. DOES IT WORK?? You will know you have done it right when you see {GPS} blinking at the top<br />
of your D700 screen and {1200} just to the right of that constantly on. The blinking GPS means<br />
that your G4T is ‘TALKING’ to your D700!<br />
g. To begin transmitting your position push and hold the [F] button for 1 second and then push the<br />
[Beacon] button.
Set-up for Kenwood TH-D7 A/E<br />
with the AvMap Geosat 5<br />
1. Kenwood TH-D7 A/E set-up<br />
NOTE: These instructions assume you have basic familiarity with operation of both the TH-D7 A/E<br />
and the AvMap Geosat 5.<br />
a. While programming the Kenwood TH-D7 and/or the AvMap Geosat 5, the communication cable<br />
should be disconnected. Strange and/or bad things can occur if you fail to heed this warning!<br />
b. Starting with the Kenwood TH-D7. Note: Items in [ ] are buttons and { } are items you enter<br />
and/or ‘see’ on the radio screen.<br />
c. Push the [Power] button to turn the radio on.<br />
Table 1. Kenwood TH-D7 A/E Settings<br />
The following APRS menu<br />
selections must be selected and/<br />
or filled in for proper TH-D7A/E<br />
- Geosat 5 operations. Screen #<br />
Item Select/Enter<br />
2-1 CALL SIGN {your call sign}<br />
2-2 GPS UNIT {NEMA96}<br />
2-3 WAYPOINT {9digits NEMA}<br />
2-5 POS AMBIGUITY {OFF}<br />
2-7 POS LIMIT {OFF}<br />
2-B PACKET PATH {WIDE1-1,WIDE2-2}<br />
2-C DATA TX {AUTO}<br />
2-D<br />
PACKET TRANSMIT<br />
INTERVAL<br />
{3 MIN.} NOTE: Smaller times<br />
(
d. Make sure that {T} and {CT} do not appear at the top of your D7A screen, if they do press the [F]<br />
button then [BAL] button to turn [T] off or the [F] button then [POS] button to turn off [CT].<br />
e. Press the [MENU] button and use the [Control Pad] (the top or bottom of the large round key<br />
pad on the left middle side of the D7A) to get to the APRS setup menu {APRS 2-X} (the X here<br />
can be any letter or number) and press the [OK] button (the right side of the [Control Pad]) to<br />
select/enter. Then use the [Control Pad] again to choose the APRS screen you desire and press<br />
[OK] to select/enter.<br />
f. Press the [ESC] button twice to leave the APRS setup screen and return the D7A user screen.<br />
g. You can now power down the radio and it will keep your settings.<br />
2. AvMap Geosat 5 set-up<br />
a. While programming the AvMap Geosat 5 and/or the Kenwood TH-D7, the communication cable<br />
should be disconnected. Strange and/or bad things can occur if you fail to head this warning!<br />
b. Items in [ ] are buttons and/or knobs and { } are items you enter/see on the Geosat 5 screen.<br />
c. Begin by pressing the [Page] button to turn the Geosat 5 on.<br />
d. After the “Welcome on board” greeting, on the {WARNING} page, press [Accept] (the navigator<br />
automatically selects accept after 5 seconds).<br />
e. On the {MAIN MENU} page press [SETTINGS].<br />
f. On the {SETTINGS} press [User Preferences]<br />
g. On the {USER PREFERENCES} page, press [Interface]<br />
h. Press [è] to go to page 2/2<br />
i. On the {INTERFACE} page, press the [APRS 9600] radial button. 9600 seems to work best for the<br />
Kenwood APRS radios<br />
j. On the {INTERFACE} page, press [OK].<br />
k. On the {USER PREFERENCES} page pres [OK].<br />
l. On the {SETTINGS} page press {MAP}.<br />
3. Making it all work!<br />
a. Make sure both the Kenwood TH-D7 and AvMap Geosat 5 are turned OFF!<br />
b. Connect the four pole 2.5mm communication cable end to the Geosat 5’s TMC receptacle and<br />
the three pole 2.5mm end to the D7A’s GPS receptacle. IMPORTANT! These are easily reversed<br />
and hooked up backwards; also when connecting to the Geosat 5 make sure you plug into the<br />
TMC receptacle, not the ANT receptacle which is right next to it and the same size!<br />
c. NOW POWER UP BOTH UNITS!<br />
d. Make sure the D7A is on the two meter band and the channel is set to 144.390.<br />
e. OK here we go! Press the [TNC] button on the D7A. This will open the {TNC} of your D7A and<br />
communications between the Geosat 5 and D7A should now begin. NOTE: Make sure that the<br />
radio isn’t in [TNC PACKET] mode.<br />
f. DOES IT WORK?? Press the [POS] button. This will bring up the coordinates screen. IF the<br />
Geosat 5 is talking to the D7A you should see the (degrees, periods and commas) blinking…if<br />
they are not blinking you are NOT communicating. Press the [POS] button again to return to the<br />
normal user screen.<br />
10