Brugsanvisning komplet - Harald Nyborg
Brugsanvisning komplet - Harald Nyborg
Brugsanvisning komplet - Harald Nyborg

You also want an ePaper? Increase the reach of your titles
YUMPU automatically turns print PDFs into web optimized ePapers that Google loves.
Dansk<br />
Produktoverblik 2<br />
Introduktion 3<br />
Aktivering 4<br />
Montering 6<br />
Fejlfinding & gode råd 9<br />
Vedligeholdelse 10<br />
Service & garanti 10<br />
Certifikater & godkendelser 11<br />
DK
Produktoverblik<br />
2 | DK<br />
Set indefra<br />
Lille display som viser ur eller parkeringstidspunkt.<br />
Radiosignal-indikator.<br />
Indikator for Lavt Batteriniveau.<br />
Ændrer indstillinger, aktiverer / deaktiverer radiostyret<br />
ur.<br />
Set udefra<br />
Stort display som viser parkeringsidspunktet.<br />
Klisterpuder som holder produktet fast på forruden.<br />
Under låget<br />
RESET: Nulstiller produktet<br />
Brug en nål eller papir-klips til at gå tilbage til fabriksindstillingen.<br />
Batterirum
Introduktion<br />
JACOB JENSEN Electronic Parking Disc er den elektroniske parkeringsskive,<br />
der automatisk registrerer og viser, hvornår bilen er parkeret.<br />
Produktet sættes fast på indersiden af bilens forrude. Parkeringstidspunktet<br />
vises i to LCD-displays.<br />
Produktet registrerer selv, når bilen startes, køres og parkeres. Parkeringstidspunktet<br />
i displayet kan dog ændres manuelt. Under kørsel<br />
fungerer displayet som ur og er synkroniseret med et internationalt<br />
radiosignal, der gør uret helt præcist.<br />
Rene linjer, simple former, kontraster mellem lyst og mørkt. Et unikt,<br />
rent og klassisk formsprog udviklet af Jacob Jensen og forædlet af<br />
hans søn, Timothy Jacob Jensen. To generationer af danske designere,<br />
som, gennem mere end 50 år, har bidraget til dagliglivets æstetik og<br />
glæde ved at designe produkter af ekstraordinær kvalitet til brug i<br />
hverdagen.<br />
Med JACOB JENSEN beviser designerne, at telefoner, ure, briller, køkkenting<br />
og andre hverdagsprodukter, som vi omgiver os selv med, kan<br />
være fyldt med inspiration, fundamental renhed og rolig skønhed.<br />
DK | 3
Aktivering<br />
Isæt batterier<br />
1. Drej produktets flade side i retning mod uret, så de to dele skilles fra<br />
hinanden, og batteridækslet kommer til syne.<br />
2. Tag batteridækslet af, og isæt to batterier (AA-batterier) oven på den<br />
sorte batterisnor. Husk at sikre, at batteriernes poler vender, som vist i<br />
batteriholderen.<br />
3. Begge LCD-displays viser nu automatisk 12:00.<br />
4. Saml herefter produktet igen ved at dreje de to dele på hinanden – denne<br />
gang i retning med uret. Tapperne skal passe i hakkene på drejeslisken.<br />
Når batterierne er brugt op, lyder en alarm, og symbolet vises i det lille<br />
(indre) display. Gentag herefter ovenstående procedure.<br />
NB! Det er nødvendigt at gentage indstillinger for ur og aktivere parkeringsfunktionen<br />
efter hvert batteriskift!<br />
Automatisk indstilling af ur<br />
Et symbol i det lille (indre) displays øverste venstre hjørne viser, at uret automatisk<br />
søger efter radiosignalet fra Frankfurt.<br />
= stærkt signal = svagt signal = intet signal<br />
Hvis signalet er stærkt, vil søgningen vare op til 10 minutter – hvis signalet<br />
er svagt, kan søgningen vare op til 24 timer. Signalets styrke kan<br />
variere alt efter lokale forhold og bilrudens type.<br />
4 | DK
Tryk ’ ’ og hold knappen inde i et par sekunder for at aktivere/genstarte<br />
søgningen. Tryk ’ ’og hold knappen inde i et par sekunder for<br />
at afbryde søgningen.<br />
Manuel indstilling af ur<br />
Det er muligt at indstille uret manuelt, hvis radiosignalet er svagt, eller<br />
hvis produktet straks skal tages i brug.<br />
1. Tryk på knappen ’SET’, og hold den inde i et par sekunder, indtil<br />
timetallet blinker.<br />
2. Indstil korrekt timetidspunkt ved at benytte ’ ’ eller ’ ’.<br />
3. Tryk på ’SET’ for at skifte til minuttal.<br />
4. Indstil korrekt minuttidspunkt ved igen at benytte ’∧ ’eller ’ ∧’.<br />
5. Tryk på ’SET’, og uret er nu indstillet.<br />
Bemærk: Tasterne låses 5 minutter efter parkering. Aktiveres igen ved<br />
kørsel eller reset. Efter manuel indstilling vil uret fortsætte sin søgning<br />
efter radiosignalet.<br />
Synkronisering med radiosignalet fra Frankfurt<br />
Uret i Electronic Parking Disc er programmeret til at synkronisere automatisk,<br />
når det er inden for en radius af 1500 kilometer (932 miles) fra radiosignalet<br />
DCF-77. Signalet udsendes fra en antenne i Frankfurt am Main,<br />
Tyskland. Uret vil modtage et opdateret signal seks gange dagligt og på den<br />
måde altid være helt præcist.<br />
Hvis produktet benyttes uden for antennens radius, eller hvis radiosignalet<br />
er for svagt, er det nødvendigt at indstille uret manuelt som beskrevet<br />
ovenfor.<br />
DK | 5
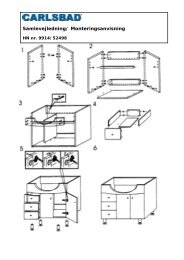
Montering<br />
Indtil parkeringsfunktionen aktiveres, vil de to displays automatisk<br />
slukke, hvis ingen knapper berøres indenfor to minutter. Uret og den<br />
automatiske søgning efter radiosignalet vil fortsat være aktivt, selvom<br />
displayet er slukket. Displays tænder igen ved tryk på en vilkårlig tast,<br />
indtil parkeringsfunktionen aktiveres.<br />
1. Affedt grundigt det område på indersiden af bilens forrude, hvor<br />
produktet skal sættes fast. Brug sprit eller anden rensevæske.<br />
2. Fjern beskyttelsesfilmen fra de tre små klæbepuder på produktets<br />
flade side, og montér skiven på indersiden af bilens forrude i nederste<br />
højre hjørne.<br />
3. Det er vigtigt at sikre, at det store display på produktets yderside er<br />
synligt udefra.<br />
Placeringen er vigtig<br />
For at produktet er gyldigt som p-skive, er det et krav fra Færdselstyrelsen,<br />
at det er korrekt monteret på bilens forrude i nederste højre hjørne.<br />
Kun nødvendigt at indstille én gang<br />
Når parkeringsfunktionen er indstillet som beskrevet i det følgende, er<br />
produktet klar til brug. Indstillingen skal foretages, før produktet benyttes<br />
første gang. Det er herefter ikke længere nødvendigt at foretage flere indstillinger<br />
før efter næste batteriskift.<br />
6 | DK
Aktivering af parkeringsfunktionen<br />
Inden første parkering eller ved batteriskift bør man altid sikre at parkeringsfunktionen<br />
er rigtig indstillet og at parkeringstidspunktet vises<br />
korrekt.<br />
1. Med motoren startet trykkes samtidig på ’SET’ og på ’ ’. Hold<br />
begge knapper inde indtil 3 korte og et langt bip har lydt.<br />
Et ’P’ kommer til syne i nederste venstre hjørne på det indre display.<br />
Produktet er nu klart til brug.<br />
Produktet kan til enhver tid nulstilles til sine oprindelige fabriksindstillinger.<br />
Det sker ved at dreje produktets forside af og trykke en spids<br />
genstand ned i hullet ’RESET’.<br />
Ved parkering (når motoren er slukket) vil begge displays altid vise<br />
parkeringstidspunktet – med mindre de er slukket manuelt, inden<br />
tastaturet låser efter 5 minutter. Under kørsel (når motoren er tændt)<br />
vil begge displays altid vise ur efter ca. 2 minutters kørsel – med mindre<br />
displays slukkes manuelt.<br />
Ved at trykke på ’SET’ er det muligt at skifte mellem følgende tre funktioner:<br />
a) Ur<br />
b) Parkeringstidspunkt<br />
c) Displays slukket<br />
DK | 7
Når bilen parkeres<br />
Hver gang bilen parkeres og motoren slukkes, angives indstillingen<br />
af parkeringstid af to korte bib. Electronic Parking Disc vil automatisk<br />
fastsætte parkeringstidspunktet til nærmeste kvarter. Hvis bilen for<br />
eksempel parkeres klokken 14:05, vil begge displays fastsætte parkeringstidspunktet<br />
til klokken 14:15. Op til fem minutter efter bilen er<br />
parkeret, er det muligt at ændre parkeringstidspunktet manuelt<br />
1. Tryk på ’SET’, og hold knappen inde i et par sekunder. Justér parkeringstidspunkt<br />
ved at benytte ’ ’eller ’ ’.<br />
2. Hvis bilen parkeres på et område uden restriktioner, kan displays<br />
slukkes ved at trykke på ’SET’.<br />
Hvis parkeringstidspunktet ikke ændres manuelt, låser tastaturet efter<br />
fem minutter.<br />
Når bilen flyttes<br />
Når motoren startes, og bilen kører, skifter begge displays tilbage til<br />
almindeligt ur efter cirka 2 minutter alt efter køremåde. Tastaturet er<br />
låst op automatisk efter 30 sekunder. Vær særlig opmærksom herpå<br />
ved meget kort kørsel. Du skal da indstille p-tiden manuelt.<br />
Måler selv, når bilen starter, kører og parkeres<br />
Teknologien i Electronic Parking Disc måler selv når bilen starter, kører og<br />
parkeres. På den måde kan produktet altid præcist angive, hvornår bilen<br />
parkeres.<br />
8 | DK
Fejlfinding & gode råd<br />
Hvis produktets ur ikke opfanger et tilstrækkeligt kraftigt radiosignal<br />
kan det skyldes:<br />
1. At signalet kan være svagt inde i bygninger. Gå udenfor med<br />
produktet eller læg det i en vindueskarm.<br />
2. At bilens forrude har en UV-beskyttelse, der svækker signalet. Gå<br />
udenfor med produktet, eller læg det i en vindueskarm.<br />
Hvis signalet fortsat er svagt, indstil da uret manuelt. Efter manuel indstilling<br />
vil produktet fortsat søge efter radiosignal. Tiden opdateres,<br />
næste gang et tilstrækkeligt stærkt signal opfanges.<br />
Hvis produktet under installationen ikke klæber fast til forruden, kan<br />
det skyldes:<br />
1. At ruden er snavset. Affedt ruden og produktet grundigt og benyt<br />
det ekstra sæt klæbepuder som medfølger.<br />
2. At ruden er for kold. Opvarm ruden, og forsøg igen.<br />
Hvis forruden skal skiftes, eller hvis produktet skal flyttes fra en bil til<br />
en anden, er det en fordel at blæse varm luft på ydersiden af forruden<br />
med f.eks. en hårtørrer, inden produktet fjernes. Det gør det nemmere<br />
at frigøre produktet og efterlader ikke mærker efter klæbepuderne.<br />
DK | 9
Vedligeholdelse<br />
1. Undgå at udsætte produktet for hårdhændet behandling, hårde<br />
stød, støv, fugt eller ekstreme temperaturer (≤ –20°C eller ≥ +70°C).<br />
2. Udsæt ikke produktet for vand. Hvis der kommer væske på produktet,<br />
skal det tørres af med en blød, fnugfri klud.<br />
3. Rengør ikke produktet med slibende eller ætsende midler.<br />
4. Produktet er designet til gå i stykker, hvis der bliver pillet unødigt<br />
ved det.<br />
5. Brug kun nye batterier – bland ikke nye og gamle batterier.<br />
6. Ved bortskaffelse må produktet af miljøhensyn ikke smides i skraldespanden.<br />
Det skal afleveres på et indsamlingssted, så materialerne<br />
kan genbruges.<br />
Service og garanti<br />
Læs om service og garanti i folderen “Certificate of Authenticity” som<br />
fulgte med produktet.<br />
Bemærk at evt. bødeforlæg ikke refunderes af udbyderen.<br />
10 | DK
Certifikater & godkendelser<br />
FS04<br />
Produktet er godkendt af Færdselsstyrelsen med henvisning til Bekendtgørelse<br />
nr. 327, 2003 angående parkeringsskiver.<br />
CE<br />
Hermed erklærer, F&H of Scandinavia at denne parkeringsskive<br />
(FH100) er i overenstemmelse med de væsentlige krav og øvrige relevante<br />
bestemmelser som fremgår af direktiv 1999/5/EC. For yderligere<br />
information, kontakt venligts F&H of Scandinavia.<br />
LANDE SOM ER OMFATTEDE AF RTTE-DIREKTIVET:<br />
Alle EU-lande, Schweiz (CH) og Norge (N).<br />
DK | 11
WEEE<br />
Elektrisk og elektronisk udstyr (EEE) indeholder materialer, komponenter<br />
og stoffer, der kan være farlige og skadelige for menneskers<br />
sundhed og for miljøet, hvis affaldet af elektrisk og elektronisk udstyr<br />
(WEEE) ikke bortskaffes korrekt.<br />
Produkter, der er mærket med nedenstående ’overkrydsede skraldespand’,<br />
er elektrisk og elektronisk udstyr. Den krydsede skralde-spand<br />
symboliserer, at affald af elektrisk og elektronisk udstyr ikke må<br />
bortskaffes sammen med usorteret husholdningsaffald, men skal indsamles<br />
særskilt.<br />
Indholdet i denne manual kan ændres uden varsel.<br />
12 | UK
PLEASE BE AWARE THAT IT IS ALWAYS THE DRIVER’S RESPONSIBILITY TO<br />
ENSURE THAT THE CLOCK IS SET CORRECTLY AND THAT THE PARKING TIME<br />
IS CORRECTLY SET BEFORE YOU LEAVE THE CAR.<br />
PLEASE BE ESPECIALLY AWARE OF THE TRANSITION BETWEEN SUMMER<br />
TIME AND WINTER TIME.<br />
PLEASE NOTE THAT DANISH REGULATION DICTATES THAT ONLY ONE PARK-<br />
ING DISC MAY BE INSTALLED. MAKE SURE TO REMOVE ANY OTHER PARK-<br />
ING DISC PRIOR TO INSTALLING THE JACOB JENSEN ELECTRONIC PARKING<br />
DISC.<br />
English<br />
Product overview 14<br />
Introduction 15<br />
Activation 16<br />
Mounting the device 18<br />
Troubleshooting & good advice 21<br />
Maintenance 22<br />
Service & warranty 22<br />
Certificates & approvals 23<br />
UK | 13<br />
UK
Product overview<br />
14 | UK<br />
Seen from the inside<br />
Small display showing the clock or parking time.<br />
Radio signal indicator.<br />
Indicator for Low Battery.<br />
Changes settings, activates/deactivates radio-controlled<br />
clock.<br />
Seen from the outside<br />
Large display showing the parking time.<br />
Adhesive pads holding the product in place on the<br />
windscreen.<br />
Under the cover<br />
RESET: Resets the product<br />
Use a needle or a paperclip to reset to factory settings.<br />
Battery compartment.
Introduction<br />
JACOB JENSEN Electronic Parking Disc is an electronic parking disc<br />
which automatically registers and displays when your car was parked.<br />
The product is attached to the inside of the windscreen. The parking<br />
time is shown on two LCD displays.<br />
The product registers when the car is started, is being driven and is<br />
being parked. The parking time on the display can however also be<br />
changed manually. During driving the display works as a clock and is<br />
synchronised using an international radio signal that ensures that the<br />
clock is always precise.<br />
Pure lines, simple forms, contrasts of light and dark. A unique, pure<br />
and classic form language developed by Jacob Jensen and refined by<br />
his son, Timothy Jacob Jensen. Two generations of Danish designers<br />
who, for over fifty years, have contributed to the aesthetics of daily<br />
life and pleasure by designing products of extraordinary quality for<br />
everyday use.<br />
With JACOB JENSEN they prove that the telephones, watches, eyewear,<br />
kitchens and other everyday products that we surround ourselves<br />
with may be filled with inspiration, radical purity and quiet beauty.<br />
UK | 15
Activation<br />
Insert batteries<br />
1. Turn the product’s flat side anti-clockwise so that the two parts separate<br />
and the battery cover appears.<br />
2. Remove the battery cover and insert two batteries (AA batteries) on top<br />
of the black battery strip. Remember to ensure that the batteries are inserted<br />
in the correct direction as shown in the battery compartment.<br />
3. Both LCD displays now show 12:00.<br />
4. Reassemble the product by turning the two parts on each other – this<br />
time clockwise. The tabs must fit into the grooves on the turnslide.<br />
When the batteries are flat, an alarm will sound and the symbol will be<br />
shown on the small (inside) display. Repeat the above procedure.<br />
NOTE! You will have to reset the settings for the clock and reactivate the<br />
parking function every time you replace the batteries!<br />
Setting the clock automatically<br />
A symbol in the top left-hand corner of the small (inside) display shows that<br />
the clock is searching automatically for the radio signal from Frankfurt.<br />
= strong signal = weak signal = no signal<br />
If the signal is strong, the search will last up to 10 minutes – if the signal is<br />
weak, the search may last up to 24 hours. The strength of the signal may vary<br />
depending on local conditions and the type of windscreen.<br />
16 | UK
Press ’ ’ and hold the key down for a couple of seconds to start/<br />
restart the search.<br />
Press ’ ’and hold the key down for a couple of seconds to stop the<br />
search.<br />
Setting the clock manually<br />
You can set the clock manually if the radio signal is weak or if you need<br />
to use the product immediately.<br />
1. Press the ’SET’ key and hold it down for a couple of seconds until<br />
the hours flash.<br />
2. Set the correct time by using ’ ’ or ’ ’.<br />
3. Press ’SET’ to change the minutes.<br />
4. Set the correct minutes by again using ’∧ ’or ’ ∧’.<br />
5. Press ’SET’ and the clock is now set.<br />
After you have set the clock manually, it will still continue its search<br />
for the radio signal.<br />
Notice that keys will lock 5 minutes after parking, and reactivate after<br />
driving or reset.<br />
Synchronising with the radio signal from Frankfurt<br />
The clock in the Electronic Parking Disc is programmed to synchronise automatically<br />
when it is within a radius of 1500 kilometres (932 miles) from<br />
the DCF-77 radio signal. This signal is broadcast from an aerial in Frankfurt<br />
am Main, Germany. The clock will receive an updated signal six times a day<br />
which means that the clock will always show the right time.<br />
If the product is used outside the radius of the aerial or if the radio signal is<br />
too weak, you will have to set the clock manually as described above.<br />
UK | 17
Mounting the device<br />
Until the parking function is activated, the two displays will automatically<br />
switch off if no buttons are pressed within two minutes. The clock<br />
and the automatic search for the radio signal will remain active even<br />
though the display is switched off. The displays switch on again if you<br />
press any button before the parking function is activated.<br />
1. Thoroughly clean the area on the inside of the windscreen to which<br />
you intend to attach the product. Use alcohol or other cleaning<br />
liquid.<br />
2. Remove the protective film from the three small adhesive pads on<br />
the flat side of the product and affix the disc to the lower righthand<br />
corner on the inside of the windscreen.<br />
3. It is important to ensure that the large display on the outside of the<br />
product is visible from outside the car.<br />
Positioning is important<br />
For the product to act as a valid parking disc the Danish Road Safety and<br />
Transport Agency requires that it is correctly fitted in the lower right-hand<br />
corner on the windscreen of the car.<br />
You only have to set the disc once<br />
When you have set the parking function as described below, the product<br />
is ready for use. You must set the product before it can be used. After this<br />
initial setting, you will not have to set the product again until you replace<br />
the batteries.<br />
18 | UK
Activation of the parking function<br />
Before you first use the disc for parking or after changing the batteries,<br />
you should always ensure that the parking function is correctly set and<br />
that the parking time is displayed correctly.<br />
1. With the engine running, simultaneously press ’SET’ and ’ ’. Hold<br />
both keys down until 3 short and 1 long beep is heard.<br />
A P icon will be shown in the lower left-hand corner of the inside display.<br />
The product is now ready for use.<br />
The product can be reset to its original factory settings at any time. This<br />
can be done by removing the front of the product and pressing a small<br />
pin into the ’RESET’ hole.<br />
When the car is parked (when the engine is switched off), both displays<br />
will always show the parking time – unless they are switched off manually<br />
before the keys lock after five minutes. When you are driving (when<br />
the engine is switched on), both displays will always show a clock when<br />
you have been driving for approx. two minutes – unless both displays are<br />
switched off manually.<br />
By pressing ’SET’ it is possible to toggle between the following three functions:<br />
a) Clock, b) Parking time & c) Displays off<br />
UK | 19
When the car is parked<br />
Every time the car is parked and the engine switched off, the setting of the<br />
parking time is indicated by two short beeps. The Electronic Parking Disc<br />
will automatically set the parking time forward to the nearest quarter of<br />
an hour. For example, if you park the car at 14:05, both displays will set the<br />
parking time to 14:15. It is possible to change the parking time manually<br />
for up to five minutes after you have parked the car.<br />
1. Press the ’SET’ key and hold it down for a couple of seconds. Adjust the<br />
parking time by using ’ ’or ’ ’.<br />
2. If you park the car in an area without parking restrictions, you can<br />
switch off the displays by pressing ’SET’.<br />
If the parking time is not changed manually, the keys will lock after five<br />
minutes have elapsed.<br />
When the car is moved<br />
When you start the engine and drive the car, both displays change back to a<br />
standard clock after approx. two minutes depending on driving mode. The<br />
keys have been unlocked automatically after 30 seconds. Please be aware<br />
of this if you only drive for a short while. You might then have to set the<br />
parking time manually.<br />
Registers when the car is started, is being driven and is being parked<br />
The technology in the Electronic Parking Disc automatically registers when<br />
the car is started, is being driven and is being parked. In this way, the product<br />
is always able precisely to register when the car is parked.<br />
20 | UK
Troubleshooting & good advice<br />
If the product’s clock is not picking up a sufficiently strong radio signal, it<br />
may be because:<br />
1. The signal may be weak inside buildings. Take the product outside or<br />
place it on a window sill.<br />
2. The windscreen has UV protection which weakens the signal. Take the<br />
product outside or place it on a window sill.<br />
If the signal is still weak, set the clock manually. When you have set the<br />
clock manually, the product will continue to search for a radio signal. The<br />
time will be updated next time a sufficiently strong signal is picked up.<br />
If the product cannot be attached to the windscreen, it may be because:<br />
1. The windscreen is dirty. Clean the windscreen thoroughly and use the<br />
extra set of adhesive pads included.<br />
2. The windscreen is too cold. Warm up the windscreen and try again.<br />
If you need to change the windscreen or if the product is to be moved from<br />
one car to another, blow hot air on the outside of the windscreen with e.g.<br />
a hairdryer before removing the product. This makes it easier to release the<br />
product and ensures that no marks from the adhesive pads remain.<br />
UK | 21
Maintenance<br />
1. Avoid handling the product roughly or exposing it to violent impact,<br />
dust, moisture or extreme temperatures (≤ –20°C or ≥ +70°C).<br />
2. Avoid exposing the product to water. If the product should come<br />
into contact with water, dry it with a soft, lint-free cloth.<br />
3. Do not clean the product with abrasive or corroding agents.<br />
4. The product is designed to break if it is tampered with.<br />
5. Use only new batteries – do not mix old and new batteries.<br />
6. For environmental reasons the product must not be disposed of<br />
together with domestic waste. It should be taken to the nearest<br />
recycling plant.<br />
Service & warranty<br />
Find out more about service and warranty in the “Certificate of Authenticity”<br />
folder included with the product.<br />
Please note that the provider will not reimburse any parking fines.<br />
22 | UK
Certificates & approvals<br />
FS04<br />
The product is certified by the Danish Road Safety and Transport Agency<br />
with reference to Order no. 327, 2003 on parking discs.<br />
CE<br />
Hereby, F&H of Scandinavia, declares that this parking disc (FH100) is<br />
in compliance with the essential requirements and other relevant provisions<br />
of Directive 1999/5/EC. Please contact F&H of Scandinavia for<br />
further information.<br />
COUNTRIES RTTE APPROVED COMPLIED<br />
All EU countries, Switzerland (CH) and Norway (N)<br />
UK | 23
WEEE<br />
Electrical and electronic equipment (EEE) contains materials, components<br />
and substances that may be dangerous and hazardous to human<br />
health and to the environment when waste from electrical and electronic<br />
equipment (WEEE) is not disposed of correctly.<br />
Products labelled with the ‘crossed-out garbage bin’ logo below constitute<br />
electrical and electronic equipment. The crossed-out rubbish<br />
bin logo means that waste from electrical and electronic equipment<br />
must not be disposed of together with unsorted domestic waste, but<br />
must be disposed of separately.<br />
The contents of this manual may change without notice.<br />
24 | UK