The Photographer's Guide to Capture NX2
The Photographer's Guide to Capture NX2
The Photographer's Guide to Capture NX2
Create successful ePaper yourself
Turn your PDF publications into a flip-book with our unique Google optimized e-Paper software.
<strong>The</strong> Pho<strong>to</strong>grapher’s <strong>Guide</strong> <strong>to</strong> <strong>Capture</strong> <strong>NX2</strong><br />
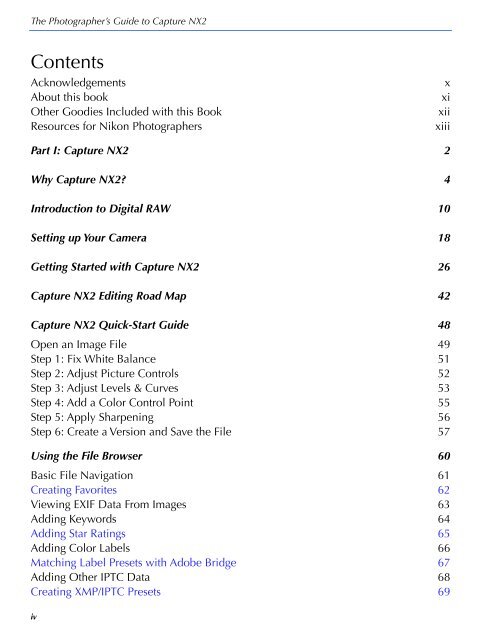
Contents<br />
Acknowledgements x<br />
About this book xi<br />
Other Goodies Included with this Book xii<br />
Resources for Nikon Pho<strong>to</strong>graphers xiii<br />
Part I: <strong>Capture</strong> <strong>NX2</strong> 2<br />
Why <strong>Capture</strong> <strong>NX2</strong>? 4<br />
Introduction <strong>to</strong> Digital RAW 10<br />
Setting up Your Camera 18<br />
Getting Started with <strong>Capture</strong> <strong>NX2</strong> 26<br />
<strong>Capture</strong> <strong>NX2</strong> Editing Road Map 42<br />
<strong>Capture</strong> <strong>NX2</strong> Quick-Start <strong>Guide</strong> 48<br />
Open an Image File 49<br />
Step 1: Fix White Balance 51<br />
Step 2: Adjust Picture Controls 52<br />
Step 3: Adjust Levels & Curves 53<br />
Step 4: Add a Color Control Point 55<br />
Step 5: Apply Sharpening 56<br />
Step 6: Create a Version and Save the File 57<br />
Using the File Browser 60<br />
Basic File Navigation 61<br />
Creating Favorites 62<br />
Viewing EXIF Data From Images 63<br />
Adding Keywords 64<br />
Adding Star Ratings 65<br />
Adding Color Labels 66<br />
Matching Label Presets with Adobe Bridge 67<br />
Adding Other IPTC Data 68<br />
Creating XMP/IPTC Presets 69<br />
iv
Working with the Browser: Thumbnail List 71<br />
Working with the Browser: Thumbnail Grid 72<br />
Working with the Browser: Filtering 73<br />
Filtering by Star Rating 74<br />
Filtering by Color Label 75<br />
Filtering by File type 76<br />
Sorting Images in the File Browser 77<br />
Comparing Multiple Images in the Browser 79<br />
Printing a Contact Sheet 81<br />
<strong>The</strong> Batch Dialog 83<br />
Advanced Batching: Watched Folders 84<br />
Batching 101: Converting NEFs <strong>to</strong> JPEGs 85<br />
Batching 201: Copying Settings Between Files 87<br />
Batching 301: Pasting Selected Settings From an Open File 89<br />
<strong>The</strong> Develop Section: Setting the Foundation 92<br />
<strong>The</strong> Develop Section: Overview 95<br />
<strong>The</strong> Develop Section: Camera Settings 96<br />
RAW Adjustments: White Balance 97<br />
Using White Balance Presets 98<br />
White Balance: Examples 99<br />
Cus<strong>to</strong>m White Balance with a Gray Card 101<br />
Creative White Balance: <strong>The</strong> “Golden Hour” 103<br />
RAW Adjustments: Picture Controls 105<br />
Checkpoint: Choosing a Picture Control Preset 107<br />
Picture Control: Disable In-Camera Sharpening 109<br />
Advanced Control: Quick Adjust 110<br />
Advanced Control: Sharpening 111<br />
Advanced Control: Contrast Fine-Tuning 113<br />
Advanced Control: Brightness 115<br />
Advanced Control: Saturation 117<br />
Advanced Control: Hue Adjustment 119<br />
Advanced Control: Monochrome Images 121<br />
B&W: Color Filter Effects 122<br />
Advanced: Color-Toned Images 123<br />
Workflow Tip: Saving Picture Control Presets 125<br />
Advanced: Creating Cus<strong>to</strong>m Curves 127<br />
Transferring Picture Control Settings <strong>to</strong> Your Camera 129<br />
v
<strong>The</strong> Pho<strong>to</strong>grapher’s <strong>Guide</strong> <strong>to</strong> <strong>Capture</strong> <strong>NX2</strong><br />
Downloading Picture Controls From Your Camera 131<br />
Disabling In-Camera Noise Reduction 133<br />
Adjust Active D-Lighting (optional) 134<br />
<strong>The</strong> Quick Fix Controls 135<br />
<strong>The</strong> Exposure Compensation Slider 137<br />
Highlight Protection 139<br />
Shadow Protection 141<br />
Adjusting Global Contrast: Levels & Curves 143<br />
Levels and Curves: Examples 145<br />
Adjusting Saturation 147<br />
Camera Settings and Quick Fix : Summary 148<br />
Camera & Lens Corrections 149<br />
Color Moiré Reduction 150<br />
Image Dust Off Tool 151<br />
Au<strong>to</strong> Color Aberration Tool 152<br />
Au<strong>to</strong> Red-Eye Reduction 153<br />
Vignette Control 154<br />
Fisheye Lens Correction 155<br />
Develop Section: Conclusions 157<br />
<strong>The</strong> Adjust Section: Introduction <strong>to</strong> Edit Steps 160<br />
Edit Steps: <strong>The</strong> Concept 161<br />
Edit Steps: An Overview 162<br />
Creating a Global Adjustment in the Edit List 163<br />
Adding More Edit Steps 165<br />
Deleting Edit Steps from the Edit List 166<br />
Resetting Adjustments 167<br />
Changing an Edit Step 168<br />
Advanced: Opacity Mixer 169<br />
Global Adjustments <strong>to</strong> Light and Color 172<br />
Using the Double Threshold Tool 173<br />
Using the Black Control Point 175<br />
Setting the White Point: White Control Point 177<br />
Global Light and Color: Levels & Curves Tool 179<br />
Basic Levels Adjustment 181<br />
Levels & Curves: Au<strong>to</strong> Contrast 183<br />
<strong>The</strong> Au<strong>to</strong> Levels Tool 185<br />
vi
<strong>The</strong> LCH Edi<strong>to</strong>r 187<br />
LCH: Color Lightness 188<br />
LCH: Saturation 189<br />
Example: Protecting Skin Tones 190<br />
LCH: Hue 191<br />
Other Global Adjustments 192<br />
Local Adjustments I: Selection Tools 194<br />
Fill/Remove Tool 195<br />
Lasso/Marquee Tools 197<br />
Viewing Selections 199<br />
Base Mask 200<br />
<strong>The</strong> Selection Brush Tool 201<br />
Gradient Tools 203<br />
Selection Control Points 205<br />
Duplicating Selection Control Points 207<br />
Interactions Between Selection Tools 209<br />
Linking Adjustments in a Single Edit Step 211<br />
Example: Graduated ND Filter 213<br />
Example: Burned-in Edges 215<br />
Example: Spotlight Effect 217<br />
Example: Dodge & Burn Tools 219<br />
Workflow Tip: Creating a Settings File 221<br />
Local Adjustments <strong>to</strong> Light & Color: Color Control Points 224<br />
Color Control Points: Overview 225<br />
Control Points: Adjusting Size 227<br />
Multiple Control Points 229<br />
Advanced: Color Control Points and the Brush 231<br />
Duplicating Color Control Points 233<br />
Example: Fixing a Weak Sky 235<br />
Example: Fill Lighting 237<br />
Advanced: <strong>The</strong> Color Picker Tool 239<br />
Other Local Adjustments 242<br />
<strong>The</strong> Au<strong>to</strong> Re<strong>to</strong>uch Brush 243<br />
Red Eye Control Points 244<br />
vii
<strong>The</strong> Pho<strong>to</strong>grapher’s <strong>Guide</strong> <strong>to</strong> <strong>Capture</strong> <strong>NX2</strong><br />
“Final” Touches 246<br />
Straightening Images 247<br />
Advanced: Correcting Lens Dis<strong>to</strong>rtion 249<br />
<strong>The</strong> Crop Tool 251<br />
Filter Effects Menu 253<br />
Sharpening and Noise Reduction 256<br />
<strong>The</strong> Unsharp Mask (USM) Tool 258<br />
<strong>Capture</strong> Sharpening 259<br />
Suggested <strong>Capture</strong> Sharpening Settings 260<br />
Advanced: High Pass Sharpening 261<br />
Creative Sharpening 262<br />
Noise Reduction Techniques in <strong>Capture</strong> <strong>NX2</strong> 263<br />
Basics of Noise Reduction 265<br />
Advanced Noise Reduction 267<br />
<strong>Capture</strong> Sharpening after Noise Reduction 269<br />
<strong>The</strong> Output Phase 272<br />
Resizing Images 273<br />
Cropping and Resizing 275<br />
Soft-Proofing 277<br />
Output Sharpening 279<br />
Example: Resizing for Web or Email 281<br />
Printing in <strong>Capture</strong> <strong>NX2</strong> 283<br />
Saving Files 285<br />
Opening your NEFs in a Pixel Edi<strong>to</strong>r 287<br />
Streamlining your Editing Workflow 290<br />
Creating a Settings File from an Edit Step 291<br />
Creating Settings Files for the Develop Section 293<br />
Applying Settings Files 295<br />
Example: Multi-Step Settings File 297<br />
Managing Settings Files 299<br />
Creating Versions 301<br />
Part II: <strong>Capture</strong> <strong>NX2</strong> “Recipes” 304<br />
Basic Portrait Recipe 305<br />
Portraits: Fill Lighting 307<br />
viii
Portraits: Whitening Teeth 308<br />
Portraits: Softening Skin 309<br />
Portraits: Reducing Wrinkles 311<br />
Portraits: Sharpening Eyes 312<br />
Basic Landscape Recipe 313<br />
Removing Haze 315<br />
Improving Clarity 317<br />
Basic Wildlife Recipe 319<br />
Basic Black and White Conversions 321<br />
<strong>The</strong> “Ansel Adams” Look 323<br />
Selective Black & White Effect 325<br />
Digital Infrared Images 327<br />
Part III: Integrating <strong>Capture</strong> <strong>NX2</strong> in<strong>to</strong> Your Workflow 332<br />
Advanced Workflow: Editing NEFs in View NX 349<br />
Emailing Pho<strong>to</strong>s with View NX 350<br />
Emailing Images from Pho<strong>to</strong> Mechanic 351<br />
Extracting JPEGs from NEFs 353<br />
Creating a Web Gallery in Pho<strong>to</strong> Mechanic 355<br />
Appendix 1: Direc<strong>to</strong>ry of <strong>Capture</strong> <strong>NX2</strong> Tools 357<br />
Appendix 2: Supplied Settings Files 373<br />
Index 375<br />
ix


