assessing aesthetic composite veneer placement via digital ...
assessing aesthetic composite veneer placement via digital ...
assessing aesthetic composite veneer placement via digital ...

Create successful ePaper yourself
Turn your PDF publications into a flip-book with our unique Google optimized e-Paper software.
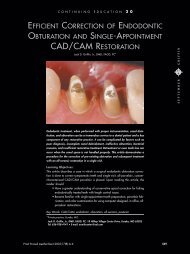
CONTINUING EDUCATION X X<br />
ASSESSING AESTHETIC COMPOSITE<br />
VENEER PLACEMENT VIA<br />
DIGITAL PHOTOGRAPHY<br />
Jack D. Griffin, Jr, DMD*<br />
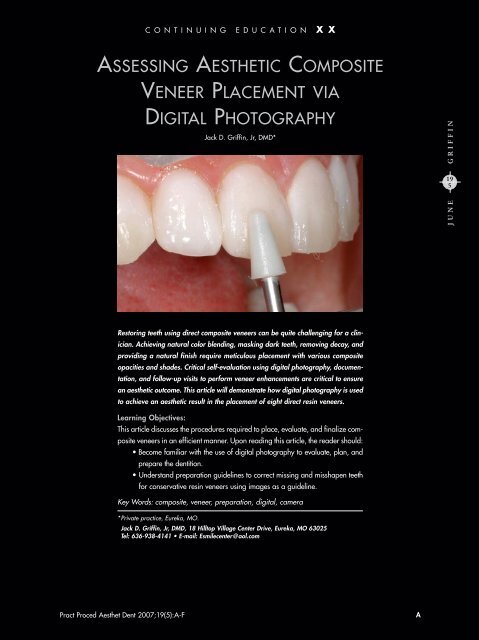
Restoring teeth using direct <strong>composite</strong> <strong>veneer</strong>s can be quite challenging for a clinician.<br />
Achieving natural color blending, masking dark teeth, removing decay, and<br />
providing a natural finish require meticulous <strong>placement</strong> with various <strong>composite</strong><br />
opacities and shades. Critical self-evaluation using <strong>digital</strong> photography, documentation,<br />
and follow-up visits to perform <strong>veneer</strong> enhancements are critical to ensure<br />
an <strong>aesthetic</strong> outcome. This article will demonstrate how <strong>digital</strong> photography is used<br />
to achieve an <strong>aesthetic</strong> result in the <strong>placement</strong> of eight direct resin <strong>veneer</strong>s.<br />
Learning Objectives:<br />
This article discusses the procedures required to place, evaluate, and finalize <strong>composite</strong><br />
<strong>veneer</strong>s in an efficient manner. Upon reading this article, the reader should:<br />
• Become familiar with the use of <strong>digital</strong> photography to evaluate, plan, and<br />
prepare the dentition.<br />
• Understand preparation guidelines to correct missing and misshapen teeth<br />
for conservative resin <strong>veneer</strong>s using images as a guideline.<br />
Key Words: <strong>composite</strong>, <strong>veneer</strong>, preparation, <strong>digital</strong>, camera<br />
*Private practice, Eureka, MO.<br />
Jack D. Griffin, Jr, DMD, 18 Hilltop Village Center Drive, Eureka, MO 63025<br />
Tel: 636-938-4141 • E-mail: Esmilecenter@aol.com<br />
Pract Proced Aesthet Dent 2007;19(5):A-F A<br />
GRIFFIN<br />
19<br />
5<br />
JUNE
Practical Procedures & AESTHETIC DENTISTRY<br />
Porcelain and <strong>composite</strong> restorations have been<br />
widely used over the past 20 years to create highly<br />
<strong>aesthetic</strong> smiles. Replacing missing tooth structure can<br />
be successfully achieved with minimal tooth reduction<br />
as long as concepts in smile design, tooth preparation,<br />
and material limitations are understood. 1-3 While <strong>composite</strong><br />
<strong>veneer</strong>s may be the greatest expression of creativity<br />
and artistic ability among clinicians, direct resin<br />
techniques can be difficult to perfect. 4 Contemporary<br />
<strong>composite</strong> systems provide clinicians with materials of<br />
varying shades and opacities that can mimic natural<br />
tooth structure when used in smile enhancement. 5<br />
As demonstrated in this presentation, the key to a<br />
successful outcome is knowing when to use the different<br />
<strong>composite</strong>s in each tooth, objectively evaluating<br />
<strong>placement</strong>, and then making necessary corrections.<br />
Photography and self-evaluation are critical adjuncts in<br />
direct <strong>veneer</strong> <strong>placement</strong> (Table).<br />
Simplifying Composite Selection<br />
Many of the resin systems (eg, Renamel, Cosmedent,<br />
Chicago, IL; Filtek Supreme Plus, 3M Espe, St. Paul, MN;<br />
Esthet-X, Dentsply Caulk, Milford, DE) available today<br />
have at least three opacities of <strong>composite</strong>, an important<br />
requisite when life-like <strong>veneer</strong>s are desired. 6 The key is<br />
knowing where to place each layer and in what shade<br />
to obtain consistent and natural results. Dentin <strong>composite</strong>s<br />
have more opacity than other <strong>composite</strong>s and are<br />
used for three basic reasons: to replace missing dentin,<br />
to add length or width to the tooth, and to conceal darker<br />
tooth colors. As a result, they efficiently block unwanted<br />
light transmission when the clinician is performing length<br />
or width additions or covering transition areas within<br />
the restoration (eg, when hiding the edge of a fracture).<br />
Since these dentin materials are typically microhybrids,<br />
they possess the strength needed to withstand occlusal<br />
forces in the intraoral environment. 7,8<br />
B Vol. 19, No. 4<br />
Table<br />
Clinical Uses for Photography in<br />
a Composite Veneer Case<br />
• Pre-treatment: Planning the case;<br />
• Mid-treatment: Scrutinizing <strong>placement</strong>, anatomy,<br />
and finish. Using as a framework for making<br />
adjustments; and<br />
• Post-treatment: Evaluating material and technique<br />
performance.<br />
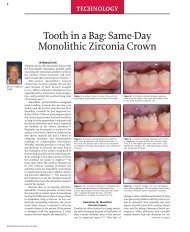
Figure 1. The lip line covered all of the gingiva except for<br />
the points of the papilla. Both porcelain and <strong>composite</strong><br />
<strong>veneer</strong>s were offered to the patient.<br />
Figure 2. Decay and <strong>composite</strong> material must be completely<br />
removed prior to <strong>composite</strong> <strong>placement</strong>.<br />
Incisal shades are strategically used in small amounts<br />
to mimic translucency and incisal characterization or to<br />
enhance the surface of the entire restoration. Since these<br />
<strong>composite</strong>s have little opacity, they cannot be used to<br />
conceal a color or transition area. If used properly, however,<br />
they will give the restoration a natural appearance.<br />
Enamel <strong>composite</strong>s basically fall between dentin and<br />
incisal in terms of opacity and their ability to mask color.<br />
They form the majority of the facial surface of the tooth<br />
and are used to form the basis of the final desired tooth<br />
shade. Their color intensity is influenced by the thickness<br />
of the resin layer and by any color that might be<br />
underneath it. The thicker it is—this also applies to dentin<br />
shades—the more intense and consistent its final shade<br />
will be. These are the basic components necessary for<br />
the clinician to create highly <strong>aesthetic</strong> <strong>composite</strong>s using<br />
a direct layering technique. While varying tints and customization<br />
materials are often needed when matching<br />
a single tooth, they are seldom required for a complete<br />
<strong>veneer</strong> case.
Figure 3. Decay, <strong>composite</strong>, and surface stains are removed,<br />
and the entire surface is roughened with a diamond bur.<br />
A contour matrix is placed and very lightly wedged.<br />
Figure 4. The areas of missing tooth structure interproximally<br />
and incisally are replaced with a microhybrid<br />
matching the existing dentin shade.<br />
Patient Examination and Treatment Planning<br />
A 24-year-old female presented with an un<strong>aesthetic</strong> smile.<br />
Comprehensive clinical examination revealed failing<br />
restorations, recurrent decay, marginal leakage, and<br />
staining. Her basic tooth color was A2 to A3, with a<br />
moderate amount of incisal translucency (Figure 1). A full<br />
series of intra- and extraoral images were taken for treatment<br />
planning, marketing, and case documentation.<br />
These images were studied—along with clinical examination<br />
notes—prior to treatment so that a basic plan could<br />
be formulated. After viewing an office-generated<br />
PowerPoint slide show displaying different treatment<br />
options, the patient chose a final tooth shade that was<br />
the darkest bleach shade (ie, 0M3). While treatment plans<br />
were made for porcelain and <strong>composite</strong> <strong>veneer</strong>s, the<br />
patient selected <strong>composite</strong> restorations due to financial<br />
reasons. Lateral smile views demonstrated that the anterior<br />
10 teeth would require <strong>veneer</strong>s from second premolar<br />
to premolar for a smooth, natural-appearing, enhanced<br />
smile, but only eight were requested by the patient.<br />
Treatment would involve <strong>veneer</strong>ing the teeth to lighten their<br />
color as well as repairing the decayed areas (Figure 2).<br />
The patient was scheduled for a 90-minute appointment<br />
to place the eight <strong>composite</strong> <strong>veneer</strong>s with a 50-minute<br />
follow-up three days later.<br />
Composite Veneer Technique<br />
Following anesthetization and tooth isolation, various<br />
shades of <strong>composite</strong> were tried on the teeth to evaluate<br />
color and masking ability. It was important to begin this<br />
assessment on a central incisor to establish proper midline,<br />
cant, color, and proportion. When done correctly,<br />
it would be much easier to establish the proper size,<br />
shape, and alignment of the surrounding teeth.<br />
The existing <strong>composite</strong> resin was removed from<br />
#9(21) with a coarse diamond bur, and all interproximal<br />
filling material and decay were removed with carbide<br />
burs. Caries indicator (ie, Sable Seek, Ultradent<br />
Products, South Jordan, UT) was used to verify complete<br />
caries elimination. The face of the tooth was roughened<br />
with a diamond bur, and a slight finish line was created<br />
just below the gingival margin. A contoured anatomical<br />
matrix was placed and wedged loosely (Figure 3). The<br />
matrix extended slightly into the sulcus and provided the<br />
smoothest possible surface to finish the <strong>composite</strong>. 9 After<br />
the tooth was etched with 38% phosphoric acid, it was<br />
rinsed thoroughly, and a dentin bonding agent was<br />
applied and air thinned.<br />
The first <strong>composite</strong> resin layer (ie, Renamel Universal<br />
Hybrid, Cosmedent, Chicago, IL) formed the foundation<br />
of color within the restoration (Figure 4). Shade A3<br />
was placed in the formerly decayed interproximal areas<br />
and on the incisal edges where length was to be added.<br />
It was undercontoured by 1 mm in all areas so that the<br />
layer would not extend through the final enamel layer<br />
Figure 5. The enamel microfill <strong>composite</strong> is placed with a<br />
plastic instrument and shaped with a <strong>composite</strong> roller after<br />
the flowable <strong>composite</strong>.<br />
PPAD C<br />
Griffin
Practical Procedures & AESTHETIC DENTISTRY<br />
Figure 6. Low opacity incisal shade is added and shaped<br />
about 1 mm longer than the final desired length to allow for<br />
anatomy development and polishing, and is then cured.<br />
after finishing, and then cured for 20 seconds. The<br />
enamel layer was initiated with the <strong>placement</strong> of a flowable<br />
<strong>composite</strong> along the gingival aspect of the matrix<br />
and followed with a bleach-shade (SB3) <strong>composite</strong>. The<br />
noncured flowable <strong>composite</strong> reduced voids and was<br />
mostly forced out as the more viscous enamel material<br />
was placed. The incisal edge was made irregular with<br />
the edge of a plastic instrument or explorer and left 1 mm<br />
to 2 mm from the desired final edge length, and was<br />
then cured for 20 seconds (Figure 5). The key was that<br />
the indentations were varied in width and length, so that<br />
the incisal shade blended naturally into the enamel without<br />
abrupt transition areas. A transparent incisal shade<br />
of flowable <strong>composite</strong> was followed by incisal-shaded<br />
<strong>composite</strong> that was shaped and cured (Figure 6).<br />
When the matrix was removed, a bulk of material<br />
at the gingival aspect extended just beneath the gingiva,<br />
where the smooth surface produced by the matrix would<br />
remain largely untouched. The excess material and basic<br />
shaping were eliminated with a finishing diamond bur,<br />
and the midline, cant, and tooth proportion were adjusted<br />
(Figure 7). Working distally from the midline, the other<br />
teeth were built around the colors and contour of this<br />
tooth (Figure 8). Basic contouring was performed with<br />
a finishing diamond bur. A #12 blade <strong>composite</strong> knife,<br />
#7901 finishing bur, and sand paper disks (ie, Sof-Lex<br />
Brush, 3M Espe, St. Paul, MN) were used for basic contouring.<br />
Curing was performed for an additional 20 seconds<br />
from the facial and lingual surfaces. A full series of<br />
intra- and extraoral images were captured before patient<br />
dismissal so that a critique could take place. Additional<br />
polishing and shaping were completed three days later<br />
at the enhancement appointment.<br />
The <strong>digital</strong> images were loaded onto the computer,<br />
scrutinized, and marked with needed changes (Figure 9).<br />
D Vol. 19, No. 5<br />
Figure 7. A basic shape is formed with a finishing diamond<br />
bur. The critical part is achieving a proper position<br />
and cant to the midline and a suitable tooth width.<br />
Figure 8. The neighboring teeth can then be completed<br />
using the same techniques as before.<br />
Figure 9. Marks can be made in a variety of ways to point<br />
out places that need correcting, so that areas requiring<br />
improvement are not overlooked.<br />
The resulting <strong>composite</strong> <strong>veneer</strong>s were objectively evaluated<br />
by the clinician, who viewed them critically without<br />
the distractions of the operatory. These images were<br />
then placed on the operatory monitor for chairside reference.<br />
Other images were printed and placed behind<br />
the patient to form an outline, so that needed enhancements<br />
could be completed in an orderly manner.
Figure 10. The <strong>composite</strong> roller makes smoothing and contouring<br />
final layers very efficient.<br />
Figure 11. Care is taken to keep anatomy on the facial<br />
surface during contouring and polishing.<br />
Figure 12. Flexible sand paper disks are used to shape<br />
embrasures between teeth and for basic tooth contouring.<br />
Enhancement Appointment<br />
At the three-day follow-up appointment, the <strong>veneer</strong>s were<br />
evaluated for areas that were rough, sharp, or unable<br />
to be flossed. Phonetics were also used to determine if<br />
the incisal edge position required adjustment. The patient<br />
was shown the images taken from the <strong>placement</strong> appointment<br />
and decided to have the second premolar <strong>veneer</strong>ed<br />
Figure 13. Interproximal surfaces are then contoured and<br />
smoothed with a #12 blade and finishing strips.<br />
as well, since they were clearly visible in the photographs.<br />
Areas that required additional <strong>composite</strong> were modified<br />
first <strong>via</strong> diamond roughening and sand blasting with<br />
27 µm silica, followed by etching and the application<br />
of a bonding agent. Composite was placed to correct<br />
voids, dark color that was visible, and/or insufficient contours.<br />
A plastic instrument was used to place the material<br />
and was smoothed and formed with a <strong>composite</strong><br />
rolling instrument (ie, CompoRoller, Kerr Corporation,<br />
Orange, CA) (Figures 10 and 11). Embrasures were<br />
shaped and refined with three levels of finishing disks,<br />
and interproximal areas were shaped with a <strong>composite</strong><br />
knife and abrasive strips (Figures 12 and 13). Care was<br />
taken to enhance facial anatomy by developing subtle<br />
developmental indentations and by beveling the incisal<br />
third back toward the lingual, which was accomplished<br />
with rubber polishing cups and disks (Figure 14). The last<br />
step included a felt wheel with polishing paste in order<br />
to achieve a high luster (Figure 15). 10 As the patient<br />
desired that her mandibular teeth matched the light color<br />
of the maxillary teeth, take-home bleaching (ie, Nite White<br />
ACP, Discus Dental, Culver City, CA) was recommended.<br />
Postoperative Images<br />
An additional follow-up appointment was made three<br />
weeks later, and a full series of <strong>digital</strong> images were captured<br />
to be used for case evaluation, legal documentation,<br />
and practice promotion. A portrait image was critical not<br />
only for marketing, but also for final case evaluation of<br />
technique and materials. Final midline position and cant<br />
were verified and archived in the office portfolio. A full<br />
smile revealed consistent color and life-like incisal characteristics<br />
(Figure 16). The patient continued to bleach her<br />
mandibular teeth, and the shade lightened enough to closely<br />
match the shade used on the maxillary <strong>composite</strong> <strong>veneer</strong>s.<br />
PPAD E<br />
Griffin
Practical Procedures & AESTHETIC DENTISTRY<br />
Figure 14. Rubber polishing disks are then used to finish<br />
the polish and to enhance developmental grooves on the<br />
facial and incisal characteristics.<br />
Figure 15. After three weeks, final images are taken that<br />
are consistent with the preoperative views.<br />
Discussion<br />
Office commotion, lighting, patient positioning, and even<br />
doctor fatigue can make the evaluation of a procedure<br />
much more difficult to do chairside than on a large monitor<br />
in a dark room separate from the operatory. An image<br />
of the full frontal view of the smile is used to check midline,<br />
cant, buccal corridor development, and other important<br />
factors. Full intraoral images from the front and sides<br />
can be used to check shade and character consistency,<br />
embrasures, surface texture, and basic shape to locate<br />
any deficiencies that might appear in the <strong>veneer</strong>s. These<br />
deficiencies include areas of bulkiness, improper embrasures,<br />
poor contours, unreal surface texture, and inconsistent<br />
colors. Photography makes the defects and needed<br />
corrections apparent.<br />
Conclusion<br />
A realistic characterization of the teeth was achieved<br />
by efficiently using different opacities of <strong>composite</strong> and<br />
<strong>placement</strong> in layers. Although <strong>composite</strong> <strong>veneer</strong>s require<br />
F Vol. 19, No. 5<br />
Figure 16. By using various opacities and colors, the<br />
<strong>veneer</strong>s cover all of the decayed and broken down areas<br />
and the new surface color is consistent and natural.<br />
more chairside effort than porcelain <strong>veneer</strong>s and may<br />
require more maintenance, they can be rewarding for<br />
the dental staff and a cost-effective confidence builder<br />
for the patient. In addition, <strong>composite</strong> <strong>veneer</strong>s allow the<br />
clinician to express his or her creativity and artistic ability.<br />
Direct resin techniques, however, can be difficult to<br />
master; therefore, by using photography as a form of<br />
evaluation throughout treatment, the patient will be<br />
ensured a superior <strong>aesthetic</strong> smile.<br />
Acknowledgment<br />
The author declares no financial interest in any of the<br />
products, materials, or suppliers referenced herein.<br />
References<br />
1. Milnar F. A minimal intervention approach to the treatment of a<br />
Class IV fracture. J Cosmet Dent 2006;21(4):106-112.<br />
2. Christensen GJ. Bonding to dentin and enamel where does it<br />
stand in 2005? J Am Dent Assoc 2005;136(9):1299-1302.<br />
3. Terry DA. Direct <strong>composite</strong> resin restoration of adolescent Class<br />
IV tooth fracture: A case report. Prac Periodont Aesthet Dent<br />
2000;12(1):23-29.<br />
4. Fahl N. The direct/indirect <strong>composite</strong> resin <strong>veneer</strong>s: A case<br />
report. Pract Periodont Aesthet Dent 1996;8(7):627-638.<br />
5. Vargas M. Conservative <strong>aesthetic</strong> enhancement of the anterior<br />
dentition using a predictable direct resin protocol. Pract Proced<br />
Aesthet Dent 2006;18(8):501-507.<br />
6. Miller M. Reality 2006. Vol 20. Houston, TX: Reality Publishing;<br />
2006.<br />
7. Chyz G. Postorthodontic restoration of worn incisal edges.<br />
Contemp Esthet 2006;10(4):36-39.<br />
8. Fahl N. Achieving ultimate anterior esthetics with a new microhybrid<br />
<strong>composite</strong>. Compend Contin Educ Dent 2000;26(suppl):<br />
4-13.<br />
9. Belvedere PC. Direct bulk <strong>placement</strong> for posterior <strong>composite</strong>s<br />
using an anatomically shaped clear matrix creating true anatomic<br />
interproximal surfaces. J Indiana Dent Assoc 2006;85(1):<br />
14-18.<br />
10. Peyton JH. Finishing and polishing techniques: Direct <strong>composite</strong><br />
resin restoration. Pract Proced Aesthet Dent 2004;16(4):<br />
293-298.
CONTINUING EDUCATION<br />
(CE) EXERCISE NO. X<br />
To submit your CE Exercise answers, please use the answer sheet found within the CE Editorial Section of this issue and complete as follows:<br />
1) Identify the article; 2) Place an X in the appropriate box for each question of each exercise; 3) Clip answer sheet from the page and mail<br />
it to the CE Department at Montage Media Corporation. For further instructions, please refer to the CE Editorial Section.<br />
The 10 multiple-choice questions for this Continuing Education (CE) exercise are based on the article “Assessing <strong>aesthetic</strong> <strong>composite</strong> <strong>veneer</strong><br />
<strong>placement</strong> <strong>via</strong> <strong>digital</strong> photography,” by Jack D. Griffin, Jr, DMD. This article is on Pages 000-000.<br />
1. Clinical dental photography can be used BEFORE a direct<br />
<strong>composite</strong> <strong>veneer</strong> case to do which of the following?<br />
a. Help plan the case with regard to tooth preparation<br />
and material choice.<br />
b. Have images to help create an office portfolio of<br />
“before” and “after” images.<br />
c. Document the case for liability reasons.<br />
d. All of the above.<br />
2. Which of the following is important in choosing a <strong>composite</strong><br />
for direct <strong>veneer</strong>s?<br />
a. Packaging in unidose compules.<br />
b. Using a system with varying <strong>composite</strong> opacities for natural<br />
variation of translucency.<br />
c. Having a single universal <strong>composite</strong> that can be used<br />
on the tooth to replace both dentin and enamel for efficiency.<br />
d. Employing incisal shades to mask underlying darker colors<br />
in the tooth.<br />
3. Which of the following <strong>composite</strong> components is used for<br />
masking color or for matching more opaque parts of the<br />
tooth?<br />
a. Dentin shades.<br />
b. Enamel shades.<br />
c. Incisal shades.<br />
d. Stumpf shades.<br />
4. Which of the following is an instrument that can aid in<br />
final <strong>composite</strong> <strong>placement</strong> and contouring?<br />
a. A <strong>composite</strong> roller.<br />
b. A <strong>composite</strong> knife.<br />
c. Composite photo.<br />
d. A microbrush.<br />
5. Why is photography valuable after <strong>composite</strong> <strong>placement</strong>?<br />
a. To honestly evaluate <strong>veneer</strong> <strong>placement</strong>.<br />
b. To form a plan for needed refinement.<br />
c. To be printed or placed on an operatory monitor for reference<br />
during <strong>veneer</strong> enhancements.<br />
d. All of the above.<br />
G Vol. 19, No. 5<br />
X<br />
CONTINUING CE EDUCATION<br />
6. Which of the following represents a type of matrix that<br />
is precontoured, helps retract tissue, and forms the basic<br />
<strong>composite</strong> shape interproximally and gingivally?<br />
a. Straight celluloid strip.<br />
b. Automatrix.<br />
c. Gingival retraction paste.<br />
d. Contour matrix.<br />
7. When there is interproximal decay that must be<br />
restored, what is the first material chosen and placed in<br />
the interproximal area?<br />
a. A dentin shade that matches the existing dentin color.<br />
b. An enamel shade that is the desired final tooth shade.<br />
c. An incisal shade that mimics incisal character.<br />
d. Custom staining to create internal character.<br />
8. Flowable <strong>composite</strong> is placed in the matrix…<br />
a. And is cured before adding any other material to provide<br />
a strong <strong>composite</strong> base.<br />
b. And is left uncured so that it is forced out by the more<br />
viscous <strong>composite</strong>, which may reduce voids.<br />
c. To seal the matrix from salivary contamination.<br />
d. To increase bond strength of the <strong>composite</strong>.<br />
9. Which tooth should be treated first in a direct <strong>composite</strong><br />
<strong>veneer</strong> case to establish cant, midline, and tooth<br />
proportion?<br />
a. Central incisor.<br />
b. Lateral incisor.<br />
c. Canine.<br />
d. Milk tooth.<br />
10. Which of the following criterium/criteria must be followed<br />
when doing final facial polishing?<br />
a. Achieve a natural polished surface that will resist staining<br />
and plaque accumulation.<br />
b. Preserve facial anatomy and avoid creating an unnaturally<br />
flat surface.<br />
c. Create embrasures that are well polished and proportionally<br />
placed.<br />
d. All of the above.<br />
PPAD G