Diagnostic Interface AVDI Common User's Manual - Abritus72.com
Diagnostic Interface AVDI Common User's Manual - Abritus72.com
Diagnostic Interface AVDI Common User's Manual - Abritus72.com

Create successful ePaper yourself
Turn your PDF publications into a flip-book with our unique Google optimized e-Paper software.
Abritus 72 Ltd<br />
Date: 18 – January - 2013<br />
<strong>Diagnostic</strong> <strong>Interface</strong><br />
<strong>AVDI</strong><br />
<strong>Common</strong> User’s <strong>Manual</strong><br />
Version: 1.2<br />
Issued by: Abritus 72 Ltd.<br />
www.ABRITUS72.com<br />
www.ABRITES.com<br />
1619 Sofia<br />
Bulgaria<br />
Tel: +359 2 9550456<br />
mailto: support@abritus72.com
<strong>AVDI</strong> COMMON USER’S MANUAL<br />
Version 1.2<br />
Document number #201<br />
Date: 03 – January-2013<br />
INTRODUCTION ...................................................................................................................................................... 3<br />
SYSTEM REQUIREMENTS .................................................................................................................................... 5<br />
GETTING STARTED................................................................................................................................................ 6<br />
4.USING <strong>AVDI</strong> WITH A VIRTUAL MACHINE (VM) ......................................................................................... 17<br />
4.USING SAE J2534 DRIVER FOR <strong>AVDI</strong> ............................................................................................................. 26<br />
5.WORKING WITH J1850 ADAPTER .................................................................................................................. 49<br />
6.TROUBLESHOOTING ........................................................................................................................................ 50<br />
2
<strong>AVDI</strong> COMMON USER’S MANUAL<br />
INTRODUCTION<br />
Version 1.2<br />
Document number #201<br />
Date: 03 – January-2013<br />
Congratulations on choosing our wonderful product!<br />
<strong>AVDI</strong> will allow you to use your Windows based PC as a powerful diagnostic tool for cars, trucks,<br />
bikes, marine equipment and recreational products.<br />
<strong>AVDI</strong> is an interface produced by ABRITUS 72 Ltd. intended for interface between a PC and<br />
electronic control units.<br />
<strong>AVDI</strong> should be used with ABRITES software produced by Abritus 72 Ltd.<br />
ABRITES is a trade mark of Abritus 72 Ltd.<br />
3
<strong>AVDI</strong> COMMON USER’S MANUAL<br />
1.1 Scope of the manual<br />
Version 1.2<br />
Document number #201<br />
Date: 03 – January-2013<br />
This document describes the software and hardware installation of your <strong>AVDI</strong> diagnostics<br />
interface.<br />
The document is applicable for the interfaces numbered 18xxxx where xxxx is a hexadecimal<br />
number between 0000 and FFFF.<br />
1.2 Your <strong>AVDI</strong> package<br />
The basic package of <strong>AVDI</strong> interface contains:<br />
Small carry bag<br />
<strong>AVDI</strong> diagnostics interface<br />
USB cable with extra power<br />
OBDII cable<br />
4
<strong>AVDI</strong> COMMON USER’S MANUAL<br />
Installation CDs/DVDs (optional)<br />
SYSTEM REQUIREMENTS<br />
Version 1.2<br />
Document number #201<br />
Date: 03 – January-2013<br />
Minimum system requirements – Windows XP, Pentium 4 with 512 MB RAM<br />
5
<strong>AVDI</strong> COMMON USER’S MANUAL<br />
GETTING STARTED<br />
Version 1.2<br />
Document number #201<br />
Date: 03 – January-2013<br />
Software for your <strong>AVDI</strong> interface can be delivered by two ways – email or installation CD.<br />
Please, make sure that you follow the steps described below.<br />
Software is represented by two windows executable files named<br />
‘Setup<strong>Interface</strong>_VVxxxx.exe’ and ‘Setup<strong>Interface</strong>_<strong>Common</strong>.exe’<br />
where VVxxxx is your interface identification number.<br />
1.3 Software installation steps<br />
Please, follow the bellow given instructions when installing the software for your <strong>AVDI</strong> interface.<br />
Important! Both executable files mentioned above must be executed consequently for the<br />
installation to be complete. Otherwise the software might not function as expected.<br />
Step 1.<br />
Start the executable file ‘Setup<strong>Interface</strong>_<strong>Common</strong>.exe’<br />
and follow the onscreen instructions.<br />
Press the “Next” button to proceed with the<br />
installation.<br />
6
<strong>AVDI</strong> COMMON USER’S MANUAL<br />
Press ‘Next’.<br />
Press ‘Next’.<br />
Version 1.2<br />
Document number #201<br />
Date: 03 – January-2013<br />
7
<strong>AVDI</strong> COMMON USER’S MANUAL<br />
Wait for the installation to complete.<br />
Press ‘Finish’.<br />
Step 2.<br />
Version 1.2<br />
Document number #201<br />
Date: 03 – January-2013<br />
Please, start the executable file ‘Setup<strong>Interface</strong>_VVxxxx.exe’ (see above) to<br />
initiate the installation procedure and follow the onscreen instructions.<br />
Depending on your operating system and settings you may be asked to confirm the start of the<br />
installation procedure or to type in your<br />
administrative credentials.<br />
8
<strong>AVDI</strong> COMMON USER’S MANUAL<br />
Press the “Next” button to proceed with<br />
the installation.<br />
Read the license agreement carefully and<br />
select “I accept the agreement” if you<br />
accept it. Then press the “Next” button.<br />
If you do not agree press the “Cancel”<br />
button to interrupt the installation<br />
procedure.<br />
Version 1.2<br />
Document number #201<br />
Date: 03 – January-2013<br />
9
<strong>AVDI</strong> COMMON USER’S MANUAL<br />
Press the “Next” button to proceed with<br />
the installation.<br />
Press the “Next” button to proceed with<br />
the installation.<br />
Press the “Next” button to proceed.<br />
Version 1.2<br />
Document number #201<br />
Date: 03 – January-2013<br />
10
<strong>AVDI</strong> COMMON USER’S MANUAL<br />
If you do not want desktop icons -<br />
uncheck the checkbox about<br />
the creation of these icons.<br />
Press the “Next” button to proceed.<br />
Please, be informed that the installation<br />
includes a copy of the user’s manual to<br />
which you could refer at any time.<br />
Version 1.2<br />
Document number #201<br />
Date: 03 – January-2013<br />
It is stored in the following location:<br />
Start -> Programs -> ABRITES <strong>Common</strong> -> <strong>AVDI</strong> <strong>Common</strong> <strong>User's</strong> <strong>Manual</strong><br />
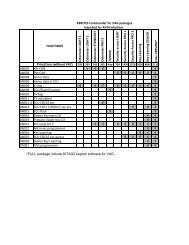
Commanders<br />
You could use the interface for any given<br />
commander by going to the following location:<br />
Start -> Programs -> ABRITES software for IDxxxxxx -> Commanders (where IDxxxxxx is<br />
your ADVI ID)<br />
ABPROG<br />
By going to the following location:<br />
Start -> Programs -> ABRITES software for IDxxxxxx -> ABPROG Programmer for <strong>AVDI</strong><br />
(where IDxxxxxx is your ADVI ID)<br />
You could access the ABPROG Programmer for <strong>AVDI</strong>.<br />
ZN030-ABPROG and ZN031-M35XXX/SPI/I2C Adapter together with Abrites EEPROM<br />
11
<strong>AVDI</strong> COMMON USER’S MANUAL<br />
Version 1.2<br />
Document number #201<br />
Date: 03 – January-2013<br />
Programmer software allows you to erase and write SPI EEPROM memory with and<br />
without incremental registers.<br />
ZN030-ABPROG and ZN031-M35XXX/SPI/I2C Adapter together should be used with<br />
ABRITES software produced by Abritus 72 Ltd.<br />
ABRITES is a trade mark of Abritus 72 Ltd<br />
*A detailed user manual is included in the installation directory of the function described above.<br />
ABPROG Programmer for NEC keys<br />
By going to the following location:<br />
Start -> Programs -> ABRITES software for IDxxxxxx -> ABPROG Programmer for NEC keys<br />
(where IDxxxxxx is your ADVI ID)<br />
You will be able to use the ABPROG Programmer for NEC keys.<br />
This programmer works with the <strong>AVDI</strong> interface. With this programmer you can read the SSID of<br />
the key, erase the NEC chip and then program it again.<br />
*A detailed user manual is included in the installation directory of the function described above.<br />
Key Tool for HITAG<br />
By going to the following location:<br />
Start -> Programs -> ABRITES software for IDxxxxxx -> ABRITES Key Tool for HITAG<br />
(where IDxxxxxx is your ADVI ID)<br />
You will be able to use the ABRITES Key Tool for HITAG<br />
HITAG-2 programmer is device programmer intended for programming of HITAG-2<br />
transponders compatible<br />
with PHILIPS PCF7936 transponders. It can be used for reading/programming of following<br />
type transponders:<br />
· PCF7936<br />
· PCF7941<br />
· PCF7942<br />
· PCF7944<br />
· PCF7945<br />
· PCF7946<br />
· Compatible with mentioned above<br />
Programmer supports both modes – PASSWORD and CIPHER mode.<br />
Log files<br />
Log files are an essential part of the troubleshooting process should an issue occur with<br />
your <strong>AVDI</strong> device. Please, note that the last working (or other) log files might be needed by<br />
our support team in order to resolve an issue with your diagnostics system.<br />
The Log files are stored in the following location:<br />
12
<strong>AVDI</strong> COMMON USER’S MANUAL<br />
Version 1.2<br />
Document number #201<br />
Date: 03 – January-2013<br />
Start -> Programs -> ABRITES software for IDxxxxxx-> Log Files (where IDxxxxxx is your<br />
ADVI ID)<br />
Quick Start<br />
The Abrites Quick Start is a<br />
simplified user interface<br />
which allows you to start working<br />
with the <strong>AVDI</strong> in a much<br />
quicker manner.<br />
After the installation is complete you should have a<br />
Quick start icon on your desktop as well as a start menu shortcut.<br />
13
<strong>AVDI</strong> COMMON USER’S MANUAL<br />
1.4 <strong>Interface</strong> preparation and connection to the PC<br />
Connect the USB cable from the <strong>AVDI</strong> package to the interface.<br />
Connect one of your diagnostic cables (OBDII,<br />
Deutsch etc.) to the interface.<br />
Connect the main USB connector to your PC.<br />
Version 1.2<br />
Document number #201<br />
Date: 03 – January-2013<br />
14
<strong>AVDI</strong> COMMON USER’S MANUAL<br />
Version 1.2<br />
Document number #201<br />
Date: 03 – January-2013<br />
If you are connecting the interface to your<br />
USB port for the first time wait until Windows<br />
notifies you that the drivers are installed successfully. Please, take into account that if you<br />
reconnect the interface to another USB port of your PC for the first time you might need to wait<br />
again until Windows confirms your successful installation.<br />
Connect your extra power USB<br />
plug (RED) to another USB port of<br />
your PC. This step is not<br />
mandatory but it is strongly<br />
recommended.<br />
You are ready to run<br />
some<br />
of the commanders.<br />
15
<strong>AVDI</strong> COMMON USER’S MANUAL<br />
Version 1.2<br />
When you start a commander you<br />
should see this :<br />
This means that the connection to the<br />
interface is OK.<br />
Software checks for connected<br />
TAG programmer<br />
If you HAVE NOT connected aTAG<br />
programmer you should see this<br />
message :<br />
Document number #201<br />
Date: 03 – January-2013<br />
16
<strong>AVDI</strong> COMMON USER’S MANUAL<br />
If you have connected a TAG<br />
programmer you<br />
should see a message that the Tag<br />
Programmer<br />
is successfully recognized and you<br />
can start working.<br />
4. USING <strong>AVDI</strong> WITH A<br />
VIRTUAL MACHINE (VM)<br />
Version 1.2<br />
Document number #201<br />
Date: 03 – January-2013<br />
If you like to use your <strong>AVDI</strong> interface (software ) with a virtual machine here are some preliminaries<br />
that should be made.<br />
4.1. Install <strong>AVDI</strong> software on the VM<br />
After you have loaded and played the VM on which you would like to use your <strong>AVDI</strong> interface,<br />
please install the ABRITES Software for the <strong>AVDI</strong> interface which you want to use on the VM. This<br />
is done exactly as the installation on your host PC (see 3.1 Software installation steps).<br />
Be sure that the checkbox about the installation of the interface’s USB drivers is set, especially if<br />
you are installing the Abrites <strong>Diagnostic</strong> Software for the first time on this machine.<br />
You should see the following window:<br />
17
<strong>AVDI</strong> COMMON USER’S MANUAL<br />
Wait for the drivers to be installed.<br />
Version 1.2<br />
Document number #201<br />
Date: 03 – January-2013<br />
Note: If you do not see the above window after pressing “Finish” then go to “C:\Program<br />
Files\ABRITES software for ID VVxxxx\USB <strong>Interface</strong> Drivers” (VVxxxx is your interface<br />
identification number) and run the “CDMyyyyy_Setup.exe” file there (yyyyy are some digits<br />
showing driver’s version, for example “CDM20814_Setup.exe” is for the driver’s version 2.08.14).<br />
4.2. Connect <strong>AVDI</strong> to the VM<br />
After the ABRITES Software is installed on the VM and you have connected the <strong>AVDI</strong> interface to<br />
an USB port of your PC you should redirect this port to the VM, otherwise you cannot use the <strong>AVDI</strong><br />
interface on the VM!<br />
This can be done in the following way (example with VMware):<br />
From the main menu of the VMware player, select “Virtual Machine” → “Removable devices” →<br />
“future devices avdi interface Vvxxx” → “Connect (Disconnect from host)”.<br />
18
<strong>AVDI</strong> COMMON USER’S MANUAL<br />
Here VVxxxx is your interface identification number.<br />
Version 1.2<br />
Document number #201<br />
Date: 03 – January-2013<br />
You will be shown a message informing you that the USB device will be unplugged from the host<br />
machine and connected to the virtual machine.<br />
Press “OK”.<br />
Your <strong>AVDI</strong> interface is now connected to the virtual machine and can be used with software<br />
installed on this machine.<br />
If you like to disconnect the <strong>AVDI</strong> interface from the VM (so you can use it on the host PC) you can<br />
either close the VM Player or do it through the VMWare menu “Virtual Machine” → “Removable<br />
devices” → “future devices avdi interface Vvxxx” → “Disconnect (Connect to host)”.<br />
4.3. Set latency timer<br />
Another prerequisite before you start using the <strong>AVDI</strong> interface on the VM is to set the latency timer<br />
of the COM port where the <strong>AVDI</strong> interface is recognized to 1ms.<br />
This can be done in the following way:<br />
Open Windows Explorer then right click on “My computer” and select “Properties”.<br />
19
<strong>AVDI</strong> COMMON USER’S MANUAL<br />
Version 1.2<br />
Document number #201<br />
Date: 03 – January-2013<br />
4.4. Shut down the VM<br />
After you have finished working with the Virtual Machine you should perform “Shut down” of the<br />
Operating System. This applies also when using the J2534 Passthru driver on Virtual Machines.<br />
20
<strong>AVDI</strong> COMMON USER’S MANUAL<br />
Version 1.2<br />
Document number #201<br />
Date: 03 – January-2013<br />
From the “System properties” window select “Hardware” and press button “Device manager”.<br />
21
<strong>AVDI</strong> COMMON USER’S MANUAL<br />
In the opened window select "Ports (COM & LPT)":<br />
Version 1.2<br />
Document number #201<br />
Date: 03 – January-2013<br />
22
<strong>AVDI</strong> COMMON USER’S MANUAL<br />
Version 1.2<br />
Document number #201<br />
Date: 03 – January-2013<br />
Your <strong>AVDI</strong> will appear in the list as "USB Serial Port (COM xx)" where "xx" can be different<br />
number. Double click on it.<br />
23
<strong>AVDI</strong> COMMON USER’S MANUAL<br />
From the screen select "Port settings".<br />
Version 1.2<br />
Document number #201<br />
Date: 03 – January-2013<br />
24
<strong>AVDI</strong> COMMON USER’S MANUAL<br />
Then press "Advanced"<br />
Make sure "Latency timer" is set to 1.<br />
Version 1.2<br />
Document number #201<br />
Date: 03 – January-2013<br />
Please, note that if you connect your <strong>AVDI</strong> to a different USB port you should do these<br />
steps again for the new COM Port.<br />
25
<strong>AVDI</strong> COMMON USER’S MANUAL<br />
4. USING SAE J2534 DRIVER FOR <strong>AVDI</strong><br />
Version 1.2<br />
Document number #201<br />
Date: 03 – January-2013<br />
Together with the software for your <strong>AVDI</strong> interface „Setup<strong>Interface</strong>_VVxxxx.exe” you will also<br />
receive an installation file for the PassThru J2534 driver for <strong>AVDI</strong>:<br />
“Setup<strong>Interface</strong>_VVxxxx_PASSTHRU.exe”.<br />
By using this driver your <strong>AVDI</strong> interface becomes compliant to SAE J2534-1.<br />
Each SAE J2534 compliant interface can be used to access the manufacturer's reprogramming<br />
web site and to update the software of electronic control units in the vehicle.<br />
This way, your <strong>AVDI</strong> interface can be used to perform online diagnostics or ECU reprogramming of<br />
a wide range of vehicles. It can also be used as a vehicle communication interface with many other<br />
third party software such as:<br />
Honda HDS<br />
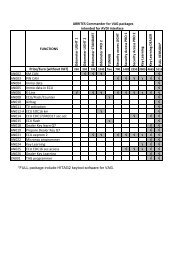
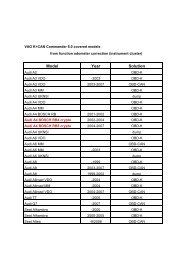
Volvo VIDA (full diagnostic capabilities)<br />
Toyota/Lexus/Scion Techstream<br />
Mercedes Star Diagnose (CAN Bus)<br />
Rover/Jaguar IDS<br />
Ford Scanner<br />
KIA GDS<br />
Hyundai GDS<br />
Tech2Win<br />
Bombardier <strong>Diagnostic</strong><br />
Mitsubishi PassThru CAN<br />
etc.<br />
26
<strong>AVDI</strong> COMMON USER’S MANUAL<br />
Version 1.2<br />
4.1. <strong>AVDI</strong> PassThru driver installation<br />
Document number #201<br />
Date: 03 – January-2013<br />
Run the PassThru setup file “Setup<strong>Interface</strong>_VVxxxx_PASSTHRU.exe” to initiate the installation<br />
procedure and follow the onscreen instructions. The installation procedure is the same as<br />
described in “3.1 Software installation steps”.<br />
It is very important to install the PassThru driver setup file in every virtual machine on<br />
which you use this driver each time you receive a new update!<br />
Important! Be sure that the checkbox about the installation of the interface’s USB drivers is<br />
ticked especially if you are installing the Abrites <strong>Diagnostic</strong> Software for the first time on<br />
this machine.<br />
27
<strong>AVDI</strong> COMMON USER’S MANUAL<br />
Version 1.2<br />
Document number #201<br />
Date: 03 – January-2013<br />
4.2. Using the <strong>AVDI</strong> interface with different OEM applications<br />
If you would like to use <strong>AVDI</strong> interface as a Vehicle Communication <strong>Interface</strong> with some third party<br />
software you should go through the following steps:<br />
Install the <strong>AVDI</strong> PassThru driver on the machine where this software is installed (see 5.1.<br />
<strong>AVDI</strong> PassThru driver installation).<br />
Connect the USB connector from the interface to your PC.<br />
Note: If you would like to work on a virtual machine, please read 4. Using <strong>AVDI</strong> on<br />
Virtual Machine (VM)!<br />
Make sure the latency timer of the COM Port where <strong>AVDI</strong> interface is recognized to be set<br />
to 1 (refer to chapter 7.1. Latency timer - problem - “...change the port settings:” (chapter<br />
4.3. Set latency timer in case you are working on a virtual machine) ).<br />
After the above steps are done, depending on the OEM, please do the following:<br />
4.2.1. Using <strong>AVDI</strong> interface with „Bombardier Utility <strong>Diagnostic</strong><br />
System“<br />
We assume that you have a working system with Bombardier Utility <strong>Diagnostic</strong> System.<br />
From start menu "START -> Programs -> Abrites Software for IDxxxxx -> PassThru" run<br />
SetupPassThruBUDS.exe (xxxxx is your interface number).<br />
You can start BUDS application.<br />
4.2.2. Using <strong>AVDI</strong> interface with DAS/Xentry<br />
We assume that you have a working system with DAS/Xentry.<br />
From start menu "START -> Programs -> Abrites Software for IDxxxxx -> PassThru" run<br />
SetupPassThruDAS.exe (xxxxx is your interface number).<br />
You can start DAS/Xentry application.<br />
After DAS/Xentry application is opened, you will see the following window:<br />
28
<strong>AVDI</strong> COMMON USER’S MANUAL<br />
Version 1.2<br />
Document number #201<br />
Date: 03 – January-2013<br />
Minimize this window on your taskbar, as you may need it during your work with the DAS/Xentry<br />
application.<br />
When the application asks you to turn Ignition ON or Ignition OFF you have to go to this window<br />
and click over ON or OFF respectively.<br />
4.2.3. Using <strong>AVDI</strong> interface with KIA GDS<br />
We assume that you have a working system with KIA GDS.<br />
From start menu "START -> Programs -> Abrites Software for IDxxxxx -> PassThru" run<br />
SetupPassThruHyundai.exe (xxxxx is your interface number).<br />
You can start KIA GDS application.<br />
4.2.4. Using <strong>AVDI</strong> interface with Hyundai GDS<br />
We assume that you have a working system with Hyundai GDS.<br />
From start menu "START -> Programs -> Abrites Software for IDxxxxx -> PassThru" run<br />
SetupPassThruHyundai.exe (xxxxx is your interface number).<br />
You can start Hyundai GDS application.<br />
4.2.5. Using <strong>AVDI</strong> interface with Ford VODU <strong>Diagnostic</strong> System<br />
We assume that you have a working system with Ford VODU <strong>Diagnostic</strong> System.<br />
Start your Ford VODU application.<br />
From main menu select "File -> Setup" and then choose "J2534" protocol and your <strong>AVDI</strong>-PT xxxxx<br />
interface "Abritus72 <strong>AVDI</strong> PT xxxxx" (xxxxx is your interface number).<br />
Your application is ready for work.<br />
Note: For using J1850 adapter with <strong>AVDI</strong> interface and Ford VODU <strong>Diagnostic</strong> System see 6.<br />
Working with J1850 adapter.<br />
29
<strong>AVDI</strong> COMMON USER’S MANUAL<br />
Version 1.2<br />
Document number #201<br />
Date: 03 – January-2013<br />
4.2.6. Using <strong>AVDI</strong> interface with Honda <strong>Diagnostic</strong> System<br />
We assume that you have a working system with Honda <strong>Diagnostic</strong> System.<br />
Start Honda <strong>Diagnostic</strong> System.<br />
Press F12.<br />
From the field "Comms <strong>Interface</strong>" select SPX-MVCI.<br />
Your application is ready for work.<br />
4.2.7. Using <strong>AVDI</strong> interface with Jaguar/Land Rover <strong>Diagnostic</strong> System<br />
We assume that you have a working system with Jaguar/Land Rover <strong>Diagnostic</strong> System<br />
From start menu run the program "START -> All Programs -> JLR -> IDS -> Select J2534 Device"<br />
and select SPX-MVCI.<br />
Start your Jaguar/Land Rover <strong>Diagnostic</strong> System.<br />
Your application is ready for work.<br />
4.2.8. Using <strong>AVDI</strong> interface with Subaru Select Monitor III <strong>Diagnostic</strong><br />
System<br />
We assume that you have a working system with Subaru Select Monitor III <strong>Diagnostic</strong> System.<br />
From start menu "START -> Programs -> Abrites Software for IDxxxxx -> PassThru" run<br />
SetupPassThruSubaru.exe (xxxxx is your interface number).<br />
You can start the SSM III application.<br />
4.2.9. Using <strong>AVDI</strong> interface with Toyota/Lexus/Scion TECHSTREAM<br />
<strong>Diagnostic</strong> System<br />
We assume that you have a working system with Techstream.<br />
Start your Techstream system.<br />
From the main menu select "Setup -> VIM Select" and then choose your <strong>AVDI</strong>-PT xxxxx interface<br />
(xxxxx is your interface number).<br />
Your application is ready for work.<br />
Note: For using J1850 adapter with <strong>AVDI</strong> interface and Techstream <strong>Diagnostic</strong> System see 6.<br />
Working with J1850 adapter.<br />
30
<strong>AVDI</strong> COMMON USER’S MANUAL<br />
Version 1.2<br />
Document number #201<br />
Date: 03 – January-2013<br />
4.2.10. Using <strong>AVDI</strong> interface with Volvo Vida <strong>Diagnostic</strong> System<br />
We assume that you have a working system with Volvo Vida.<br />
Be sure that your system is fully working. On the right corner of your taskbar you have two icons<br />
(one for SQL server and one for VIDA which should be in status Running).<br />
From star menu "START -> Programs -> Abrites Software for IDxxxxx -> PassThru" run<br />
"SetupPassThruVolvo.exe".<br />
You can start Volvo Vida <strong>Diagnostic</strong> System.<br />
Note: For using J1850 adapter with <strong>AVDI</strong> interface and Volvo Vida <strong>Diagnostic</strong> System see 6.<br />
Working with J1850 adapter.<br />
4.2.11. Using <strong>AVDI</strong> interface with GM Tech2Win <strong>Diagnostic</strong> System<br />
We assume that you have a working system with GM Tech2Win <strong>Diagnostic</strong> System.<br />
You can get a valid license by performing a security access via GlobalTIS.<br />
First you must ensure that the COM port in Tech2Win configuration is set properly.<br />
In Tech2Win configurator select Modify/View and the click on the button “opel”.<br />
31
<strong>AVDI</strong> COMMON USER’S MANUAL<br />
Version 1.2<br />
Document number #201<br />
Date: 03 – January-2013<br />
Then click on the Vehicle Communication <strong>Interface</strong> and select COM port for Tech2-RS323<br />
emulation.<br />
You must select a COM port which is not in use.<br />
This means the selected COM port must not be in the list "The following serial ports are<br />
detected:" (made in red on the screenshot).<br />
After COM port selection save the configuration.<br />
32
<strong>AVDI</strong> COMMON USER’S MANUAL<br />
Version 1.2<br />
Document number #201<br />
Date: 03 – January-2013<br />
33
<strong>AVDI</strong> COMMON USER’S MANUAL<br />
Run Tech2Win and wait until the main screen is displayed:<br />
Run GlobalTIS.<br />
In GlobalTIS click on Security Access (Security).<br />
Version 1.2<br />
Document number #201<br />
Date: 03 – January-2013<br />
34
<strong>AVDI</strong> COMMON USER’S MANUAL<br />
Version 1.2<br />
Document number #201<br />
Date: 03 – January-2013<br />
In GlobalTIS, Security click on the button Start Download. This will run Security Access wizard.<br />
When its main window is displayed click on the button Next.<br />
When the activation finishes you will see the following window:<br />
35
<strong>AVDI</strong> COMMON USER’S MANUAL<br />
Version 1.2<br />
Document number #201<br />
Date: 03 – January-2013<br />
After a successful security access inTech2Win you can see an open lock on the right side of the<br />
status bar. Inside the bracket you see the number of days the license is valid. When you start<br />
Tech2Win again the security indicator is not displayed as long as no vehicle communication is<br />
being performed. During the first communication with a vehicle the license will be checked and the<br />
indicator displays either an open or closed lock.<br />
4.2.12. <strong>AVDI</strong> and BMW - EDIABAS INPA WINKFP NFS NCS EXPERT<br />
<strong>Diagnostic</strong> System usage<br />
We assume that you have a working system with installed EDIABAS.<br />
Download and install latest passthru drivers for BMW-EDIABAS (for example<br />
pttbmw_2.1.0.0.exe).<br />
From start menu run the program "START -> All programs -> BMW PassthruD x.x.x.x -><br />
PassthruD Configuration".<br />
Select your <strong>AVDI</strong> interface and set the checkbox about baud 115200.<br />
Copy all files from the folder "\Program Files\BMW AG\PassThruD" to the folder<br />
"\EDIABAS\BIN" except the file "EDIABAS.INI"<br />
Open your "\EDIABAS\BIN\EDIABAS.INI" in “NOTEPAD” and replace the string "<strong>Interface</strong><br />
= STD:...." with the string "<strong>Interface</strong> = STD:passthrud".<br />
4.2.13. Using <strong>AVDI</strong> interface with DIS <strong>Diagnostic</strong> System running on<br />
Virtual Machine<br />
We assume that you have installed VMWare.<br />
Use this software to play the Virtual Machine(VM) on which the DIS system is installed.<br />
To use DIS with <strong>AVDI</strong> interface you should perform the following steps:<br />
1. Change the IP address of the first VMWare adapter to 192.168.68.1:<br />
Open windows explorer.<br />
Type in the address bar the following “C:\Windows\System32\ncpa.cpl” and press Enter.<br />
36
<strong>AVDI</strong> COMMON USER’S MANUAL<br />
Version 1.2<br />
Document number #201<br />
Date: 03 – January-2013<br />
In the opened window right click with the mouse over “VMware Network Adapter VMnet1”<br />
and choose properties.<br />
Select “Internet Protocol (TCP/IP)” (or it might be “Internet Protocol Version 4 (TCP/IPv4)”<br />
depending from windows version) and click Properties.<br />
Select “Use the following IP address”.<br />
Enter IP address 192.168.68.1, Subnet mask 255.255.255.0.<br />
37
<strong>AVDI</strong> COMMON USER’S MANUAL<br />
Version 1.2<br />
Document number #201<br />
Date: 03 – January-2013<br />
2. From start menu “Start -> All Programs -> ABRITES Software for ID XXXXXX” select<br />
“ebridge” (XXXXXX is the number of your <strong>AVDI</strong> interface).<br />
Make sure the interface is recognized. If it is not recognized you will be informed with the<br />
following message:<br />
If the interface is recognized the following window will appear:<br />
38
<strong>AVDI</strong> COMMON USER’S MANUAL<br />
Version 1.2<br />
Choose CAN or Kline. Click on “DIS DiagHead”<br />
Choose “Run” in the menu of the newly opened dialog.<br />
Start VMWare and play VM with DIS.<br />
Document number #201<br />
Date: 03 – January-2013<br />
From the VMWare menu select “Virtual Machine” -> “Removable devices” -> Network adapter -<br />
> Connect.<br />
Do this for all Network adapters (1,2,3, etc.).<br />
39
<strong>AVDI</strong> COMMON USER’S MANUAL<br />
Version 1.2<br />
Document number #201<br />
Date: 03 – January-2013<br />
Go to VM with DIS and press button “Administration” at the bottom right corner.<br />
In the new window press “Connection setup” button.<br />
In the new window below “Free diagnostic heads” you should see the name of your host PC<br />
followed by the IP address 192.168.68.1.<br />
40
<strong>AVDI</strong> COMMON USER’S MANUAL<br />
Version 1.2<br />
Document number #201<br />
Date: 03 – January-2013<br />
Click over it and press “Test”. Press “Connecting”. After connection is established press the<br />
arrow button in the bottom left corner.<br />
You should see on the bottom of the “BMW <strong>Diagnostic</strong> Hed V1.2” written “Connected”:<br />
You can start your work with DIS diagnostic system through <strong>AVDI</strong> interface.<br />
41
<strong>AVDI</strong> COMMON USER’S MANUAL<br />
Version 1.2<br />
4.3. Usage BMW DIS via PASSTHRU driver<br />
Document number #201<br />
Date: 03 – January-2013<br />
We assume that you have installed VMWare and “Abrites Commander for BMW”.<br />
4.3.1. Initial configuration<br />
The initial configuration is done only once.<br />
After it is performed only steps from “5.3.2. Usage” should be performed.<br />
Download and install latest passthru drivers for BMW-EDIABAS (for example<br />
pttbmw_2.1.0.0.exe – drivers are also available for download from<br />
http://update2.abritus72.net/downloads/pttbmw_2.1.0.0.exe).<br />
Open with "NOTEPAD" your "\Program Files\BMW AG\PassThruD\EDIABAS.INI" and replace<br />
the string "Port= " with the string "Port=6801".<br />
From start menu run the program "START -> All programs -> BMW PassthruD x.x.x.x -><br />
PassthruD Configuration".<br />
Select your <strong>AVDI</strong> interface and set the checkbox about baud 115200.<br />
1. Open windows explorer.<br />
Type in the address bar the following “C:\Windows\System32\ncpa.cpl” and press Enter.<br />
In the opened window right click with the mouse over “VMware Network Adapter VMnet1”<br />
and choose properties.<br />
Select “Internet Protocol (TCP/IP)” (or it might be “Internet Protocol Version 4 (TCP/IPv4)”<br />
depending from windows version) and click Properties.<br />
42
<strong>AVDI</strong> COMMON USER’S MANUAL<br />
Version 1.2<br />
Select “Use the following IP address”.<br />
Enter IP address 192.168.68.1, Subnet mask 255.255.255.0.<br />
Document number #201<br />
Date: 03 – January-2013<br />
43
<strong>AVDI</strong> COMMON USER’S MANUAL<br />
Version 1.2<br />
4.3.2. Usage<br />
Document number #201<br />
Date: 03 – January-2013<br />
From start menu “Start -> All Programs -> ABRITES Software for ID XXXXXX” select<br />
“DiagHead” (XXXXXX is the number of your <strong>AVDI</strong> interface).<br />
Press “Run”.<br />
From start menu run the program "START -> All programs -> BMW PassthruD x.x.x.x -> IFH<br />
Server".<br />
Start VMWare and play VM with DIS.<br />
If you see in the following picture in upper right corner:<br />
i.e. both rows lighted then DIS system is connected to the host machine.<br />
You can start your work with DIS diagnostic system.<br />
44
<strong>AVDI</strong> COMMON USER’S MANUAL<br />
If only the second row is lighed then:<br />
Version 1.2<br />
Document number #201<br />
Date: 03 – January-2013<br />
From the VMWare menu select “Virtual Machine” -> “Removable devices” -> Network adapter -<br />
> Connect.<br />
Do this for all Network adapters (2,3, etc.).<br />
From the VMWare menu select “Virtual Machine” -> “Removable devices” -> Network adapter -<br />
> Settings...<br />
In the opened window select “Hardware”, click over “Network adapter” and check “Host-only: A<br />
private network shared with the host” as shown in the picture below:<br />
45
<strong>AVDI</strong> COMMON USER’S MANUAL<br />
Do this for all Network adapters (2,3, etc.).<br />
Version 1.2<br />
Document number #201<br />
Date: 03 – January-2013<br />
If only the second row is lighed then press button “Administration” at the bottom right corner.<br />
In the new window press “Connection setup” button.<br />
46
<strong>AVDI</strong> COMMON USER’S MANUAL<br />
Version 1.2<br />
Document number #201<br />
Date: 03 – January-2013<br />
In the new window below “Free diagnostic heads” you should see the name of your host PC<br />
followed by the IP address 192.168.68.1.<br />
Click over it and press “Connecting”. After connection is established press the arrow button in<br />
the bottom left corner.<br />
Minimize virtual machine (i.e. switch to the host machine).<br />
47
<strong>AVDI</strong> COMMON USER’S MANUAL<br />
Version 1.2<br />
Document number #201<br />
Date: 03 – January-2013<br />
You should see “Connected” on the bottom of the “BMW <strong>Diagnostic</strong> Hed V1.2””:<br />
You can start your work with DIS diagnostic system.<br />
48
<strong>AVDI</strong> COMMON USER’S MANUAL<br />
5. WORKING WITH J1850 ADAPTER<br />
Version 1.2<br />
Document number #201<br />
Date: 03 – January-2013<br />
Abrites J1850 adapter is intended to support SAEJ1850 PW 10.4 kbps and PWM 41.6 kbps<br />
protocol standarts.<br />
Adapter must be connected between <strong>AVDI</strong> and OBD2 cable using the DB25 sockets.<br />
No additional settings are required.<br />
The J1850 adapter<br />
The J1850 adapter connected<br />
To the OBD2 cable using the DB25<br />
sockets on the <strong>AVDI</strong><br />
49
<strong>AVDI</strong> COMMON USER’S MANUAL<br />
6. TROUBLESHOOTING<br />
Version 1.2<br />
6.1. Latency timer - problem<br />
Document number #201<br />
Date: 03 – January-2013<br />
Sometimes depending on the user rights in Windows may see the following message:<br />
50
<strong>AVDI</strong> COMMON USER’S MANUAL<br />
Version 1.2<br />
Document number #201<br />
Date: 03 – January-2013<br />
You have two options for this – first is to run the application as an administrator<br />
51
<strong>AVDI</strong> COMMON USER’S MANUAL<br />
Or to change the port settings:<br />
1.Connect your <strong>AVDI</strong> to an USB port of your PC<br />
Version 1.2<br />
Document number #201<br />
Date: 03 – January-2013<br />
52
<strong>AVDI</strong> COMMON USER’S MANUAL<br />
2. Press "Start" button of the windows<br />
Version 1.2<br />
Document number #201<br />
Date: 03 – January-2013<br />
53
<strong>AVDI</strong> COMMON USER’S MANUAL<br />
3. Go to "Computer" and right click then select "Properties"<br />
Version 1.2<br />
Document number #201<br />
Date: 03 – January-2013<br />
54
<strong>AVDI</strong> COMMON USER’S MANUAL<br />
4. From the upper left corner of the screen select "Device manager"<br />
Version 1.2<br />
Document number #201<br />
Date: 03 – January-2013<br />
55
<strong>AVDI</strong> COMMON USER’S MANUAL<br />
5. Select "Ports (COM & LPT)"<br />
Version 1.2<br />
Document number #201<br />
Date: 03 – January-2013<br />
56
<strong>AVDI</strong> COMMON USER’S MANUAL<br />
Version 1.2<br />
Document number #201<br />
Date: 03 – January-2013<br />
6. Your <strong>AVDI</strong> will appears in the list as "USB Serial Port (COM xx)" where "xx" can be a different<br />
number. Double click on it.<br />
57
<strong>AVDI</strong> COMMON USER’S MANUAL<br />
7. From the screen select "Port settings"<br />
Version 1.2<br />
Document number #201<br />
Date: 03 – January-2013<br />
58
<strong>AVDI</strong> COMMON USER’S MANUAL<br />
8. Then press "Advanced"<br />
Version 1.2<br />
Document number #201<br />
Date: 03 – January-2013<br />
59
<strong>AVDI</strong> COMMON USER’S MANUAL<br />
9. Now you should set "Latency timer" to 1<br />
Version 1.2<br />
Document number #201<br />
Date: 03 – January-2013<br />
Please note that if you connect your <strong>AVDI</strong> to a different USB port for the FIRST TIME you will<br />
always<br />
be requested to set settings of the port manually.<br />
60
<strong>AVDI</strong> COMMON USER’S MANUAL<br />
Version 1.2<br />
6.2. <strong>Interface</strong> not connected<br />
If you see this message you need to<br />
check whether the interface is<br />
connected to the computer, if it is<br />
connected properly and you see this<br />
message again send us the last<br />
generated log file by the software to<br />
the following e-mail address :<br />
support@abritus72.com<br />
The Log file is located in My<br />
Documents\ABRITES software for ID<br />
VVxxxx<br />
(VVxxxx is your interface identification number.)<br />
Document number #201<br />
Date: 03 – January-2013<br />
61
<strong>AVDI</strong> COMMON USER’S MANUAL<br />
Version 1.2<br />
Document number #201<br />
Date: 03 – January-2013<br />
5. ADDITIONAL CABLES<br />
5.1. CB001 – OBDII Cable<br />
62
<strong>AVDI</strong> COMMON USER’S MANUAL<br />
5.2 CB002 – BMW 20 PIN CIRCLE CABLE<br />
5.3 CB003– Mercedes 38 Pin cable<br />
Version 1.2<br />
Document number #201<br />
Date: 03 – January-2013<br />
63
<strong>AVDI</strong> COMMON USER’S MANUAL<br />
5.4 CB004– Mercedes Sprinter 14 Pin cable<br />
OBDII (F) 14 pin cable<br />
Version 1.2<br />
4+5 1<br />
16 3<br />
7 14<br />
15 4<br />
Document number #201<br />
Date: 03 – January-2013<br />
64
<strong>AVDI</strong> COMMON USER’S MANUAL<br />
5.5 CB005– Cable for connecting<br />
<strong>AVDI</strong> and ESL(ELV)<br />
DB25(M) ESL<br />
Version 1.2<br />
5 GND<br />
8 K-line<br />
17 +12V<br />
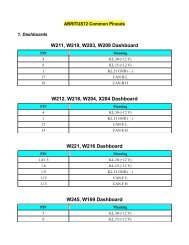
5.6 CB006– Cable for connecting <strong>AVDI</strong> and dashboard<br />
W203, W209, W211, W219<br />
DB25(F) Dash conector<br />
5 GND ( Dash pin 1)<br />
7 Can Hi (Dash pin 18)<br />
15 Can Lo (Dash pin 17)<br />
17 +12V (Dash pin 4+6)<br />
5.7 CB007– Cable for connecting <strong>AVDI</strong> and BRP<br />
Document number #201<br />
Date: 03 – January-2013<br />
65
<strong>AVDI</strong> COMMON USER’S MANUAL<br />
Version 1.2<br />
Document number #201<br />
Date: 03 – January-2013<br />
66
<strong>AVDI</strong> COMMON USER’S MANUAL<br />
5.7 Cable for connecting <strong>AVDI</strong> and Deutcsh 6 pin<br />
Version 1.2<br />
Document number #201<br />
Date: 03 – January-2013<br />
5.8<br />
Cable<br />
for<br />
conne<br />
cting<br />
<strong>AVDI</strong><br />
and<br />
Deutc<br />
sh 9<br />
pin<br />
67
<strong>AVDI</strong> COMMON USER’S MANUAL<br />
5.8 J1850 adapter<br />
Version 1.2<br />
Document number #201<br />
Date: 03 – January-2013<br />
68