Section 1 - Illustrated Principles of Pool and Billiards
Section 1 - Illustrated Principles of Pool and Billiards
Section 1 - Illustrated Principles of Pool and Billiards

Create successful ePaper yourself
Turn your PDF publications into a flip-book with our unique Google optimized e-Paper software.
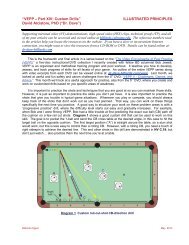
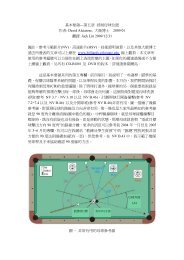
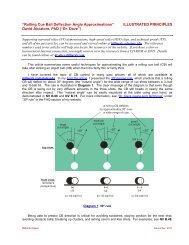
Obviously, you want to avoid bank shots like the plague if you want to be consistently successful with the<br />
drill (<strong>and</strong> with your position play in game situations). When playing for position to pocket one <strong>of</strong> the drill balls<br />
in a corner pocket, you need to make sure you end up above the line through the ball to the pocket. This will<br />
allow you to pocket the ball without bumping into the next ball, without needing to resort to a bank. Diagram<br />
2 illustrates several ways to accomplish this. From position A, a simple draw shot is a good option (see the<br />
black path). If the shot is straight in (from B), a good option is drawing straight back <strong>of</strong>f the side cushion (see<br />
the yellow path). If the CB were at C, a good option would be to follow forward with running English <strong>of</strong>f two<br />
cushions (see the light blue path). If you are above the ball, as in position D, a good choice is to follow for a<br />
natural-angle path to the other side <strong>of</strong> the balls (see the purple path). If you are up even higher, at E, you can<br />
draw <strong>of</strong>f two cushions to help kill the speed for good position (see the red path). A touch <strong>of</strong> outside English<br />
helps create the angle needed. And if the CB were even higher, at F, an option is to go up <strong>and</strong> down the<br />
table (see the dark blue path); although, this is a tough shot <strong>and</strong> much more difficult to control, so it is best to<br />
not leave such a steep angle if you can avoid it. These <strong>and</strong> other options are demonstrated in NV C.8.<br />
<strong>Billiards</strong> Digest September, 2012<br />
F<br />
E<br />
D C B<br />
3 2<br />
Diagram 2 Path options for position from the 2 ball to the 3 ball<br />
The next time you practice, try all <strong>of</strong> the position routes illustrated above <strong>and</strong> demonstrated in the video,<br />
try to think <strong>of</strong> others, <strong>and</strong> see how well you can do with the drill. As with all <strong>of</strong> the drills on VEPP, you should<br />
record your scores <strong>and</strong> track your improvement over time. The “How to Use VEPP” document on the VEPP<br />
website contains some sheets to help with this. Scores are useful for assessment <strong>and</strong> to provide a challenge.<br />
You can also use them to set goals for future improvement.<br />
I hope you enjoy <strong>and</strong> benefit from my series <strong>of</strong> articles featuring drills from the “Video Encyclopedia <strong>of</strong><br />
<strong>Pool</strong> Practice (VEPP).” Example clips from the second VEPP DVD can be viewed on the VEPP website or at<br />
billiards.colostate.edu under NV C.5 through NV C.8. Next month, we’ll start looking at useful pattern <strong>and</strong><br />
safety drills from the third disc.<br />
Good luck with your game,<br />
Dr. Dave<br />
A