AZBox Ultra HD Resurrection

You also want an ePaper? Increase the reach of your titles
YUMPU automatically turns print PDFs into web optimized ePapers that Google loves.
execution of programs at any RAM address.<br />
The procedure is always to interrupt<br />
the startup of YAMON with CTRL-<br />
C. Now the network interface is configured<br />
and activated. Finally, a TFTP<br />
server is started on the computer with<br />
which you can load an recovery image<br />
into RAM.<br />
You start with this and the receiver<br />
boots in a minimized Linux operating<br />
system. Next you copy, as you would<br />
1<br />
3 4<br />
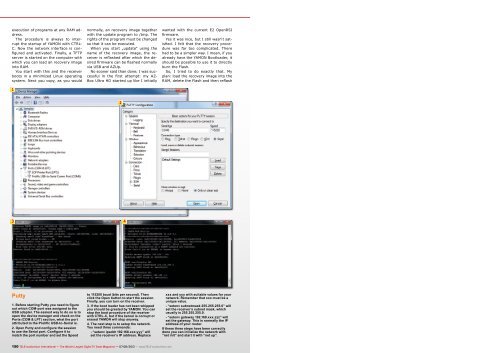
Putty<br />
1. Before starting Putty you need to figure<br />
out which COM-port was assigned to the<br />
USB adapter. The easiest way to do so is to<br />
open the device manager and check on the<br />
Ports (COM & LPT) section, what the port<br />
attributed to the Prolific USB-to-Serial is.<br />
2. Open Putty and configure the session<br />
to use the Serial port. Configure it to<br />
match the port number and set the Speed<br />
normally, an recovery image together<br />
with the update program to /tmp. The<br />
rights of the program must be changed<br />
so that it can be executed.<br />
When you start „update“ using the<br />
name of the recovery image, the receiver<br />
is reflashed after which the desired<br />
firmware can be flashed normally<br />
via USB and AZUp.<br />
No sooner said than done; I was successful<br />
in the first attempt: my AZ-<br />
Box <strong>Ultra</strong> <strong>HD</strong> started up like I initially<br />
150 TELE-audiovision International — The World‘s Largest Digital TV Trade Magazine — 07-08/2013 — www.TELE-audiovision.com<br />
2<br />
to 115200 baud (bits per second). Then<br />
click the Open button to start the session.<br />
Finally, you can turn on the receiver.<br />
3. If the boot loader has not been whipped<br />
you should be greeted by YAMON. You can<br />
stop the boot procedure of the receiver<br />
with CTRL-C, but if the kernel is corrupt or<br />
erased YAMON will stop anyway.<br />
4. The next step is to setup the network.<br />
You need three commands:<br />
- “setenv ipaddr 192.168.xxx.yyy” will<br />
set the receiver’s IP address. Replace<br />
wanted with the current E2 OpenRSI<br />
firmware.<br />
Yes it was nice, but I still wasn‘t satisfied.<br />
I felt that the recovery procedure<br />
was far too complicated. There<br />
had to be a simpler way. I mean, if you<br />
already have the YAMON Bootloader, it<br />
should be possible to use it to directly<br />
burn the Flash.<br />
So, I tried to do exactly that. My<br />
plan: load the recovery image into the<br />
RAM, delete the Flash and then reflash<br />
xxx and yyy with suitable values for your<br />
network. Remember that xxx must be a<br />
unique value.<br />
- “setenv subnetmask 255.255.255.0” will<br />
set the receiver’s subnet mask, which<br />
usually is 255.255.255.0.<br />
- “setenv gateway 192.168.xxx.zzz” will<br />
set the gateway. This is normally the IP<br />
address of your router.<br />
If these three steps have been correctly<br />
done you can initialize the network with<br />
“net init” and start it with “net up”.