eng TELE-audiovision 1307
The World’s Largest Digital TV Trade Magazine
The World’s Largest Digital TV Trade Magazine

Create successful ePaper yourself
Turn your PDF publications into a flip-book with our unique Google optimized e-Paper software.
13 14<br />
15 16<br />
TTL Recovery<br />
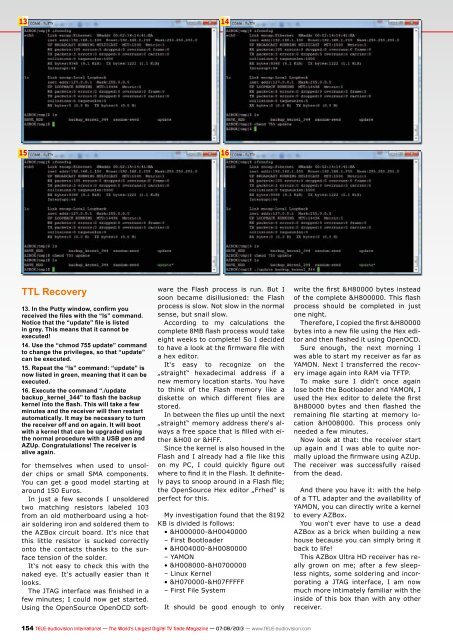
13. In the Putty window, confirm you<br />
received the files with the “ls” command.<br />
Notice that the “update” file is listed<br />
in grey. This means that it cannot be<br />
executed!<br />
14. Use the “chmod 755 update” command<br />
to change the privileges, so that “update”<br />
can be executed.<br />
15. Repeat the “ls” command: “update” is<br />
now listed in green, meaning that it can be<br />
executed.<br />
16. Execute the command “./update<br />
backup_kernel_344” to flash the backup<br />
kernel into the flash. This will take a few<br />
minutes and the receiver will then restart<br />
automatically. It may be necessary to turn<br />
the receiver off and on again. It will boot<br />
with a kernel that can be upgraded using<br />
the normal procedure with a USB pen and<br />
AZUp. congratulations! The receiver is<br />
alive again.<br />
for themselves when used to unsolder<br />
chips or small SMA components.<br />
You can get a good model starting at<br />
around 150 Euros.<br />
In just a few seconds I unsoldered<br />
two matching resistors labeled 103<br />
from an old motherboard using a hotair<br />
soldering iron and soldered them to<br />
the AZBox circuit board. It‘s nice that<br />
this little resistor is sucked correctly<br />
onto the contacts thanks to the surface<br />
tension of the solder.<br />
It‘s not easy to check this with the<br />
naked eye. It‘s actually easier than it<br />
looks.<br />
The JTAG interface was finished in a<br />
few minutes; I could now get started.<br />
Using the OpenSource OpenOCD soft-<br />
ware the Flash process is run. But I<br />
soon became disillusioned: the Flash<br />
process is slow. Not slow in the normal<br />
sense, but snail slow.<br />
According to my calculations the<br />
complete 8MB flash process would take<br />
eight weeks to complete! So I decided<br />
to have a look at the firmware file with<br />
a hex editor.<br />
It‘s easy to recognize on the<br />
„straight“ hexadecimal address if a<br />
new memory location starts. You have<br />
to think of the Flash memory like a<br />
diskette on which different files are<br />
stored.<br />
In between the files up until the next<br />
„straight“ memory address there‘s always<br />
a free space that is filled with either<br />
&H00 or &HFF.<br />
Since the kernel is also housed in the<br />
Flash and I already had a file like this<br />
on my PC, I could quickly figure out<br />
where to find it in the Flash. It definitely<br />
pays to snoop around in a Flash file;<br />
the OpenSource Hex editor „Frhed“ is<br />
perfect for this.<br />
My investigation found that the 8192<br />
KB is divided is follows:<br />
• &H000000-&H0040000<br />
– First Bootloader<br />
• &H004000-&H0080000<br />
– YAMON<br />
• &H008000-&H0700000<br />
– Linux Kernel<br />
• &H070000-&H07FFFFF<br />
– First File System<br />
It should be good enough to only<br />
154 <strong>TELE</strong>-<strong>audiovision</strong> International — The World‘s Largest Digital TV Trade Magazine — 07-08/2013 — www.<strong>TELE</strong>-<strong>audiovision</strong>.com<br />
write the first &H80000 bytes instead<br />
of the complete &H800000. This flash<br />
process should be completed in just<br />
one night.<br />
Therefore, I copied the first &H80000<br />
bytes into a new file using the Hex editor<br />
and then flashed it using OpenOCD.<br />
Sure enough, the next morning I<br />
was able to start my receiver as far as<br />
YAMON. Next I transferred the recovery<br />
image again into RAM via TFTP.<br />
To make sure I didn‘t once again<br />
lose both the Bootloader and YAMON, I<br />
used the Hex editor to delete the first<br />
&H80000 bytes and then flashed the<br />
remaining file starting at memory location<br />
&H008000. This process only<br />
needed a few minutes.<br />
Now look at that: the receiver start<br />
up again and I was able to quite normally<br />
upload the firmware using AZUp.<br />
The receiver was successfully raised<br />
from the dead.<br />
And there you have it: with the help<br />
of a TTL adapter and the availability of<br />
YAMON, you can directly write a kernel<br />
to every AZBox.<br />
You won‘t ever have to use a dead<br />
AZBox as a brick when building a new<br />
house because you can simply bring it<br />
back to life!<br />
This AZBox Ultra HD receiver has really<br />
grown on me; after a few sleepless<br />
nights, some soldering and incorporating<br />
a JTAG interface, I am now<br />
much more intimately familiar with the<br />
inside of this box than with any other<br />
receiver.