Euphonix TT007
Euphonix TT007
Euphonix TT007

Create successful ePaper yourself
Turn your PDF publications into a flip-book with our unique Google optimized e-Paper software.
<strong>Euphonix</strong> Inc.<br />
220 Portage Ave.<br />
Palo Alto, California 94306<br />
Phone: 650-855-0400<br />
Fax: 650-855-0410<br />
Web: http://www.euphonix.com<br />
e-mail: info@euphonix.com<br />
<strong>Euphonix</strong> <strong>TT007</strong><br />
Machine Control Hub for System 5<br />
and CS Series Consoles<br />
Operation Manual<br />
Document Revision: 2.0<br />
Release Date: February, 2002<br />
<strong>TT007</strong> Version: 4<br />
Part Number: 840-05044-03
In the interest of continued product development, <strong>Euphonix</strong> reserves the right to make<br />
improvements in this manual and the product it describes at any time, without notice or<br />
obligation.<br />
System 5, S-5, PatchNet, eMix, EuCon, R-1, Audio Deck, Studio Hub are trademarks of<br />
<strong>Euphonix</strong> Inc.<br />
©2001 <strong>Euphonix</strong> Inc. All rights reserved worldwide. No part of this publication may be<br />
reproduced, transmitted, transcribed, stored in a retrieval system, or translated into any<br />
language in any form by any means without written permission of <strong>Euphonix</strong> Inc.
<strong>Euphonix</strong> <strong>TT007</strong> Operation Manual<br />
Table of Contents<br />
List of Figures .........................................................................................................................v<br />
List of Tables ......................................................................................................................... vi<br />
Chapter 1: Overview..........................................................................................................7<br />
1.1 Introduction..................................................................................................7<br />
1.2 Navigating the Front Panel ..........................................................................8<br />
Chapter 2: <strong>TT007</strong> Menu Modes..................................................................................11<br />
2.1 Port Mode Menu ........................................................................................11<br />
2.1.1 Machine Menu ...............................................................................12<br />
2.1.2 TimeLine Lynx Network Support..................................................14<br />
2.1.3 Connecting Controllers to the <strong>TT007</strong> ............................................15<br />
2.2 Sync Mode Menu.......................................................................................16<br />
2.3 Utility Mode Menu ....................................................................................17<br />
2.4 Presets Mode Menu ...................................................................................19<br />
2.5 Transport Mode Menu ...............................................................................21<br />
Chapter 3: Configurations ...........................................................................................23<br />
3.1 <strong>Euphonix</strong> as Master Machine ....................................................................23<br />
3.1.1 LTC ................................................................................................23<br />
3.1.2 Serial ..............................................................................................24<br />
3.1.3 MIDI...............................................................................................24<br />
3.1.4 LTC/Serial/MIDI ...........................................................................25<br />
3.2 <strong>Euphonix</strong> As Slave Machine......................................................................25<br />
3.2.1 Serial ..............................................................................................25<br />
3.2.2 Large Network (Serial/MIDI/LTC) ...............................................26<br />
3.3 TcR as Master with Serial Control ............................................................27<br />
3.4 LynxNET as Master...................................................................................28<br />
iii
<strong>Euphonix</strong> <strong>TT007</strong> Operation Manual<br />
Appendix 29<br />
A.1 Frequently Asked Questions......................................................................29<br />
A.2 Explanation of Controllers.........................................................................30<br />
A.2.1 Examples of Devices, Controllers, and Emulators ........................31<br />
A.3 MIDI Operation with Pro Tools.................................................................34<br />
A.3.1 OMS MIDI Setup...........................................................................34<br />
A.3.2 Pro Tools as Master........................................................................35<br />
A.3.3 Pro Tools as Controller ..................................................................36<br />
A.4 9-Pin Operation with ProTools ..................................................................37<br />
A.4.1 OMS Setup.....................................................................................37<br />
A.4.2 ProTools (9-pin Remote) as a Serial Master or Slave....................37<br />
A.5 Operation with a 3324, 3348, or 3348HR..................................................39<br />
A.6 Cable Pinouts .............................................................................................41<br />
iv
<strong>Euphonix</strong> <strong>TT007</strong> Operation Manual<br />
List of Figures<br />
1-1 <strong>TT007</strong> front and rear panels.................................................................................................7<br />
1-2 Front panel with Port Assignments Display ........................................................................8<br />
1-3 <strong>TT007</strong> Menu Modes ............................................................................................................9<br />
2-1 Port Assignments for Time Lynx Network........................................................................14<br />
2-2 Front panel usage ...............................................................................................................17<br />
2-3 <strong>TT007</strong> preset examples......................................................................................................20<br />
3-1 LTC Master parameter setting and configuration..............................................................23<br />
3-2 Video machine slaved to <strong>Euphonix</strong> console ......................................................................24<br />
3-3 Audio Workstation slaved to <strong>Euphonix</strong> console................................................................24<br />
3-4 Audio Workstation, video deck, and hard-disk recorder slaved to <strong>Euphonix</strong> console......25<br />
3-5 <strong>Euphonix</strong> console slaved to video machine.......................................................................25<br />
3-6 <strong>Euphonix</strong> console slaved in a large network .....................................................................26<br />
3-7 TcR as Master ....................................................................................................................27<br />
3-8 LynxNet as Master.............................................................................................................28<br />
A-1 <strong>TT007</strong> as controller............................................................................................................31<br />
A-2 <strong>TT007</strong> as device ................................................................................................................32<br />
A-3 <strong>TT007</strong> as secondary controller .........................................................................................32<br />
A-4 <strong>TT007</strong> as multiple controller hub ......................................................................................33<br />
A-5 OMS MIDI Setup...............................................................................................................34<br />
A-6 OMS Studio Setup and MIDI Device Info dialogs............................................................34<br />
A-7 Synchronization tab in the Pro Tools Peripherals dialog...................................................35<br />
A-8 MIDI Controllers tab in the Pro Tools Peripherals dialog.................................................36<br />
A-9 Pro Tools Transport Controls ............................................................................................36<br />
A-10 Machine Control tab in the Pro Tools Peripherals dialog..................................................37<br />
A-11 Pro Tools Remote Mode 9-pin cable .................................................................................38<br />
A-12 Cable pinout diagrams .......................................................................................................41<br />
v
<strong>Euphonix</strong> <strong>TT007</strong> Operation Manual<br />
List of Tables<br />
2-1 Port Modes...................................................................................................................... 12<br />
2-2 Sync Modes..................................................................................................................... 16<br />
2-3 Function and LCD symbols for front panel keys ........................................................... 21<br />
A-1 Devices and Controllers.................................................................................................. 31<br />
vi
<strong>Euphonix</strong> <strong>TT007</strong> Operation Manual<br />
Chapter 1: Overview<br />
1.1 Introduction<br />
The <strong>TT007</strong> is an optional rack-mount device that provides machine control for all <strong>Euphonix</strong><br />
consoles. The <strong>TT007</strong> allows the console to become the single, centralized machine<br />
control hub within any studio. Virtually every machine, in or out of the control<br />
room, can be remotely controlled from the console at the press of a button. The flexibility<br />
gained from the addition of the <strong>TT007</strong> is unprecedented. These are a few of the<br />
many features that can be seamlessly implemented with the <strong>TT007</strong>:<br />
• Entire machine networks can be configured and set into motion directly from<br />
the console.<br />
• user nameable, instantly accessible locate points<br />
• automatic transport cycling<br />
• jogging and variable shuttle<br />
• control tape decks, DAWs, and other synchronizers<br />
All timecode formats and frame rates are supported, including MIDI Time Code (MTC)<br />
and external video sync. MIDI Machine Control (MMC), the TimeLine Lynx network,<br />
and Sony 9-pin (P2) protocols work right “out of the box” to insure that starting<br />
to work with the <strong>TT007</strong> is quick and easy. Three MIDI and three serial machine ports<br />
are available. The <strong>TT007</strong> also has a built-in timecode generator and LTC reader.<br />
<strong>TT007</strong><br />
VIDEO<br />
RS422<br />
OUT TC WINDOW IN SYNC<br />
S 1<br />
Port keys Menu keys<br />
S1 S2 S3 PC VI<br />
1 2 3 4 5<br />
UP NEXT<br />
>><br />
6 7 8 9 0<br />
<br />
M1 M2 M3 TCR TCG DOWN PREV ENTER<br />
S 2 S 3<br />
OUT TC WINDOW IN SYNC<br />
S 1<br />
S 2 S 3<br />
Video In<br />
Video Out/Thru<br />
Serial Ports (S 1-3)<br />
<strong>TT007</strong><br />
S 4<br />
S 4<br />
OUT<br />
OUT<br />
Expansion Port<br />
EXIT<br />
MIDI M1<br />
IN<br />
IN<br />
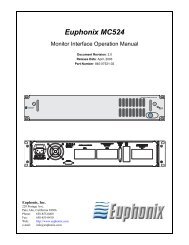
Figure 1-1 <strong>TT007</strong> front and rear panels<br />
The <strong>TT007</strong>’s front panel is very easy to master. Dedicated Port buttons instantly access<br />
individual assignments for each machine control Port. Any Port can be defined as a<br />
master, controller, or slave. A single master acts as the synchronization source for all<br />
machines in the network.<br />
7<br />
LCD Display<br />
Preset #<br />
Timecode<br />
Format<br />
Timecode<br />
Readouts<br />
Transport Status Icon<br />
S1s S2 S3 -- Vi- 30:S TG 00:50:02:06<br />
M1s M2c M3 TR TG P:01 M2 00:50:02.06<br />
M 2 M 3<br />
OUT IN OUT<br />
IN<br />
OUT IN OUT<br />
IN<br />
MIDI Ports (M 1-3)<br />
TR IN<br />
TR IN<br />
Timecode Reader<br />
(TR In)<br />
TIMECODE<br />
TG OUT<br />
TG OUT<br />
Data Wheel<br />
AC INPUT 100V TO 260V<br />
50 TO 60 HZ<br />
O<br />
I<br />
Timecode Generator<br />
(TG Out)
<strong>Euphonix</strong> <strong>TT007</strong> Operation Manual Overview<br />
The transport controls of the master machine can drive the network but the <strong>TT007</strong> is<br />
unique in its ability to accept transport commands from additional control surfaces and<br />
relay those commands to the master machine. Any controller device in the studio (System<br />
5, CS3000/CS2000, DAW, Sequencer, etc.) defined as a controller (and on-line)<br />
has direct access to the master machine. This gives the engineer new freedom to issue<br />
commands from the most convenient place in the studio at any given moment: Hit Play<br />
on the sequencer, turn around and press Stop on the workstation to make an edit, then<br />
pull forward and hit Play on the console to continue the mix!<br />
The built-in SMPTE/EBU generator can supply the master timecode source when random<br />
access machine control is desired, or for machines unable to generate their own timecode.<br />
Two readouts on the front panel LCD display incoming timecode from any selected<br />
Port. Additionally, a video burn-in window can be set to display one of the eight<br />
available timecode sources. The burn-in window can be superimposed on a video monitor<br />
by simply passing a composite video signal through the <strong>TT007</strong> video reference input.<br />
The <strong>TT007</strong> stores 50, user-defined presets that are instantly recalled when needed. The<br />
presets store customized machine control configurations including Port configurations,<br />
timecode formats, sync preferences, and window displays.<br />
The transport controls on the <strong>TT007</strong> are similar to most tape machines: Play, Stop, Fast<br />
Forward and Rewind are all clearly marked on the front panel. Transport mode allows<br />
control of any one of the seven ports or the timecode generator from the transport keys<br />
and the front panel Data Wheel.<br />
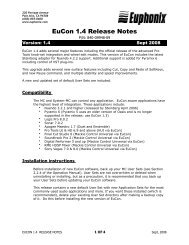
1.2 Navigating the Front Panel<br />
Navigating the <strong>TT007</strong>’s front panel and menu system is easy after you familiarize<br />
yourself with a few basics. The front panel has two rows of green buttons. The first<br />
10 are dedicated Port Keys. The last six are Menu/Transport keys: they move through<br />
the menu tree and change parameter values and then act as transport buttons when in<br />
Transport Mode.<br />
Menu Keys<br />
<strong>TT007</strong><br />
Port Keys<br />
S1 S2 S3 PC VI<br />
1 2 3 4 5<br />
6 7 8 9 0<br />
M1 M2 M3 TCR TCG DOWN<br />
UP<br />
NEXT<br />
>><br />
<br />
PREV ENTER<br />
EXIT<br />
Port Assignments Display<br />
(Default Screen)<br />
Figure 1-2 Front panel with Port Assignments Display<br />
8<br />
S1s S2 S3 -- Vi- 30:S TG 00:50:02:06<br />
M1s M2c M3 TR TG P:01 M2 00:50:02.06
<strong>Euphonix</strong> <strong>TT007</strong> Operation Manual Overview<br />
When the <strong>TT007</strong> boots up, the first screen visible is the Port Assignments Display, which<br />
is the default screen. Press the EXIT key from this screen to display the <strong>TT007</strong>’s ROM<br />
version number. Press the EXIT key one or more times from any other display (depending<br />
on the depth within the menu system) to restore the Port Assignments Display.<br />
The Port Assignments Display shows the status of all ports, as well as the current<br />
SMPTE/EBU frame rate and synchronization reference. The two timecode readouts on<br />
the right remain visible at all times regardless of the current mode or menu level. The<br />
Port name to the left of each timecode window identifies its source. A single character<br />
at the far right of the LCD display shows the current transport status (Play / Stop / Rew<br />
/ FF / Shuttle) for the displayed Port.<br />
From the Port Assignments Display, press the Enter key to select the Menu mode.<br />
Port Assignments Display<br />
(Default Screen)<br />
Port Mode Menu Sync Mode Menu Utility Mode Menu Presets Mode Menu Transport Mode Menu<br />
Figure 1-3 <strong>TT007</strong> Menu Modes<br />
The PREV and NEXT keys scroll through the list of menus. Press ENTER to confirm<br />
the current selection and display that mode’s menus. Press EXIT to return to the Port<br />
Assignments Display. The UP and DOWN keys light when they can select parameter<br />
settings. In general, the PREV and NEXT keys scroll through parameters and lists and<br />
the UP and DOWN keys select a specific value for the parameter. The PREV/NEXT<br />
and UP/DOWN keys light in each context to guide you through the selection process.<br />
The Data Wheel performs the same function as the currently lit keys: Rotate the Data<br />
Wheel counterclockwise for PREV or DOWN and clockwise for NEXT or UP.<br />
Chapter 2: <strong>TT007</strong> Menu Modes discusses the five mode menus in detail.<br />
Chapter 3: Configurations discusses common <strong>TT007</strong> configurations.<br />
9
<strong>Euphonix</strong> <strong>TT007</strong> Operation Manual <strong>TT007</strong> Menu Modes<br />
Chapter 2: <strong>TT007</strong> Menu Modes<br />
2.1 Port Mode Menu<br />
To access Port Mode from the Port Assignments Display:<br />
1. Press any Menu key.<br />
2. Scroll through the list with the PREV and NEXT keys until PORT MODE is<br />
displayed.<br />
3. Press the ENTER key.<br />
You can also press any of the dedicated, front panel Port keys. Depending on the Port being<br />
viewed, the display shows a different status to indicate that Port’s current assignment.<br />
The possible assignments are:<br />
Off<br />
Port is inactive (off-line).<br />
Controller<br />
Port can pass both synchronization data and transport commands (FF, Rew, Stop, etc.)<br />
to/from the connected device. Transport commands relayed from the device, are returned<br />
to the Master Port. See Section A.2 - Explanation of Controllers for more information.<br />
Slave<br />
Port passes only synchronization data (timecode) to the connected device.<br />
Master<br />
Sets port as the master synchronization source for the entire system. Any timecode sync<br />
source from the Master device will be transmitted to all other <strong>TT007</strong> ports selected as<br />
either Slave or Controller. The Master device’s transport may be controlled locally via<br />
its own front panel or remotely via other controller devices attached to the <strong>TT007</strong>.<br />
The PREV and NEXT keys scroll through the Port list. The UP and DOWN keys (or<br />
the Data Wheel) select assignment options. Pressing EXIT returns to the default display.<br />
ENTER has no function in this menu.<br />
NOTE: Selecting a Port as Master forces any previous Master Port selection off-line. Designating<br />
a Master is immediate when selected in the Port menu. If the <strong>TT007</strong> is configured<br />
without a Master Port, the EXIT and ENTER keys flash alternately to alert the user<br />
that no Master Port has been defined for this preset.<br />
11
<strong>Euphonix</strong> <strong>TT007</strong> Operation Manual <strong>TT007</strong> Menu Modes<br />
Table 2-1 Port Modes<br />
Port Available assignments<br />
M1-M3 OFF / Controller / Slave / Master c / s / M<br />
S1-S3 OFF / Controller / Slave / Master c / s / M<br />
* Proprietary protocol for Studer D820 and D827 control<br />
** Timebase synchronization is based on LTC signals received at the TcR Port. Longitudinal Time<br />
Code (LTC) signals are typically audio reference tracks on the Master machine.<br />
NOTE: The <strong>TT007</strong>’s TcG should always be set to Slave if not selected as Master.<br />
2.1.1 Machine Menu<br />
Pressing a Port key twice accesses the Machine Menu. The first press displays the Port<br />
Menu screen; the second press displays the Machine Menu. In the Machine Menu, the<br />
PREV and NEXT keys scroll the available parameters, which vary based on whether<br />
the Port is configured as a Master or Slave:<br />
Record<br />
OFF Safe (Recording disabled)<br />
EDIT Insert recording over audio tracks only<br />
ASSEMBLE Overwrite sync track, video, and audio tracks<br />
Track Arm<br />
OFF No Track Arming Request is translated to port<br />
ON Any analog or digital Track Arm Request is translated to port<br />
D=A Converts analog Track Arm Requests to equivalent Digital Requests<br />
48 no tally For use with Pro Tools. Since Pro Tools does not output track tallies<br />
when in record, the tallies generated by the <strong>TT007</strong> are not current if<br />
track arming is changed while Pro Tools is in motion; they are just<br />
the last known state.<br />
12<br />
Symbol in Port<br />
Assignments<br />
Display<br />
S1 (additional) LynxNET (Master) / Lynxnet (Slave) / EsBUS* / A-Smith T / t / E / A<br />
TcG OFF / Slave / Master s / M<br />
TcR OFF / FromMaster** / Master m / M<br />
Resolve (Vi) VIDEO / Free run R / –
<strong>Euphonix</strong> <strong>TT007</strong> Operation Manual <strong>TT007</strong> Menu Modes<br />
Stop<br />
Still Translates Stop commands to device as Still<br />
Stop Translates Stop commands to device as Stop<br />
Standby Translates Stop commands to device as Standby<br />
Stop vs. Still or Standby commands are used by some hard disk machines, (such as Radar<br />
and Fairlight), to determine whether the device should return to input when parked.<br />
Type (Master)<br />
Normal<br />
TC in Play For non-video resolved machines<br />
Code only Uses wind commands to locate for machines with no timecode reader<br />
MMC Standard MIDI Machine Control<br />
MTC Only Uses MTC only to determine status for systems that do not respond<br />
to MMC information requests (i.e., Pro Tools). Additionally, the<br />
punch IN and punch OUT commands are continuous controllers.<br />
Type (Slave)<br />
Slow Shtl U-matic, etc.<br />
Med Shtl D1, D2, Beta, etc.<br />
Hard Disk V1, etc.<br />
Slow Vari<br />
Tape DAxx DA88, DA98, etc.<br />
Tape 33xx 324, 3348, 3348HR, etc.<br />
Selecting the proper machine type for each serial Slave port provides a fast and reliable<br />
lock between device machines. The Type sub-menu provides a list the most commonly<br />
used device types. Determine the type that best matches the ballistics of the machine<br />
connected to this particular Port. Older U-matic video decks should be set to Slow Shtl.<br />
Newer D2 and Beta video machines can be set to Med Shtl.<br />
Offset (slave/TcG)<br />
Use this field to set positive or negative TC offsets for any serial Slave device. The data<br />
wheel is used to set the desired offset. The UP and DOWN keys select between HH,<br />
MM, SS or FF. Data entry is immediate so there is no need to confirm an offset value.<br />
Offsets may also be trimmed on the fly. Press the ENTER key to clear the current offset.<br />
The Timecode Generator (TcG) can have an offset even when configured as Master.<br />
This is helpful when striping timecode starting at a time other than 00:00:00.00.<br />
13
<strong>Euphonix</strong> <strong>TT007</strong> Operation Manual <strong>TT007</strong> Menu Modes<br />
Generator<br />
Gain +9 to -24 dB in 3-dB steps<br />
Burst Selects the number of frames to output during serial Rew/FF and locate<br />
commands<br />
Delay For <strong>Euphonix</strong> diagnostics use only: should be set to OFF<br />
2.1.2 TimeLine Lynx Network Support<br />
In addition to its own network of devices, the <strong>TT007</strong> may also be integrated with a<br />
TimeLine Lynx machine control network. The S1 Port connects as the Lynx Network<br />
controller where it can command any combination of the eight machines on the Lynx<br />
network.<br />
The Port Assignment menu for S1 has three additional settings (besides the standard<br />
Controller / Slave / Master). Scroll to the LynxNET setting using the UP and DOWN<br />
keys or the Data Wheel, then press the S1 Port key a second time to enter the TimeLine<br />
Network configuration menu. A master machine must be selected from one of the eight<br />
displayed addresses. Additional machines may be selected into the on-line group as<br />
desired. All selections for the TimeLine Network menu are stored within a preset, so<br />
selecting groups of machines in any combination is fast. Simply recall the desired preset<br />
to reconfigure the entire network.<br />
Select the Master machine (1-8) by pressing the corresponding numbered Port key.<br />
Display the Select page with the PREV and NEXT keys or Data Wheel, then use the<br />
Port/number keys again to bring other machines on-line.<br />
Master On-Line (Selected)<br />
1 2M 3 4. 5. 6. 7 8 S1 00:00:00.00<br />
Master ["Lynx" NET ]M2 00:00:00.00<br />
Use the [] keys or Data<br />
Wheel to toggle between "Master" and<br />
"Select" pages.<br />
Figure 2-1 Port Assignments for Time Lynx Network<br />
14
<strong>Euphonix</strong> <strong>TT007</strong> Operation Manual <strong>TT007</strong> Menu Modes<br />
2.1.3 Connecting Controllers to the <strong>TT007</strong><br />
The <strong>TT007</strong> serial ports (S1, S2, S3) are wired so they can be cabled directly to devices.<br />
When connecting an additional controller to the network, the transmit (Tx) and receive<br />
(Rx) pins of the RS-422 interconnect cable must be reversed to enable the <strong>TT007</strong> to emulate<br />
a device and translate controller commands to the network.<br />
The pinout for such a cable is shown in Figure A-12 on page 41.<br />
15
<strong>Euphonix</strong> <strong>TT007</strong> Operation Manual <strong>TT007</strong> Menu Modes<br />
2.2 Sync Mode Menu<br />
Sync Mode is used to set basic synchronization parameters, such as frame rate and<br />
clock reference. To access the Sync Mode from the Port Assignments Display:<br />
1. Press any Menu key.<br />
2. Scroll through the list with the PREV and NEXT keys until SYNC MODE is<br />
displayed.<br />
3. Press the ENTER key.<br />
The PREV and NEXT keys scroll through the list of selections. The UP and DOWN<br />
keys and the Data Wheel change the setting.<br />
Table 2-2 Sync Modes<br />
Parameter Value Description<br />
Resolve<br />
TC Detect<br />
Frame Std<br />
Video Std<br />
LEDs<br />
Relock<br />
MTC Stop<br />
Free Run Internal Clock Reference -<br />
Video Sync to External Video Reference R<br />
ON <strong>TT007</strong> automatically selects the frame<br />
rate to match incoming timecode (default)<br />
OFF Frame rate auto-sensing is disabled<br />
24:FILM Film 24:F<br />
25:EBU EBU 25:E<br />
30:DF SMPTE (Drop frame) 30:D<br />
30:SMPTE SMPTE (Non-drop) 30:S<br />
NTSC<br />
PAL<br />
Comms Port Keys light to indicate communications<br />
with attached devices<br />
Locking Port Keys light to indicate synchronization<br />
lock with attached devices<br />
OFF Slaves not relocked if they lose lock<br />
ON Slaves re-lock if they lose lock<br />
OFF<br />
ON<br />
16<br />
LCD<br />
Symbol
<strong>Euphonix</strong> <strong>TT007</strong> Operation Manual <strong>TT007</strong> Menu Modes<br />
2.3 Utility Mode Menu<br />
Utility Mode is used to configure the <strong>TT007</strong>’s user interface options. All timecode<br />
display windows and Data Wheel functions are configured from this menu. To access<br />
the Utility Mode from the Port Assignments Display:<br />
1. Press any Menu key.<br />
2. Scroll through the list with the PREV and NEXT keys until UTILITY MODE<br />
is displayed.<br />
3. Press the ENTER key.<br />
SERVICE<br />
RESET TT Soft system re-boot<br />
MEM CLEAR Clears presets to factory defaults and erases any RAM-based OS<br />
BURNIN TC<br />
BURN-IN TC (Src) Selects Port for on-screen display<br />
Column (0-219) Moves burn-in from left to right on-screen<br />
Line (0-139) Moves burn-in up and down on-screen<br />
Size/Mode (OFF, 1-8) Selects display format for burn-in<br />
Bottom TC<br />
Selects source Port for lower TC display in LCD window.<br />
Top TC<br />
Selects source Port for upper TC display in LCD window.<br />
SHORTCUT: Pressing the UP or DOWN keys while holding any Port key displays that Port in<br />
the top or bottom LCD timecode readout, respectively (see Figure 2-2).<br />
Step 1: Hold desired Port key<br />
<strong>TT007</strong><br />
S1 S2 S3 PC VI<br />
1 2 3 4 5<br />
6 7 8 9 0<br />
<br />
M1 M2 M3 TCR TCG DOWN PREV ENTER<br />
UP<br />
Step 2: Press to display here<br />
NEXT<br />
>><br />
EXIT<br />
Step 2: Press to display here<br />
Figure 2-2 Front panel usage<br />
17<br />
S1s S2 S3 -- Vi- 30:S TG 00:50:02:06<br />
M1s M2c M3 TR TG P:01 M2 00:50:02.06
<strong>Euphonix</strong> <strong>TT007</strong> Operation Manual <strong>TT007</strong> Menu Modes<br />
NudgeMode Select<br />
In Transport Mode, the Data Wheel functions as:<br />
JOG Jog Wheel (movement in single-frame steps)<br />
SHUTTLE Shuttle Wheel (scan speed control)<br />
CS3000/2000 owners: From the DSC, enter Jog by toggling the [] key until it flashes.<br />
Enter Variable Shuttle by toggling the [] key until it is solid. Both functions use the<br />
Spin Knob as the machine control interface when active.<br />
WindSpeed Adjust<br />
Selects scan speed rate in the range 001–010. This setting applies to machines that support<br />
a threaded (heads engaged) vs. unthreaded (heads disengaged) wind mode. The<br />
higher the WindSpeed number, the faster the machine will scan in threaded wind mode.<br />
This setting is stored with the Preset.<br />
If set OFF, FF and Rew commands are always unthreaded. If set to any non-zero value,<br />
the first press of a FF or Rew key initiates a threaded wind (scan). A second press of the<br />
same key initiates an unthreaded wind. A third press of the same key toggles back to a<br />
threaded wind, etc.<br />
REV Play<br />
OFF Reverse Play disabled<br />
ON Reverse Play enabled; press Play immediately after Rew to initiate<br />
Reverse Play<br />
REC Safe<br />
This is the global master Record Safe switch for the <strong>TT007</strong> and all ports are configured<br />
by this selection:<br />
OFF Record Ready; any port may receive Record commands<br />
ON All Safe Mode; record commands will not pass out to any device<br />
Re-Direct<br />
Selects a port, other than the Master, to receive track arming and record commands:<br />
OFF<br />
M1<br />
M2<br />
M3<br />
S1<br />
S2<br />
S3<br />
18
<strong>Euphonix</strong> <strong>TT007</strong> Operation Manual <strong>TT007</strong> Menu Modes<br />
2.4 Presets Mode Menu<br />
Presets Mode is very powerful for users who require flexibility in machine control setups.<br />
Up to 50 presets can store different port assignment configurations. Each preset<br />
can be named for easy identification.<br />
To access the Presets Mode from the Port Assignments Display:<br />
1. Press any Menu key.<br />
2. Scroll through the list with the PREV and NEXT keys until PRESETS is<br />
displayed.<br />
3. Press the ENTER key.<br />
Presets Mode has three functions:<br />
Recall Recalls currently selected preset number upon pressing ENTER<br />
Rename Renames the current RAM preset<br />
Store Stores the current configuration into the selected preset number<br />
upon pressing ENTER<br />
Recalling a Preset<br />
Select Recall with the PREV and NEXT keys. Use the Data Wheel to select the desired<br />
preset by name or preset number. Confirm the selection and recall the preset with the<br />
ENTER key.<br />
SHORTCUT: Use the Port keys as a fast way to access presets. From the Recall Menu, press<br />
a Port key to recall the corresponding Preset number (1-10).<br />
Renaming a Preset<br />
Select Rename with the PREV and NEXT keys. Use the UP and DOWN keys to move<br />
the cursor and the Data Wheel to change the selected character. There is no need to<br />
confirm the new name; ENTER has no function in this screen.<br />
Renaming affects only the current preset in RAM. A renamed preset may be stored to<br />
its original preset number or another location using the Store function.<br />
Storing a Preset<br />
Select Store with the PREV and NEXT keys. Use the Data Wheel to select the desired<br />
preset number, then press ENTER to select that number. You will then be asked to<br />
confirm the selection by pressing the UP key. The current configuration is written to<br />
the selected location in RAM (battery backed-up).<br />
19
<strong>Euphonix</strong> <strong>TT007</strong> Operation Manual <strong>TT007</strong> Menu Modes<br />
Individual machines may be controlled independently simply by creating presets that<br />
identify only a single port. Groups of machines may be configured in the same manner.<br />
Those presets may then be instantly recalled from the console to control the entire network,<br />
a group, or individual machines.<br />
NOTE: Turning on MSTR CTRL recalls the current preset number lit on the DSC. Any <strong>TT007</strong><br />
configuration not saved to a preset will be lost.<br />
Figure 2-3 shows some examples of <strong>TT007</strong> preset setups.<br />
Preset #1 - S1M<br />
DA-88<br />
Preset #4 - S1M - S2s - S3s<br />
DA-88<br />
DA-98<br />
Preset #2 - S2M Preset #3 - S3M<br />
BVW-75<br />
DA-98<br />
Preset #6 - TGM<br />
Synclavier<br />
Figure 2-3 <strong>TT007</strong> preset examples<br />
20<br />
BVW-75<br />
Preset #5 - S1s - S3M<br />
DA-98 BVW-75
<strong>Euphonix</strong> <strong>TT007</strong> Operation Manual <strong>TT007</strong> Menu Modes<br />
Parameters Stored in Presets<br />
• Port Assignments (Master, Controller, Slave, LynxNET, EsBUS)<br />
• LynxNET Master and On-line selections<br />
• Video Reference (Resolve/Free run)<br />
• Timecode Frame rate<br />
• Video Standard<br />
• Port selections for LCD Window timecode displays<br />
• Burn-in Window Port selection<br />
• Master Port Record Mode (Edit/Assemble/OFF)<br />
• Slave Port Type<br />
• Slave and Master Offset values<br />
2.5 Transport Mode Menu<br />
Any machine in the network can be controlled from the <strong>TT007</strong>’s front panel. To access<br />
the Transport Mode from the Port Assignments Display:<br />
1. Press any Menu key.<br />
2. Scroll through the list with the PREV and NEXT keys until TRANSPORT<br />
MODE is displayed.<br />
3. Press the ENTER key.<br />
When the Transport Mode is entered, the Port currently defined as Master is automatically<br />
selected. The Menu keys have the functions shown in Table 2-3. The machine’s<br />
transport state is indicated to the right of the timecode display.<br />
Table 2-3 Function and LCD symbols for front panel keys<br />
Key Function<br />
ENTER Play / Stop / <br />
> Fast Forward / Scan » / <br />
21<br />
LCD<br />
Symbol<br />
Data Wheel Jog / Shuttle or
<strong>Euphonix</strong> <strong>TT007</strong> Operation Manual<br />
Chapter 3: Configurations<br />
Before attempting to synchronize multiple machines, you must:<br />
• be familiar with all basic <strong>TT007</strong> functions discussed in the previous sections;<br />
• have a basic understanding of synchronization and machine control.<br />
3.1 <strong>Euphonix</strong> as Master Machine<br />
3.1.1 LTC<br />
In the recording industry, many devices cannot generate their own timecode and rely<br />
on incoming LTC to synchronize. The many workstations, sequencers, consoles, and<br />
automation systems that fall into this category are known as code-only slaves. A problem<br />
arises when neither the audio source nor the mixing console can generate timecode. The<br />
solution is to add a third machine with the sole function of providing timecode to the<br />
other two devices.<br />
Both the System 5 and CS3000/2000 series consoles are designed to control the <strong>TT007</strong><br />
as a seamless extension of the <strong>Euphonix</strong> system. All <strong>TT007</strong> functionality is available<br />
to the mixer as if it were actually embedded in the console. In such a situation, the<br />
console becomes a virtual machine.<br />
A simple application for this additional functionality uses the <strong>Euphonix</strong> system to<br />
generate LTC. To use the <strong>Euphonix</strong> system as the LTC master, consult Figure 3-1 for<br />
parameter settings and configuration.<br />
Video Sync<br />
Generator<br />
S1 S2 S3 -- ViR 30:S<br />
M1 M2c M3 TR TGM P:01<br />
DSC: MstrCtrl=On TC Slave=Off Machine Select=1<br />
Video<br />
Out<br />
Video<br />
In<br />
S1 S2 S3 (S4)<br />
Figure 3-1 LTC Master parameter setting and configuration<br />
Notice that the console is connected to the M2 Port; this is a standard system connection.<br />
By default, every <strong>TT007</strong> preset pre-assigns M2 as a controller so the console is always<br />
on-line and able to drive the machine control system.<br />
23<br />
MIDI In<br />
(factory default Preset #1)<br />
M1 M2 M3<br />
MIDI Out<br />
<strong>Euphonix</strong> Console<br />
LTC<br />
In<br />
LTC<br />
Out<br />
Audio Workstation
<strong>Euphonix</strong> <strong>TT007</strong> Operation Manual Configurations<br />
3.1.2 Serial<br />
3.1.3 MIDI<br />
Synchronizing audio and video is a common and useful application for the <strong>TT007</strong>. The<br />
<strong>Euphonix</strong> machine control system can access three separate video decks using standard<br />
Sony P2 serial control. The following preset slaves a video machine to <strong>Euphonix</strong>generated<br />
timecode connected on S1.<br />
S1s S2 S3 -- ViR 30:S S1 00:18:01:06<br />
(factory default Preset #2)<br />
M1 M2c M3 TR TGM P:02 M2 00:18:01.06=<br />
DSC: MstrCtrl=On TC Slave=Off Machine Select=2<br />
To<br />
Video Display<br />
Monitor<br />
Video Sync<br />
Generator<br />
Video<br />
Out<br />
Video Deck<br />
Video<br />
In<br />
S1 S2 S3 (S4)<br />
Figure 3-2 Video machine slaved to <strong>Euphonix</strong> console<br />
Many sequencers use MIDI Machine Control (MMC) and MIDI Time Code (MTC) for<br />
synchronization instead of SMPTE/EBU timecode. The <strong>Euphonix</strong> system provides a<br />
tremendous benefit to a studio by converting SMPTE/EBU to MTC, which allows<br />
MTC machines to follow SMPTE/EBU synchronization networks. Figure 3-3 shows<br />
how to slave an Audio Workstation on the M1 port to the <strong>Euphonix</strong> System.<br />
DSC: MstrCtrl=On TC Slave=Off Machine Select=3<br />
Figure 3-3 Audio Workstation slaved to <strong>Euphonix</strong> console<br />
24<br />
M1 M2 M3<br />
MIDI In<br />
MIDI Out<br />
<strong>Euphonix</strong> Console<br />
S1 S2 S3 -- ViR 30:S S1 00:18:01:06<br />
(factory default Preset #3)<br />
M1s M2c M3 TR TGM P:03 M2 00:18:01.06=<br />
Video Sync<br />
Generator<br />
Video<br />
Out<br />
* Video Sync is optional<br />
Video<br />
In<br />
S1 S2 S3 (S4)<br />
Audio Workstation<br />
MIDI In<br />
M1 M2 M3<br />
MIDI Out<br />
MIDI In<br />
MIDI Out<br />
LTC<br />
In<br />
LTC<br />
Out<br />
<strong>Euphonix</strong> Console<br />
LTC<br />
In<br />
LTC<br />
Out
<strong>Euphonix</strong> <strong>TT007</strong> Operation Manual Configurations<br />
3.1.4 LTC/Serial/MIDI<br />
The <strong>Euphonix</strong> system can control a group of slave machines as easily as a single slave.<br />
Figure 3-4 shows three machines slaved to the <strong>Euphonix</strong> system simultaneously.<br />
Figure 3-4 Audio Workstation, video deck, and hard-disk recorder slaved to <strong>Euphonix</strong> console<br />
3.2 <strong>Euphonix</strong> As Slave Machine<br />
3.2.1 Serial<br />
S1s S2 S3 -- ViR 30:S S1 00:18:01:06<br />
(factory default Preset #4)<br />
M1s M2c M3 TR TGM P:04 M2 00:18:01.06=<br />
DSC: MstrCtrl=On TC Slave=Off Machine Select=4<br />
To<br />
Video Display<br />
Monitor<br />
Video Sync<br />
Generator<br />
Video<br />
Out<br />
Video Deck<br />
Video<br />
In<br />
S1 S2 S3 (S4)<br />
Hard Disk<br />
Recorder<br />
Most video post applications prefer using the video machine as the master sync source.<br />
The <strong>Euphonix</strong> system can easily slave to serial timecode on any of its 9-pin Ports.<br />
Preset 5 configures the S1 Port as Master (Figure 3-5).<br />
Figure 3-5 <strong>Euphonix</strong> console slaved to video machine<br />
25<br />
MIDI In<br />
M1 M2 M3<br />
MIDI Out<br />
MIDI In<br />
MIDI Out<br />
<strong>Euphonix</strong> Console<br />
S1M S2 S3 -- ViR 30:S S1 00:18:01:06<br />
(factory default Preset #5)<br />
M1 M2c M3 TR TGs P:05 M2 00:18:01.06=<br />
DSC: MstrCtrl=On TC Slave=Off Machine Select=5<br />
To<br />
Video Display<br />
Monitor<br />
Video Sync<br />
Generator<br />
Video<br />
Out<br />
Video Deck<br />
Video<br />
In<br />
S1 S2 S3 (S4)<br />
M1 M2 M3<br />
MIDI In<br />
MIDI Out<br />
<strong>Euphonix</strong> Console<br />
LTC<br />
In<br />
LTC<br />
In<br />
LTC<br />
Out<br />
Audio Workstation<br />
LTC<br />
Out<br />
Audio Workstation
<strong>Euphonix</strong> <strong>TT007</strong> Operation Manual Configurations<br />
In addition to simply slaving to timecode, however, the <strong>Euphonix</strong> system can also act<br />
as the machine transport controller for the Master video deck. Even though the <strong>Euphonix</strong><br />
console is a slave to incoming timecode, it can still use its transport controls to drive the<br />
master machine. Play/Stop/Locate commands issued from the console are received by<br />
the master synchronization device, which then sends timecode to all machines on the<br />
network. This is extremely powerful because all the console’s locate functions are<br />
available for every machine in the studio without having to move from the console:<br />
named locate points, automatic cycling, jog, variable shuttle, threaded vs. unthreaded<br />
winding, and remote punch-ins.<br />
3.2.2 Large Network (Serial/MIDI/LTC)<br />
Figure 3-6 shows a typical large-scale installation that demonstrates the power of a<br />
<strong>Euphonix</strong> studio.<br />
S1M S2c S3s -- ViR 30:S S1 00:18:01:06<br />
(factory default Preset #6)<br />
M1s M2c M3c TR TGs P:06 M2 00:18:01.06=<br />
DSC: MstrCtrl=On TC Slave=Off Machine Select=6<br />
To<br />
Video Display<br />
Monitor MIDI In<br />
Video Sync<br />
Generator<br />
Video Deck<br />
Video<br />
Out<br />
Video<br />
In<br />
Audio Workstation<br />
MDM Recorder<br />
S1 S2 S3 (S4)<br />
Figure 3-6 <strong>Euphonix</strong> console slaved in a large network<br />
Note that S2 is a controller, which means that not only does it chase the serial timecode,<br />
but it also sends machine control commands to the master. M3 is also a controller,<br />
which provides control to the network operator from four locations: the master deck,<br />
the <strong>Euphonix</strong> console, the dialog workstation, or the music sequencer.<br />
26<br />
DAT Machine<br />
MIDI Out<br />
MIDI In<br />
MIDI Out<br />
MIDI In<br />
MIDI Out<br />
M1 M2 M3<br />
LTC<br />
In<br />
<strong>Euphonix</strong> Console<br />
MIDI<br />
Sequencer<br />
LTC<br />
Out<br />
Sound FX<br />
Sampler
<strong>Euphonix</strong> <strong>TT007</strong> Operation Manual Configurations<br />
3.3 TcR as Master with Serial Control<br />
Many older video decks do not provide timecode on their serial control cable, which is<br />
used only for machine control. The <strong>Euphonix</strong> system allows these machines to act as<br />
the Master by reading its audio LTC timecode track at the TcR Input Port.<br />
S1M S2 S3 -- ViR 30:S<br />
M1 M2c M3 TRm TGs P:04<br />
DSC: MstrCtrl=On TC Slave=Off Machine Select=Setup Required (1-6)<br />
To<br />
Video Display<br />
Monitor<br />
Video Sync<br />
Generator<br />
Video<br />
Out<br />
Video<br />
In<br />
Video Deck<br />
S1 S2 S3 (S4)<br />
Figure 3-7 TcR as Master<br />
Play/Stop/FF/Rew commands are issued to the master machine via the 9-pin connection,<br />
and the synchronization timecode is then sent back from the TcR Port. This configuration<br />
is also useful when regenerated (offset) code is desired as the synchronization source.<br />
The From Master option on the <strong>TT007</strong> allows reading code from MIDI Masters when<br />
LTC has been recorded on an audio track of an editor or MDM.<br />
27<br />
M1 M2 M3<br />
MIDI In<br />
MIDI Out<br />
<strong>Euphonix</strong> Console<br />
LTC<br />
In<br />
LTC<br />
Out
<strong>Euphonix</strong> <strong>TT007</strong> Operation Manual Configurations<br />
3.4 LynxNET as Master<br />
The <strong>Euphonix</strong> system can address eight machines using the TimeLine Lynx protocol.<br />
S1 can be configured as the interface Port to the LynxNET. Any machine on the Lynx-<br />
NET may be assigned as Master for the entire <strong>TT007</strong>. We recommend that the master<br />
Lynx module feed timecode to the TcR Port using the From Master option to ensure<br />
accurate synchronization if video is not present.<br />
S1T S2 S3 -- Vi 30:S<br />
M1 M2c M3 TRm TGs P:05<br />
DSC: MstrCtrl=On TC Slave=Off Machine Select=Set-up Required (1-6)<br />
Video Sync<br />
Generator<br />
Lynx<br />
Network<br />
Video<br />
Out<br />
Video<br />
In<br />
* Video Sync is optional<br />
S1 S2 S3 (S4)<br />
Lynx Module<br />
Figure 3-8 LynxNet as Master<br />
28<br />
M1 M2 M3<br />
MIDI In<br />
MIDI Out<br />
<strong>Euphonix</strong> Console<br />
LTC<br />
In<br />
LTC<br />
Out
<strong>Euphonix</strong> <strong>TT007</strong> Operation Manual<br />
Appendix<br />
A.1 Frequently Asked Questions<br />
Why does my TC generator not run when I hit play?<br />
• It is not configured as a Master or Slave.<br />
• It is set to video resolve but no video sync is being received<br />
Why does the master machine selection keep shutting off?<br />
There can only be one master machine, so when you configure a new port as Master,<br />
any port previously designated as Master automatically toggles OFF. This may happen<br />
unintentionally while passing through the master selection for a port while intending to<br />
configure it for some other setting.<br />
Why does the video sync selection keep shutting off?<br />
The TcR (Timecode Reader) and Video sync are mutually exclusive, i.e., the <strong>TT007</strong><br />
can only use one of them as a reference. When either is selected, the other automatically<br />
toggles OFF.<br />
Why does the TC reader keep shutting off?<br />
See above.<br />
What is the difference between a Master, Slave and Controller?<br />
See Explanation of Controllers on page 30.<br />
Why are my presets gone?<br />
Replacing the system software Eprom and/or selecting MEM CLEAR from the Service<br />
submenu erases system presets.<br />
Why is there no timecode at the desk but I see it on the <strong>TT007</strong> display?<br />
The Timecode Generator is not set to Slave. TC should be set to slave in all cases unless<br />
it is configured as a master.<br />
Why won’t my slave chase (P2-to-P2 mode)?<br />
• Check that all machines are video referenced.<br />
• Be sure that you have selected an appropriate slave type in the Type sub-menu.<br />
• Be sure the device does not require a controller-to-controller Tx/Rx pin swap.<br />
See Cable Pinouts on page 41.<br />
29
<strong>Euphonix</strong> <strong>TT007</strong> Operation Manual Appendix<br />
Why won’t my Lynx modules lock?<br />
• Be sure each module has a unique address number.<br />
• Be sure LTC from the Master is being sent to the TcR port and that the port is<br />
selected as From Master if no video sync is present.<br />
• Be sure that the Lynx modules are running current software versions. <strong>Euphonix</strong><br />
has tested the <strong>TT007</strong> using the following software versions:<br />
Lynx I: v500_26L<br />
Lynx II: v700_11<br />
Why does the video sync LED light even when video is not connected?<br />
This is caused by a sensing bug in the video reader chip that, in some cases, confuses<br />
open air RF as a video signal. Cycling the <strong>TT007</strong>’s power on/off usually clears the<br />
erroneous indication.<br />
Why am I having problems making my MicroLynx / Audio Kinetics<br />
synchronizer work with the <strong>TT007</strong>?<br />
These synchronizers are not yet supported.<br />
How can I adjust the LCD viewing angle contrast on my display?<br />
There is no software-based control for this feature. There is an adjustment potentiometer<br />
inside the <strong>TT007</strong> on the main circuit board next to the front panel connectors.<br />
Why does my video deck not unthread the tape and high-speed<br />
wind when I select Rew/FF?<br />
The Windspeed option is selected in the <strong>TT007</strong> Utility Menu. With this option set, the<br />
first press of Rew/FF will result in a threaded Scan and the second press will unthread<br />
the tape and initiate a high-speed wind.<br />
A.2 Explanation of Controllers<br />
The RS-422 ports on the <strong>TT007</strong> are wired (normalled) to send (Tx) and receive (Rx)<br />
data to and from tape-based machines. To connect any device to the <strong>TT007</strong>, use a<br />
standard, straight-thru, pin-to-pin cable. The <strong>TT007</strong> may also emulate a device simply<br />
by swapping the Tx and Rx lines of the RS-422 cable. In this configuration, the <strong>TT007</strong><br />
may be considered a virtual machine.<br />
30
<strong>Euphonix</strong> <strong>TT007</strong> Operation Manual Appendix<br />
A.2.1 Examples of Devices, Controllers, and Emulators<br />
Table A-1 shows examples of devices and controllers. A machine that can act as both<br />
a device and controller is defined as an emulation device. They are particularly well suited<br />
to work with the <strong>TT007</strong> because they can be an on-line audio member of a group while<br />
acting as an additional controller in the network. The diagrams below illustrate various<br />
<strong>TT007</strong> configurations and the cabling required.<br />
<strong>TT007</strong> as Controller<br />
Table A-1 Devices and Controllers<br />
Machine Device Controller<br />
J.L. Cooper CS-10 X<br />
J.L. Cooper MCS 9-pin X<br />
Sony Video Controller X<br />
Sony BVU-950 X<br />
Doremi Labs V-1 X<br />
Tascam DA-88/98 X<br />
Sonic Solutions SonicStudio X X<br />
Otari Radar X<br />
Opcode StudioVision X X<br />
Logic Audio X X<br />
<strong>TT007</strong> X X<br />
Figure A-1 shows an example of typical single-machine remote control from <strong>TT007</strong><br />
using normal Tx/Rx cable pinout wiring.<br />
Remote Controller only<br />
+Tx/-Tx +Rx/-Rx<br />
+Tx/-Tx +Rx/-Rx<br />
VCR Device only<br />
Equivalent<br />
Configurations<br />
Figure A-1 <strong>TT007</strong> as controller<br />
31<br />
<strong>TT007</strong> as Controller<br />
+Tx/-Tx +Rx/-Rx<br />
+Tx/-Tx +Rx/-Rx<br />
VCR Device only
<strong>Euphonix</strong> <strong>TT007</strong> Operation Manual Appendix<br />
<strong>TT007</strong> as Device<br />
Figure A-2 shows a typical virtual machine configuration with the <strong>TT007</strong> serving as<br />
random access TC Generator to drive sequencers and/or DAWs; uses reverse Tx/Rx<br />
cable pinout wiring.<br />
Remote Controller only<br />
+Tx/-Tx +Rx/-Rx<br />
+Tx/-Tx +Rx/-Rx<br />
VCR Device only<br />
Equivalent<br />
Configurations<br />
Figure A-2 <strong>TT007</strong> as device<br />
<strong>TT007</strong> used as Secondary Controller<br />
Figure A-3 shows an expanded control configuration that allows two Controllers simultaneous<br />
control of a single Device; uses reverse Tx/Rx cable pinout wiring.<br />
Remote Controller only<br />
+Tx/-Tx +Rx/-Rx<br />
+Tx/-Tx +Rx/-Rx<br />
<strong>TT007</strong> as Emulator & Controller<br />
+Tx/-Tx +Rx/-Rx<br />
+Tx/-Tx +Rx/-Rx<br />
VCR Device only<br />
Figure A-3 <strong>TT007</strong> as secondary controller<br />
32<br />
Remote Controller only<br />
+Tx/-Tx +Rx/-Rx<br />
+Tx/-Tx +Rx/-Rx<br />
TcG Master<br />
<strong>TT007</strong> as Device
<strong>Euphonix</strong> <strong>TT007</strong> Operation Manual Appendix<br />
<strong>TT007</strong> as Multiple Controller Hub<br />
Figure A-4 shows a configuration that takes advantage of the <strong>TT007</strong>’s unique ability to<br />
accept and translate commands from multiple controllers to a single master device. Any<br />
one of the four controllers in the network can operate the transport on the tape machine.<br />
Uses reverse Tx/Rx cable pinout wiring.<br />
Remote Controller only<br />
+Tx/-Tx +Rx/-Rx<br />
DAW Controller only<br />
+Tx/-Tx +Rx/-Rx +Tx/-Tx +Rx/-Rx<br />
+Tx/-Tx +Rx/-Rx<br />
<strong>TT007</strong> as Emulator & Controller<br />
+Tx/-Tx +Rx/-Rx<br />
+Tx/-Tx +Rx/-Rx<br />
Tape Machine Device only<br />
Figure A-4 <strong>TT007</strong> as multiple controller hub<br />
For additional system configurations, see Chapter 3: Configurations.<br />
33<br />
Euponix Console Controller only<br />
MIDI
<strong>Euphonix</strong> <strong>TT007</strong> Operation Manual Appendix<br />
A.3 MIDI Operation with Pro Tools<br />
A.3.1 OMS MIDI Setup<br />
Configure settings according to those set in the following dialogs.<br />
Figure A-5 OMS MIDI Setup<br />
Figure A-6 OMS Studio Setup and MIDI Device Info dialogs<br />
34
<strong>Euphonix</strong> <strong>TT007</strong> Operation Manual Appendix<br />
A.3.2 Pro Tools as Master<br />
In the Synchronization tab of the Pro Tools Peripherals dialog (Figure A-7), select the<br />
Enable Control of Pro Tools via MMC checkbox. Configure other settings according<br />
to Figure A-7.<br />
Figure A-7 Synchronization tab in the Pro Tools Peripherals dialog<br />
On the <strong>TT007</strong>, set the MIDI port to: MTC only and Master.<br />
This setup will not permit track-arming from the console but will allow recording to be<br />
initiated from the console. There is no record tally. For these reasons, this setup is not<br />
recommended. If you need these functions, see Section A.4.2 - ProTools (9-pin Remote)<br />
as a Serial Master or Slave.<br />
35
<strong>Euphonix</strong> <strong>TT007</strong> Operation Manual Appendix<br />
A.3.3 Pro Tools as Controller<br />
In the Synchronization tab of the Pro Tools Peripherals dialog (Figure A-7), deselect<br />
the Enable Control of Pro Tools via MMC checkbox.<br />
In the MIDI Controllers tab, configure the settings as shown in Figure A-8.<br />
Figure A-8 MIDI Controllers tab in the Pro Tools Peripherals dialog<br />
In the Transport Control, set the Transport menu to Pro Tools (Figure A-9).<br />
Figure A-9 Pro Tools Transport Controls<br />
On the <strong>TT007</strong>, set the MIDI port to Controller. This setup will not allow track-arming<br />
from the console but will allow recording to be initiated from the console.<br />
36
<strong>Euphonix</strong> <strong>TT007</strong> Operation Manual Appendix<br />
A.4 9-Pin Operation with ProTools<br />
A.4.1 OMS Setup<br />
Deselect the Modem port in the OMS MIDI Setup dialog (Figure A-5).<br />
A.4.2 ProTools (9-pin Remote) as a Serial Master or Slave<br />
To control Pro Tools from the <strong>TT007</strong>, configure Pro Tools as follows:<br />
1. Set the Machine Control tab in the Peripherals dialog as shown in Figure A-10.<br />
Figure A-10 Machine Control tab in the Pro Tools Peripherals dialog<br />
2. Click the clock on the upper-left of the Transport Control so it highlights (as<br />
shown in Figure A-9). This sets Pro Tools Online and relinquishes local control.<br />
3. Select the Remote option from the Transport Control’s Transport menu.<br />
Track-arming (only when Pro Tools is stopped) and record are functional but Quick<br />
Punch must be selected.<br />
Track tallies are turned off while Pro Tools is in record so check the ProTools screen<br />
for track status. The <strong>TT007</strong> can fake tallies, but if arming is changed while Pro Tools<br />
is in motion, the console tally states will be out of sync.<br />
37
<strong>Euphonix</strong> <strong>TT007</strong> Operation Manual Appendix<br />
On the <strong>TT007</strong>, set:<br />
• Stop = Stop<br />
• Arming = On or 48 no tallies<br />
Use the Pro Tools remote mode 9-pin cable shown below. A serial control 9-pin cable<br />
or v-LAN configuration will not work<br />
6 7 8<br />
3 4 5<br />
1 2<br />
Figure A-11 Pro Tools Remote Mode 9-pin cable<br />
38<br />
1 2 3 4 5<br />
6 7 8 9<br />
Mini-8 9-Pin D-Sub<br />
3<br />
4<br />
5<br />
6<br />
8<br />
2<br />
9,1<br />
8<br />
7<br />
3
<strong>Euphonix</strong> <strong>TT007</strong> Operation Manual Appendix<br />
A.5 Operation with a 3324, 3348, or 3348HR<br />
Master (Word Clock)<br />
1. For System 5, connect the word clock from the SH612 to the 3348.<br />
2. Connect the 3348 to the <strong>TT007</strong>’s serial port.<br />
3. Set the port to Master.<br />
4. Set the machine type to TC in Play.<br />
T/C from Master will be active.<br />
5. Connect the LTC from the 3348 to the <strong>TT007</strong>’s TcR.<br />
If the tape was striped to a video reference:<br />
• the machine type can be set to Normal;<br />
• <strong>TT007</strong> should be video referenced;<br />
• LTC is not needed.<br />
Master (Video Sync)<br />
1. Connect video sync to the 3348 and the <strong>TT007</strong>.<br />
2. Connect the 3348 to the <strong>TT007</strong>’s serial port.<br />
3. Set the port to Master.<br />
4. For System 5, connect the word clock from the 3348 to the SH612.<br />
5. Set the SH612 to Reference Word Clock.<br />
Slave (Word Clock)<br />
1. For System 5, connect the word clock from the SH612 to the 3348.<br />
2. Connect the 3348 to the <strong>TT007</strong>’s serial port.<br />
3. Set the port to Slave.<br />
4. Set the machine type to 33xx.<br />
39
<strong>Euphonix</strong> <strong>TT007</strong> Operation Manual Appendix<br />
Slave (Video Sync)<br />
1. Connect video sync to the 3348 and <strong>TT007</strong>.<br />
2. Connect the 3348 to the <strong>TT007</strong>’s serial port.<br />
3. Set the port Slave.<br />
4. Set the machine type to 33xx.<br />
5. For System 5, connect the word clock from the 3348 to the SH612.<br />
6. Set the SH612 to Reference Word Clock.<br />
If record and track arming control is needed when running as a slave, set Re-direct to<br />
the machine’s port.<br />
NOTE: The Sony 3348HR used for testing did not accept Track Arm and Record commands<br />
simultaneously. From the System 5 Main panel, Machines –> Setup –> Track Arm<br />
in Motion should be set to Arm Only.<br />
40
<strong>Euphonix</strong> <strong>TT007</strong> Operation Manual Appendix<br />
A.6 Cable Pinouts<br />
This a simple loop back dongle to<br />
use with built in self diagnostics.<br />
Self Testers<br />
<strong>TT007</strong>-2<br />
<strong>TT007</strong>-2<br />
S4<br />
S1, S2, S3<br />
S4<br />
S1, S2, S3<br />
<strong>TT007</strong>-2<br />
<strong>TT007</strong>-2<br />
RJ45 Socket<br />
1<br />
2<br />
3<br />
4<br />
5<br />
6<br />
7<br />
8<br />
(+5V)<br />
(+5V)<br />
RxD-<br />
RxD+<br />
TxD-<br />
TxD+<br />
GND<br />
GND<br />
9 WAY D MALE<br />
1<br />
6<br />
2<br />
7<br />
3<br />
8<br />
4<br />
9<br />
5<br />
+5V <strong>TT007</strong>-2 S4<br />
J27<br />
REMOTE<br />
RJ45 Socket<br />
1<br />
POWER (+5V)<br />
2<br />
1<br />
(+5V)<br />
2<br />
-RX7<br />
RxD-<br />
3<br />
+RX7<br />
RxD+<br />
4<br />
-TX7<br />
TxD-<br />
5<br />
+TX7<br />
TxD+<br />
6<br />
GND<br />
7<br />
GND<br />
8<br />
9 WAY D FEMALE<br />
1<br />
6<br />
2<br />
7<br />
3<br />
8<br />
4<br />
9<br />
5<br />
-RX<br />
+RX<br />
+TX<br />
-TX<br />
0V<br />
0V<br />
NET (GP132) i/f<br />
Diagnostic Port i/f<br />
<strong>TT007</strong>-2 Controller to Controller<br />
Interface Pinout / S1, S2, S3<br />
Figure A-12 Cable pinout diagrams<br />
41<br />
This cable connects to the GP132<br />
Track Arming system, when enabled<br />
This cable allows for connection to a<br />
PC/Mac via RS232, when enabled<br />
<strong>TT007</strong>-2 S4 GP132 NIN, NOUT<br />
RJ45 Socket<br />
RJ45 Socket<br />
9 WAY D FEMALE<br />
1<br />
6<br />
2<br />
7<br />
3<br />
8<br />
4<br />
9<br />
5<br />
9 WAY D MALE<br />
1<br />
6<br />
(+5V)<br />
(+5V)<br />
RxD-<br />
RxD+<br />
TxD-<br />
TxD+<br />
GND<br />
GND<br />
9 WAY D FEMALE<br />
1<br />
6<br />
2<br />
7<br />
3<br />
8<br />
4<br />
9<br />
5<br />
<strong>TT007</strong>-2 S4<br />
(+5V)<br />
(+5V)<br />
TxRx1-<br />
TxRx1+<br />
TxRx2-<br />
1<br />
2<br />
3<br />
4<br />
5<br />
6<br />
7<br />
8<br />
1<br />
2<br />
3<br />
4<br />
5<br />
6<br />
7<br />
8<br />
RJ45 Socket<br />
-RX<br />
+RX<br />
+TX<br />
-TX<br />
-RX<br />
+RX<br />
+TX<br />
-TX<br />
2<br />
1<br />
2<br />
3<br />
4<br />
5<br />
6<br />
7<br />
8<br />
(+5V)<br />
(+5V)<br />
RxD-<br />
RxD+<br />
TxD-<br />
TxD+<br />
GND<br />
GND<br />
7<br />
|<br />
Controller<br />
3<br />
TxRx2+<br />
8<br />
<strong>TT007</strong><br />
|<br />
GND<br />
GND<br />
4<br />
9<br />
5<br />
0V<br />
0V<br />
EUPHONIX INC.<br />
220 PORTAGE AVE.<br />
PAL ALTO, CALIFORNIA<br />
U.S.A.<br />
Title<br />
TIME TRANSPORTER - TEST & CONVERTOR CABLES<br />
Size Document Number REV<br />
A2 <strong>TT007</strong> Cables 1<br />
Date: February 12, 1998 Sheet 1 of 1