Application for Simple Hip Spica - 3M
Application for Simple Hip Spica - 3M
Application for Simple Hip Spica - 3M

Create successful ePaper yourself
Turn your PDF publications into a flip-book with our unique Google optimized e-Paper software.
<strong>3M</strong> Coban 2 Compression System <strong>Application</strong> <strong>for</strong> <strong>Simple</strong> <strong>Hip</strong> <strong>Spica</strong><br />
Materials & Positioning<br />
• If the proximal edge of the leg bandage curls or if the bandage slips prematurely, an easy and com<strong>for</strong>table way to stabilize the bandage is to apply a hip spica.<br />
• Select the 15cm (6 inch) or 20cm (8 inch) <strong>3M</strong> Coban 2 Com<strong>for</strong>t Foam Layer, depending on the girth, and select the 15cm (6 inch) <strong>3M</strong> Coban 2 Compression Layer <strong>for</strong> the proximal thigh and spica application.<br />
<strong>Application</strong> of Com<strong>for</strong>t Foam Layer to <strong>Hip</strong> <strong>Spica</strong><br />
Layer 1: Com<strong>for</strong>t Foam Layer<br />
• Apply this layer with the foam side against<br />
the skin with just enough tension to con<strong>for</strong>m.<br />
• Cover the skin with as thin a layer as<br />
possible with no gaps.<br />
<strong>Application</strong> of Compression Layer to <strong>Hip</strong> <strong>Spica</strong><br />
Layer 2: Compression Layer<br />
• Apply even compression with at least two<br />
layers. Even compression is best achieved<br />
when the material is applied at full stretch.<br />
• It is recommended that you hold the roll close<br />
to the body throughout the application <strong>for</strong><br />
controlled, even compression.<br />
• If “bulges” are noted after the application,<br />
apply additional compression layer until the<br />
application appears smooth.<br />
<strong>3M</strong> and Coban are trademarks of <strong>3M</strong>. Please recycle. © <strong>3M</strong> 2012. All rights reserved. 70-2010-9030-8 GF 185<br />
Step 1: Using the 15cm (or 20cm) com<strong>for</strong>t foam layer, continue with circular<br />
windings to cover the thigh as proximal as possible at the inner side of the leg,<br />
until thigh is covered.<br />
Step 5: Apply the 15cm compression layer at full stretch, following the same windings<br />
as the com<strong>for</strong>t foam layer. Apply at least two circular windings around the waist. When<br />
coming back across the abdomen, mould the application to the anatomy. If needed, apply<br />
additional winding(s) <strong>for</strong> support. End with a circular winding around the upper thigh.<br />
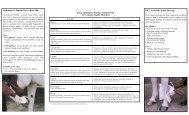
Bandage Removal<br />
Dipping the scissor tips into cream allows<br />
com<strong>for</strong>table and easy bandage removal.<br />
Step 2: Continue by bringing a circular turn around the waist to position<br />
the material so the opposite hip is covered. When coming back across the<br />
abdomen, mould the application to the anatomy. If needed, apply additional<br />
winding(s) <strong>for</strong> support.<br />
Step 6: Mould the entire<br />
application to the anatomy.<br />
Step 7: Trim the application as<br />
needed <strong>for</strong> com<strong>for</strong>t.<br />
How to Apply/Remove<br />
Step 3: End the com<strong>for</strong>t foam layer with a circular winding<br />
around the abdomen. Cut and mould to underlying layer.<br />
<strong>3M</strong> Coban 2 Compression System <strong>Application</strong> <strong>for</strong> <strong>Hip</strong> <strong>Spica</strong> with Abdominal Apron<br />
Materials & Positioning<br />
• If the proximal edge of the leg bandage curls or if the bandage slips prematurely, an easy and com<strong>for</strong>table way to stabilize the bandage is to apply a hip spica.<br />
• Select the 15cm (6 inch) [or 20cm (8 inch) depending on the girth] <strong>3M</strong> Coban 2 Com<strong>for</strong>t Foam Layer, and select the 15cm (6 inch) <strong>3M</strong> Coban 2 Compression Layer <strong>for</strong> the proximal thigh and spica application.<br />
<strong>Application</strong> of Com<strong>for</strong>t Foam Layer to <strong>Hip</strong> <strong>Spica</strong><br />
Layer 1: Com<strong>for</strong>t Foam Layer<br />
• Apply this layer with the foam side against<br />
the skin with just enough tension to con<strong>for</strong>m.<br />
• Cover the skin with as thin a layer as<br />
possible with no gaps.<br />
<strong>Application</strong> of Compression Layer to <strong>Hip</strong> <strong>Spica</strong><br />
Layer 2: Compression Layer<br />
• Apply even compression with at least two layers.<br />
Even compression is best achieved when the<br />
material is applied at full stretch.<br />
• It is recommended that you hold the roll close to<br />
the body throughout the application <strong>for</strong> controlled,<br />
even compression.<br />
• If “bulges” are noted after the application, apply<br />
additional compression layer until the application<br />
appears smooth.<br />
Step 4:<br />
To complete the application over the exposed skin on<br />
back of thigh (see dashed line), apply a piece of com<strong>for</strong>t<br />
foam layer large enough to cover the area. Cut and<br />
mould application to the anatomy and secure with tape.<br />
Step 1: Using the 15cm (or 20cm) com<strong>for</strong>t foam layer, continue with circular windings to<br />
cover the thigh as proximal as possible at the inner side of the leg, until thigh is covered.<br />
Step 3: Apply the 15cm compression layer at full stretch, following the same windings as the com<strong>for</strong>t foam<br />
layer. Apply at least two circular windings around the waist. When coming back across the apron, lift apron<br />
(patient can assist) and take the material beneath the apron while moulding the application to the anatomy.<br />
If needed add additional pieces of compression layer in a medial to lateral direction to provide extra lift of<br />
the abdominal apron. Cut and mould to the anatomy.<br />
Step 2: Continue by bringing a circular turn around the waist to position the material so the opposite hip is covered. When coming<br />
back across the apron, lift apron (patient can assist) and take the material beneath the apron while moulding the application to<br />
the anatomy. If needed, apply additional winding(s) to support apron. Cut and mould to the anatomy.<br />
Step 4: Mould the entire<br />
application to the anatomy.<br />
Step 5: Trim the application as<br />
needed <strong>for</strong> sanitary reasons.
3<br />
<strong>3M</strong> Canada Company<br />
P.O. Box 5757<br />
London, Ontario N6A 4T1<br />
Canada<br />
1-800-364-3577<br />
www.<strong>3M</strong>.ca/coban2layer<br />
<strong>3M</strong> Deutschland GmbH<br />
Health Care Business<br />
Carl-Schurz-Str.1<br />
41453 Neuss Germany<br />
<strong>3M</strong> and Coban are trademarks of <strong>3M</strong>.<br />
Used under license in Canada. © 2012, <strong>3M</strong>.<br />
All rights reserved. Printed in Canada.<br />
Please recycle. 1208-02243