How To configure and use Forced Authorization Codes in Cisco ...
How To configure and use Forced Authorization Codes in Cisco ...
How To configure and use Forced Authorization Codes in Cisco ...

You also want an ePaper? Increase the reach of your titles
YUMPU automatically turns print PDFs into web optimized ePapers that Google loves.
<strong>How</strong> <strong>To</strong> <strong>configure</strong> <strong>and</strong> <strong>use</strong> <strong>Forced</strong> <strong>Authorization</strong> <strong>Codes</strong> <strong>in</strong> <strong>Cisco</strong> Unified Communications Manager 7.x<br />
Read This document <strong>and</strong> it’s entirety before implement<strong>in</strong>g FAC<br />
Some companies, colleges <strong>and</strong> universities, restrict certa<strong>in</strong> <strong>use</strong>rs to dial certa<strong>in</strong> str<strong>in</strong>g of numbers such<br />
as Long Distance, International, or 411 dial<strong>in</strong>g, <strong>in</strong> order to that <strong>in</strong> UCM 7.x you must <strong>use</strong> FAC<br />
Step 1.- Design<strong>in</strong>g Force <strong>Authorization</strong> <strong>Codes</strong><br />
Let’s proceed to <strong>configure</strong> a few <strong>Forced</strong> <strong>Authorization</strong> <strong>Codes</strong>, but first we are go<strong>in</strong>g to assume that we<br />
have 3 <strong>use</strong>rs <strong>in</strong> our company, <strong>and</strong> that as such we will <strong>configure</strong> 3 different levels of access to the PSTN,<br />
beca<strong>use</strong> this company is small we will only <strong>use</strong> levels, 1, 2, <strong>and</strong> 3, <strong>and</strong> large environments I will suggest<br />
you to <strong>use</strong> 10, 20 ,30. Increment<strong>in</strong>g authorization codes establishes a level of “access”, you can specify<br />
authorization levels <strong>in</strong> the range of 0 to 255, ok let’s design our level of access.<br />
Level 1.-Users <strong>in</strong> level 1 will have access to 911 <strong>and</strong> local dial<strong>in</strong>g only<br />
Level 2.-Users <strong>in</strong> level 2 will have access to 911, 411, Local, Long Distance dial<strong>in</strong>g only<br />
Level 3.-Users <strong>in</strong> level 3 will have access to 911, 411, Local, Long Distance, <strong>and</strong> International dial<strong>in</strong>g<br />
-Our <strong>use</strong>rs are go<strong>in</strong>g to be,<br />
Cesar Fiestas with authorization code 123456 <strong>and</strong> authorization level 3<br />
Jane Doe with authorization code 654321 <strong>and</strong> authorization level 2<br />
Joe <strong>use</strong>r with authorization code 999999 <strong>and</strong> authorization level 1<br />
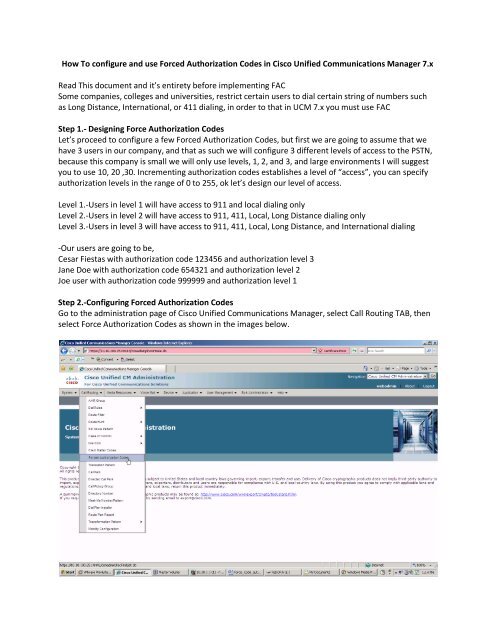
Step 2.-Configur<strong>in</strong>g <strong>Forced</strong> <strong>Authorization</strong> <strong>Codes</strong><br />
Go to the adm<strong>in</strong>istration page of <strong>Cisco</strong> Unified Communications Manager, select Call Rout<strong>in</strong>g TAB, then<br />
select Force <strong>Authorization</strong> <strong>Codes</strong> as shown <strong>in</strong> the images below.
Proceed to create our <strong>use</strong>rs along with their respective authorization levels by click<strong>in</strong>g the ADD NEW<br />
button.
Now, let’s proceed to create couple of our <strong>use</strong>rs.
Great!, we have now created our <strong>use</strong>rs along with their respective FAC codes <strong>and</strong> levels, take a look at<br />
the image below<br />
Step 3.Configur<strong>in</strong>g Route patterns<br />
For test<strong>in</strong>g purposes I have <strong>configure</strong>d the follow<strong>in</strong>g route patterns <strong>and</strong> we will be apply<strong>in</strong>g<br />
FAC/<strong>Authorization</strong> levels to the International, Long Distance, Local <strong>and</strong> 411 route patterns, remember<br />
we don’t want to apply a <strong>Forced</strong> <strong>Authorization</strong> Code to 911!<br />
9.011!# International Dial<strong>in</strong>g<br />
9.1[2-9]XX[2-9]XXXXXX Long Distance Dial<strong>in</strong>g<br />
9.411 Information Dial<strong>in</strong>g<br />
9.704XXXXXXX Local Dial<strong>in</strong>g<br />
9.911 Emergency Dial<strong>in</strong>g<br />
Take a look at the image shown below
Now s<strong>in</strong>ce we have 3 <strong>use</strong>rs <strong>configure</strong>d with <strong>Forced</strong> <strong>Authorization</strong> <strong>Codes</strong>, we will now proceed to modify<br />
<strong>and</strong> place a restriction <strong>in</strong> our route patterns so that when a User dials a certa<strong>in</strong> str<strong>in</strong>g of numbers<br />
match<strong>in</strong>g a certa<strong>in</strong> route pattern <strong>configure</strong>d to require a Force <strong>Authorization</strong> Code/<strong>Authorization</strong> Level.<br />
Let’s proceed to set up the 9.011!# Route pattern which is <strong>in</strong>ternational Dial<strong>in</strong>g with a<br />
FAC/<strong>Authorization</strong> level code of 3, which is our higher authorization level code,<br />
Go to the Adm<strong>in</strong>istration page of <strong>Cisco</strong> Unified Communications Manager, select the Call Rout<strong>in</strong>g TAB,<br />
then select the Route/Hunt TAB, then select the Route Pattern TAB
Let’s proceed to set up the 9.1[2-9]XX[2-9]XXXXXX Route pattern which is Long Distance Dial<strong>in</strong>g with a<br />
FAC/<strong>Authorization</strong> level code of 2, which is our mid level authorization level code<br />
Th<strong>in</strong>gs to know:<br />
What happened when a <strong>use</strong>r hears the tone played by UCM?<br />
The <strong>use</strong>r will need to enter their respective FAC, once the <strong>use</strong>r have entered their FAC, it will be a<br />
period of time before the call is completed, you can adjust this timer by modify<strong>in</strong>g the T302 timer <strong>in</strong><br />
System-Service Parameters-RespectiveUCM-<strong>Cisco</strong> Callmanager Service, before adjust<strong>in</strong>g the T302 Timer<br />
read it’s help page!<br />
This document was created by Cesar Fiestas