CCNA Exploration: Accessing the WAN Student Skills Based
CCNA Exploration: Accessing the WAN Student Skills Based
CCNA Exploration: Accessing the WAN Student Skills Based

Create successful ePaper yourself
Turn your PDF publications into a flip-book with our unique Google optimized e-Paper software.
<strong>CCNA</strong> <strong>Exploration</strong>: <strong>Accessing</strong> <strong>the</strong> <strong>WAN</strong> <strong>Student</strong> <strong>Skills</strong> <strong>Based</strong><br />
Assessment Lab<br />
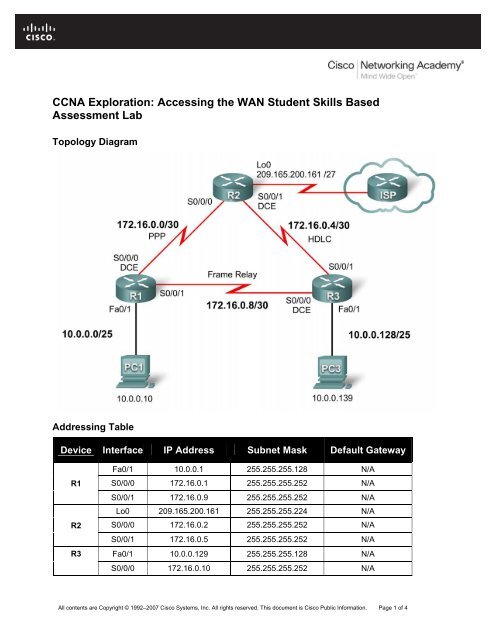
Topology Diagram<br />
Addressing Table<br />
Device Interface IP Address Subnet Mask Default Gateway<br />
R1<br />
R2<br />
R3<br />
Fa0/1 10.0.0.1 255.255.255.128 N/A<br />
S0/0/0 172.16.0.1 255.255.255.252 N/A<br />
S0/0/1 172.16.0.9 255.255.255.252 N/A<br />
Lo0 209.165.200.161 255.255.255.224 N/A<br />
S0/0/0 172.16.0.2 255.255.255.252 N/A<br />
S0/0/1 172.16.0.5 255.255.255.252 N/A<br />
Fa0/1 10.0.0.129 255.255.255.128 N/A<br />
S0/0/0 172.16.0.10 255.255.255.252 N/A<br />
All contents are Copyright © 1992–2007 Cisco Systems, Inc. All rights reserved. This document is Cisco Public Information. Page 1 of 4
<strong>CCNA</strong> <strong>Exploration</strong><br />
<strong>Accessing</strong> <strong>the</strong> <strong>WAN</strong>: <strong>Skills</strong> <strong>Based</strong> Assessment <strong>Student</strong> <strong>Skills</strong> based Assessment Lab<br />
Device Interface IP Address Subnet Mask Default Gateway<br />
S0/0/1 172.16.0.6 255.255.255.252 N/A<br />
PC1 NIC 10.0.0.10 255.255.255.128 10.0.0.1<br />
PC3 NIC 10.0.0.139 255.255.255.128 10.0.0.129<br />
Learning Objectives<br />
To complete this lab:<br />
• Cable a network according to <strong>the</strong> topology diagram<br />
• Erase <strong>the</strong> startup configuration and reload a router to <strong>the</strong> default state<br />
• Perform basic configuration tasks on a router<br />
• Configure and activate interfaces<br />
• Configure and activate serial interfaces (PPP with CHAP, HDLC, and Frame Relay)<br />
• Configure RIP on all <strong>the</strong> routers<br />
• Configure basic router security<br />
• Configure ACLs<br />
• Configure basic NAT<br />
Scenario<br />
This lab tests you on <strong>the</strong> skills and knowledge that you learned in <strong>Exploration</strong> 4. Use cisco for all<br />
passwords in this lab, except for <strong>the</strong> enable secret password, which is class.<br />
Task 1: Prepare <strong>the</strong> Network<br />
Step 1: Cable a network that is similar to <strong>the</strong> one in <strong>the</strong> topology diagram.<br />
Step 2: Clear any existing configurations on <strong>the</strong> routers.<br />
Task 2: Perform Basic Device Configurations<br />
Configure <strong>the</strong> R1, R2, and R3 routers according to <strong>the</strong> following guidelines:<br />
• Configure <strong>the</strong> router hostname.<br />
• Disable DNS lookup.<br />
• Configure an EXEC mode password.<br />
• Configure a message-of-<strong>the</strong>-day banner.<br />
• Configure a password for console connections.<br />
• Configure synchronous logging.<br />
• Configure a password for vty connections.<br />
All contents are Copyright © 1992–2007 Cisco Systems, Inc. All rights reserved. This document is Cisco Public Information. Page 2 of 4
<strong>CCNA</strong> <strong>Exploration</strong><br />
<strong>Accessing</strong> <strong>the</strong> <strong>WAN</strong>: <strong>Skills</strong> <strong>Based</strong> Assessment <strong>Student</strong> <strong>Skills</strong> based Assessment Lab<br />
Task 3: Configure and Activate Serial and E<strong>the</strong>rnet Addresses<br />
Step 1: Configure interfaces on R1, R2, and R3.<br />
Step 2: Verify IP addressing and interfaces.<br />
Step 3: Configure <strong>the</strong> PC1 and PC3 E<strong>the</strong>rnet interfaces.<br />
Step 4: Test connectivity between <strong>the</strong> PCs and routers.<br />
Task 4: Configure Serial Interfaces<br />
Step 1: Configure and verify PPP encapsulation with CHAP au<strong>the</strong>ntication between R1 and R2.<br />
The password is “cisco”.<br />
Step 2: Configure and verify HDLC encapsulation between R2 and R3.<br />
Step 3: Configure Frame Relay between R1 and R3.<br />
Task 5: Configure RIP<br />
Step 1: Configure RIP on R1, R2, and R3.<br />
RIP updates should only be sent on <strong>the</strong> serial links between <strong>the</strong> routers. Prevent all o<strong>the</strong>r RIP<br />
updates on all networks.<br />
Step 2: Test connectivity with <strong>the</strong> ping command.<br />
Step 3: Verify <strong>the</strong> routing table with <strong>the</strong> appropriate command.<br />
Task 6: Configure Basic Router Security<br />
Step 1: Enable a secure Telnet login using a local database on R2.<br />
Step 2: Disable unused services and interfaces on R2.<br />
Step 3: Confirm that R2 is secured.<br />
Task 7: Configure Access Control Lists<br />
Step 1: Allow telnet to R1 and R3 from R2 only.<br />
Step 2: Do not allowlHTTP, Telnet, and FTP traffic from <strong>the</strong> Internet to PC1.<br />
Step 3: Do not allow PC1 to receive traffic from <strong>the</strong> 10.0.0.128 /25 network.<br />
Step 4: Verify that PC3 cannot ping PC1, but can ping 10.0.0.1.<br />
Task 8: Configure NAT.<br />
Step 1: Configure NAT to allow PC3 to ping PC1.<br />
All contents are Copyright © 1992–2007 Cisco Systems, Inc. All rights reserved. This document is Cisco Public Information. Page 3 of 4
<strong>CCNA</strong> <strong>Exploration</strong><br />
<strong>Accessing</strong> <strong>the</strong> <strong>WAN</strong>: <strong>Skills</strong> <strong>Based</strong> Assessment <strong>Student</strong> <strong>Skills</strong> based Assessment Lab<br />
Step 2: Verify that PC3 can reach PC1.<br />
Task 9: Document <strong>the</strong> Router Configurations<br />
Task 10: Clean Up<br />
Erase <strong>the</strong> configurations and reload <strong>the</strong> routers. Disconnect and store <strong>the</strong> cabling. For PC hosts that are<br />
normally connected to o<strong>the</strong>r networks, such as <strong>the</strong> school LAN or to <strong>the</strong> Internet, reconnect <strong>the</strong><br />
appropriate cabling and restore <strong>the</strong> TCP/IP settings.<br />
All contents are Copyright © 1992–2007 Cisco Systems, Inc. All rights reserved. This document is Cisco Public Information. Page 4 of 4