Built-in oven HBA53B5.0A - Appliances Online
Built-in oven HBA53B5.0A - Appliances Online
Built-in oven HBA53B5.0A - Appliances Online
Create successful ePaper yourself
Turn your PDF publications into a flip-book with our unique Google optimized e-Paper software.
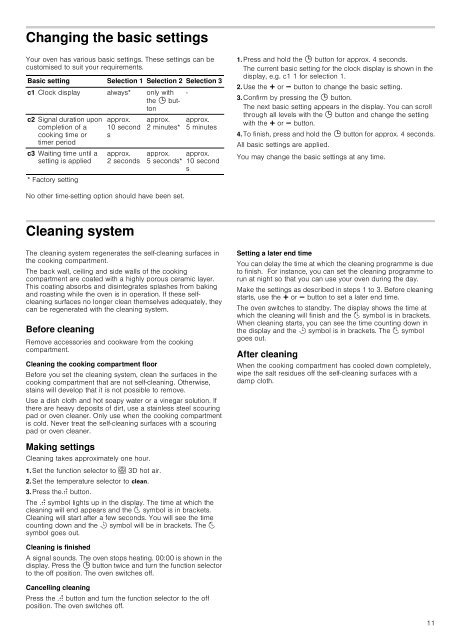
Chang<strong>in</strong>g the basic sett<strong>in</strong>gs<br />
Your <strong>oven</strong> has various basic sett<strong>in</strong>gs. These sett<strong>in</strong>gs can be<br />
customised to suit your requirements.<br />
Basic sett<strong>in</strong>g Selection 1 Selection 2 Selection 3<br />
c1 Clock display always* only with<br />
the 0 button<br />
-<br />
c2 Signal duration upon<br />
completion of a<br />
cook<strong>in</strong>g time or<br />
timer period<br />
c3 Wait<strong>in</strong>g time until a<br />
sett<strong>in</strong>g is applied<br />
* Factory sett<strong>in</strong>g<br />
No other time-sett<strong>in</strong>g option should have been set.<br />
Clean<strong>in</strong>g system<br />
The clean<strong>in</strong>g system regenerates the self-clean<strong>in</strong>g surfaces <strong>in</strong><br />
the cook<strong>in</strong>g compartment.<br />
The back wall, ceil<strong>in</strong>g and side walls of the cook<strong>in</strong>g<br />
compartment are coated with a highly porous ceramic layer.<br />
This coat<strong>in</strong>g absorbs and dis<strong>in</strong>tegrates splashes from bak<strong>in</strong>g<br />
and roast<strong>in</strong>g while the <strong>oven</strong> is <strong>in</strong> operation. If these selfclean<strong>in</strong>g<br />
surfaces no longer clean themselves adequately, they<br />
can be regenerated with the clean<strong>in</strong>g system.<br />
Before clean<strong>in</strong>g<br />
Remove accessories and cookware from the cook<strong>in</strong>g<br />
compartment.<br />
Clean<strong>in</strong>g the cook<strong>in</strong>g compartment floor<br />
Before you set the clean<strong>in</strong>g system, clean the surfaces <strong>in</strong> the<br />
cook<strong>in</strong>g compartment that are not self-clean<strong>in</strong>g. Otherwise,<br />
sta<strong>in</strong>s will develop that it is not possible to remove.<br />
Use a dish cloth and hot soapy water or a v<strong>in</strong>egar solution. If<br />
there are heavy deposits of dirt, use a sta<strong>in</strong>less steel scour<strong>in</strong>g<br />
pad or <strong>oven</strong> cleaner. Only use when the cook<strong>in</strong>g compartment<br />
is cold. Never treat the self-clean<strong>in</strong>g surfaces with a scour<strong>in</strong>g<br />
pad or <strong>oven</strong> cleaner.<br />
Mak<strong>in</strong>g sett<strong>in</strong>gs<br />
approx.<br />
10 second<br />
s<br />
approx.<br />
2seconds<br />
Clean<strong>in</strong>g takes approximately one hour.<br />
approx.<br />
2 m<strong>in</strong>utes*<br />
approx.<br />
5seconds*<br />
approx.<br />
5m<strong>in</strong>utes<br />
approx.<br />
10 second<br />
s<br />
1. Set the function selector to < 3D hot air.<br />
2. Set the temperature selector to s.<br />
3. Press theu button.<br />
The u symbol lights up <strong>in</strong> the display. The time at which the<br />
clean<strong>in</strong>g will end appears and the p symbol is <strong>in</strong> brackets.<br />
Clean<strong>in</strong>g will start after a few seconds. You will see the time<br />
count<strong>in</strong>g down and the r symbol will be <strong>in</strong> brackets. The p<br />
symbol goes out.<br />
Clean<strong>in</strong>g is f<strong>in</strong>ished<br />
A signal sounds. The <strong>oven</strong> stops heat<strong>in</strong>g. 00:00 is shown <strong>in</strong> the<br />
display. Press the 0 button twice and turn the function selector<br />
to the off position. The <strong>oven</strong> switches off.<br />
Cancell<strong>in</strong>g clean<strong>in</strong>g<br />
Press the u button and turn the function selector to the off<br />
position. The <strong>oven</strong> switches off.<br />
1. Press and hold the 0 button for approx. 4 seconds.<br />
The current basic sett<strong>in</strong>g for the clock display is shown <strong>in</strong> the<br />
display, e.g. c1 1 for selection 1.<br />
2. Use the @ or A button to change the basic sett<strong>in</strong>g.<br />
3. Confirm by press<strong>in</strong>g the 0 button.<br />
The next basic sett<strong>in</strong>g appears <strong>in</strong> the display. You can scroll<br />
through all levels with the 0 button and change the sett<strong>in</strong>g<br />
with the @ or A button.<br />
4. To f<strong>in</strong>ish, press and hold the 0 button for approx. 4 seconds.<br />
All basic sett<strong>in</strong>gs are applied.<br />
You may change the basic sett<strong>in</strong>gs at any time.<br />
Sett<strong>in</strong>g a later end time<br />
You can delay the time at which the clean<strong>in</strong>g programme is due<br />
to f<strong>in</strong>ish. For <strong>in</strong>stance, you can set the clean<strong>in</strong>g programme to<br />
run at night so that you can use your <strong>oven</strong> dur<strong>in</strong>g the day.<br />
Make the sett<strong>in</strong>gs as described <strong>in</strong> steps 1 to 3. Before clean<strong>in</strong>g<br />
starts, use the @ or A button to set a later end time.<br />
The <strong>oven</strong> switches to standby. The display shows the time at<br />
which the clean<strong>in</strong>g will f<strong>in</strong>ish and the p symbol is <strong>in</strong> brackets.<br />
When clean<strong>in</strong>g starts, you can see the time count<strong>in</strong>g down <strong>in</strong><br />
the display and the r symbol is <strong>in</strong> brackets. The p symbol<br />
goes out.<br />
After clean<strong>in</strong>g<br />
When the cook<strong>in</strong>g compartment has cooled down completely,<br />
wipe the salt residues off the self-clean<strong>in</strong>g surfaces with a<br />
damp cloth.<br />
11


