Built-in oven HBA53B5.0A - Appliances Online
Built-in oven HBA53B5.0A - Appliances Online
Built-in oven HBA53B5.0A - Appliances Online
Create successful ePaper yourself
Turn your PDF publications into a flip-book with our unique Google optimized e-Paper software.
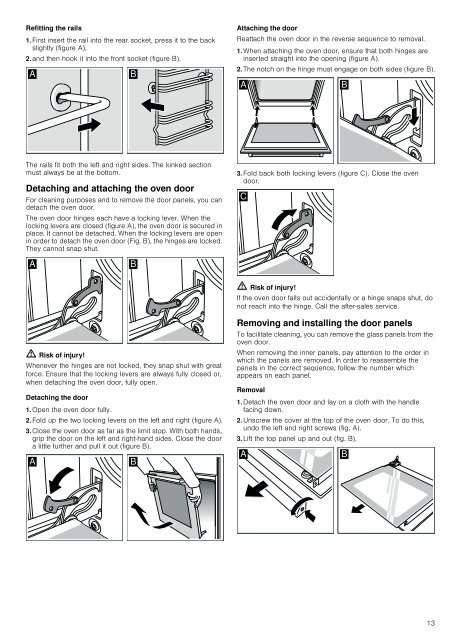
Refitt<strong>in</strong>g the rails<br />
1. First <strong>in</strong>sert the rail <strong>in</strong>to the rear socket, press it to the back<br />
slightly (figure A),<br />
2. and then hook it <strong>in</strong>to the front socket (figure B).<br />
<br />
The rails fit both the left and right sides. The k<strong>in</strong>ked section<br />
must always be at the bottom.<br />
Detach<strong>in</strong>g and attach<strong>in</strong>g the <strong>oven</strong> door<br />
For clean<strong>in</strong>g purposes and to remove the door panels, you can<br />
detach the <strong>oven</strong> door.<br />
The <strong>oven</strong> door h<strong>in</strong>ges each have a lock<strong>in</strong>g lever. When the<br />
lock<strong>in</strong>g levers are closed (figure A), the <strong>oven</strong> door is secured <strong>in</strong><br />
place. It cannot be detached. When the lock<strong>in</strong>g levers are open<br />
<strong>in</strong> order to detach the <strong>oven</strong> door (Fig. B), the h<strong>in</strong>ges are locked.<br />
They cannot snap shut.<br />
<br />
ã=Risk of <strong>in</strong>jury!<br />
Whenever the h<strong>in</strong>ges are not locked, they snap shut with great<br />
force. Ensure that the lock<strong>in</strong>g levers are always fully closed or,<br />
when detach<strong>in</strong>g the <strong>oven</strong> door, fully open.<br />
Detach<strong>in</strong>g the door<br />
1. Open the <strong>oven</strong> door fully.<br />
2. Fold up the two lock<strong>in</strong>g levers on the left and right (figure A).<br />
3. Close the <strong>oven</strong> door as far as the limit stop. With both hands,<br />
grip the door on the left and right-hand sides. Close the door<br />
a little further and pull it out (figure B).<br />
<br />
<br />
<br />
<br />
Attach<strong>in</strong>g the door<br />
Reattach the <strong>oven</strong> door <strong>in</strong> the reverse sequence to removal.<br />
1. When attach<strong>in</strong>g the <strong>oven</strong> door, ensure that both h<strong>in</strong>ges are<br />
<strong>in</strong>serted straight <strong>in</strong>to the open<strong>in</strong>g (figure A).<br />
2. The notch on the h<strong>in</strong>ge must engage on both sides (figure B).<br />
<br />
3. Fold back both lock<strong>in</strong>g levers (figure C). Close the <strong>oven</strong><br />
door.<br />
<br />
ã=Risk of <strong>in</strong>jury!<br />
If the <strong>oven</strong> door falls out accidentally or a h<strong>in</strong>ge snaps shut, do<br />
not reach <strong>in</strong>to the h<strong>in</strong>ge. Call the aftersales service.<br />
Remov<strong>in</strong>g and <strong>in</strong>stall<strong>in</strong>g the door panels<br />
To facilitate clean<strong>in</strong>g, you can remove the glass panels from the<br />
<strong>oven</strong> door.<br />
When remov<strong>in</strong>g the <strong>in</strong>ner panels, pay attention to the order <strong>in</strong><br />
which the panels are removed. In order to reassemble the<br />
panels <strong>in</strong> the correct sequence, follow the number which<br />
appears on each panel.<br />
Removal<br />
1. Detach the <strong>oven</strong> door and lay on a cloth with the handle<br />
fac<strong>in</strong>g down.<br />
2. Unscrew the cover at the top of the <strong>oven</strong> door. To do this,<br />
undo the left and right screws (fig. A).<br />
3. Lift the top panel up and out (fig. B).<br />
<br />
<br />
<br />
13


