

Built-in oven HBA53B5.0A - Appliances Online
Built-in oven HBA53B5.0A - Appliances Online
Built-in oven HBA53B5.0A - Appliances Online

Create successful ePaper yourself
Turn your PDF publications into a flip-book with our unique Google optimized e-Paper software.
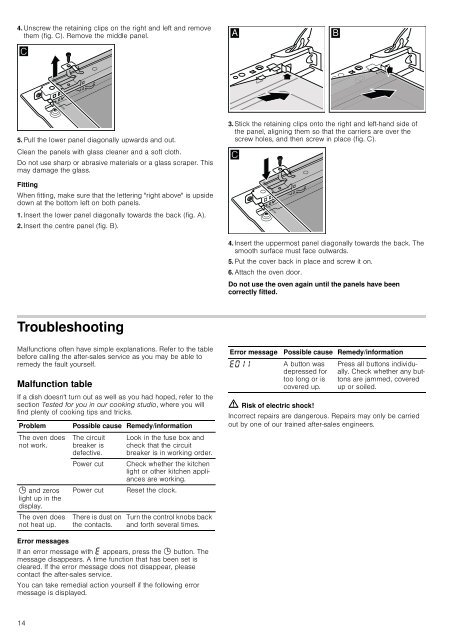
4. Unscrew the reta<strong>in</strong><strong>in</strong>g clips on the right and left and remove<br />
them (fig. C). Remove the middle panel.<br />
<br />
5. Pull the lower panel diagonally upwards and out.<br />
Clean the panels with glass cleaner and a soft cloth.<br />
Do not use sharp or abrasive materials or a glass scraper. This<br />
may damage the glass.<br />
Fitt<strong>in</strong>g<br />
When fitt<strong>in</strong>g, make sure that the letter<strong>in</strong>g "right above" is upside<br />
down at the bottom left on both panels.<br />
1. Insert the lower panel diagonally towards the back (fig. A).<br />
2. Insert the centre panel (fig. B).<br />
Troubleshoot<strong>in</strong>g<br />
Malfunctions often have simple explanations. Refer to the table<br />
before call<strong>in</strong>g the after-sales service as you may be able to<br />
remedy the fault yourself.<br />
Malfunction table<br />
If a dish doesn't turn out as well as you had hoped, refer to the<br />
section Tested for you <strong>in</strong> our cook<strong>in</strong>g studio, where you will<br />
f<strong>in</strong>d plenty of cook<strong>in</strong>g tips and tricks.<br />
Problem Possible cause Remedy/<strong>in</strong>formation<br />
The <strong>oven</strong> does<br />
not work.<br />
0 and zeros<br />
light up <strong>in</strong> the<br />
display.<br />
The <strong>oven</strong> does<br />
not heat up.<br />
Error messages<br />
If an error message with “ appears, press the 0 button. The<br />
message disappears. A time function that has been set is<br />
cleared. If the error message does not disappear, please<br />
contact the after-sales service.<br />
You can take remedial action yourself if the follow<strong>in</strong>g error<br />
message is displayed.<br />
14<br />
The circuit<br />
breaker is<br />
defective.<br />
Look <strong>in</strong> the fuse box and<br />
check that the circuit<br />
breaker is <strong>in</strong> work<strong>in</strong>g order.<br />
Power cut Check whether the kitchen<br />
light or other kitchen appliances<br />
are work<strong>in</strong>g.<br />
Power cut Reset the clock.<br />
There is dust on<br />
the contacts.<br />
Turn the control knobs back<br />
and forth several times.<br />
<br />
3. Stick the reta<strong>in</strong><strong>in</strong>g clips onto the right and left-hand side of<br />
the panel, align<strong>in</strong>g them so that the carriers are over the<br />
screw holes, and then screw <strong>in</strong> place (fig. C).<br />
<br />
4. Insert the uppermost panel diagonally towards the back. The<br />
smooth surface must face outwards.<br />
5. Put the cover back <strong>in</strong> place and screw it on.<br />
6. Attach the <strong>oven</strong> door.<br />
Do not use the <strong>oven</strong> aga<strong>in</strong> until the panels have been<br />
correctly fitted.<br />
Error message Possible cause Remedy/<strong>in</strong>formation<br />
“‹‚‚ A button was<br />
depressed for<br />
too long or is<br />
covered up.<br />
ã=Risk of electric shock!<br />
Incorrect repairs are dangerous. Repairs may only be carried<br />
out by one of our tra<strong>in</strong>ed after-sales eng<strong>in</strong>eers.<br />
<br />
Press all buttons <strong>in</strong>dividually.<br />
Check whether any buttons<br />
are jammed, covered<br />
up or soiled.


