Authentication Functions using isafeguard
Authentication Functions using isafeguard
Authentication Functions using isafeguard

Create successful ePaper yourself
Turn your PDF publications into a flip-book with our unique Google optimized e-Paper software.
Department of Electronics<br />
Faculty of Electrical Engineering, Mechanical Engineering and<br />
Naval Architecture (FESB)<br />
University of Split, Croatia<br />
Laboratory Exercises IV: <strong>Authentication</strong><br />
<strong>Functions</strong> (Part Two)<br />
Keywords: message authentication codes (MAC), CBC-MAC, digital<br />
signatures, public-key certificates, managing certificates<br />
Dr. Mario Čagalj<br />
mario.cagalj@fesb.hr<br />
http://www.fesb.hr/~mcagalj<br />
December 5, 2007
FESB Computer and Data Security Course 1<br />
Introduction<br />
In this set of exercises we continue our survey of theory and applications of authentication<br />
functions. Here we focus on message authentication codes, digital signatures and<br />
public-key certificates. We begin our study by analyzing some security weaknesses in<br />
MAC functions that use a block cipher in the CBC encryption mode (CBC-MAC) as<br />
a basic building block. Next, we demonstrate the application of a digital signature to<br />
data integrity and data origin protection. Finally, we study public-key certificates and<br />
their application to protection of data source integrity. We will see how to generate<br />
and sign a certificate, and how to integrate it with a web server so to enable secure<br />
SSL/TLS sessions.<br />
Exercise 1<br />
A Message <strong>Authentication</strong> Code function (C(·)) takes two input variables, a message<br />
m and a secret key K, and generates a compact, fixed length, authenticator (MAC)<br />
for message m (i.e., MAC = C(K, m)). The MAC function C(·) should be such<br />
that an entity who does not have an access to the secret key K cannot calculate a<br />
valid authentication code (MAC) for a given message. When properly implemented, a<br />
correct MAC guarantees both message and message source integrity.<br />
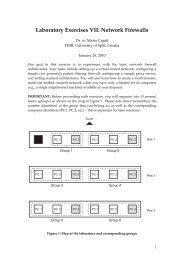
Task 1.1. Cipher Block Chaining MAC (CBC-MAC)<br />
The CBC-MAC construction is depicted in Figure 1. Thus, a message m is broken up<br />
into N blocks and input into the ordinary CBC encryption mode. The only difference<br />
with respect to the CBC encryption mode is the fact that the initialization vector is<br />
set to zero. Finally, we take the last ciphertext CN as a MAC for message m under<br />
the secret key K. Speaking mathematically, calculation of a CBC-MAC for message<br />
K<br />
m 1<br />
0 +<br />
+<br />
+<br />
CN-1 E<br />
K<br />
m 2<br />
E<br />
K<br />
m 3<br />
E<br />
…<br />
K<br />
m N<br />
+<br />
E<br />
MAC = C N<br />
Figure 1: CBC-MAC construction for message m = m1m2 . . . mN.<br />
m = m1m2 . . . mN and secret key K can be described as follows:<br />
C1 = E(K, m1 ⊕ 0)
FESB Computer and Data Security Course 2<br />
Ci = E(K, mi ⊕ Ci−1), i = {2, 3, . . . , N}<br />
MAC = CN .<br />
The CBC-MAC construction is known to be secure only for messages of a fixed length.<br />
In this task, we will demonstrate insecurity of the CBC-MAC for variable-length messages.<br />
Assume that an attacker knows CBC-MACs for messages mA and mB, that is, MACA<br />
and MACB, respectively. However the attacker does not know the secret key (K) used<br />
in calculation of the CBC-MACs. Equipped with this knowledge, the attacker outputs<br />
message mC and the corresponding CBC-MAC (MACC):<br />
mC = mA <br />
<br />
mB,1 ⊕ MACA mB,2mB,2 . . . mB,N<br />
MACC = MACB ,<br />
where mB,i is the ith block of message mB. Show that MACC is indeed a correct<br />
message authentication code (CBC-MAC) for message mC and secret key K.<br />
Task 1.2. Detection of Replay Attacks<br />
Recall, in the replay attack an adversary simply replays (re-sends) a copy of a previously<br />
captured (recorded) message (e.g., a network packet carrying authenticated<br />
information). Explain, how can a MAC be used to prevent (detect) replay attacks.<br />
Exercise 2<br />
In this exercise you will use a software product iSafeguard (see Figure 2) to protect<br />
integrity and authenticity of the origin of your data. iSafeguard enables strong encryption<br />
and authentication based on public-key cryptography (i.e., RSA encryption and<br />
RSA digital signature). Your task in this exercise is to exchange an e-mail message<br />
Figure 2: iSafeguard: A tool for providing strong encryption and authentication.<br />
with your colleague such that the message confidentiality, integrity and origin are all<br />
protected.<br />
NOTE: Before proceeding with this exercise, please make sure that iSafeguard is installed<br />
on your machine.
FESB Computer and Data Security Course 3<br />
Task 2.1. Answer the Following Questions<br />
1. You and your colleague use the RSA public-key cryptosystem for encryption and<br />
authentication. What is an essential prerequisite for you to be able to verify<br />
(data and origin) authenticity of an e-mail digitally signed by your colleague?<br />
2. What is a prerequisite for your colleague to be able to ensure the confidentiality<br />
of an e-mail sent to you?<br />
3. You encrypt an e-mail message with your RSA private key and send the corresponding<br />
ciphertext to your colleague. Will he/she be able to decrypt it? Please<br />
explain.<br />
Task 2.2. Managing Personal (Self-Signed) Certificates<br />
1. Open iSafeguard “Certificate Manager” (Figure 3) console by first right-clicking<br />
on the golden lock icon in the system tray, then selecting “Certificate Manager”.<br />
Figure 3: iSafeguard: Certificate Manager control panel.<br />
2. Create a personal self-signed public-key certificate by clicking the “Create...”<br />
button. Follow the instructions by the “Certificate Creation Wizard”.<br />
At this stage you have created a RSA public/private key pair and a self-signed<br />
public-key certificate. A self-signed certificate (Figure 4) essentially comprises<br />
your RSA public key and a digital signature of the RSA public key. Note that<br />
your RSA public key is signed with your RSA private key - therefore self-signed.<br />
3. At this stage you and your colleague have to exchange your RSA public keys,<br />
that is, your self-signed certificates. To accomplish this task, first export your
FESB Computer and Data Security Course 4<br />
Figure 4: Self-Signed Certificate for Mario Cagalj.<br />
certificate by clicking on the “Export...” button in the “Certificate Manager”<br />
console. You will be offered to export you private key along with the certificate.<br />
Do you chose to export your private key? Please explain.<br />
Upon exporting the certificate, exchange it with your colleague.<br />
4. Having received a self-signed certificate of your colleague, import it into iSafeguard.<br />
To accomplish this, in the “Certificate Manager” console click on the<br />
“Import...” button and follow the instructions by “Certificate Import Wizard”.<br />
Finally you are ready to sign/encrypt e-mail messages to be sent to your colleague.<br />
Task 2.3. Encrypting/Signing Messages<br />
1. Compose an e-mail message <strong>using</strong> your web-based email application (e.g., Webmail).<br />
2. Encrypt the e-mail from the previous step such that only your colleague can read<br />
it. To accomplish this use iSafeguard as follows. First make sure the window<br />
that contains the e-mail text has the input focus by clicking your mouse inside<br />
the window. Then, right-click on the golden lock icon in the system tray and<br />
select “Focus Window” and then “Encrypt” (Figure 5). The “Select Recipients”<br />
dialog will pop-up, from which you have to select a desired recipient.<br />
3. Send the encrypted e-mail to your colleague and ask him to read it. To read<br />
the encrypted message first make sure the window that contains the ciphertext<br />
has the input focus by clicking your mouse inside the window. Then, right-click
FESB Computer and Data Security Course 5<br />
Figure 5: iSafeguard: Encrypting a message.<br />
on the golden lock icon in the system tray and select “Focus Window” and then<br />
“Read”.<br />
4. Use iSafeguard to sign and encrypt an e-mail message so that its recipient (your<br />
colleague) can be sure of the message origin and that it hasn’t been modified. In<br />
addition, only the recipient (in addition to the sender) should be able to read the<br />
message. What happens if the recipient does not have an access to the senders<br />
public key? Will she/he be able to decrypt the received message? Please explain.<br />
Exercise 3<br />
In this exercise we will show how to integrate public-key certificates with a web server<br />
so to enable secure SSL/TLS sessions. Our goal is to set up the system (client, server,<br />
certificates, SSL/TLS server) such that an end user does not receive certificate warning<br />
messages as the one shown in Figure 6.<br />
Figure 6: A warning message that informs a user about potential problems with a<br />
digital certificate presented by a web server.
FESB Computer and Data Security Course 6<br />
To accomplish our goal we will use two software products: XCA (for key and certificate<br />
(X.509) management) and Abyss (a simple web server).<br />
NOTE: Before proceeding with this exercise, please make sure that XCA and Abyss<br />
web server are both installed on your machine.<br />
Task 3.1. Creating a Certification Authority (CA)<br />
In this task, we will first create a CA. The role of CA is to issue public-key certificates<br />
to end entities (e.g., our web server). In other words, the CA digitally signs a public<br />
key of a web server and embeds it into the server’s certificate. The CA uses its private<br />
key for signing. In practice, the CA certificate manager (a certificate server) should be<br />
installed on a secure machine (potentially disconnected from the network); the CA’s<br />
private key should be kept highly secure.<br />
The CA also issues a self-signed public-key certificate, whereby the CA digitally signs<br />
its own public key. This certificate is distributed, in a secure way (the integrity of the<br />
CA’s certificate must be protected), to all users who use a certificate issued by the CA<br />
to verify the authenticity of the certificate holder (e.g., a web server).<br />
Figure 7: X Certificate and Key management application.<br />
1. Open XCA and click the “New Certificate” button to start X.509 certificate<br />
creation procedure (Figure 7).<br />
2. Make sure that you select SHA-1 as the “Signature algorithm”; the default algorithm<br />
is set to SHA 256 that is not supported by some Windows-based operating<br />
systems. Also, select CA template for this certificate (we are creating a CA).
FESB Computer and Data Security Course 7<br />
3. Select the “Subject” tab and fill in the fields such as “Internal name”, “Country<br />
code”, etc. with appropriate values (for an example please refer to Figure 8).<br />
Generate a new private key by clicking on the “Generate a new key” button.<br />
Note that this is the signing key of the CA.<br />
Figure 8: Creating a X.509 certificate for the CA.<br />
4. Select the “Extensions” tab and set the “Type” of the certificate to “Certification<br />
Authority” (see Figure 8). Click “OK” to finish the certificate creation procedure.<br />
You can check the details of the created CA certificate by double-clicking on it<br />
in the main XCA window under the “Certificate” tab.<br />
Task 3.2. Creating a Web Server Certificate<br />
In this task we create a public-key certificate for a web server. This certificate will be<br />
digitally signed by the previously created Certification Authority (CA) .<br />
1. Again, click the “New Certificate” button in the main XCA window. Select<br />
the “Source” tab and configure the web server certificate properties as follows.<br />
Check “Use this Certificate for signing” and set it to the name of the CA created<br />
in the previous task. Set the “Signature algorithm” to SHA-1 and choose<br />
“HTTPS server template” from the list of available templates (Figure 9).<br />
2. Select the “Subject” tab and fill in appropriately the available fields (Figure 9). It<br />
is particularly important that you set the “Common name” value to 127.0.0.1.<br />
This will be the IP address (or the corresponding URL) of your web server. If<br />
not set or if this value does not correspond to the real IP address (or the URL
FESB Computer and Data Security Course 8<br />
Figure 9: Creating a X.509 certificate for the web server.<br />
of your web server) each time you try to establish a secure (SSL/TLS) session<br />
with this server, your web browser will give you a warning message about this<br />
mismatch. Finally, generate a new private key for the web server certificate by<br />
clicking “Generate a new key”.<br />
3. Optionally, under the “Extensions” tab you may want to set the type to “End<br />
Entity”. Click “OK” to finish the certificate creation procedure.<br />
Task 3.3. Exporting Certificates<br />
In this task, we will export the certificates created in the previous tasks, that is, the CA<br />
public-key certificate (without the private key) and the web server public-key certificate<br />
including its private key.<br />
1. Open the “Certificates” tab in the main XCA window. Select the certificate that<br />
belongs to the CA and click “Export”. Select a destination and filename where<br />
you want to store the certificate and click “OK”.<br />
2. Repeat the previous step but now export the public-key certificate of the web<br />
server.<br />
3. Finally, we export the private key of the web server. To accomplish this, open<br />
the “Private Keys” tab and select the private key of the web server. The “Key<br />
export” window pops-up. Check the box “Export the private part of the Key<br />
too” and uncheck “Encrypt the Key with a password”.
FESB Computer and Data Security Course 9<br />
Task 3.4. Configuring Abyss Web Server<br />
Figure 10: Abyss web server console.<br />
1. Open the Abyss web server console. Follow the “SSL/TLS Certificates” link to<br />
open the “SSL/TLS Certificates” dialog (Figure 11(left)).<br />
2. We first configure the “Private Keys” parameter. Click the “Add” button to<br />
import the server’s private key that we previously exported <strong>using</strong> XCA. In the<br />
“Private Key - Add” dialog, choose some internal name for this private key (e.g.,<br />
HTTPSPrivKey) and set the “Action” parameter to “Import” (Figure 11(right)).<br />
Finally, you copy the private key (exported <strong>using</strong> XCA) into the text box marked<br />
as “Key Contents”. To accomplish this, open the private key in any text editor,<br />
copy and paste it into the text box “Key Contents” (Figure 11(right)). Click the<br />
“OK” button.<br />
3. Next we configure a web server certificate in the “Certificate” dialog. Chose a<br />
name for your certificate and enter it in the “Name” field. Set “Private Key” to<br />
the private key that the certificate is based on (e.g., to HTTPSPrivKey). Next<br />
set “Type” to “Signed by a Certification Authority (CA)”. Finally, enter the<br />
main certificate in the text box “Main Certificate”. As with the private key,<br />
open the web server certificate (exported <strong>using</strong> XCA) is any text editor, copy<br />
and paste it into this text box. Click “OK” to validate the certificate.<br />
4. In the Abyss web server console (Figure 10) click on the “Configure” button and<br />
follow the link marked as “General”. In the “General” dialog, set the following<br />
parameters (Figure 12). Set parameter “Protocol” to HTTPS, parameter “HTTPS
FESB Computer and Data Security Course 10<br />
Figure 11: Configuring an SSL/TLS certificate and a private key.<br />
Port” to 4330. The “HTTPS Port” is the port on which the host waits for secure<br />
HTTPS connections. Note that the default value of HTTPS Port is 443, however<br />
you might experience certain problems with Abyss web server when <strong>using</strong> this<br />
value for the port. To save this configuration click the “OK” button. Restart the<br />
web server and make sure that it started to listen on the correct port (i.e., 4430).<br />
5. Finally, create simple html file and name it index.html. Copy this file to the “htdocs/”<br />
subdirectory in the “Abyss Web Server” directly. Overwrite any existing<br />
index.html file.<br />
Task 3.5. Testing Your Configuration<br />
1. Open a web browser and enter the following address in the address bar:<br />
https://127.0.0.1:4430 .<br />
Do you get any warning message? Which one? Can you explain why do you get<br />
it?<br />
2. We would like to eliminate this warning message. What can we do in this regard?<br />
3. Recall that the CA has digitally signed the web server public-key certificate. So if<br />
our web browser would have an access to the CA certificate (i.e., if it would trust<br />
this certificate), the web browser could successfully verify the digital signature in<br />
the web server certificate and would not report any warning messages.
FESB Computer and Data Security Course 11<br />
Figure 12: Configuring the HTTPS parameters.<br />
To accomplish this goal in a Windows operating system, we can place the CA’s<br />
certificate in the Trusted Root Certification Authorities directory. Here<br />
are the steps to install the CA’s certificate:<br />
(a) Click “Start ⊲ Run” and type “MMC”. This opens the “Microsoft Management<br />
Console”.<br />
(b) Click “File ⊲ Add Remove Snap-in”. This opens the “Add/Remove Snap-in”<br />
window.<br />
(c) In the resulting window click “Add”. This opens the “Add Standalone<br />
Snap-in” window.<br />
(d) In this window find the “Certificates snap-in”. Select it and click “Add”.<br />
(e) Select “Computer account” and click “Next”.<br />
(f) Select “Local computer” and click “Finish”.<br />
(g) Click “Close” and then “Ok”. Now you will see the “Certificates snap-in”<br />
in the MMC.<br />
(h) Expand the “Certificates” node, right click on “Trusted Root Certification<br />
Authorities” and select “All Tasks ⊲ Import...”.<br />
(i) Click “Next” then select the CA’s .cer file and click “Next” again.<br />
(j) The next step in the wizard should indicate that the certificates will be<br />
placed in the “Trusted Root Certification Authorities”. If so, click next. If<br />
not, fix it.<br />
(k) Click “Finish”.
FESB Computer and Data Security Course 12<br />
This procedure might not work well for Firefox. Alternatively, you can use a web<br />
browser to install the CA certificate. In the “Tools” menu, click “Options...”<br />
(Firefox) or “Internet Options...” (Internet Explorer) to open the dialog through<br />
which you can manage certificates.<br />
4. Now that you have installed the CA certificate, try to access again to<br />
Do you get any warning message?<br />
https://127.0.0.1:4430 .<br />
5. Try to access to the web server by <strong>using</strong> the following address<br />
https://localhost:4430 .<br />
Do you get any warning message? Please explain your answer.<br />
Task 3.6. Certificate Chain<br />
Equipped with the knowledge from the previous tasks, configure you system (publickey<br />
certificates, web server) such that your web browser can verify successfully (and<br />
without any warning messages) the authenticity of the web server <strong>using</strong> the following<br />
chain of certificates:<br />
CA cert −→ Intermediate cert −→ Web Server cert .<br />
The CA does not sign directly the web server certificate, but some Intermediate certificate<br />
authority that in turn signs the web server certificate (Figure 13).<br />
Figure 13: An example showing a successfully verified chain of certificates.