Britax Marathon 70 Instruction Manual
Britax Marathon 70 Instruction Manual
Britax Marathon 70 Instruction Manual

Create successful ePaper yourself
Turn your PDF publications into a flip-book with our unique Google optimized e-Paper software.
Rear-Facing Installation<br />
Lap-Shoulder Belt Installation<br />
Before You Begin:<br />
• Check that your vehicle belt is compatible for use with child<br />
seats. See pages 8-13 for more information.<br />
* If your vehicle seat belt system includes a locking feature,<br />
use of the lock-offs is not required as long as the vehicle seat<br />
belt system is locked. Check your vehicle owner’s manual<br />
to determine how to lock your vehicle seat belt system when<br />
installing a child restraint.<br />
• This child seat must be reclined to position 3 when<br />
installed rear-facing.<br />
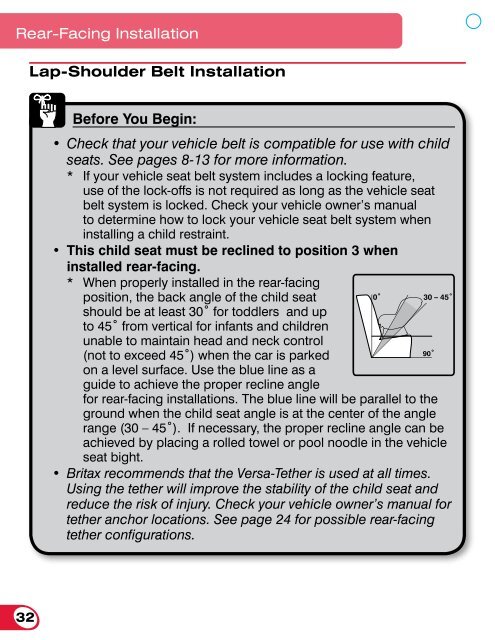
* When properly installed in the rear-facing<br />
position, the back angle of the child seat<br />
should be at least 30˚ for toddlers and up<br />
to 45˚ from vertical for infants and children<br />
unable to maintain head and neck control<br />
(not to exceed 45˚) when the car is parked<br />
on a level surface. Use the blue line as a<br />
guide to achieve the proper recline angle<br />
for rear-facing installations. The blue line will be parallel to the<br />
ground when the child seat angle is at the center of the angle<br />
range (30 – 45˚). If necessary, the proper recline angle can be<br />
achieved by placing a rolled towel or pool noodle in the vehicle<br />
seat bight.<br />
• <strong>Britax</strong> recommends that the Versa-Tether is used at all times.<br />
Using the tether will improve the stability of the child seat and<br />
reduce the risk of injury. Check your vehicle owner’s manual for<br />
tether anchor locations. See page 24 for possible rear-facing<br />
tether configurations.<br />
Install with lap-shoulder belt as shown above.<br />
Rear-Facing Installation<br />
IMPORTANT: The harness buckle strap should lie toward<br />
the back of the child seat during installation.<br />
32 33