Britax Marathon 70 Instruction Manual
Britax Marathon 70 Instruction Manual
Britax Marathon 70 Instruction Manual

Create successful ePaper yourself
Turn your PDF publications into a flip-book with our unique Google optimized e-Paper software.
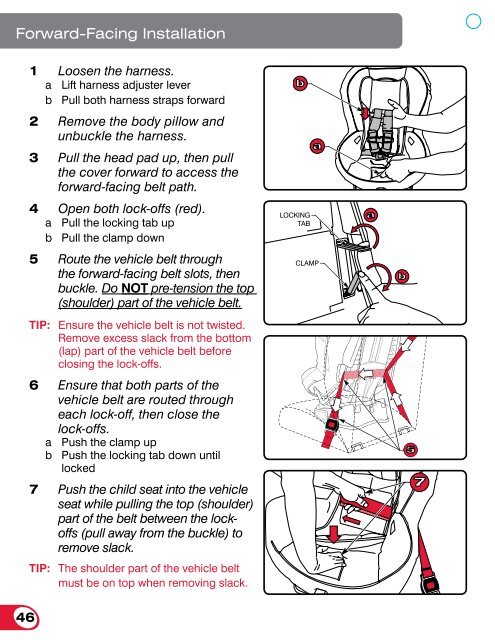
Forward-Facing Installation<br />
1 Loosen the harness.<br />
a Lift harness adjuster lever<br />
b Pull both harness straps forward<br />
2 Remove the body pillow and<br />
unbuckle the harness.<br />
3 Pull the head pad up, then pull<br />
the cover forward to access the<br />
forward-facing belt path.<br />
4 Open both lock-offs (red).<br />
a Pull the locking tab up<br />
b Pull the clamp down<br />
5 Route the vehicle belt through<br />
the forward-facing belt slots, then<br />
buckle. Do NOT pre-tension the top<br />
(shoulder) part of the vehicle belt.<br />
TIP: Ensure the vehicle belt is not twisted.<br />
Remove excess slack from the bottom<br />
(lap) part of the vehicle belt before<br />
closing the lock-offs.<br />
6 Ensure that both parts of the<br />
vehicle belt are routed through<br />
each lock-off, then close the<br />
lock-offs.<br />
a Push the clamp up<br />
b Push the locking tab down until<br />
locked<br />
7 Push the child seat into the vehicle<br />
seat while pulling the top (shoulder)<br />
part of the belt between the lockoffs<br />
(pull away from the buckle) to<br />
remove slack.<br />
TIP: The shoulder part of the vehicle belt<br />
must be on top when removing slack.<br />
b<br />
LOCKING<br />
TAB<br />
a<br />
CLAMP<br />
a<br />
b<br />
5<br />
7<br />
8 Pull slack through the lock-off<br />
toward the vehicle belt retractor.<br />
9 Attach and remove slack from the<br />
Versa-Tether (if an anchor point is<br />
available). Store excess webbing<br />
in the elastic strap.<br />
10 Replace the cover.<br />
Check that no more than<br />
20% or 3 inches (7.6 cm)<br />
of the base hangs over the<br />
edge of the vehicle seat<br />
Check that there is<br />
LESS than 1 in. (2.5 cm)<br />
of movement (front to back or<br />
side to side) at the belt path<br />
Check Versa-Tether ®<br />
(Top Tether) attachment<br />
Forward-Facing Installation<br />
Check buckle<br />
connection<br />
Checklist<br />
9 Check that the vehicle belt is securely fastened.<br />
9 Check that no more than 20% or 3 inches (7.6 cm) of the base hangs<br />
over the edge of the vehicle seat<br />
9 Check that the child seat cannot be moved front to back or side to side<br />
more than 1 in. (2.5 cm) at the belt path. If the child seat is not secure,<br />
repeat installation and ensure all slack is removed from the lower<br />
connector straps or use a different seating location.<br />
9 Check that any excess Versa-Tether ® webbing is contained within your<br />
vehicle and secured in the elastic strap.<br />
46 47<br />
8<br />
Check that Versa-Tether ®<br />
(Top Tether) webbing is<br />
stored in the elastic strap