
You also want an ePaper? Increase the reach of your titles
YUMPU automatically turns print PDFs into web optimized ePapers that Google loves.
6<br />
Using Your <strong>Panniers</strong><br />
6<br />
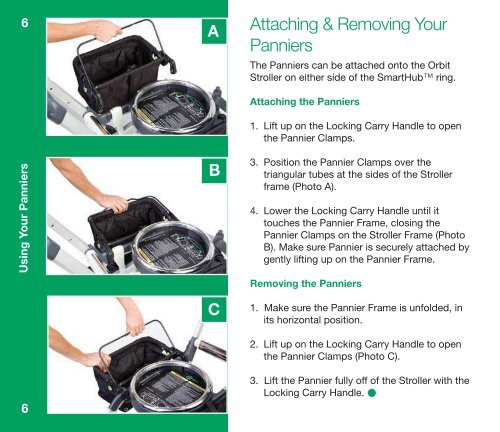
A<br />
B<br />
C<br />
Attaching & Removing Your<br />
<strong>Panniers</strong><br />
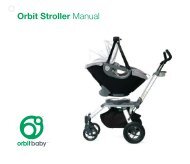
The <strong>Panniers</strong> can be attached onto the Orbit<br />
<strong>Stroller</strong> on either side of the SmartHub ring.<br />
Attaching the <strong>Panniers</strong><br />
1. Lift up on the Locking Carry Handle to open<br />
the Pannier Clamps.<br />
3. Position the Pannier Clamps over the<br />
triangular tubes at the sides of the <strong>Stroller</strong><br />
frame (Photo A).<br />
4. Lower the Locking Carry Handle until it<br />
touches the Pannier Frame, closing the<br />
Pannier Clamps on the <strong>Stroller</strong> Frame (Photo<br />
B). Make sure Pannier is securely attached by<br />
gently lifting up on the Pannier Frame.<br />
Removing the <strong>Panniers</strong><br />
1. Make sure the Pannier Frame is unfolded, in<br />
its horizontal position.<br />
2. Lift up on the Locking Carry Handle to open<br />
the Pannier Clamps (Photo C).<br />
3. Lift the Pannier fully off of the <strong>Stroller</strong> with the<br />
Locking Carry Handle.<br />
Collapsing & Folding Your<br />
<strong>Panniers</strong><br />
The <strong>Panniers</strong> can be collapsed and then folded<br />
on the <strong>Stroller</strong> when not in use.<br />
Folding the <strong>Panniers</strong> while on the <strong>Stroller</strong><br />
1. Pull both ends of the black Clip together and<br />
fasten, collapsing the Pannier (Photo D).<br />
2. Press the two green Folding Buttons at<br />
the same time to fold the Pannier Frame<br />
downwards, against the <strong>Stroller</strong> (Photo E).<br />
Unfolding the <strong>Panniers</strong><br />
1. Lift the Pannier Frame until it clicks at the<br />
horizontal position.<br />
2. Release Clip to expand the Pannier.<br />
Using the Rain Fly<br />
1. Pull out the Rain Fly from the Rain Fly Pocket<br />
and spread it over the Pannier opening.<br />
2. Choose from three sets of Button Holes<br />
depending on height of goods in your<br />
Pannier. Fit the Button Holes over the green<br />
Rain Fly Anchors (Photo F).<br />
D<br />
E<br />
F<br />
7<br />
Using Your <strong>Panniers</strong><br />
7