HC60RX Computer Interface - Controller - X10PRO.com
HC60RX Computer Interface - Controller - X10PRO.com
HC60RX Computer Interface - Controller - X10PRO.com

Create successful ePaper yourself
Turn your PDF publications into a flip-book with our unique Google optimized e-Paper software.
<strong>Computer</strong> <strong>Interface</strong> - <strong>Controller</strong><br />
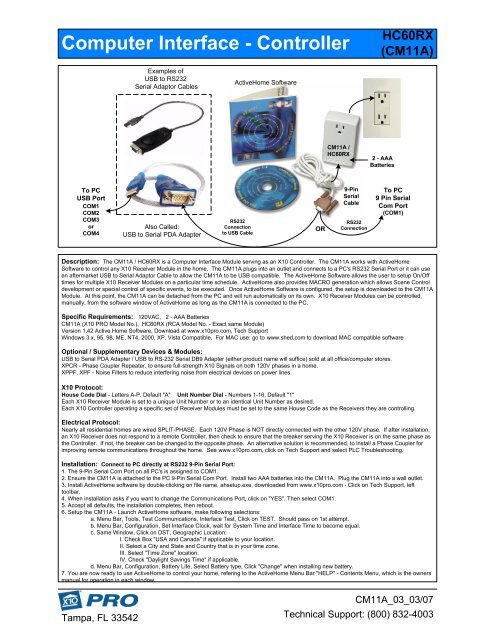
To PC<br />
USB Port<br />
COM1<br />
COM2<br />
COM3<br />
or<br />
COM4<br />
Tampa, FL 33542<br />
Examples of<br />
USB to RS232<br />
Serial Adaptor Cables<br />
Also Called:<br />
USB to Serial PDA Adapter<br />
ActiveHome Software<br />
RS232<br />
Connection<br />
to USB Cable<br />
CM11A /<br />
<strong>HC60RX</strong><br />
<strong>HC60RX</strong><br />
(CM11A)<br />
To PC<br />
9 Pin Serial<br />
Com Port<br />
(COM1)<br />
Description: The CM11A / <strong>HC60RX</strong> is a <strong>Computer</strong> <strong>Interface</strong> Module serving as an X10 <strong>Controller</strong>. The CM11A works with ActiveHome<br />
Software to control any X10 Receiver Module in the home. The CM11A plugs into an outlet and connects to a PC's RS232 Serial Port or it can use<br />
an aftermarket USB to Serial Adaptor Cable to allow the CM11A to be USB <strong>com</strong>patible. The ActiveHome Software allows the user to setup On/Off<br />
times for multiple X10 Receiver Modules on a particular time schedule. ActiveHome also provides MACRO generation which allows Scene Control<br />
development or special control of specific events, to be executed. Once ActiveHome Software is configured, the setup is downloaded to the CM11A<br />
Module. At this point, the CM11A can be detached from the PC and will run automatically on its own. X10 Receiver Modules can be controlled,<br />
manually, from the software window of ActiveHome as long as the CM11A is connected to the PC.<br />
Specific Requirements: 120VAC, 2 - AAA Batteries<br />
CM11A (X10 PRO Model No.), <strong>HC60RX</strong> (RCA Model No. - Exact same Module)<br />
Version 1.42 Active Home Software, Download at www.x10pro.<strong>com</strong>, Tech Support<br />
Windows 3.x, 95, 98, ME, NT4, 2000, XP, Vista Compatible, For MAC use: go to www.shed.<strong>com</strong> to download MAC <strong>com</strong>patible software<br />
Optional / Supplementary Devices & Modules:<br />
USB to Serial PDA Adapter / USB to RS-232 Serial DB9 Adapter (either product name will suffice) sold at all office/<strong>com</strong>puter stores.<br />
XPCR - Phase Coupler Repeater, to ensure full-strength X10 Signals on both 120V phases in a home.<br />
XPPF, XPF - Noise Filters to reduce interfering noise from electrical devices on power lines.<br />
X10 Protocol:<br />
House Code Dial - Letters A-P, Default "A" Unit Number Dial - Numbers 1-16, Default "1"<br />
Each X10 Receiver Module is set to a unique Unit Number or to an identical Unit Number as desired.<br />
Each X10 <strong>Controller</strong> operating a specific set of Receiver Modules must be set to the same House Code as the Receivers they are controlling.<br />
Electrical Protocol:<br />
Nearly all residential homes are wired SPLIT-PHASE. Each 120V Phase is NOT directly connected with the other 120V phase. If after installation,<br />
an X10 Receiver does not respond to a remote <strong>Controller</strong>, then check to ensure that the breaker serving the X10 Receiver is on the same phase as<br />
the <strong>Controller</strong>. If not, the breaker can be changed to the opposite phase. An alternative solution is re<strong>com</strong>mended, to install a Phase Coupler for<br />
improving remote <strong>com</strong>munications throughout the home. See www.x10pro.<strong>com</strong>, click on Tech Support and select PLC Troubleshooting.<br />
Installation: Connect to PC directly at RS232 9-Pin Serial Port:<br />
1. The 9-Pin Serial Com Port on all PC's is assigned to COM1.<br />
2. Ensure the CM11A is attached to the PC 9-Pin Serial Com Port. Install two AAA batteries into the CM11A. Plug the CM11A into a wall outlet.<br />
3. Install ActiveHome software by double-clicking on file name, ahsetup.exe, downloaded from www.x10pro.<strong>com</strong> - Click on Tech Support, left<br />
toolbar.<br />
4. When installation asks if you want to change the Communications Port, click on "YES". Then select COM1.<br />
5. Accept all defaults, the installation <strong>com</strong>pletes, then reboot.<br />
6. Setup the CM11A - Launch ActiveHome software, make following selections:<br />
a. Menu Bar, Tools, Test Communications, <strong>Interface</strong> Test, Click on TEST. Should pass on 1st attempt.<br />
b. Menu Bar, Configuration, Set <strong>Interface</strong> Clock, wait for System Time and <strong>Interface</strong> Time to be<strong>com</strong>e equal.<br />
c. Same Window, Click on DST, Geographic Location:<br />
I. Check Box "USA and Canada" if applicable to your location.<br />
II. Select a City and State and Country that is in your time zone.<br />
III. Select "Time Zone" location.<br />
IV. Check "Daylight Savings Time" if applicable.<br />
d. Menu Bar, Configuration, Battery Life, Select Battery type, Click "Change" when installing new battery.<br />
7. You are now ready to use ActiveHome to control your home, refering to the ActiveHome Menu Bar "HELP" - Contents Menu, which is the owners<br />
manual for operation in each window.<br />
OR<br />
9-Pin<br />
Serial<br />
Cable<br />
RS232<br />
Connection<br />
2 - AAA<br />
Batteries<br />
CM11A_03_03/07<br />
Technical Support: (800) 832-4003
<strong>Computer</strong> <strong>Interface</strong> - <strong>Controller</strong><br />
Module Setup<br />
Tampa, FL 33542<br />
Macro Setup<br />
<strong>HC60RX</strong><br />
(CM11A)<br />
Timer<br />
Settings<br />
ActiveHome<br />
Sample Screens<br />
Installation: Connect to PC via the USB to Serial Adaptor Cable:<br />
1. Purchase a USB to 9-Pin Serial Adaptor cable, this will allow the CM11A to be<strong>com</strong>e USB <strong>com</strong>patible. The cable is available at any <strong>com</strong>puter/<br />
office store. Ensure that a software installation CD <strong>com</strong>es with it.<br />
2. Install the software for the USB to Serial adaptor cable. Do not connect the USB Adaptor cable until the software directs you to do so.<br />
3. Once the USB cable is fully installed, go to Control Panel, then: System / Hardware / Device Manager. Look under: Ports (COM & LPT).<br />
a. There you will see the USB Cable device installed: i.e. - { USB-to-Serial Comm. Port (COM1) } Double Click on that item.<br />
b. Select Port Settings Tab / Advanced. Lower Left Box, note which Com Port Number: is assigned. It must be on COM1, 2, 3 or 4.<br />
c. If not, change it to one of those COM Ports 1-4, until one that is not being used, is accepted.<br />
4. Once COM1, 2, 3 or 4 is selected, that is the Com Port that will be assigned in ActiveHome.<br />
5. Ensure the CM11A is attached to the USB Adaptor Cable. Install two AAA batteries into the CM11A. Plug the CM11A into a wall outlet.<br />
6. Install ActiveHome software by double-clicking on file name, ahsetup.exe, downloaded from www.x10pro.<strong>com</strong> / Tech Support.<br />
7. When installation asks if you want to change the Communications Port, click on "YES". Then select COM1, 2, 3 or 4, same as Adaptor Cable.<br />
8. Accept all defaults, the installation <strong>com</strong>pletes, then reboot.<br />
9. Setup the CM11A - Launch ActiveHome software, make following selections:<br />
a. Menu Bar, Tools, Test Communications, <strong>Interface</strong> Test, Click on TEST. Should pass on 1st attempt.<br />
b. Menu Bar, Configuration, Set <strong>Interface</strong> Clock, wait for System Time and <strong>Interface</strong> Time to be<strong>com</strong>e equal.<br />
c. Same Window, Click on DST, Geographic Location:<br />
I. Check Box "USA and Canada" if applicable to your location.<br />
II. Select a City and State and Country that is in your time zone.<br />
III. Select "Time Zone" location.<br />
IV. Check "Daylight Savings Time" if applicable.<br />
d. Menu Bar, Configuration, Battery Life, Select Battery type, Click "Change" when installing new battery.<br />
10. You are now ready to use ActiveHome to control your home, referring to the ActiveHome Menu Bar "HELP" - Contents Menu, which is the<br />
owners manual for operation in each window.<br />
CM11A_03_03/07<br />
Technical Support: (800) 832-4003